Showing posts with label Judith Connors. Show all posts

Saturday, 21 March 2026

Dedicating my 1000th

Pin It now!

For this 1000th post I kept musing on the choice of subject. And I finally decided to dedicate it to some of my favourite people who have shaped and inspired my tatting journey. This is a symbolic gesture to ALL the tatting teachers, designers, innovators, experimenters, explorers who have shared their own learnings and experiences. 

Three Geniuses and a brand new stitch in tatting!

Two years back I stumbled upon two drawings that gave Ninetta Caurso's treble tatting stitch a basis in tatting history! 

A drawing on page 31 in Anne Dyer's 1994 book, To Boldly Go Where No Shuttle Has Gone Before, showing the decorative chain picots. 

A drawing on page 85 in Rhoda Auld's 1974 book, Tatting: the contemporary art of knotting with a shuttle showing her twisting the thread (this twisted picot is something I had pointed out in my pictorial) and passing the shuttle through it. Her tatted model is what we now call the vapour stitch.

Well, our very talented Ninetta engineered the two movements to create her treble tatting stitch (tds) all on her own! At the time she did not posses either of the books and till I pointed it out to her, she had not noticed! Basically, the chain picot became the 1st half of the tds while the vapour stitch became the 2nd half of the tds! 

💧One of the reasons for the delay in posting this was ambiguity about whether I could share the diagram pic from the book with due credit. Anita suggested I ask Tamie Montgomery, who now runs The Online Tatting Class and is very mindful of such issues. She was very receptive and we discussed it. Although she said it was okay to use the accredited pics (like Georgia had done) since it was a 'technique', I still wasn't comfortable, till I hit upon the idea of showing it in thread as above. 

💧💧💧

Auld is gold bead effects!

Last year I found some new beading effects by Rhoda Auld in the same book and took the liberty to give them each a name based on words used by her.

Framed Bead - The diagram on page 107 has been in circulation through Georgia Seitz's classes for several years now. Georgia pitched it as a way to add a bead in the center of a ring and I used it in this butterfly. 


However, Rhoda showed it as a way to add a free bead on a long picot with bare thread framing the bead on both sides when slack is removed. Makes for some good possibilities.

Piggyback Beads - Now this was fun to discover! On pages 99-100 Rhoda shows how to place two free beads one over the other using simple movements. I tweaked it a bit to make it easier to tat.
Instead of loading the bead on the core thread where she has to move the chain stitches, I loaded it on the knotting thread (teal in above sample) and the rest of the process remains the same. On an earlier page, Rhoda makes the teal picot longer and ties up both picots till required for joining. Hence there are many options depending on the pattern.
My sample is a bit wonky, but you get the picture, right?
💧💧💧

Generosity knows no bounds!

💧I can't thank Anita Barry enough for gifting me so many vital books on my list. Without these I wouldn't have been able to review and edit Net Best's, Six T's of Shuttle Tatting, not with any satisfaction or confidence. These have helped me to confirm, correct, or refine terms for her glossary, and even understand and discover so many gems, some of which I took the liberty of adding to the glossary.

💧Judith Connors has been taking an active interest in the glossary, too, either as an answer to my question, as a reaction to my blog post, or reaching out on her own privately. You can imagine what a treasure trove of knowledge she is and how lucky we are to benefit from her skills. 

Judith sent me a copy of her 2000 book, Creative Tatting with beads, shuttle, and needle. It has some of my all-time favourite patterns besides numerous interesting effects and applications. While I read the book, tatting models will be later in the year. 

💧Late last year I received a wonderful digital book by Carin Jansen, Riego ReTatted (2023).  She needed some advice on selling the book through the USA, not being sure of its reception. With permission, I sought Anita's advice and we both gave our respective take urging Carin to put it on the market. Eventually she decided against it for personal reasons, though she has shared her Dutch version within her group. It is such a labour of love and we hope she will change her mind in future. Carin has chosen patterns from each of Mlle Eleonore Riego's books (1850-1886) and shared detailed steps and modernised versions/tips in a pleasant format alongside diagrams and written patterns. 

💧💧💧

I'd like to think that my blog has stayed true to its name to the extent that almost 95% of my posts have a tip of some kind. Unfortunately I couldn't stay true to the url since this blog soon turned into a tatting blog ... not that I'm complaining, LOL. 

Hope you continue to follow my blog and read my posts. 💞

You will find tutorial links to terms in this post here - https://tipsaroundthehome.blogspot.com/p/tatting-resources.html and you can use the search box on the right panel to look for past posts on the tags used here and much more.

💧💧💧

Many many thanks to all the wonderful tatters mentioned here and also to those not mentioned who have influenced, inspired, and improved my tatting journey and maintained my eagerness to blog.

Friday, 6 June 2025

bridge tatting

Pin It now!

 Like I said in my recent posts, expert and experienced tatters have graciously come to my aid whenever I asked for it. And some have gone a step further by sharing their work and/or discussing techniques and terminology even before I asked.  One such is Judith Connors who has been instrumental in guiding and inspiring me through this past decade. My presentations have been influenced by her despite not being a perfect student.

Early last month, Judith sent me her article on 'Building Bridges' along with a pic of her Fan motif (If you are a member, you can see her model in the Queensland Tatters 2025 group post here - https://craftree.com/forum/threadfs/40423?page=1#258577). We had discussed bridging some years back, too. I was in a state of tatting inertia when this motif instantly spurred me to wind my shuttles and tat since this decorative/functional bridge had been on my trial list since 2019 (https://craftree.com/forum/threads/39159), but never got down to actually applying it. I did do the Rose Motif from Priscilla Tatting Book No.3!   

Bridging Flower Motif - based and adapted from Judith Connors' Fan motif
sharing my process, pattern, and tips/tricks

How many rounds does this motif have? 
Do we cut after the inner 'rosette' round?
Were Celtic shuttles or needle used for the Celtic effect?
Or were 4 shuttles used for the interlaced/overlapping chains? 

Getting back to the present motif, it occurred to me that I could use the element to create overlapping or interlaced chains instead of single lines! So off went my shuttles to confirm. 

Now this post is only about the adapted motif - process, pattern, and tips/tricks. I have pics for a pictorial, along with the background and explanation, terminology and history. Part of it is already explained in the link above (https://tipsaroundthehome.blogspot.com/2022/01/bridging-gaps.html). The rest will be shared in a few days to avoid stepping on Judith's class despite her permission. For the curious, we know the technique as split chain, which is a misnomer and limiting, meant mainly for climbing out.  

My first attempt. I ran out of thread and also realised that if I continued around there would be cupping (I had increased the count in some parts). Moreover the thread had a tendency to unravel, even though it is Anchor mercerised cotton. Cut my losses and started over.

Design Tip starting with a magic circle: Since I wasn't sure how big the central ring should be, I preferred to use the  magic circle (the multiple threads are to make the picot large enough to join to later). Wrap the thread around the magic circle and start the first inner chain. End each chain with a lock join around the circle. 
TIP to keep last half-stitch flipped: The marker on the right - since each bridge is a long chain, by the time it was completed, the last half-stitch often unflipped and locked the core thread below. This temporary marker on the core thread prevents it from happening. 
After a few repeats, I pulled on the magic circle to see whether it was working well. Successful; no cupping or ruffling.

Bridging Flower Motif pattern
  1. Only 2 shuttles are used with continuous thread and the entire motif is worked in one pass. 
  2. 8 repeats and all chains in this prototype. No space for a central ring. In Anchor mercerised crochet cotton size 20 (equivalent to Lizbeth size 10), the motif measures 6.5cms in diameter.
  3. In the image above, I have split the sequencing (A to F) to indicate where there is a change of direction , shuttles, or element. 
  4. The entire motif is worked clockwise from the front.
  5. Chains C & E are bridging chains aka bridge, bar. 
  6. I used a 2cms folded picot gauge to measure the bare thread for bar/bridge before lock joining it to a picot on the previous element.  TIP:  I found that making a lock join by pulling the loop down instead of up through the picot makes a neater start to the bridge.
  7. These bars are covered with Dora Young's Knotless Method or tied stitches worked from left to right. I worked them all from the front, though there are several variations of the method. 
  8. NOTE: The arrows for bridges indicate where the thread from shuttle2 goes, not the direction of working the stitches. 
  9.  While making each subsequent bridge, keep it in FRONT of the previous chain so that the overlapping is synchronised.  
10. For the bridges on the last rosette chain, TWO each had to be made! The above image shows the first pair done and the 2nd pair is being bridged.
After working the first bridge exactly like ch-C, then one more bridge is made joining to the first rosette on the right, at the base of the very first bridge. The stitches are then worked using the Australian method. This, too, is worked from the front, but in the opposite direction (right to left). Repeat this for the 2nd pair of bridges. 
Important: To maintain overlap, pass the shuttle under and over the last bridge both times.

11. After the motif is finished, and both threads are in the center, I threaded them together and inserted the needle through the picots held open with the magic circle, and kept removing the threads from the circle. Final tie, cut, and hide ends.
Option: One can use metallic thread or colour-coordinated thread for the magic circle and leave it be after tightening the slip knot. Then hide all ends - from the motif as well as the circle.

 
Possible Variation: However one can use a central ring of 10 small picots separated by 1ds and make a 10-repeat motif. 
Future Idea: Can we use this bridging technique to work block tatting over or across an element?

I will try to write the pattern in a more lucid form when I share the pictorials and other details. Here I wanted to focus more on the process.

Technique Option: Also, instead of the bridges going from right to left, we can move forward. Thus from chain A we can work the 'bridge'  like a floating chain or single shuttle split chain, leaving a picot open with a paperclip to join to later. 

Bridge tatting or bridging encompasses a lot more, not all of which is outlined here. In this post and motif, the bridges are ornamental - a design element; they can be functional too. Hopefully I will be able to cover it all in the pictorials post. 

I cannot thank Judith enough for her valuable mentorship and guidance since we 'met' at InTatters a decade ago! We may not always agree but the discussions are always lively and passionate!

Thursday, 30 January 2025

gratitude

Pin It now!

 Over the past year or more I have been in touch with several tatters be they domain experts, designers, originators, tatting teachers/mentors. They have helped to explain nuances or clarify concepts, particular techniques, which in turn has aided me in hopefully improving the presentation and authenticity of information in the Glossary (and an occasional chapter item) for the book, 'Six T's of Shuttle Tatting' by Net Best which I have the pleasure of editing (I will write a separate post giving more details about the book). 

I will tender a formal thanks with each name when the book is complete (including in the book itself). Yet stepping into this new year it just feels right to acknowledge their general contribution and gracious and prompt help. To date not a single person refused to share their knowledge and understanding and each of them has been prompt in responding. Some have graciously sent me pic(s) of their work which is now included in the book. 

There are a few who I have pestered more frequently, though. Obviously my dear friends Ninetta Caruso and Anita Barry but also Judith Connors whose expert guidance is always welcome.

Angela Edwards is the late author's friend who is doing all the formatting, proofing, and compiling the master copy for the book. She has been a constant and enthusiastic companion in this journey, even acting as a sounding board and converting my UK English, LOL. Without her help it would've become too overwhelming.  

💖💖💖

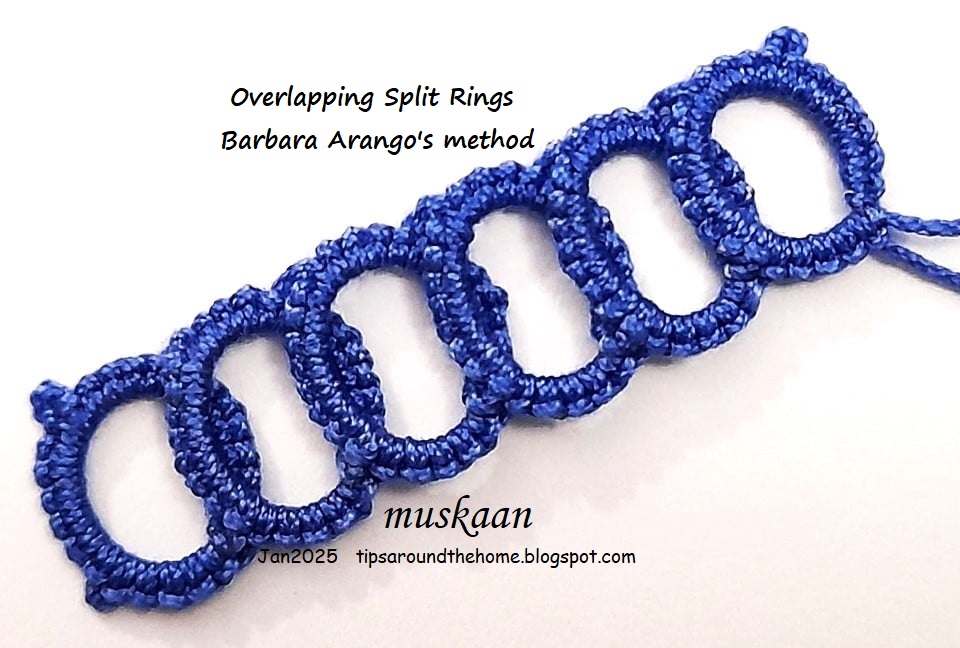
Bit of a visual treat before I proceed ... above is Barbara Arango's method of making Overlapping Split Rings. She tends to join them (where I had left them unattached ; and a snowflake) and has used them beautifully in several of her designs. Look for her in the FB group, Just-Tatting. 

Above left was my first trial and I enjoyed it so much that I kept going till I got this ring, joining back to the first. I want to add some beads but haven't been able to yet .... will post again when I finish.

💖💖💖

Laurel McFarlane noticed that several links in my past posts no longer worked, especially from Georgia's classes. She volunteered to send me the correct links, often delving into the wayback machine, etc., and diligently compiled them over several months! I am ashamed to say that except for a few I haven't been able to update them all yet. So in the interim, if you come across any, please ask. 

Of course Ninetta has been a huge support with the Endrucks 1920 Project and words fail to express how much I can rely on her and her friendship. I had the good fortune to make several new friends through this project even during 2024.

💖💖💖

During the year, I was also humbled by several gifts during the year, some of which I blogged about, but some slipped by. These included tatted coasters from Bandini, books from Ninetta & Lilas Lace, newsletters/bulletins from Ring of Tatters, IOLI, and a surprise from Judith - their last printed newsletter, another surprise pattern gifted by Edda Guastalla, and threads from Madhur. 

All these goodies do not diminish the joy (and some trials) from learning 'new' tatting techniques, comparing and contrasting them, sharing pictorials, and taking up challenges. In fact my next two posts include my pictorials and explorations. Stay tuned .... what is a blog without readers, huh?!

💖💖💖

A Huge Thanks to all! 

Sunday, 5 January 2025

last and first

Pin It now!

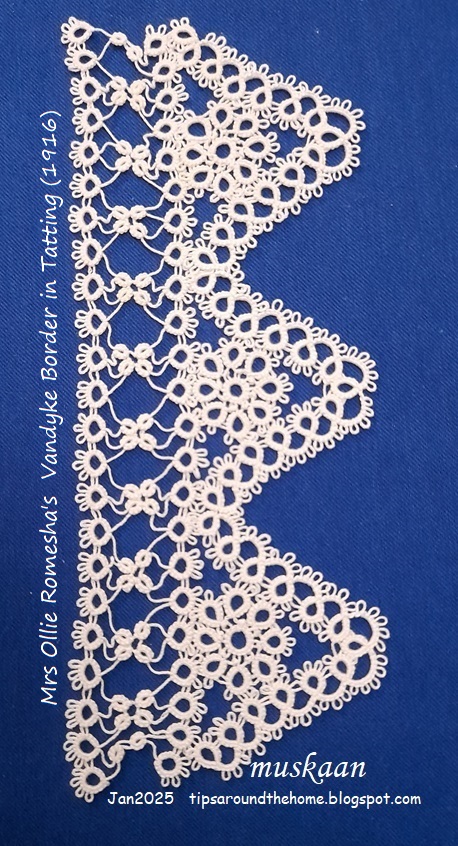
 So this is the last thing I tatted and the first I picked up at the turn of the year. And I have my tatting buddy Anita to thank for it. She was on a determined mission to finish off her ongoing works before the new year came around. Impressed and motivated, I chose this sampler I had shared here and finished it on the night of 31st Dec 2024 with an hour to spare! 

And in 2025, I picked it up again to hide the tails, block and photograph it. Notice the thread going across at the top? I won the thread chicken race!!!

Pattern is Vandyke Border in Tatting by Mrs Ollie Romesha  published in Needlecraft Vol. VII, No. 8, April 1916 and the PDF can be downloaded here - https://www.antiquepatternlibrary.org/html/warm/tatting.htm

One headside motif showing wheel surrounded by a scroll.
NOTE - The pattern calls the circular medallion a 'wheel'. However the correct term for this classic formation is 'daisy'. https://tipsaroundthehome.blogspot.com/2024/03/counts.html

My Notes - 
1. Pattern calls for starting the scroll at the ring indicated by white arrow. I started with the one indicated by orange arrow.
2. 4ds is missing in the pattern for ring indicated by blue arrow. All 5 rings are identical.
3. Pattern calls for tatting the scroll first and later tat the wheel (daisy) joining it to the scroll on the go. I preferred tatting the wheels separately and joining the scroll to each. 

A single motif turned around looks like the letter A! In Anchor size 40, it is 4cms high and just under 4cms wide.

Three repeats without the footside or sewing edge is more pliable and can be used for a collar, necklace, etc.

4. This lace is worked in four parts as per original pattern - wheels, pointed edge, two rows of a straight edge on the upper side. Worked with one shuttle (and ball only in scroll) throughout. 

5. Continuous Tatting in Wheel using Slip Stitch - Determined to keep it vintage, I did not use any continuous tatting method to climb out of the rows in the lace. However, the wheel is an exception where Mrs Ollie works it in one pass using only one shuttle. She works the central ring then instructs us to close the ring and 'fasten thread to 1st picot and tat ring ....'. Basically leave a very short bare thread space, make lock join in 1st picot, and start outward facing ring. I recently learned this is called a SLIP STITCH - leaving bare thread to span the distance in order to climb out at a different point. We've all used this in some form, some situation or other. Now we have a term (Judith Connors' An Illustrated Dictionary of Tatting, 2007 ed.) and Judith patiently clarified it for me. In a future post I will elaborate on these situations, one such being this Rosette Enchained snowflake .

6. In Anchor mercerised cotton size 40, measurements for 3 repeats: 7cms high x 17cms long. Without the footside rows, the triangle is 4cms high. 
Not happy with the bare thread lengths in the footside rows. I used a 5mm gauge. 4mm would've been better. My fear, despite the trial, came true, sigh.

From this upturned side, the peaks remind me of temples in India.

I hope to use this short length on a greeting card or card topper once I visualise what else should go into the composition. Your suggestions are welcome.

Related posts

Sunday, 8 September 2024

pleasure and pondering

Pin It now!

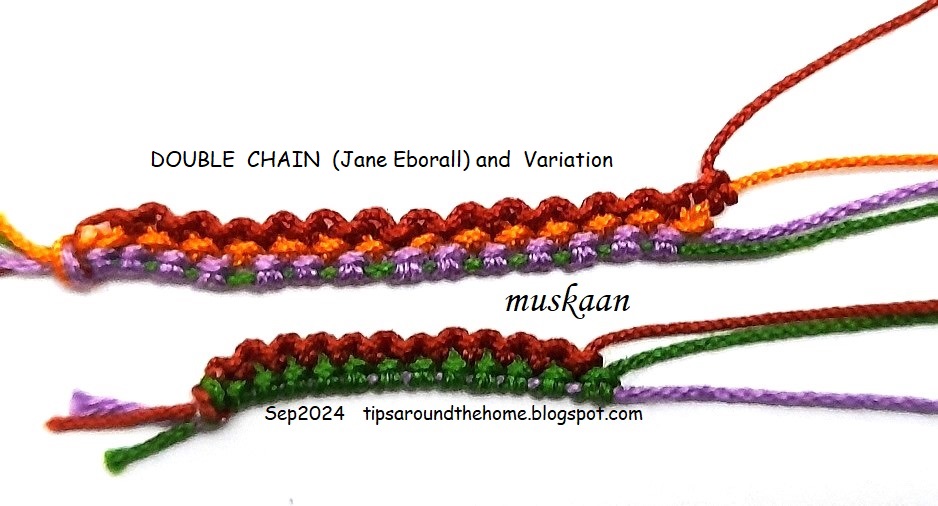
 Something old something new with loads of fun and possibilities. I found it listed in Karen Cabrera's Lesson #151 - Double Chain. At the end of the video is a model which was clearly a Jane Eborall pattern. However when I went to Jane's Techniques page, there is no listing for it. Finally I traced down the pattern where she used it - Butterfly with Fancy Edging (2001 rewritten 2011).

And I went a couple steps further, playing with some effects. This is merely a small window into possibilities which can be explored in future. In the above pic you see the three samplers and details follow ...
Abbreviations used: SH = shuttle ; SS = switch shuttles ; DS = double stitch ; RORS = reverse order reverse stitch (as in RODS) ; DC = double chain

Original Double Chain using 3 threads. All double stitches, but you switch shuttles and core threads. 

Step1: SH1 is the active shuttle (lavender) and SH2 thread forms stitches (green). Make 1DS and SS.
Step2: SH2 is the active shuttle (green) and SH3 thread forms stitches (brown). Make 1DS and SS.
Repeat steps 1 & 2 to desired length.
If using 3 colours, the first one remains hidden.

What if we added another thread? 'Double Chain' or should we say 'Triple Chain' using 4 threads. At least 3 shuttles are required while the 4th one can be a ball.
The process is exactly the same, except for the additional thread requiring an extra step.

Despite how they've been photographed, these are not straight chains. When I tried to straighten the DC variation, the SH1 core thread (green in this case) became visible between the stitches. Does make for a nice effect, though. The more threads you add, the wider this colour blip.
TIP: Yes, they can become straight if we use a thicker thread in SH1. 

NOTE The SH1 core thread remains free throughout but the other core threads become 'locked in'. Hence care should be taken to snug each stitch properly.

Since multiple shuttles are used, we can throw off rings and make chains! Imagine the free-styling one can do! And of course we can add beads in so many wonderful arrangements and colours!
In the above sample, I allowed the chain to curve.
TIP: This double chain can be used to make mock rings.


When I showed Ninetta a sneak peek, she sent me a link to Edda Guastalla's site where she has used and diagrammed the double chain technique.

Its not just fun and games. There are several lessons and some startling observations that emerged from this project! Let me share these with you and would love to read your insights and feedback.

Comparing Double Chain with other Techniques

1. Is it Pearl Tatting? 
To the extent that there are extra/auxiliary/additional threads, it can be considered pearl tatting. However there are differences - 
    the chain is not straight ;
    stitches face the same way, not opposite ; and
    the stitches are in two separate tiers, not on a common core thread.

2. Is it a Cord or cord tatting?
No, because the chains have a tendency to curve just like regular chains. The reason is obvious because the broader stitch caps are all lined up on one side. See TIP above.

3. Is it similar to Daisy picot?
Yes, it can be considered a chain version of the daisy picot technique. This is something I tried on the last few stitches and it worked.
    the stitches are two-tiered ;
    the double chain can be worked with only one shuttle (SH2 in the tatted sample) and 2 balls, making DS with one thread and RORS with the other thread. The reverse order reverse stitch (RORS) has to be coaxed gently to face outward (like the DS) and then repeat. 
    
4. Is it Helix Tatting?
Now here's the clincher! It is actually a precursor to helix tatting! It is the 2D version with exactly the same technique/process.
If we add more threads and join it back to the first thread, voila, we have a hollow tube as in helix tatting! 

5. Is it ATT?
Alternate Thread Tatting is a term coined by Shuttle Brothers where two threads (and often two shuttles) are used to make rings and chains incorporating an array of effects involving picots, thrown rings, colour switches, etc. 
    stitches all face outwards and they use the daisy picot a lot ;
    but the ATT chain is made with only two threads, not three (or more) ; 
    While rings (ATR) are made with two threads, the double chain (with 3 threads) can only be joined back as a mock ring. 
I think we can clearly rule out ATT.    

6. Is it TATHing?
Tatting with Alternate Thread is a term coined by Judith Connors where two shuttles are used alternately on the core thread as in pearl tatting, Maltese rings, daisy picot. 
    In this double chain, the stitches or picots (if any) face the same way, but it can be tatted using the daisy picot method. 
    However, the chain does need three threads to be made.
So where do we stand on this point? I'm not sure. Does TATHing include effects where the stitches face the same way? 

This is it for now. Hope to hear your thoughts and input.

UPDATE (10th Sep 2024): In Priscilla Tatting Book No.3, a 'double chain' is illustrated (Diag. 7) for the Tatted Centerpiece made with Needle and Shuttle pattern. Here some stems are worked as normal chains with a shuttle and then a second tier of stitches are inserted between the stitches below using a needle. Thank you, Mary A!

Many thanks to all mentioned. Its always a productive day when we learn something!

Saturday, 9 March 2024

exciting firsts

Pin It now!

 Editing the book, 'The Six T's of Shuttle Tatting' is creating opportunities to try out exciting techniques and effects, long in my to-try list. And learning a Lot in the process. The author, Net Best, had created one glossary for her book, and another more comprehensive glossary for her group and possibly for later digitization. We decided to combine both to make the glossary as updated as possible, which was her main goal. This also means we have to add missing sampler images. I have reached out to several of my tatting friends to contribute some specific pics (with due credit), and so far everybody has graciously given permission. 

While I won't be sharing all pics, here are a few - I love the way these turned out!  

1. BROOMSTICK PICOT - 

I followed Karen Cabrera's Lesson #104 - https://youtu.be/yp5W6ZrDF9I

And since the long adjoining picots need to be joined to create the effect, I allowed my shuttles to create this little motif - like a flame within a flame. 
Is it interesting enough for the pattern to be shared?
Although I'm sure there are tons of tatters who will simply count the stitches and tat it up, and we all know who will get the credit ... yes, Pinterest, LOL. 
I used really thick thread (probably a size 3) so that the effect shows up in thumbnail pics.


2. DANCING PICOTS -
I followed Karen Cabrera's Lesson #107 - https://www.youtube.com/watch?v=DX7Ig978Xg4
This is a variation of the Daisy Picot and requires 2 shuttles.
I encapsulated the 2nd shuttle thread within the first half-stitch at the start and the last half-stitch at the end. (Judith Connors' tip).
While I tatted over the shuttle 1 tail at the start, I didn't do it for the Sh2 thread, although it can be done.
NOTE: All picots here (bare threads) can be both decorative and functional (for joining).


3. INTERWOVEN  SPLIT  RING  BRAID / CORD -
This 2-shuttle variation is attributed to Wally Sosa, and I referred to Jane McLellan's Choker pattern - https://janemactats.blogspot.com/2012/04/choker-pattern.html  [In the right panel on her blog page, you can find the pdf links for the lovely beaded versions of choker as well as a necklace].
All split rings are 8/8. This time I used Anchor size 20.
It comprises a red foundation cord tatted to desired length. Then the teal cord is worked, weaving the red cord alternately over and under through the open ring before it is closed. 
It is such a lovely piece! However, I have no idea how to use it. It is a bit short for a friendship bracelet coz I ran out of thread and don't wish to add more. 
Any ideas how I could use it?


I hope you enjoyed seeing and reading this, and will try to use these techniques in future tatting. And adding beads for even more variations. I certainly hope to incorporate my new learnings some day. For the present, I am busy tatting more samplers and working on the book, to the exclusion of all else. If I don't concentrate on it it will never get done. Our target is to finish it before year end.

And there are more to share ....

Friday, 16 February 2024

east to west heart!

Pin It now!

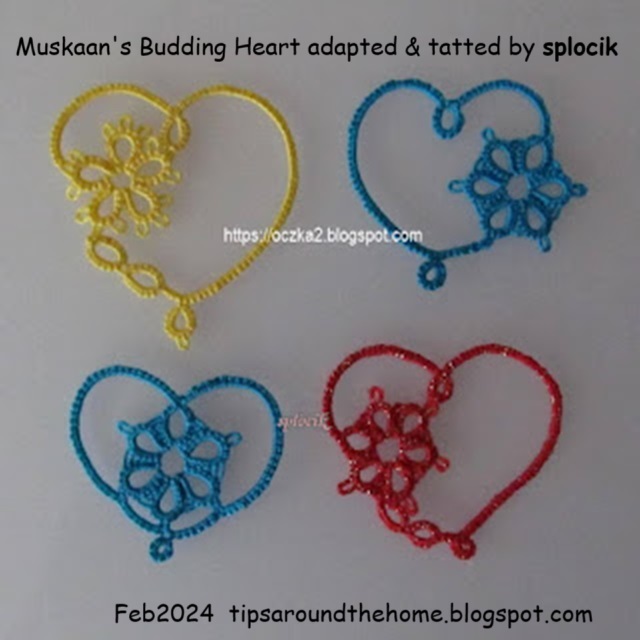
My Budding Heart pattern was published in the Feb 2024 issue of 'Talking Tatting' (No.58.3 quarterly newsletter of Queensland Tatters, Australia), courtesy of Judith Connors. I think this is perhaps the third or fourth pattern she has chosen for publication and it is such a huge yet humbling endorsement.

💗💗

Several versions have been tatted which I sometimes come across on different platforms, but to remind you of one very special version from Krystyna Mura (Poland) - https://tipsaroundthehome.blogspot.com/2021/02/palentine-day.html

💗💗

And most recently, is splocik's (Poland) play with the pattern - not one but four! Such cute versions and I love how she attached the dimple to the flower, thus anchoring the long outline. She shares her thoughts and process here - https://oczka2.blogspot.com/2024/02/zainspirowao-mnie-serduszko-frywolitkowe.html

💗💗

If you remember, this heart is part of the Buddy Hearts (2020) collection of 5 patterns, three of which were shared by Anita Barry(USA)! https://tipsaroundthehome.blogspot.com/2019/02/buddy-hearts.html. This set has been taught in the Online Tatting Class (Feb 2019) and published in the IOLI Bulletin (Summer 2020). Good to see the widespread reach of these little motifs.

You can download all 5 here (long version) - https://drive.google.com/file/d/1frJpMRiHu5fOEH9Zs3VANVGIURZA126_/view   and (short diagram-only version) - https://drive.google.com/file/d/1DZFxEDvEwe-rPUv1evgPaxic1sbaEnHC/view 

💗💗

I had a mind to tat a new heart pattern but couldn't manage my time and other commitments. However, it is definitely on my trial list and should be shared well before the next season of hearts.  

💗💗

💗Many many thanks to Judith, splocik, and of course, Anita and Krystyna!💗

Tuesday, 9 January 2024

what a heart

Pin It now!

Hearts are great motifs to learn and apply new techniques, practice and hone skills, embellish, and create new designs! Look at where this tiny little heart has travelled so far .... without forgetting it's origins!

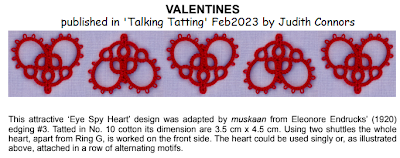
It all started with Endrucks' pattern #3 (1920), an edging which was reworked and presented by Anita Barry (2020), which inspired AlenAlea Rako to turn it into squares (2021), from which I espied a heart (2022) and Sue Bradham saw a butterfly (2022).

A few months later, when we chose this heart pattern for one of our games (Pretty Me Endrucks Aug2022), more adaptations came about! These include a key chain by Marina MadJar tatting, an enlarged heart motif and one-pass bookmark by Margaret Davies, a coaster by Ninetta Caruso, and a butterfly by Stephaine Mc (Tattimic). Pattern links here - https://tipsaroundthehome.blogspot.com/2022/09/aug-roundup-1.html

During our game and later, several arrangements were shared including 3-in-1 Earrings, Collar, Bookmark, and other ideas. https://tipsaroundthehome.blogspot.com/2022/09/playful-hearts.html. 


This heart continued to inspire and Ninetta, through her coaster, designed the Tat Me Snowflake (2 versions) in Nov - https://drive.google.com/file/d/1ZENvdgxihM0YI3Ar_UxP9lqRwprmFotP/view  

2023 started with the pattern being tatted and published by Judith Connors in their Talking Tatting, Feb2023 newsletter. She kindly permitted us to share her complete article  - https://drive.google.com/file/d/1aJ34xgaE67A0aI8LTj2xYpvx-NQLrBx1/view 

Later in June, Michelle Forclaz made additions to the hearts to make the Inside Out Flowers. https://drive.google.com/file/d/13L0NCvkqJM94Bnbnbf4ogVUzhhYjuaSN/view  The pdf also shows a few other adaptations she tried such as a little teddy bear, fox head, and butterfly.

Meanwhile tatters have often picked up the pattern and shared their versions, many with beads, and applications. And 2 new patterns emerged in December.

E3 Heart Butterfly by Jiamrat Supapol https://drive.google.com/file/d/19DWVrfGhrbb-l80icUsFiq4msQhmJTjl/view

and the E3 Heart Square Motif by Reiko Akamatsu where she adapted the E42 doily center to fit snugly inside the square. https://drive.google.com/file/d/1YxBre5DlW3RcW3ZJFY7-VrDnzvWeuN6m/view


For more heart derivatives, check the Hearts Directory - https://docs.google.com/document/d/1MpYw9XMB8Asz8zusj1ZpHvX8A8Ww424-rEVORtxcL1w/view
For more E3 pattern derivatives, check out the other Directories as well. We now have a composite doc listing all directory links (making it easier to reference, etc.). Endrucks Directories  - https://docs.google.com/document/d/1w1TZBg-HIzseGEUoJ-rko7tNbtSgZY5A18Oy2Y9Hh0Y/view

Please note that in this post, I have included pics of only the 'new' models that haven't been shared here so far. 

Hearty thanks to each and every Endrucksian mentioned here! Hope you continue your exploration and experimentation, sharing the beautiful results.

Saturday, 7 October 2023

rosettes

Pin It now!

 In tatting, we often come across different names for the same technique/effect and the same name for different techniques! (jot it down to various reasons - historical, linguistic, ignorance, non-standardization, ....).  One example of the latter is Rosette. This historical term refers to at least three different styles as evident in the collage below!

Our newest game in the Endrucks 1920 Project FB group involves the third motif and it seemed a good opportunity to address this situation and refresh my knowledge.


They are arranged along evolutionary lines -

1. Single ring with picots aka central ring. Tatted with a single thread. This was a common starting medallion in numerous antique patterns, and the thread was tied and cut after each! Now, we climb out with a mock picot or if possible, we work it as a thrown ring for continuous tatting.

2. Outward facing rings, often called a daisy or flower. Again, tatted with a single thread and the rings are joined to each other to create beautiful medallions. It helps that joining on the go was discovered. The number of rings can determine the shape and size.

Rosace is a term used by several non-English speaking tatters, to address this formation. eg. Maria Papia's earrings (https://www.youtube.com/watch?v=wbqLn8xTaGU) and Lilas Lace's pictorial of Edwige Renaudin's Double Rosace (https://lilas-lace.fr/blog/2014/02/28/diy-a-double-rosace-diy-une-rosade-a-double-rangee-danneaux/)

3. Concentric chains around a central ring. Each chain segment is joined to the picot below from the previous round. The entire medallion is worked continuously, but requires two threads. Obviously this came into existence after the discovery of tatted chains.

In the sample above, the consecutive chain rounds are niched closely into a compact circle - like a dartboard. However, if the chains are made slightly longer, with more of an arch on each chain, it gives the appearance of a flower - a Rose or wild rose as Sharon Briggs calls it (https://sharonstattedlace.blogspot.com/2008/05/tatting-wild-rose.html).


This is all I have. Have you encountered the term for another formation? Please do share.

My main references for the above, besides online resources already listed (including Craftree), are - Elgiva Nicholls' 'Tatting: Technique & History' 1984, and Judith Connors' 'An Illustrated Dictionary of Tatting'. And all three tatted samples above are from derivatives of Endrucks' (1920) patterns 42, 20, and 37.

UPDATE: (9th Oct 2023) - Perhaps I should've spoken about the origin of the word rosette, etc. But here's a comment by Stéphanie Mc (Tattimic) on my FB post and quoted here ---

I'm pretty sure it comes from French.
In French, the word "rosette" can take about 10 different meanings. It usually refers to something circular with a circle in the middle, but not necessarily.
Also, when the suffix "-ette" is added to a noun - let's say "rose", haha-, it refers to a smaller version of that noun. So a "rosette" is supposed to mean "a small rose", at least in some interpretation of the word, of course.

 Well, she is absolutely right! 

My sincerest thanks to all mentioned!

Monday, 24 April 2023

patterns galore

Pin It now!

 In one of my recent posts I mentioned how we are curating patterns, models, ideas derived directly or secondarily from Eleonore Endrucks' ‘Die Schiffchen-Spitzen’, 1920, and collecting them in categorised Directories. The format is similar to the EP doc with pics of the model and link/details to the pattern. So far we have released 7 directories listed below (click on the blue text).

1. Hearts - https://docs.google.com/document/d/1MpYw9XMB8Asz8zusj1ZpHvX8A8Ww424-rEVORtxcL1w/view

2. Butterflies - https://docs.google.com/document/d/1fKXsc8OyQ8Z2qAuzLeS_jR9CGJKsmSn_KsFnD5U71tM/view

3. Flowers - https://docs.google.com/document/d/10tmXv6I3ybB8dv69SV7V3OjlhcEMbNE4N-NSaqjLt4g/view

4. Foliage - https://docs.google.com/document/d/1EIgPKHH9V2Dg4gDZNefVfSVNRZQC6LbSfhiaWA_s-G8/view

just 'coz every post needs a pic!
The top 4 directories include patterns we chose for the #pickmeEndrucks Feb2023 event - the roundups of which you enjoyed in my last 3 posts. These include hearts, flowers, foliage, and butterflies including some 3D patterns. Above is the collage used as cover pic in our FB group that month.

And Judith Connors shared the Eye Spy Heart pattern (with slight tweak) derived from Endrucks' pattern #3  in 'Talking Tatting', Feb2023. She very graciously shared the pdf with us.

5. Baskets -https://docs.google.com/document/d/1v2hfFk2Nhg3ZpqUSW9vRCV_0AmQYp4qOx7gs3uJEr-g/view            This directory consists of patterns/models/ideas for baskets, boxes, bowls, including egg decorations, which we shared for our #gitftmeEndrucks Mar2023 event. 

6. Coasters & doilies (round) -https://docs.google.com/document/d/1Xc1hiwrg5yPEvi77jj2uxWqlkECuyZjFjuCJ08VcoLA/view

7. Bookmarks and Insertions -https://docs.google.com/document/d/1dtWGgZZEGBBwLDpJgRChAEo91l4uuXq-fxRNzKDc6r8/view

At present we have two more directories close to finishing, and one completed directory that will be released for our May event!


Creating these directories is helping us keep track of the derivatives from each original pattern. Otherwise the increasing volume of new derivatives/adaptations was making it difficult to get a bird's eye view of what our Endrucks 1920 Project has brought forth. It is also easier to update each directory with new derivatives.

Earlier we were including these in the main Endrucks 1920 Project document (EP doc) - the size kept increasing yet not everything could be included. Hence this solution. Eventually we will keep only the main patterns in the EP doc and move all derivatives to their respective directory. There will be no need for the Gallery of Possibilities there either.

Our heartfelt thanks go out to all the wonderful tatters who continue to make the Project grow beyond expectations!  - Ninetta & Muskaan