Friday 31 July 2020

excitedly

Pin It now!
Day 2 of my Distraction continues.....7
As I said yesterday, I wound 2 shuttles, ctm,  with Anchor size 40, and started Robin's Challenge Snowflake.  Rounds 1 & 2 seen.
Then I deliberately left off and picked up the size 80 edging. 13 repeats done so far.
Both patterns can be found here - http://tattingbythebay.blogspot.com/p/free-patterns.html

Ruthie May is tatting along, working the snowflake in 6 stranded embroidery thread and using needle.


After 2 rounds, the snowflake measures 1.5". I like how the padded chains keep their shape. I think it's the first time I worked it in size 40. So much neater than size 20. (https://tipsaroundthehome.blogspot.com/2015/11/pds-padded-double-stitch.html)

I've used self-closing mock Josephine Rings in 2 of my patterns - I had called it SCM(J)R, not having come across it before. Love them!
https://tipsaroundthehome.blogspot.com/2016/06/under-pinning.html and
https://tipsaroundthehome.blogspot.com/2019/11/frost-flower-pictopattern.html

Followed the pattern exactly,  except for  this lock join in the end. I substituted it with Reverse Join because I want the red shuttle back in action in next round. (https://tipsaroundthehome.blogspot.com/2020/07/lock-join-plus.html)

Let's see what tomorrow brings. I'll have to get back to my usual (new) life routine, so.... What I do know is that I am having fun :-D

Thursday 30 July 2020

starting

Pin It now!
After what seems like ages (certainly months), I finally got some uninterrupted time to tat. Blissful!!!

This is Robin Perfetti's Floral Edging pattern - http://tattingbythebay.blogspot.com/p/free-patterns.html
After much online browsing and even sketching out a couple of my own designs, I finally settled on this beautiful pattern.

So far, I've completed 6 repeats. Worked in Lizbeth size 80, it is 1/2 inch wide and 3" long.
This is for a handkerchief to gift, which is why I wanted something with minimum decorative picots. Makes maintenance easy.
I hope to embroider something in one corner. If not, perhaps some tatted motif.

Tomorrow Ruthie May and I will be starting Robin's Challenge Snowflake.  Join us - more the merrier.
Time permitting,  there are several other little patterns on my immediate list.
Distraction, with a capital D, is my First name obviously ;-D What's yours ?! 

Tuesday 28 July 2020

picoted Josephines

Pin It now!
Oh, my poor head – it is filled up with so much tatting-related stuff that my memory bank is full! No RAM, no way to access my over-full storage capacity, despite frequent rebooting, sigh! Turns out I already used the tufted rings in the Icy Rivulet Snowflakes last year - https://tipsaroundthehome.blogspot.com/2019/11/frozen-or-flowing.html. Barbara Slodka had first shared the video link (can't find the exact thread, but earlier than this - https://m.facebook.com/groups/752452334871921?view=permalink&id=2521882034595600 ; and the recent discussion - https://m.facebook.com/groups/752452334871921?view=permalink&id=3082763385174126&_rdr )

I seem to be going round in circles. Like I mentioned in the previous post (https://tipsaroundthehome.blogspot.com/2020/07/applying-techniques-rakhi.html), some question either in facebook or privately, set me on the path to compare various picot formations in Josephine Rings (JR) or Josephine Knots (JK) back in Oct-Nov 2019. 
But let’s move logically ….

Picots in Josephine Rings
A study of 4 methods
For each style in this study -  

1. Regular or Interlocking Picots
( https://youtu.be/V7XbtXhpN-4 )
Picots made normally (with or without a gauge) after every half-stitch.
       JR: 1ds, (p, 1hs)x14, p, 1ds.
Notice how the picots split apart as they get longer. The long picots are termed Interlocking Picots.

2. Mrs Mee Picots
http://www.youtube.com/watch?v=qNW4CyGWzQA )
Picots made normally (with or without gauge) after every 2 half-stitches. 
  Make the picot followed by a half-stitch, and repeat the half-stitch (pic below).
      JR: 1ds, (p, 2hs)x14, p, 1ds.
This results in a larger ring, but with more stable but ‘independent’ picots and a larger center space. There is a tendency for the picots to twist decoratively if they are longer than 10mm.

3. Tuft Picots 
This requires a picot gauge through the 'leg' or loop of each half-stitch. The gauge may be placed above core thread (Nadezhda's method) or below the core thread (Ninetta's method). The beauty lies around the periphery where picots seem to be interlaced.
What Actually happens, is that the stitch itself becomes a picot! The gauge 'pushes up' the belt or horizontal bar of each stitch to lie on the outside instead of at the base of a picot as normally happens. 
The above rings have 20 picots of 5mm in size 8 perle cotton. 

Nadezhda Malysheva method - gauge above core thread
https://youtu.be/HFCimyOpoXI March 2018)
Hold the gauge above core thread as usual. But look closely – the gauge is ‘inserted’ through the open ‘leg’ or loop of the stitch rather than the main arch of hs as in #1 and #2.
      JR: 1ds, (p, 1hs)x14, p, 1ds.
Notice the outer edge of the picots – they appear interlaced or interwoven, creating a neat trim around the periphery. It almost appears as if the stitches are made loosely - which they are, in a sense. But the 10mm picots split apart as in #1.

Ninetta Caruso method - gauge below core thread
( https://youtu.be/1uTtSE8ZUJY  Aug 2017)
Hold the gauge Below the core thread, but inserted through the ‘leg’ or loop of the stitch instead of the arch. 
      JR: 1ds, (p, 1hs)x14, p, 1ds.       
When the ring is closed, both Nadezhda’s and Ninetta’s rings turn out to be The Same! However, since the former does not have a name, and it was Ninetta who created it before, I think it is proper to term them both Tuft Picots. The rings can be called Tufted Rings.

My Observations and Thoughts -
  • Of the 4 methods, only Mrs Mee’s picots can be used for joining – they remain stable due to the extra hs between picots; the other 3 are merely decorative. They form a broader JR and a larger number of picots is more visually pleasing.
  • I find that using perle cotton creates a better tufted ring as seen in the rakhi I posted earlier.
  • As seen, 5mm picots give the best result. As the picots increase in length, they tend to split apart and twist. It makes sense, because the belt/bar of the stitch no longer has any support and slides back!
  • It is important to factor in the thread size to get the desired result.
  • It will be interesting to see the effect with graduated picots! And beads.

Saturday 25 July 2020

applying techniques rakhi

Pin It now!
It's that time of the year again - Rakshabandhan is round the corner and Indian tatters are already posting lovely tatted rakhis. Here's my rakhi for 2020 ... AppliTech rakhi/bracelet!

The portmanteau 'AppliTech' refers to the fact that it is kind of a test or trial or experimental piece for applying a few techniques. It started as an observation piece for the Lock Join Plus methods as posted here - https://tipsaroundthehome.blogspot.com/2020/07/lock-join-plus.html where lock join, reposition threads, SLT, and reverse join (and switch shuttle) were all used in batches, resulting in randomly placed colours on one side.

Then, in response to a question on facebook, I re-demonstrated what I had discovered last year - whether you hold the gauge above the core thread or below it (as in Ninetta's Tuft picot), provided it goes through the leg of half stitch, the final result is the Same!

All tutorial links here, including my study of picots (Interlocking, Mrs Mee, Tuft} - https://tipsaroundthehome.blogspot.com/p/tatting-resources.html
I will share my detailed comparison in next post, along with more observations.

I continued on to make the 3rd Josephine Ring placing the gauge above core thread.
Each ring starts and ends with 1ds, and has a picot after every half-stitch.
Each JR is made of 20 1st half-stitches with a 5mm gauge.

Many of us have already come across this beautiful Lavender sprig by tatting_art on pinterest or Instagram and she has uploaded a how-to video here (thanks for sharing the link, Karen Cabrera).

Next, I started mock rings with treble tat stitch. I started each chain with an Intruding picot which served as the starting picot for first tds, also to join back the chain into a mock ring!

Why mock rings, you ask?! Because I did not know how big the ring should be, what the count should be.  With mock rings,  I had the freedom to keep 'bending the curve' to gauge the chain length.  Hence, no tds count. 

Close-up of the dimensional/stacked flower. Bead was added before starting the last mock ring, by pulling up a loop...
Continued with the Priscilla edging (Fig 29 from her Tatting Book 3), though this time I followed a symmetry in colour placement. Lock Join and Reverse Join are used in alternating chains to move up to the next chain. By direct tatting (unflipped/reverse stitches) every alternate chain, I could tat all from the front. No RW or turn work!
Added findings after it reached 7" length. Anchor Pearl Cotton size 8.

Perhaps with a bit more effort, I could work the 2nd part of the edging to face opposite, rather than appear continuous. But there are a lot more things on my over-full plate ;-P
See you soon ....

Oh, but before I go, Sue Fuller taught my 2017 rakhi (in March) and Bonds of Love rakhi/bracelet (in April? she liked the blue, red, white version) in the Online Tatting Class earlier this year. I didn't get a hold of the logs, though, so have no idea what transpired in the class ;-D

Tuesday 21 July 2020

she's all heart

Pin It now!
Certified Master Tatter, Anita Barry, shares 2 of her latest creations with Tat Land! And I am honoured that she graces my 600th post!
What could be better?! It took a full community and some extra special friends to get me to where I am today.
So first, her Rainbow Coin Tatting Purse. It has several interesting features.
Notice the mock toggle in the center? This knotted chain was taught by Karey Solomon.
The main body uses a picoted lock join that Dora Young used effectively in recreating crocheted doilies in tatting in her book ('All New Knotless Tatting').

Such a thrill to see the new intruding picots being used in the foundation row with all subsequent rows worked around and above. Alternating regular and intruding picots allowed the initial single chain to have joining picots along both edges. Clever!

This tiny purse has a wealth of knowledge stored within! Will certainly tat it ...

click to download the pdf (with detailed instructions) - https://drive.google.com/file/d/1bW9PEKLdbh9KgexmIehU2c3G3u8chfgr/view?usp=sharing


I Love You More Necklace and earrings patterns! I see Karen Bovard Sayre's influence here, with all these split rings ;-D
I was hoping to tat the heart while posting, but it will have to wait for another day. Wonder if I'd be able to flesh out the necklace heart a bit - more curvaceous ;-P

click to download pdf - https://drive.google.com/file/d/1p-Visi8RyqgMD6AWMxTo__9cArDYvjxt/view?usp=sharing

Hope you enjoy all these patterns. I know these are on my to-tat list!

Many many thanks, buddy , love you !

Friday 17 July 2020

lock join plus

Pin It now!
Many months back, in response to some curiosity and confusion among several tatters, I decided to illustrate the simple progression and functional similarity between a few techniques. Here the underlying common factor is the ubiquitous Lock Join. Add one extra step to the LJ, and it opens up the canvas to change colours, shuttles, and even direction of chains.
I took stepwise pics for each of the combinations back then, but preparing a proper stream-lined article has taken way more time than intended. I am immensely grateful to Anita Barry, Master Tatter, for her proofing and editing.

In order to make the document manageable, it is uploaded as a series of 5 pdfs, each a stand-alone (click on each title to download) –

  1. Lock Join Plus – Executive Summary and practice Patterns for further exploration. (3 pages)
 
How one extra movement after a lock join can open up the canvas to change colours, shuttles, and even direction of chains. 

For starters, a simple 2-colour motif is used where all chains face the same direction. But for further exploration, more patterns are listed. 

  1. LJ Plus - Lock Join (LJ) pictorial (1 page)
 
How to make the lock join using both up and down loops. 

Notice how the colour blips in the 2 right joins are larger than the remaining 3. If the down loop LJ is followed by a 2nd half-stitch, the blip is almost hidden completely.
Links to undo a LJ and variations that include making a LJ with 2nd shuttle.
See also Lock Join in Mock Rings


  1. LJ Plus – Reposition pictorial (1 page)
 
A laissez-faire crossing of threads. Simple, quick, vintage. Compare how chain segments change colour and the slight overlap at the start of each chain.

  1. LJ Plus - Shoe Lace Trick (SLT) pictorial (1 page)
 
Tying a half knot outside the LJ – overhand tie or SLT. Again chain colours get switched. SLT also allows us to switch the core thread in instances when the shuttle is running low on thread.

  1. LJ Plus – Reverse Join (RJ) pictorial (2 pages)
 
Encapsulating or entrapping the other thread within the LJ. Created by Elaine P Gan (tattingbox). 

Pics showing an up loop and a down loop. The latter 
minimises the colour blip in a RJ as well.

Functionally the same as crossing and SLT after LJ, but more elegant and efficient – a smooth transition.


After each or either of these, if we turn work, reverse work, switch shuttle, and/or direct tat (unflipped stitches) the next chain, we add another dimension – changing the direction of the chain! Along with colour. Our choices multiply! And we might even be able to work throughout with just one shuttle and ball. To explore these choices, some practice patterns are listed in the main pdf. Besides block tatting, think also of filet tatting, especially in 2 colours, where these can be used effectively. I forgot to mention the role of lock join plus in mock rings and mock onion rings, but you get the idea, right? Wherever you have 1 or more chains joined below, play with LJ Plus!
I used all the above 4 in this vintage edging from Priscilla Tatting Book3 Fig 29 where the chains move to and fro. We can turn work after each chain or we can work every alternate chain directly (reverse stitch - unflipped). I started with LJ, then tried reposition, SLT, and RJ after every 3rd chain. Shuttle in hand changes depending on our choices.

So I'm sure there is no need to spell out why I presented this article/pdfs in the way I did? There is lot of scope to play and design because each method has it's own pluses and minuses!
Do you see a butterfly in the above arrangement? Time to pick up my shuttles again and work out a pattern ;-D
Before that you might get fed one more lesson, so stay locked in ;-P

UPDATE 1: When working with only one shuttle and ball, changing the direction of chain using direct tatting - https://tipsaroundthehome.blogspot.com/2021/06/2nd-shuttle-or-ball.html 
UPDATE 2: Carrying on with functional movements, see pictorial Twist Work (TwW) -


Wednesday 15 July 2020

splitting the mesh

Pin It now!
My Italian Connection is at play again, splitting chores! Couple of days back Elisabetta De Napoli shared a picture of her filet tatting in an Italian facebook group. On request, she readily created a series of pics and explanation to share through my blog. Ninetta, ever gracious, did the translation and added her notes. Yours humbly had the privilege to assemble, 'polish', and present. So without more ado, here’s her split chain method of filet tatting.
At the end is her Italian version, verbatim.

Filet Tatting (split chain method)
by  Elisabetta De Napoli
Two shuttles, continuous thread (CTM).

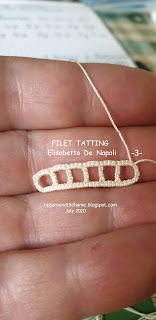
Fig1) Foundation Row: Start a dead end chain, holding a picot space. work for desired length, finishing with 4ds. The above model has 6 picots separated by 4ds.
       Ch: picot, 4ds, [1 picot, 4ds]x5 

Fig2) Turn the Corner: Reverse Work and switch shuttles or do a shoe lace trick (SLT), then continue with a chain to move to the next level or row.
Row 1: consists of 6 split chains, joined to the foundation row picots.
       SCh: 4ds, 1 picot, 4ds / 4ds.
To make a Split Chain (SCh) leave bare thread just enough for 4ds, lock join to nearest picot of previous chain, tat 4ds. 
(see tutorials - https://tipsaroundthehome.blogspot.com/p/tatting-resources.html )

Fig3) Make split chains for the entire length/till the end.
       [SCh: 4ds / 4ds]x5

Fig4) Repeat steps 2 and 3 for as many rows as desired.
This creates an Open Filet or mesh.

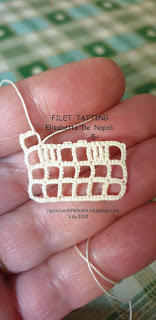
To Fill a Square: Plan ahead in the previous row to include small picots for joining. As can be seen in the image, the 2nd and 5th chain segments in Row2 have very small picots. This is how it is done here …
Picoted Chain segment (pCh): To fill a square in the next row, in the previous row a plain 4ds chain includes tiny picots as follows -  
       pCh: 1ds and 1fhs, 1vsp, 1reverse order ds (1shs and 1fhs), 1vsp, 1shs and 1ds.
(basically, 4 ds is divided into 1.5ds at the ends and 1rods in the center flanked by 2 small picots. The picots are made within a ds rather than at the end of a ds - as in backside chains)

Fig5) Row 3: Of the 6 squares, the 2nd and 5th squares will be filled here, which means there are 2 extra split chains within the square.
       Make 1st open square:  4ds, 1picot, 4ds, SCh: 4ds.
       Filled square: [SCh: 1ds / 4ds]x3
       2 open squares: [SCh: pCh / 4ds]x2
       1 filled square: SCh: 1ds / 4ds.
       Last open square: SCh: 4ds / 4ds.
       Move up to Row 4.

Fig6) Row 4. We planned ahead in Row3 which squares we want to fill in this row. Hence picots were included and accordingly in Row 4, squares 1&2 are open, 3&4 are filled, and 5&6 are open.

For Filled Square Over Filled Square:
If next row has an empty square over this filled one, tat normal ds between split chains (total 4ds). If next row has a filled square over this filled one, tat the same sequence as in the picoted chain segment in this way: 
       the chain is 1ds and 1fhs, 1split chain (4ds), 1reverse order ds (1shs and 1fhs), 1split chain (4ds), 1shs and 1ds, all in place of 4ds.

∞∞∞
This is what Elisabetta says, for our Italian friends –
Ciao Ninetta, ti invio le foto che ho fatto e le spiegazioni:
2 navette e filo continuo
1° lavorare un arco di 1 pip  4 nodi fino a raggiungere il numero di spazi vuoti
 che occorrono;
2° girare e lavorare 4 nodi 1 pip 4 nodi e agganciarsi al primo pip  lasciando lo spazio per uno split chain di 4 nodi e ripetere, 4 nodi e split chain di 4 nodi, fino all'ultimo piop;
3° girare il lavoro e ripetere come il primo giro agganciandosi al piccolo pip che si crea tra i gruppi di 4 nodi;
4° per avere degli spazi pieni occorre prevedere, nel giro precedente dei piccoli pip nei gruppi di 4 nodi. (*)
Spero sia sufficiente, in caso contrario io sono qui.
Ti abbraccio e ti ringrazio anticipatamente **
∞∞∞

Filet Tatting - some other methods (with updates):
I have little experience with actual filet tatting. But here are links to a few other methods –

  • 'Reversing Chain' method in John’s and Jeff’s blog. Read the comments, too, for answers.
  • Mary Konior's rings/floating rings and chains method in Margaret's blog (image only).
  • and a similar 'Filet-Ochhi' rings and chains method by Christel Wutzmer and Agnes Focke from "Doppelknoten" Nr. 7 (2005) in Jeff's blog (image only).
  • Shoe Lace Trick method by Mandatory (my notes on this method here- https://tipsaroundthehome.blogspot.com/2016/06/something-new-something-old.html ) She has done quite some experimenting with filling effects (pics in her Craftree album)
  • Sue Hanson's tiny split chain basket (taught at Spokane, 2008 and pattern shared in many facebook groups) is a bit similar to the above method and uses 2 colours. 

I have been working on a tutorial series about lock join and chains, and this fits right in, especially if you take up a 2-colour challenge – I had forgotten about filet tatting! Life has intervened major-ly hence the delay in polishing it up. But soon – Anita has been proofing it …


Many many thanks to Elisabetta and Ninetta – share the joy!

Sunday 5 July 2020

welcome intrusions

Pin It now!
It has been amazing - the interest and the exploration that has already moved far and wide ... almost overnight! I cannot thank my tatting mates enough for their enthusiasm and for embracing the potential of Intruding Picot (ip)!


In chronological order -
Wally Sosa - This multi-talented and creative lady had also discovered this picot, calling it 'Evil', and dismissing it! Above is a nice comparison between, and combo of, normal and intruding picots.

Wally Sosa - Introducing the Rolled intruding picot! She combined her rolled picot with the ip to create such an interesting effect. And there's more - she has already tatted a beautiful motif/pendant using these and will be sharing a tutorial soon. Can't wait ....

Ruthie May - She interrupted her doily to try out her first intruding picots (thankfully she didn't close the ring - who wants to open a ring?!) and she has created this lovely pearl tatting/Maltese ring effect! It is something that had not occurred to me.

Ninetta Caruso - Can't keep her away from metallic threads and beads ;-D
Such a wonderful Beaded ip - as seen from front and back! Think of the scope for play....

Anita Barry - Independently, she came up with the Pearl tatting effect.
In the trefoil, one can see the dimpled effect in the side rings, and she has pulled up the ip in the middle ring! Creates a matted/woven effect.

Anita Barry - sent in this exploratory trial piece as well. The messy one on the right makes me think of snipping the ip and ruffling them!

This is my Filled Ring trial using ip. Didn't come out right, but I can put it down as proof of concept at this stage. Had thought of twisting them, but that was too fiddly. However, it can be quite easy if done on a chain.
I want to try it with SCMR. I also want to try it with folded rings and chains. Could we weave them as well or am I getting way ahead of my skills, head in clouds?
Lots of homework ;-D

UPDATE : Jane McLellan created a lovely bookmark using interlaced rings and intruding picots! Check it out - https://janemactats.blogspot.com/2020/07/muskaan-bookmark.html

Present Summary -
So, what a spread, with many more ideas to try out besides a downward facing picot - Rolled, Pearled & Maltese (using a single thread is now possible!), Filled, Beaded, Dimpled, Ruffled (inside!), Mock rings, Onion rings, bead in center of ring and other functions ..... this is just the start of the Intrusion!
UPDATE : I have used it successfully with dot picots, dot picot strings, double picot, twisted picot, and even a half-closed ring with twisted picot as it's base!


And speaking of welcome intrusions, a few more prettified butterflies flew in after 2 years! Did they get lost in migration - I hope not. Care to send in more Make Me Pretty Butterflies?
Corinne worked her cute version for an event by Association Francaise de Frivolite.

 Krystyna Mura posted her version - I couldn't even recognise it - so great is the transformation!

Madhur Dadlani was inspired by Corinne's version and posted this cool freshness!


Keep Intruding, dear tatters. No 'stings' attached :-)))