Showing posts with label butterfly. Show all posts

Friday, 26 December 2025

full of options tatting

Pin It now!

 In our endeavour since July 2025 to update patterns in our Endrucks 1920 Project collection, some PDFs posed a dilemma. For instance whether to leave the E1 shamrock and it's butterfly offshoot in the same PDF or to separate them. A survey in our FB group voted overwhelmingly in favour of the former. We took the opportunity to include a stepwise pictorial, add some missing portions, as well as options to work certain parts through some mini-pictorials.

E1 Happy Hands Shamrock and Butterfly by Diana Howe and Muskaan : 
https://drive.google.com/file/d/1_D5xY68NyfsKMB4LDr0GUv-WYC0VCba6/view (updated pattern link)

Following are some notable features -

This Way or Tat? (TWoT Notes): This is one of those patterns where many paths and options are possible.  Diana had diagrammed both clockwise and counterclockwise pathways (my E1 Happy Hands Heart from which it was derived could also be worked either way), and my working of the shamrock followed a third. Since it is a two shuttle pattern, just follow the shuttle which is in the right position, but adjust the instructions accordingly.  

I used contrasting colours in size 10 knitting cotton for the pictorial to clearly indicate which shuttle is in use.
Dimpled Yorkie: Since the heart ring is fairly large, it is a good idea to apply the two-step closure option as in the dimpled yorkie. Notice the bare thread on the left, just before the ring starts? It is part of the false picot ....

False Picot: Since there will be two back and forth chains at the base of the heart, a false picot is needed to prevent overcrowding. And the bare threads need to be long enough to accommodate them.

False Picot v/s Mock Picot): I distinguish between a false picot and a mock picot. The former is just bare thread left before and/or after an element to simulate a picot. The latter usually uses an overhand tie, a lock stitch, or a paperclip/spacer to make the picot. False picot is a much more vintage term than a mock picot, often used interchangeably, and the construction is left to the discretion of the tatter. However one should be aware of this since it may affect which of the two shuttles you will be using to continue. Does it coincide with what the designer intended? If not, the tatter will need to adapt accordingly.

Lock Join and Under-Over Join (U-OJ) aka Alligator Join: During my early trials with the original E1 pattern, I finally settled on making a lock join through the false picot in order to keep the chain in place. This was followed by ensuring that the two threads/shuttles were on either side of the picot (one above and one under).  
However the lock join can be eliminated completely and only the U-OJ can be used if so desired. And which thread you wish to keep above and which under is entirely up to the tatter. Just make sure to adjust instructions accordingly.

The first heart motif is complete in the above image. 

Armadillo join: While in the above model we went with the original consecutive joins (picot join on top and lock join below), this can be substituted with the armadillo join as explained in my previous post. https://tipsaroundthehome.blogspot.com/2025/12/armadillo-join.html . 

Over The Top Join (OTT): This is an adaptation of the U-O join when the space is too small for a shuttle to pass under (or one forgets to position the shuttles ahead of the final chain segment in the pattern). Above image shows Ninetta working it in the 2nd or 3rd repeat.

 
Ninetta's E1 shamrock and butterfly versions! Can't thank her enough for all her enthusiastic and prompt support in so many unexpected ways!

Stem : Diana recommended the BDS or padded chain for a stem. However, any decorative chain or cord can be applied such as the lock chain in above model, a pearl tatted chain, etc. 

Never let it be said that tatting is just rings and chains and picots, LOL.

We will soon be releasing the EP Tutorials document which endeavours to list all tatting techniques, effects, and terms used in the Endrucks patterns - original, reworked, and derived. Until then you can find tutorial links in the Tatting Resources tab above (https://tipsaroundthehome.blogspot.com/p/tatting-resources.html).

Please give credit to the designer and pattern, and use the tag #Endrucks1920Project when you post your version of the pattern.

Monday, 15 July 2024

so many

Pin It now!

 Quite by chance I noticed that this is my 912th post since starting in Dec 2013. So many posts, hmmm, and yet not enough coz there are so many more that haven't yet seen this space. Hopefully in time. Today's post also shows the many potential forms the simple E43 petal from my last post can take. Many of these shapes were suggested by keen observers (listed at the end)! So many eyes :-)))

It is difficult to photograph a 3D model and I truly wish I could've done a better job or taken a video. Nevertheless, ... 

Please Note that in the right colours, with the right number of petals, and if and where the petals are joined, a range of flower impressions can be achieved, besides other shapes. Hence I am calling this a E43 3D Generic Flower. I still need to tat in the stem, pistil, sepals, etc. For pattern details - https://tipsaroundthehome.blogspot.com/2024/07/what-heart-wants.html . I will share the specific petal/flower pattern soon.

In the following, the join is made at the side of petal and at the base.

1. Three petals joined, curved inwards. In the right colours, it could be a spiderwort, a buttercup, a tulip (with unattached petals). And how about a butterfly (2 or 4 petal wings)?!
TIP: When joined, the petals (and flower) hold their shape though each one can be pushed in or out. If left unattached, stiffening or some wire would be needed to hold the petals in place.
2. Two petals facing each other. Could be a flower bud, pendant, fairy light bulbs, or even a strawberry!

3. Two petals could also become a clam shell, oyster with pearl, or a tulip bud. Perhaps even a little gift pouch.

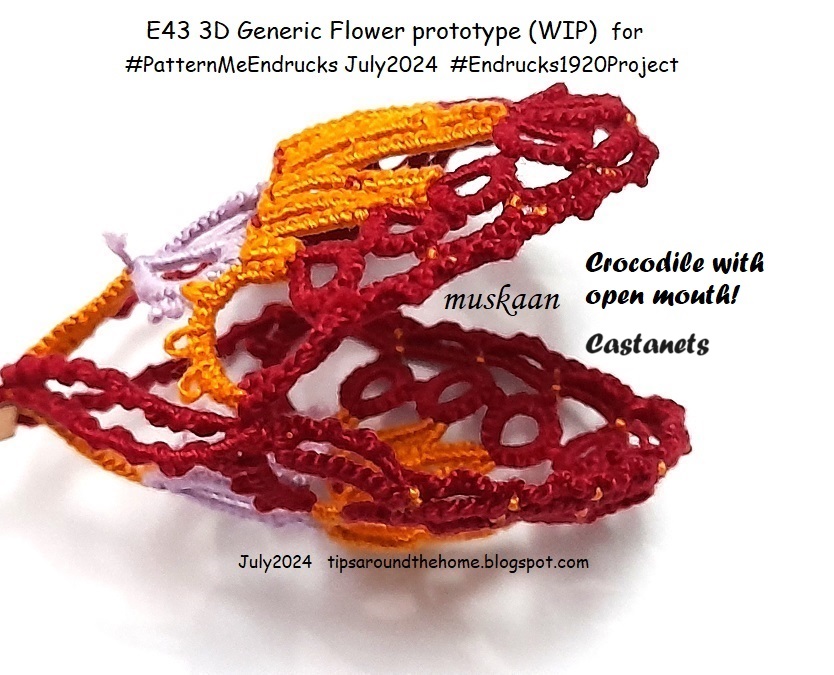
4. Two petals. Now this reminds me of an open-mouthed crocodile. Or castanets? Perhaps even a pair of oven mitts.

5. Two petals, another angle. These pics were taken at night when I was too lazy to get some pearls to insert inside. 

6. This is the 3rd petal. Now the entire flower with any number of petals and joined only at the sides and base, can be tatted in one pass, provided the outermost row is worked in one go at the very end. I had to tat this separately since there wasn't any forethought, LOL.

7. Single petal (#3) without the outermost additional trim around the rings. With beads and gems it would make a lovely pendant or earring.
TIP: For a more rounded tip, remove the middle ring of the trefoil.

8. Three petals joined. Don't you see a butterfly?

9. Three petals joined, facing inward. Same flower, but upended. Could be any number of decorative embellishment or jewellery. Perhaps even a candle decoration at the base.

10. Three petals joined and curved outwards. With the right number and colour of petals, and additional pistils, etc., this really would make a nice hibiscus or petunia.
 
11. And I have to share the lead pic again coz Anita saw this ... 
"This looks like a frightened lady. Can you see her? Her lavender eyes are wide open & picots look like eye lashes, and her orange mouth is open wide, with her orange hair standing straight up.
Or, an Alien. Hmmmm. What’s in my coffee today? Hahaha.
The lady in the petals.
Spell-bound flower, maybe?"

And what do You see? 
Giving credit to my friendly eyes ... what each one saw ...
  • Pendant - Maria Burgo & Vani Kattoju
  • Shell - Jane McLellan
  • Tulip - Ninetta Caruso, Anita Barry
  • Petunia, Hibiscus - Anita Barry
  • Open umbrella for a clown - Anita Barry
  • Spiderwort - Ninetta Caruso
Further, Ninetta has this to say -
"The E43 is like a festoon imho, you had a great idea to extract petals! This pattern has that last double chain over the rings, it "close" the drawing, something that is not present in the E14 even it is similar. So E43 makes a better petal than E14 (or E10)."

Related Posts -

 Thanks for all the friendly suggestions and nudges, ladies! There can never be too many!

Saturday, 15 June 2024

picot me roundup 3

Pin It now!

 I had shifted Ninetta's entries to this Part 3 in order to equalise all 3 posts. And then I got caught up in a lot of other stuff and this post got delayed. It turned out to be a blessing in disguise 'coz a few more butterflies fluttered in! 
Game - #PicotMeEndrucks April2024
Pattern - Antonia Lai's E32 adaptation 'Life is Bliss butterfly' 
Objective - Use ornamental picots to embellish the butterfly motif. 
Roundups and details - Part 1  ; Part 2

21. Ninetta Caruso - started a virtual butterfly effect when she used Celtic Knotted Picots! Many members used the CKP, albeit in different ways, as you would've seen in previous roundups.
Calling it her Frilly Butterfly, she says, "This is the frilly butterfly that I got, ....  I tried for my first time the "Celtic knotted picot", developed by Sabina Carden-Madden, I followed her tutorial shared years ago, that luckily can be reached again using the wayback machine:
https://web.archive.org/web/20190108165755/http://www.paradisetreasures.com/ckp.html. Thank you for the fun! It's wonderful that in tatting we never stop learning!"
To me, her CKPs themselves looked like tiny butterflies!
Her 2nd entry was even frillier than the first one and she called it the Fluffy Butterfly.
She says "This is my fluffy butterfly, ... these are "layered picots", they are called also floral picots or ruffled picots, it is like the Victorian set but with picots between sections of half stitches, it's a technique already found in Priscilla's patterns."
The top view is in the inset.

22. Reiko Akamatsu - started this circular edging with a series of butterflies.
It's still a WIP and the amazing part is that she does not seem to have altered the stitch count at all. A truly versatile motif!

23. Sabine Robert - joined us for the first time with 3 versions!
She says, " - I start tatting with this Life is Bliss Butterfly pattern (2nd project, after some trainings). Not so easy, I need to do more and more"
One can already see her progress and improvement! And adding beads is not always easy for a new tatter.

24. Sara Dougan - is a new member, too. 
She used a combination of long decorative picots, double picots, and butterfly picots!

25. Silvana Buonvino - sent in these delightfully coloured versions!
Besides the pearls and beads, she used double picots, triple picots, and Josephine Picots. She asked whether the JPs could be made on rings and tried out the suggestions for her 4th butterfly! 

Voila, her 4th entry has Josephine Picots on rings as well as on chains! 
Silvana embellished her own skills along with the butterfly! 

26. Stephanie Mc (Tattimic) - shared her ideation and design process and has promised us the pattern, too!
Her 3 idea sketches (which inspired Lauretta Tondelli to learn the CKP) for which she asked for feedback.
The 3 versions that finally emerged. The one on the right uses balanced double stitches to stabilise the long "wobbly" chains and a scroll of rings and chains for the bottom wings.
She says, "But then, I still didn't have any picots, which wouldn't do for a #picotmeendrucks, right? So I asked myself how I could add a shape inside the largest loop and still use the crocheted picots suggested in the list of ideas (I like it! It's so super cute!). That's when all hell broke loose, because it meant to rethink again the initial pattern (so no real onion rings, for exemple), and I ended up with the design you see on the left. 
That being said, thank you for the initial challenge, haha. It sparked my imagination!"
And what a spark it is! 

The metamorphosis process in thread!
She says, "And here are a couple of tests I made along the way. I often see people wondering how to create new design. That's one way to go : trial and error, haha."
This is proof that designing is not always easy, despite the numerous paths one can take to convert an idea into thread.

27. Vani Kattoju - heeded my request and shared her 3 versions though she was not fully satisfied with her working. Appreciate it, Vani!
She says, "My first attempt at using vapor picots, Mrs Mee picots and tuft picots. A little Not so perfect butterfly." 
She used a mix of double picots, "...layered picots and twisted picots."
 
For her 3rd version,  "I tried daisy picots as the highlight along with few double picots."
This motif has been the vehicle for a lot of first learnings and practice makes perfect.

28. Wanda Salmans - created 5 versions and blogged about each of them.
She says, "My first try at the Picot Me Endrucks April 2024 Game of the Month. The one on the left is the pattern adaption by Antonia Lai. I started it several times - it helps not to be tired or distracted when starting something new. For the second one, I played around with picots. I used HH20-126 Purple Splendor."
Her 2nd version has overlapping double picots and twisted picots. 
Her post - https://www.wandasknottythoughts.com/2024/04/playing-with-butterflies/
3rd version is decorated with chains on long picots, giving a scalloped edge to the wings. She has used several bits and pieces on her 'Safety Pin Brooch'.  
Read all about it here: https://www.wandasknottythoughts.com/2024/04/safety-pin-brooch/
Both 4th and 5th versions use what Mark Myers' called the Picot Lock Join. It is basically a lock join made with the 2nd shuttle to a picot and the basic join in inverted tatting. 

29. Lou Bunker - made sure her butterflies fluttered around in June.
She says, "Fun little pattern works up fast, very addictive." 
Some of her cuties have beads and double picots.

30. Manju Talekar - has this beaded beauty to share, sent in June.

She says, "I tatted it with Lizbeth variegated thread #20 color 123. The transparent glass bead in the center reflects light but cannot be seen in the picture. Wings can move up and down by the side of glass bead. Enjoyed making it."
A tatted butterfly that can actually fly - wonderful!

UPDATE (Dec2025): 
31. Debbie L Fister - Sep2024
Debbie says - Question: if a pattern calls for a normal picot would substituting decorative picots change the pattern significantly? What modifications should I consider?
thank you very much. I am a bit surprised that the photo is so messy. I decided I am not a designer (yet). I have to say this was a challenge, but I really wanted to try Celtic rings. As for substitions: 3 graduated picots with 0 ds between adds 2 ds. Same with a double picot.
But what about interlocking or tufted? The rings don't seem to that different in size, but now I'm thinking the extra ds might affect the way the corner fits on the book page.

So this brings us to the end of the Picot Me Endrucks roundup. Ninetta and I are so grateful for this huge interest and the beauties that emerged from the game, besides the learning, exploration and experimentation. 

At final count we have an exciting 31 participants and 76 butterflies!!! Remember, if you have made any Endrucksian pattern you are free to send it to either Ninetta or to me at any time. Leave a comment in our respective blogs if you wish. (all relevant links on the right panel of this blog)

Many many thanks to all our participants for sharing your work and thoughts and brightening up the tatting skies with these lovely creations! 

Related Posts -

Friday, 7 June 2024

picot me roundup 2

Pin It now!
 Continuing from my previous post showcasing the first batch of zhuzhed butterflies, there are plenty more effects to see here. Antonia Lai's Life is Bliss butterfly derived from Endrucks' pattern #32 with decorative picots for #PicotMeEndrucks April 2024.

11. Katie Verna - tatted her first two on International Tatting Day and found them "cute and fun to tat". Such an honour.
She also tried the CWJ. These two-toned motifs show a reversal of colour.

For her next attempt, Katie says, "This time I added beads to picots and attempted twisted picots with a bead. Those twisted picots were devilish--the twists liked to escape as I tried to make the following double knot! Still, a very fun project! Thank you!"
They came out looking pretty despite being troublesome :-)

12. Lauretta Tondelli - in an attempt to recreate a sketch shared by Stephanie Mc, learned to make the Celtic Knotted Picot and though she did not use it in her model below, she did tat a beautiful little butterfly with it.
Here, bullion knots decorate the chains. Notice her onion ring? That's the way she usually makes them - a continuous chain curling on itself.

13. Lella Loops - two models in needle tatting
In the first (lower) one double picots adorn the wings.
In the second (upper) model she used a cluster of 3 picots and Daniela Ambrosini's "cerchi rigati" or Ribbed Rings - something that was completely new to us! I enjoyed learning this effect with shuttle (links in the Tatting Tutorials page).

14. Maria Renee Contretras de Andretta - sent in 3 models saying "I present you my Monarch butterflies, From Guatemala."
The top one has double picots, while the lower two have adjoining picots in this lovely colourway.

15. Martha Ess - It was such a thrill to see her participating! If you are new to my blog, Martha is the one who uploaded Frau Endrucks' book to the APL and opened up a whole new world to us.
She asked, "Has anyone yet submitted Mrs. Mee's Pearl Stitch, shown here with regular and extra long twisty versions." 
Martha first brought these antique (1862) picots to light here - https://marthas-tatting-blog.blogspot.com/2011/06/amazing-mrs-mee.html

16. Martina Reinhold - also sent in two, the first being from the original itself.
In the 2nd one she used double, triple, and twisted picots. Notice how she has lengthened the pair of picots between rings and also twisted them before joining. 

17. Michelle Forclaz - sent in her lovely 2-colour version
using Josephine Rings/Picots.

18. Muskaan - made just one using
9 types (or variations) of decorative picots. The main objective was to use gathered picots to enhance the shape of the top wings and I was pleased with the effect. In addition, there are twisted picots with JR, twisted double picot, double picots (with variaitons), chain picot, graduated picots, JR, etc.
 
19. Pam Bray - sent in four and kindly shared details. In her own words .....
"First attempt making a “Life is Bliss Butterfly” two colors and beads. Thread size 10 (I think)"
I like the 2 beads on the core thread of the ring topped with long picots that widen at the base because of the beads. Now this is one easy way to make a wide picot without any hassle!
2nd version - "There are four types of picots on this butterfly. It was fun to learn different kinds of picots."
Absolutely love the way her CKP antennae turned out! The other 3 picots include normal free picots, triple picots, and wide picots.
3rd version - "There are four -five types of picots on this butterfly. It was fun to learn different kinds of picots. Designing it is challenging and it is not perfect…"
I can identify loop-over picots, long picots, broomstick picots, crossed picots, and Josephine rings/picots. The antennae are quite cleverly, organically constructed.

4th version with "1. overlapping double picots, 2. Josephine ring downward picot (inside a ring), 3. twisted picot antennas , 4. daisy picots on bottom wings 5. as usual joined picots"
Now that is quite a learning curve, and so gratifying that Pam has added so many new effects to her skill set.

20. Paola Bevilacqua - has a  penchant for creating something new! And she has kindly shared her notes.
Her bookmark version tatted in plain cotton Babylo Sky in continuous tatting, butterflies facing opposite directions alternately. She explains .... "Anyway, after making the first butterfly, I turned the work around and made the second, let’s say upside down, to get the arches in the opposite position, and I went ahead rotating the work at each end of the butterfly."
It would make a nice trim, too.
In the same thread, she decorated the butterfly with small Celtic Knotted Picots alternating with treble stitch picots, and triple picots for the lower wings.

Star Circle - Here's another arrangement of the butterfly motifs in a circle with a perfect pentagon inside! It was a deliberate design decision. Graduated picots and cut picots adorn the inner space without altering the stitch count of the rings, while the periphery is enhanced with treble tatting. In these arches, she did [ch:3ds, 10tds, 3ds]. It makes a beautifully defined outline!
Her 4th version is "A butterfly perched on a poppy" and has inward facing/drop double picot (or more likely a triple picot, though not clearly visible) inside the rings; long picots; adjoining picots; and a Josephine ring on the onion ring body. She tatted the antennae at the end, inserting thread through the joining picot. It is a lock chain with a very long picot, tied back at the base. The picot is cut in the middle.
The inward-facing double/triple picots were made using what Elgiva Nicholls called 'drop' picot. This is what Paola says - "I made the reverse picot ( AA long picot BB, AA small picot BB, ) to close I took the LP with BB."
Basically, --- 2fhs, long picot, 2shs, 2fhs, small picot, 2shs joining the long picot with the 2shs. 

And again our game has thrown up new effects techniques, derivations, ..... These are opportunities to learn something new, dip your toe into designing, practice rarely used techniques, ....
For more such creativity, join me in Part 3 of this roundup, coming soon.
And if you are wondering about numbers, so far 47 models/versions have been shared by 20 members!

..... to be continued

Many many thanks to all our wonderful participants for such inspiring beauties!