Saturday 27 April 2024

taking wing

Pin It now!

Just as I had visualized and hoped for! The wings with gathered picots! Yes, I'm doing the happy dance for sure, soaring on wings of fancy :-D

The Pattern -- 'Life is Bliss' butterfly by Antonia Lai, derived from Endrucks' pattern #32 (or E32). Here is the pattern - https://drive.google.com/file/d/1F_2y-JQn-noKF2AvegujNQIP4IYXRqWZ/view . For all links to Endrucks' docs and patterns - https://docs.google.com/document/d/1w1TZBg-HIzseGEUoJ-rko7tNbtSgZY5A18Oy2Y9Hh0Y/view


The Game -- This is my entry for the #PicotMeEndrucks April 2024 game in the Endrucks 1920 Project FB group. I had this in mind ever since I was preparing the presentation, etc., yet could not get around to tatting it for various reasons. One morning probably a week back, I actually woke up reaching out for the butterfly I had finished tatting (in my dream literally, but it was oh so vivid!!!). Yesterday I finally took hold of myself and belted it out for real.

The Thread Colour -- Deliberately chose a bold but lighter shade. Variegated or dark hues would probably mask the picots or appear too busy. Worked in Anchor size 20 (equi to Lizbeth 10) mercerised cotton. The lower ones are my butterflies for the #PickMeEndrucks game last Feb (https://tipsaroundthehome.blogspot.com/2023/02/indisciplined.html) These two models were a great help in deciding placement and size of picots.

The Decorative Picots -- gathered picots; double picots and some variations; twisted picots (floating) with Josephine ring/picot at the tip; twisted double picot; chain picot; graduated picots. Phew! 

I had roughly sketched my idea of where I wanted which picot. Once shuttles were picked up, some of these were changed.

I have labelled the various picots in this pic. Easier to show than explain. All picots used a 1/2 inch picot gauge, though the long picot was made with the gauge held horizontally. The graduated picots were eye-balled.

You can find a whole visual list of decorative picots here - https://drive.google.com/file/d/1D6l4gQWeGu1Se1ZXAhP2vWLQMd4lfzMJ/view

It wasn't all smooth sailing especially since it was to be both a first trial and the final. I often had to retro-tat, including opening up closed rings. But so worth it!

The Sequence -- I started with the inner onion ring, going clockwise. The entire body and right wing were tatted continuously. However, for bilateral symmetry of the gathered picots on the left wing, I had to join the threads at the base of the onion ring and tat the wing from the back. This also meant joining the picots from the back. It took me three trials to get it right. 

The Tweaks -- The only addition I made was to add a shadow chain with graduated picots along the outer sides of the top rings. I think this provided the motif with balance and body. I didn't use a CWJ for the onion ring, opting for a lock join so that the chain picot could be made properly. For the double picots I divided the 6ds of ring to 4 picot 2. One inadvertent mistake was 2 stitches instead of 3 between the joining picots of side rings. 

The Finish -- I needed to dampen, shape, and let the motif rest to tidy up all elements. However it could've done with some better blocking but I was too excited to see 'finished' and photographed ;-P. 

🦋🦋🦋Now that the metamorphosis is done, let me enjoy my flight to the skies 🦋🦋🦋

Related Posts
https://tipsaroundthehome.blogspot.com/2024/03/happy-itd-2024.html
https://lelia-stitchesoflife.blogspot.com/2024/04/picot-me-endrucks-april-2024.html
https://tipsaroundthehome.blogspot.com/2024/04/no-excuse-to.html

Thursday 25 April 2024

ETs alit

Pin It now!

 Jan to March we refrained from organising any game of the month in our FB group. Both Ninetta and I needed a long break to attend to other tasks. Quite a bit of work is involved in holding a game which is not always visible. 

Instead we asked members to display their Endrucksian Tatting (ET) by taking a collective pic(s) of all their Endrucks' works done thus far. The collage they sent would be showcased as the group cover for a few days. 

We started with Ninetta's exquisite collage, but the images below are not in sequence. Several members have already gifted away most of their models.

Ninetta Caruso has now tatted samplers from all 44 of Endrucks' original patterns, besides so many derivatives!!! She tacked on the 44 samplers to an accordion book which was part of an exhibition of their association. You can read about it in her blog, and do take a few seconds to see the booklet in this video --- https://drive.google.com/file/d/1X-11fHJliaA1WWBigcK51oJMGRv6Xjag/view
And her post - https://ninettacaruso.blogspot.com/2024/04/and-offline-life.html

Lella Loops shared her lovely needle-tatted models most from past games.

Michelle Forclaz sent in her works which include so many patterns she tweaked and played with.

Margaret Davies has been participating and tweaking and designing derivative patterns, too. This is her first collage.
 
Margaret Davies graciously sent in her second collage as well.

Debra F Cox took time out to gather whatever models she had left. She used a couple to decorate the book cover, too.
Muskaan This is my first collage which I detailed here - https://tipsaroundthehome.blogspot.com/2024/02/endrucksian-links.html


Muskaan This is my 2nd collage which shows many of the doilies and snowflakes. Multiples are the result of either the design process or of tweaking for presenting the original pattern.

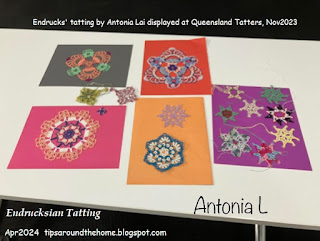
Antonia Lai had displayed some of her lovely ET at Queensland Tatters in Nov 2023. We used her pic as our cover for the 2nd anniversary of our FB group, hence not repeated this year. She has tatted many more, including new derivatives. In fact it is her Life is Bliss butterfly from E32, that we are using in our game this month.

We thank all our lovely members who took the time to send us a pic. This is merely a sliver of a slice of the Endrucksian pie which has grown in the past few years! 


Meanwhile, I have stopped receiving notifications when I leave a comment on other blogs. Kind of crazy why some glitch or other keeps plaguing Blogger. Fortunately, one just has to wait it out.

Friday 19 April 2024

bracelet query

Pin It now!

Early this month I was approached by a lady, Beata S, to help with a bracelet pattern. She showed me a pic and I immediately thought of a single shuttle pattern. However, the rings were so clearly overlapping, that it created some confusion and I veered towards interlaced split rings. That I was seeing the image on a small screen didn't help either. I can't show that pic for obvious reasons,

I asked my PIC Ninetta for confirmation and she quickly came back with a couple of WIP pics and it was such a relief. 

This bracelet is almost as basic as they come, quick to tat up, and a great way to embellish or use as a lanyard, jewellery piece, etc. It has dimension, texture, and strength. 
The following pics are a very quick stepwise pictorial using thick thread and large pearl beads. The size of ring will depend on the size of the bead - let the ring be just a tad larger.

1. String beads onto to shuttle thread and tat a ring.
Slip the bead towards the ring just tatted.
    Each ring is 12 ds ; 4mm pearl beads ; size 3 thread.
 
2. Leaving just enough bare thread to span the distance between previous ring and bead, tat the next ring.

3. Pass a crochet hook through the top of the previous ring and pull up the new ring through it,  centering the bead in the previous ring.
4. Continue these steps for the desired length.
Many variations are possible, obviously, including more than one bead in the center, seed beads around the ring, etc. 
Check out Ninetta's numerous Russian-inspired versions here - https://ninettacaruso.blogspot.com/2019/08/russian-inspired-bracelets.html

5. This is how it looks from the back. Notice the bare thread between rings. It can be avoided by using seed beads to cover the bare thread, thus making the braid reversible with kind of a dual look.

I really wish I could have made a better version - intended but not executed. Perhaps in future. At present I am working in fits and starts.

As soon as I was satisfied, I typed out instructions to Beata, and told her I would send the pics in a bit. I had barely uploaded the pics when I received her beautiful version! She was not only quick, but so neat! 

It is always satisfying to answer a query and be of help. And we learn in the process, too. I have often had to delve deeper into a technique to answer a question, thus improving my own understanding. 

UPDATE: (19th April 2024) Beata Saifer just sent me this new image of her bracelet and graciously permitted me to share it here ---
Thank you, Beata! It's been nice corresponding and chatting with you!

Tuesday 16 April 2024

gaming bookmark

Pin It now!

 An insertion as a bookmark is my entry for the two 2024 games I am playing.

Main body is from 'Tatting Techniques' by Elgiva Nicholls (p27, 1976) and the charm is from Rebecca Jones (fig123, 1985).

I have too many variegated Lizbeth, mostly with shades of pink/magenta. Difficult to always use for fear of eclipsing the pattern. But I took the leap and it came out okay I think. Lizbeth size 20. 

Learning from my past experience, where my chains are usually tighter/shorter than vintage patterns, I increased the chain stitches beforehand and it worked out well.

Pearl Tatting tail for the bookmark using Anchor perle cotton size 8. I didn't use any picot gauge since my main aim was to enjoy uninhibited tatting on International Tatting Day, 2024.
In order to avoid sewing in ends, I ended with two heavily picoted folded rings, hiding the other colour within each.
Pearl tatting is one of the blocks in Natalie Rogers' PICOT Bingo game which you can join here - https://www.patreon.com/posts/picot-bingo-95729145?  This is my fifth submission so far. Need to speed it up a notch!

The tail was attached to the #123 medallion from Rebecca Jones , shared here - https://tipsaroundthehome.blogspot.com/2024/03/happy-itd-2024.html

Turning an insertion into a bookmark is nothing new or unique. Bookmarks, being short, are a good way to enjoy a pattern with a different use. 
The large rings are linked through a common picot. I think the colours are doing fine together.


And the bookmark is also my entry to splocik's Small Decorations game that was first announced here - https://splocik2.blogspot.com/2024/01/mae-dekoracje-galeria-grudniowa.html
She shared the March entries here - https://splocik2.blogspot.com/2024/04/mae-dekoracje-2024-galeria-marcowa.html

Many thanks to all mentioned here for lovely patterns and fun games!

Friday 12 April 2024

no excuse to

Pin It now!

 no excuse to not decorate!!! Check out the diversity of decorative or ornamental picots in tatting! 

This collage is a small glimpse into way more picot types than we would ever use, or use sparingly. Yet it is a pity they get glossed over. Now we have no excuse to skip them, when visual models are laid out in this pdf titled DECORATIVE  PICOTS  IN  TATTING https://drive.google.com/file/d/1D6l4gQWeGu1Se1ZXAhP2vWLQMd4lfzMJ/view
It can act as a quick reference to make our choices.

Backstory - It started with Net Best's upcoming book ' Six T's of Shuttle Tatting' that I am editing. She had listed the names of several picots/elements in her glossary without any pics. It was understandable because the book was meant for beginner/intermediate level tatters. And since it was going to be a physical book, there were limits on the number of pages. 

Now we have decided that only a few copies will be hard copies for private circulation. Sales will be in the form of a digital book. (It was an option she had veered towards before her death.) Phew, that takes away the page pressure. We also decided to shift the elements to a separate chapter to showcase their variety. To that end, I have been tatting up these samplers.

Meanwhile we started the #PicotMeEndrucks game this month in our FB group. [You can read the details with links here - https://lelia-stitchesoflife.blogspot.com/2024/04/picot-me-endrucks-april-2024.html  Carol, thanks so much for the shoutout!]. We felt that perhaps a visual reference would spur more interest and effort, although we already have some spectacular entries. Hence I focused all my energies on tatting all the picots I had on my list in order to share with our members in time. Obviously I haven't had time to tat my own butterfly version yet, LOL. 

In the pdf there are no details about each picot. They are arranged alphabetically despite the fact that there are underlying similarities and several can be grouped together. Well, I need to keep something for the book, right?!

If you know of any picot that can be added, please do let me know. Or any input is welcome.
Meanwhile, I hope you join in if you can and choose your picot to style your butterfly! Send me your version if you are not on FB. 

Friday 5 April 2024

snapshots

Pin It now!

 Today felt good and I was energized enough to take photos of some of our plants. Some are recent, others have stayed with us for a couple years. Hubby has added so many pots and plants that our balcony is flourishing with flora after a long bleak winter. He has placed the smaller pots on two adjoining larger pots for a tiered effect!

 
Hubby bought 5 Portulaca plants in red to plant in a specially bought flattish pot. There appear to be two varieties; the others haven't bloomed yet. He had asked for the 10 o'clock ones, but I believe they could be a mix of 9 and 10 o'clock.
 
We had one such way back and the dense pink/magenta flowers were a pleasure to see blooming every morning! At times we got 40 flowers in that one little pot! And I made several other pots with their high prolification.  Hoping to see the same with these.
The little flowers in the Mayurpankhi (peacock plume) plant are more visible in this pic than with the naked eye, LOL.

 
Syngonium golden or the green Arrowhead is on the left, and it has been thriving and giving off new leaves throughout winter.
The Snake plant has also endured very nicely, Though not clearly discernible, the two original plants grew in height (and foliage) and are at the back (with the two brownish stems). At least four new plants came up at the base of the original during winters - the shorter ones in front.
 
After a long wait, finally the money plant also has new leaves on its branches.
And the curry leaf plant, after wilting in winter, has sprouted new twigs after I pruned it recently.

 
This is just a tiny snippet of the Jade plant! It has branched out so much that I couldn't capture it in one shot. The jade has turned out to be slow starter but sped, once it became stable! At the start of winter I had pruned and placed several twigs in water in our bathroom which gets very good sunlight. Three of them took root and are still alive. 
Then there's one of the ajwain pot. Don't know why it came out so pale in the pic.

Here's the other pot showing part of the ajwain plant. 
It's time to do a bit of pruning to allow both pots to fill up.

In the morning, these portulaca petals looked much more defined and curved. By the time I decided to take pics after a couple of hours, the petals had curved under exposing more of the center. Hoping to have lots of opportunities to take more pics.

Oh, and Finally hubby caved in and bought vermicompost. I used to swear by this when I was the gardener in our balcony. In the new version, hubby kept buying a spray-on liquid fertiliser. He can see the difference the compost has made and is converted, LOL!