Showing posts with label braid. Show all posts

Friday, 19 April 2024

bracelet query

Pin It now!

Early this month I was approached by a lady, Beata S, to help with a bracelet pattern. She showed me a pic and I immediately thought of a single shuttle pattern. However, the rings were so clearly overlapping, that it created some confusion and I veered towards interlaced split rings. That I was seeing the image on a small screen didn't help either. I can't show that pic for obvious reasons,

I asked my PIC Ninetta for confirmation and she quickly came back with a couple of WIP pics and it was such a relief. 

This bracelet is almost as basic as they come, quick to tat up, and a great way to embellish or use as a lanyard, jewellery piece, etc. It has dimension, texture, and strength. 
The following pics are a very quick stepwise pictorial using thick thread and large pearl beads. The size of ring will depend on the size of the bead - let the ring be just a tad larger.

1. String beads onto to shuttle thread and tat a ring.
Slip the bead towards the ring just tatted.
    Each ring is 12 ds ; 4mm pearl beads ; size 3 thread.
 
2. Leaving just enough bare thread to span the distance between previous ring and bead, tat the next ring.

3. Pass a crochet hook through the top of the previous ring and pull up the new ring through it,  centering the bead in the previous ring.
4. Continue these steps for the desired length.
Many variations are possible, obviously, including more than one bead in the center, seed beads around the ring, etc. 
Check out Ninetta's numerous Russian-inspired versions here - https://ninettacaruso.blogspot.com/2019/08/russian-inspired-bracelets.html

5. This is how it looks from the back. Notice the bare thread between rings. It can be avoided by using seed beads to cover the bare thread, thus making the braid reversible with kind of a dual look.

I really wish I could have made a better version - intended but not executed. Perhaps in future. At present I am working in fits and starts.

As soon as I was satisfied, I typed out instructions to Beata, and told her I would send the pics in a bit. I had barely uploaded the pics when I received her beautiful version! She was not only quick, but so neat! 

It is always satisfying to answer a query and be of help. And we learn in the process, too. I have often had to delve deeper into a technique to answer a question, thus improving my own understanding. 

UPDATE: (19th April 2024) Beata Saifer just sent me this new image of her bracelet and graciously permitted me to share it here ---
Thank you, Beata! It's been nice corresponding and chatting with you!

UPDATE (May 2024): Corina Meyfeldt used a different method (Collar Rings) to achieve the same result. https://cmhandmade.blogspot.com/2014/07/hello-jaden.html

UPDATE (July 2024): Mad Jar Tatting had uploaded a video demonstrating how to tat this braid. While the outcome is the same, she tats a line of alternating rings and beads to desired length. Then she starts weaving the rings. https://www.youtube.com/watch?v=rIrGNrkWHJE - Ring with Beads in size 20

Wednesday, 2 September 2020

influential intrusion

Pin It now!
It all started when Grace Tan saw the intruding picot and brought out her long-stalled pattern. She thought it could be used in her serpentine pattern and simplify the working instructions. And I was one of the first few she roped in to test tat Endless Hearts Braid with Corner.
Grace adapted her heart patterns into an undulating length of lace - a clever symmetry - and a larger heart for the corners. The frequent directional changes take a bit of getting used to, but soon one can set a rhythm. It still needs some concentration, especially if one resorts to fs/bs tatting as I did, in two colours, trying to keep the blips at the back. I had to draw my own diagram for reference initially.
 
Inward facing  picots - She substituted the Intruding Picot (ip) with Ninetta's Face Inward Picot (FIP), although the ip worked for me (above pics) in the 3rd and 4th corners. FIP was my first time and it was not easy to tease out the leg in perle cotton. I followed instructions for the braid, using FIP in first 2 corners.
Encapsulating Picot Join (EPJ) - I got to try out this new blipless join that can link several elements together at a later time. As the term suggests, it is a picot join that encapsulates or traps another element or picot. More elements can be linked to the same point later as well.
Sometimes I got the EPJ looking almost invisible from the front, at other times a thread bulge was visible. I played with many tweaks, such as up and down loops, etc, but need more study in thicker thread to figure out how best to avoid that thread to make it consistently indistinguishable.
Layered Picot Join - My 'easier' alternate to EPJ -
1. Make a longer picot on the ring such that it can span the chain(s) that it intends to encapsulate.

 
2. Keep this picot at back of work and make a normal picot join through Both picots simultaneously. 
3. This is how it looks from the back. 
Note - these pics were taken when I was working backside. 

 
4. This is how it appears from the front - the join is invisible here.
5. This is how the hook will be inserted through both picots when working frontside.
And a 4th element can be joined to that same picot through the back. I love how clean the chains look - the join is invisible.
Drawback - the rings tend to lie slightly below the chains, but with sufficiently long picot, it can be avoided. Mainly, there is a colour bar at the back (clearly visible in #3).
Turn Chain (tc) - Of course there are several other ways to work this, as outlined in Grace's post. Overall, I limited myself to very few tweaks and substitutions, trying to largely stay true to the pattern. I have used many ways to turn a chain, but stayed with her version of turn chain which was to simply rotate the stitches in such a way as to reposition them, like this Twist Work (TwW).
There are also several applications to this versatile pattern! -
Add a drop crystal and beads for a beautiful V-shaped necklace or collar; or a square collar to sew on!
Without the corners, it is easily a braid, bracelet, bookmark, ring, choker, etc. 

In Anchor Pearl cotton size 8, the braid is 1" broad ; 2 hearts = 1.5" long. The entire frame is 3" on the inner edge and just over 5" at the outer edge.
All in all, a good learning experience with tons of ways to work it.

Romancing With Life - an autobiography by Dev Anand -
This all-hearts pattern seemed a fitting frame for this true karma yogi's life, work, and joie de vivre perspective. Ageless, who died at 88 with his boots on and with more energy and curiosity than his juniors by generations.

Dev Anand needs no introduction to Hindi film buffs and Indians in general (isn't that top left pic just great?! - the 3 great contemporary heroes). But my international friends, can you identify who he is with in the top right pic?! This hardbound book is a feel-good read for the most part, dwelling mostly on his various loves - be it nature, mountains, films/film-making, women, beauty, etc. There are more areas and depth one would have liked to read about, but it is understandable how the entire focus was on romancing.


Tuesday, 26 May 2020

not for the faint-hearted

Pin It now!

It’s been years since I first posted the technique for interlaced split rings, and despite being among the all-time visited posts, I did not get around to creating any patterns. So when Lilas asked for a pattern, it got me thinking.

I started with one of my sketches and, gulp, I couldn’t get the looping right despite going through my own pictorials! A bit of perseverance, and now I’m happy with my rhythm.

I’ll be posting my trials, experiments, tips, and samplers. I have no intention of creating complete projects at this stage. But for those interested, I will share the count and instructions and you can play and adapt as you wish.

This is the very first of the present attempts. 4 shuttles.
Large rings are 10/10, alternating with small 5/5 rings. I tried both movements for practice.
Worked in Anchor size 20. I think the small rings should be 6/6 to avoid this cramped look. And the large rings can then be made 12/12.

Tried with 6 shuttles.
All rings are basically 12/12 – and the ones along the edge have a long picot for beads.
Here, I deliberately experimented with
back/front, front back movements on each row, alternating with front/back, back/front movements on next row. Look carefully and you can see the over/under and under/over effects.

I wanted a broad bracelet, hence the long picots on both sides, to be joined to interlaced braids. This is how far I have reached on the first side, and will snip it off... it is too broad! I have an idea on how to finish the bracelet, though.

This is just the start …. Lots of ideas and I welcome more - please share your thoughts :-)


Sunday, 14 October 2018

a slave to urges

Pin It now!
I’ve been pretty lethargic these last few days – picking up the shuttle and/or Cluny loom for short durations only. Reading, watching tennis, and now housecleaning (Not my favourite urge, mind you) seem to occupy my time more than my passionate urge to tat. Oh, and I fought my urge, staying completely off the grid for a couple of days - detox, perhaps?

But I couldn’t resist the urge to tat this latest from kukkatatting! It’s her 94th scmr medallion and I love the picot flowers all around giving the snowflake a flurry look. Except for the ones on the tips, the picot flowers are linked to each other, and I missed out one attachment. 
Worked in size 40 thread, it measures over 7cms across. I hope she does not mind me copying her pattern. In case of any complaint, I will delete this post with due apologies.
ÕÖ×ÖÕ
After a few days of musing, here’s how far the Scrappy doily has come. I absolutely Loved all the advice I got (thank you once again, gracious tatters/crafters), and it has guided me in this round so far.
I started by sketching an outline of the 4th round (which you may remember was ovoid), and then sketched a couple more lines around it to balance out the asymmetry. 
Also, I increased the size and number of rings at the starting end to overcome that missing ¼th inch. I haven’t needed to add too many additional rings along the side, though. Let’s see how it turns out. I’m enjoying the figuring out process, without applying high-end mathematical calculations ;-P

ÕÖ×ÖÕ
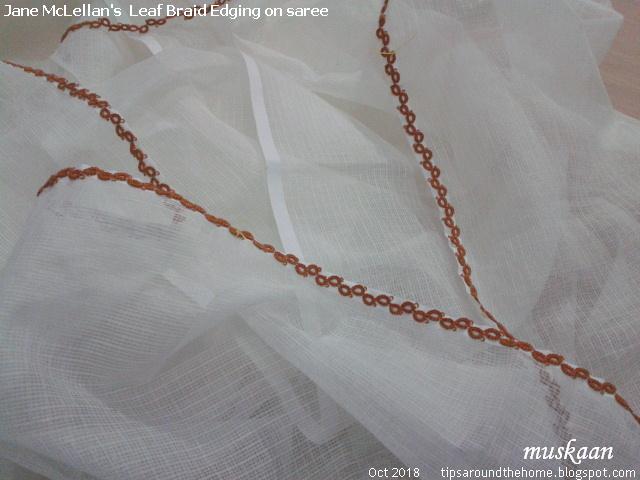
And a couple of weeks back I did finish sewing in Jane McLellan's leaf braid edging on to my MIL's saree. I didn't want to end up with all the sewing in one go (blossoms motifs and edging together). This is actually a pic taken much earlier.
ÕÖ×ÖÕ
Meanwhile, I Have finally made the Cluny Butterfly and will share it once I finish writing the pattern. Lots of trials and friendly feedback, but may still need to be test-tatted, so get your shuttles and scrap threads and Time ready for a request :-D

Saturday, 15 September 2018

among friends

Pin It now!
A short thank you post to my creative and generous tatting friends for sharing such lovelies !

This is my version of Jane McLellan’s Leaf Braid with Flowers. 

I’ve been tatting the leaf braid for quite a few weeks now (for hanky, then saree, and now this), but haven’t tired of it yet! And of course this one with buds and blossoms was even more fun. I intend to use this short length on a future card. Worked in Anchor size 20.
Jane also has pics on how to work the split/SCMR! 
Again, this braid can be worked with 2 shuttles using a ball instead of 3rd shuttle for the top half of split/scmr).

Next is Ninetta Caruso’s Swirling Butterfly 
This is my one shuttle free flying adaptation. 

When winding the shuttle, leave a short length of thread (CTM) to act as core thread for the final chain. All the rest is worked as simple rings (one with treble tatting) starting with the head and moving clockwise. The body is a tds chain worked last.
So now we have 3 versions where the original 2 & 3 shuttle versions have the butterfly on a twig. Ninetta has great stepwise pics which made it easy to 'reverse' sketch and tat with one shuttle.

Now this butterfly is a 9 month old trial that popped out of my Cluny tatting box! It caught my attention because of it's positional similarity to Ninetta’s butterfly. I was trying to create a butterfly with the intention of later converting the 2 wing rings into Cluny leaves. I need to do a lot more work on it before it can work out properly. But design suggestions are most welcome.

That’s it for now. When I complete the tat-along, I will share another way to do the 2nd part of the tds – one all experienced tatters have done or seen - as a twisted picot !!! So don’t fly too far - keep close to the blossoms :-D

Friday, 14 September 2018

Cluny basic colour variation

Pin It now!
Colour Cluny Tatting contd.

In the previous post the tally was worked in a single colour. But what if we wish to use 2 colours in a pattern? There are a few examples out there, but I find that the tallies are of the same colour in all. In a couple of examples, SLT was used to switch colours for the next element. What if we could switch the colours easily within the tally, with no need for a SLT? It’s what I tried in this braid and motif.

Confession: My Cluny leaves are far from perfect. Please do not let my limitations dissuade you from trying it out yourself. I’m sure you will do a much better job than I.

What we have here is a kind of transition between the basic single colour tally (where both loom & weaving threads are of same colour) and the multicoloured tallies where 2 or more colours can be seen in the leaf itself. As in the basic Cluny, we are still using only 2 threads, albeit in different colours. And this entails an additional step to hide colour blip.

UPDATE : practice pattern for basic colour variation : 2-Tone Cluny Bracelet.


Cluny Tatting –Basic Colour Variation
Basic (2 threads) Cluny tatting in 2 colours
(where Warp/loom thread is of different colour)
Resultant tally is single coloured

The following will be covered here :
  • Weaving a different coloured tally (2 ways – A & B)
  • Exiting in a way that the desired colours/shuttles are in position for next element (A4 & B2).
  • Hiding a colour blip (A6 &B3)
 
A1. As seen, the loom/Warp threads are mustard, while the weaving thread is green.
A2. We start weaving by bringing the shuttle to the right – Under Warp2 & Over Warp3

 
A3. First pass made to the left – Under, Over, Under. To complete the 1 wrap/weave, bring shuttle back to right – Over, Under, Over. (not shown here)
A4. The tally is woven and shaped. Shuttle is back to the starting position - on the right.

 A5. Start closing loom by pulling the top loop off the loom.

A6. If we close normally, the Warp colour will show at the tip. 
In order to minimize it, I introduced an extra step : 
Pass shuttle back-to-front through the top loop …
NOTE : In certain cases, it may become necessary to pass shuttle front-to-back.

 
A7. … the shuttle is through and we can start closing the top loop
A8. Top loop is closed. Now close the bottom loop.
 
A9. All loops closed and tally is complete. 
Notice I haven’t pulled the lower loop tight enough, leaving a colour blip at the bottom (I still need lots of practice). This would be unnoticeable in a single colour basic tally, but when working with more than one colour, it can pose a problem.
If we follow this weaving pattern, there is a tendency for the weaving thread to emerge on the right, and the loom shuttle on the left.

A10. If we want to change colour placement in the next element, we would normally resort to the SLT/overhand tie as I did in this case. But, the following pictures show how we can avoid the SLT.

I took this opportunity to also show the other way to weave (Ninetta pointed it out in her comment). No right or wrong, it’s just how one prefers to work, as long as one is consistent. 
B1. After the SLT, the shuttles got switched and loom is made with green, 
and weaving is done with mustard.
Here, the weaving commences from left to right by going Over Warp2, Under Warp3.
 Move to left is Over, Under, Over (not shown) Continue weaving.

 B2. Tally is woven and shaped. The shuttle is on the left, and it is time to close.

 B3. To avoid colour blip, pass shuttle, back-to-front, through top loop….

 B4. … shuttle is through. Now close all loops.

 B5. This closure brings the weaving shuttle to the left and loom shuttle to the right.

So basically, 
the last pass determines whether the weaving shuttle will emerge on the right or the left.
If the last pass is to the right (as in A4), weaving shuttle will emerge on the right 
and loom shuttle on the left.
If last pass is to the left (as in B2), weaving shuttle will emerge on the left 
and loom shuttle on the right.

Where you park your shuttle, is where you will pick it up from – the left curb or the right curb. And in case you want it on the other side, then take a U-turn, i.e., weave one extra pass and you land on the curb of your choice!
Couldn’t resist a bit of frivolity ;-P 

It is what I followed in the Cluny Flower Motif pattern by Jennifer Williams. No SLTs. I chose to make the short chain between tallies in maroon, but could just as easily have made them in pink by choosing where to leave the weaving on the last pass.
In Anchor size 20 : Rnd1 - 1¼” ; Rnd2 - >2"
One can see my tallies get a wee bit better as I go along. One of the pink tallies is actually shorter than the others. I keep losing track of the count when weaving ;-(
Further, I didn’t RW to join to the center ring, opting for a lock join instead. This meant I could tat the entire Cluny round clockwise from the front.


We’ve taken the first steps towards colour Cluny tatting. From the next post on, we start with the tallies that have more than one colour in their weave! I found that a bit more exciting (my tallies came out better, too), though one does need to manage the extra threads. Hope you stay tuned...


I’d like to thank Jane McLellan with all my heart.
Appreciate her indulgence and help as we tried to figure out a suitable name 
for this transitional basic to multi-colour Cluny tatting.

…to be continued