Saturday 28 November 2020

no cash only credit Freebies

Pin It now!

 Credit to the designer that is ;-P Otherwise all is absolutely free if you kindly refrain from including the cost of your threads, beads, tools, time, and effort :-D

'Tis is the season, and though a bit late notifying, here is the up to date G-docs file of my Snowflake as well as Holiday patterns. Some are adaptations from other designs but most are my original.

All my Snowflake, Stars, etc. patterns. I included hexagonal motifs and medallions as well, though technically not snowflakes https://docs.google.com/document/d/1r4OmXX_c5LjFebMN2UbSNiYqXYETLmoridK0X1YIQco/view

And these contain some more Holiday motifs in the shape of wreaths, trees, crosses, bells, and so on -https://docs.google.com/document/d/1Q-of3aKPFKlqMnXuEyhupbGHIW18OjH2yZYzlaTJHnQ/view

Of course there are motifs for other holidays and festivals as well, and they are all jumbled up. But at least it is all in there for now. 

All in one place, easy for me to update, easy for you to access. I always put the date of my last update on top right of 1st page. Hope you find something you like and enjoy tatting it, tweaking it, and most of all Sharing it! Show me pics :-)))

Oh, and do please visit the respective blog post before starting any pattern. There are usually many more pics in there and possibly some tips and updates, and often splendid ideas in the comments!


Tuesday 24 November 2020

spinoff fun

Pin It now!

In Jan this this I tatted 2 more spinoffs from Folded Fun square and star. 2 six-pointed versions. I'll try to add a pattern when I get around to it, but don't hold your breath! Because as I peeked into my diary where the 25 Snowflake projects were documented, I cannot find the new ones, sigh!

This is the snowflake version, not much different from the 5-pointed star. The main difference is additional stitches in the inner rings so that we now have 6 instead of 5.

This is the Stupa version - the folded rings on the outside reminded me of the 3rd century BCE Sanchi Stupa - a world famous UNESCO world heritage site - part of Buddhist holy pilgrimage.

Here they are all together (one of the stars is a prototype), positioned as a cross. I loved tatting the two 6-point versions, even during my slump phase and the colours cheered me up.

Worked in Anchor Pearl Cotton, size 8.

I have a lot of rummaging to do! Be it patterns or actual lace. I barely complete a project than jump on to another and keep forgetting along the way. Which is why I will be uploading pics of several of my designed lace, even if sharing the pattern may come much later.

Saturday 21 November 2020

D to C cup

Pin It now!

 Apologies, but couldn't resist ;-P Trying to lighten my dark mood. 

Round 4 of #37 from Endrucks pattern is giving me quite a heartburn to the extent that I might even consider bra-burning ;-D 

This was my first attempt and I didn't bother completing the round.

I have a reminder for cupping v/s ruffling here - https://tipsaroundthehome.blogspot.com/p/jottings.html ... in case of cupping, decrease inner round or increase outer round.

Since my center motif is as tight and small as can be, with small picots to boot, I worked on increasing this new round. Instead of 7ds chain segments, I made each 8ds. The result was not much different!

But before snipping, I stretched the round. It was really gratifying to pull it and pull and pull ;-D Yeah, cruel! And look, here's what happened -

Doesn't look too bad, huh?

But here's a closer view. All that stretching still couldn't hide the irregularity.

The rings along the periphery are in 2 sizes - 8ds and 6ds alternately. 

So, dear tatters, how should I solve this? I'd like to keep the overall shape intact. Subsequent rounds are mostly chains and the few rings do not really impinge. Here's the original model -
Love to hear from you. Thanks in advance for your help and advice.

Meanwhile, only 3 patterns are left to claim and more patterns have been completed and uploaded to the project doc here - https://docs.google.com/document/d/17LEVftXweztBIOWh4sL4BB7bX65ssoOsOn4oXIgCepY/view Ninetta has suggested we could have these patterns test-tatted. We welcome you to join in when you can and play with the patterns to generate more ideas. 

Friday 20 November 2020

my first roses

Pin It now!

 A comment in the previous post served as a reminder of my very first roses! I had designed these several months back for the Lock Join Plus series. The next in line was to be the Dora Young Join (DYJ).

That presentation needs a few finishing touches, but I keep getting caught in something or other ;-P So, detailed pictorial for later, hope you like these rose motifs for now - good for gluing to cards!

All you need is only one shuttle and leftover thread. String seed beads for a beaded version.

This beaded version was made second. Beads not merely decorated the rose and added texture, but also serve to estimate (and communicate) the length in the absence of stitches!

This is the first, made with variegated size 3 thread. Start with a central ring, then each subsequent round grows larger, spiraling around, joining to previous bare thread space. Why not a Lock Join, you ask? Because it is not very stable - it tends to twist the thread.

I've done this before, moving from the out to in and substituting the lock join with a DYJ - https://tipsaroundthehome.blogspot.com/2019/03/dyj-instead-of-lj.html 

But more about the DYJ when I continue the series and post the tutorial. For now, I'd love for you to share your impression and feelings about this rose.

Since the rounds move spirally, one can easily replace the bare thread with actual stitches. A project for future.

Tuesday 17 November 2020

arranging motifs

Pin It now!
Oh what fun!!! Working pattern #37 from Endrucks' 1920 book. The beautiful motif in the center of that doily really caught my attention and I went to town with it. Not merely for it's beauty, but for it's clever construction! I will speak of the construction in another post, sharing only the numerous arrangement ideas here.

Presenting the Square Diamond Motif in possible arrangements

The yellow motif below is in Anchor 20 while the other 2 are in Anchor Pearl size 8. Hence the difference in dimensions. and I think the orange one may have been tatted too tightly. All motifs also served as trials and experiments. 

 
arrangements #1 & #2 : Simple linear joining of motifs - vertically or horizontally. Keep going, adding more columns and rows for a larger lace fabric.

 
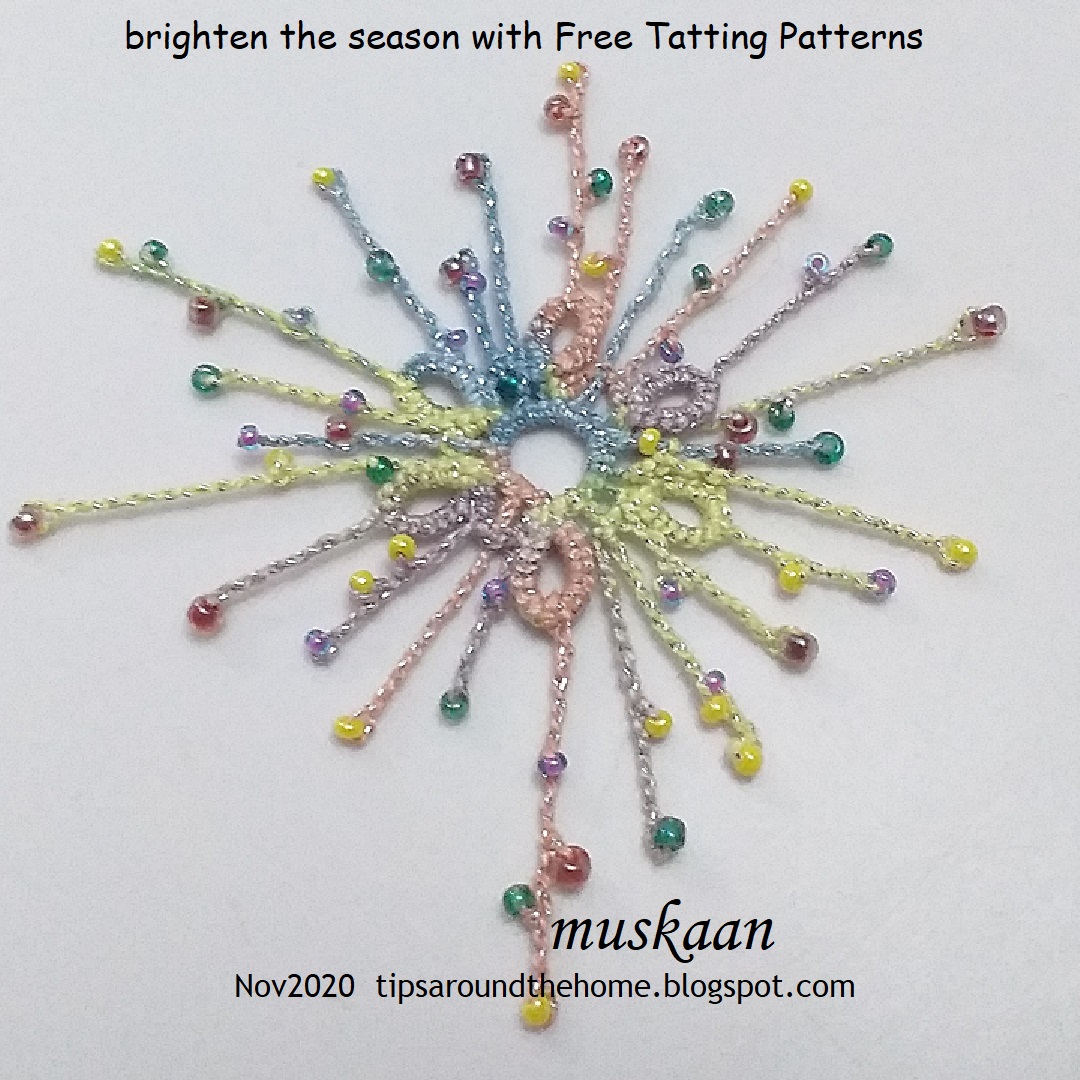
arrangements #3 & #4: Attached tip to tip, in different sized threads and decorated with beads, could make a beautiful mobile or window ornament.
I like the triangular placement!
arrangements #5 : But this is an arrangement I think is new in tatting, as far as I know? Tip to center joining. 
I noticed that one can add a 2nd row using only 2 motifs in a triangular arrangement, and then the 3rd row with this offset joining. And so on, alternating rows/columns with one motif less. It creates a very interesting rectangular fabric with negative triangles.

 
Square Diamond Motif Bookmark : I made a 4th motif in size 8, inserted a satin ribbon at the tip for tassel and a cute bookmark took shape.

Square Diamond Motif Bracelet : Here a white satin ribbon is laid below the linked motifs, and crystals added in center and on ribbon.

Here I hadn't yet placed the crystals in the center. 
I used Reverse Join to change colour placement in the outer rounds in each motif. And the last 2 rounds are worked a bit differently in each motif, although not immediately visible since the rings are small.

So here's a little exercise if you are interested (this post was intended to showcase it, but I couldn't get the presentation completed and I like opening it up ...) :
Disregard the colours. Consider the last 2 rounds and specifically the 5 small rings and 1 thrown ring in each arm.  Can you identify possible pathways/sequence to work these rings and chains? How many ways can you trace?


Meanwhile, finished projects and samples are trickling in from participants around the world. Ninetta and I are engaged in finalising presentation, guiding, interacting, and so on. Lots of activity! And only about 5 patterns left unclaimed so far! Tatters have returned for more patterns after doing one - they have discovered the magic and cleverness of Eleonore Endrucks!!!
Do take a few minutes to check the samples and the final patterns in modern format in the Endrucks 1920 Project doc here https://docs.google.com/document/d/17LEVftXweztBIOWh4sL4BB7bX65ssoOsOn4oXIgCepY/view
The document also contains links to the 1920 book (with tatted models) and another book with diagrams and pattern - both can be downloaded either from there or from Georgia's archived books.


I am so thankful to Martha Ess for scanning and uploading the book, to Georgia Seitz for introducing me to it, and to Ninetta Caruso for joining And more importantly for converting it into a Community Project ! And of course, how can we forget the volunteers and their lovely creations?!

Saturday 14 November 2020

charmed, I'm sure?

Pin It now!

a very happy Diwali! ek diya jawanon ke naam

Charmed Cross pendant / earrings

While rummaging for my old notes, I came across a loose sheet with the sketch of the Charmed Cross pendant. It is certainly stylized, but I wasn't sure if it came across as a cross. I thank all my facebook friends who responded enthusiastically - clear majority wanted status quo! Since time is at a premium, I have decided to postpone any experimentation but invite you to play and experiment as you wish.

Here is the journey so far - 


'Charmed' because one can fill in the large empty center with Any charm, cross, gem, or teardrop of course.
I used Floating Beads method for the teardrops. But I know most will prefer to use their own methods ;-D

One can repeat the top motif on the side arms and lengthen the base to make a more defined cross.
As a couple of tatters said it looks like a kite - so fly away with your shuttles in hand!

For earrings, make 2 of course. Simply work the same pattern if finer thread. This model is in Anchor 20 which is similar to Lizbeth 10.

For the Bookmark prototype, here's the count for the 6 extra rings and chains:

R1: 6+4-2. rw
Ch: 8 rw
R2: 6+(R1)3-3. rw
Ch: 5 rw
R3: 4+(R2)2-2-4. rw SS
R4: 6-6 dnrw SS
Ch:5 rw
R5: 3+(R3)3-6 rw
Ch: 8 rw
R6: 2+(R5)4+6 
I would like to improve on this at some future date.


Hope you enjoy tatting and playing with this pattern. And don't forget to tag me when you upload your version!

                          Many thanks to all respondents and comments

Wednesday 11 November 2020

stiffen the flakes

Pin It now!

As the season approaches snowflakes are being tatted by the dozens for decoration and gifting. And that leads to a commonly asked question – how do I stiffen my tatting, my snowflakes? 

There are already several methods (and studies) tatters use and share, some of which are listed here - scroll down to 2. Starting and Finishing > Blocking & Stiffening

Recently I came across this simple but effective explanation, accompanied by a couple of pics, shared by Barbara Pickens Tozzano in a facebook group (Tatting Ayse). It is not 'new', but so well presented. I have her gracious permission to share it with you!

How to Stiffen Tatted Snowflakes/Lace 

by Barbara Pickens Tozzano

In her own words –

" Just want to share my method of stiffening snowflakes for ornaments. This is tried and true. I have used this method for 30 years with no problems. No yellowing or anything.

  1. I like to iron and lightly starch ornaments first.
  2. Use 1 part white school glue and 1 part water mixed in a squeeze bottle. The glue bottle works well.
  3. Disposable plastic bowl or plate for larger items. A small, CHEAP plastic paint brush.
  4. Paper toweling for blotting excess glue.
  5. Waxed paper for drying ornaments on.


Place snowflake in bowl or plate, squeeze just enough glue\water mixture onto tatting to saturate using the small paintbrush to spread the glue. Next place snowflake on paper toweling and blot with a second piece. Then place ornament on the waxed paper to dry being sure it is shaped properly. Leave to dry overnight and then attach hanger. Enjoy! I give many of these in Christmas cards as gifts. I hope you will find this information helpful. "


I certainly find this very helpful! Now if I can get off my lazy back and actually do it - after all all these materials are on hand in almost every home. 

What is Your go-to method for stiffening?

Many thanks, Barbara, for sharing your time-tested method with my readers.

Friday 6 November 2020

hidden addiction

Pin It now!

She's done it again! First earrings, now ice drops - all adaptations of the Hidden Rose snowflake.  I'm sure you, too, will find Krystyna Mura's ice drop variations absolutely stunning. Margaret Davies has done an ice drop adaptation earlier and shared her pattern here

In the first ice drop adaptation, she modified the pattern a bit to add the cabochon in the center and beads around it. Hence the front (top pic) and back (next pic) are slightly different.

In her own words - "I am crazy about this pattern and I can't stop tatting it"

Her 2nd adaptation uses 3 shuttles with a rose cabochon in the middle and if she hadn't mentioned it, I wouldn't have noticed - there are Seven repeats!

What a cute rose cabochon! Krystyna tells me this flake was gifted and her friend loved it.

I come across several models on facebook, and would've liked to share them all. At least half a dozen tatters have made this particular snowflake multiple times (read 6 or more)! It gladdens my heart so.... But wait there's more ....

If you remember Anita was going to teach her heart adaptation from this snowflake at Palmetto Tat Days this year. On her return, she graciously sent me a copy of the pattern to share with you! So now, you can easily download this single page pdf instead of tracking my blogpost.

 Hidden Rose Snowflake Heart pattern pdf by Anita Barry. In fact, she tied a tassel and it is a cute little bookmark. 


All related posts, covering references made in this post -
UPDATE: a 4th method without paperclip is shared by Melanie Cervi. See all updates in the doc below -


Wednesday 4 November 2020

the enticing hole

Pin It now!

.... in an array of denser block tatting patterns in Endrucks' 1920 book ! ('Die Schiffchen-Spitszen' by Frau Eleonore Endrucks Leichtenstern )

If you remember, over 5 years back Georgia Seitz had asked me to work pattern #22 and share in modern format. From that one broad lace, so many different patterns emerged, including little angels and I fell in love with this book and worked in private trying to cover the entire book (including some derivations), calling it my Endrucks Project. All of it is in various stages of incomplete ;-P

At first glance, the images are not enticing. But once I start tatting up a pattern in colour and translate modern notation, ideas blow around and it becomes addictive. Ninetta is feeling that same enchantment & addiction as you can see from her lovely versions over the past several weeks! She has systematically tackled 4 patterns already and has roped in several volunteers in the Chiacchierino facebook group!!! Some have started posting their first trials. We welcome you to join in, or watch the progress in this document - Endrucks 1920 Project which contains all information, links, and updates.


This is my adaptation of pattern #29 into a close-ended, one-pass bookmark/bracelet which I am calling The Enticing Hole  Endrucks pattern #29 vintage to modern

This is the first motif. The joining picots should be very small, unlike those seen in this first trial. Doesn't this look like the top frill of a gown? Or perhaps an angel, even a 3D version. is waiting to emerge?

A few more repeats in Anchor 20. The 2 colours show how easy it is to work with 2 shuttles, covering a large area in one pass. And all segments are basically 6ds!

In the original, the insertion is open-ended. We prefer continuous tatting, and I used one of the small motifs to span the side.

The center ring is fairly large with 48 stitches! I tried SCMR for the 2nd pink ring, but it distorted as is clearly visible. So true rings, using my usual adaptation of Patty Dowden's working large ring tutorial.
It is also Very important to leave a mock picot at the base of the large ring otherwise the later chains tend to pull it out of shape (as is visible in a couple of my rings).

This is in Lizbeth 20 #131. It is fall after all! 4 repeats, including both sides makes this bookmark 15.5cms long and 4.5 cms wide.

Since I hadn't thought of a tail design yet, I tried satin ribbons to reduce all the negative space.

Of course, it hides alternate motifs. I also thought of using this as a surround for a wrist watch, provided the dial fits within the ring diameter.

And it is better to have an odd number of repeats. Oh, I forgot to insert the ribbon Inside the ring, sigh!
One more colour. Of course, one can simply tie the ribbon as a tail at one end. I really don't mind the negative space....in fact the hole in the center is quite enticing ;-D
But Ninetta's 'eyes wanted to see something there'. How about glass gems as in ice drops? These are the smallest I had and they do add a bit of sparkle and lift. One will need to modify the center for these insertions.
Pearls! Gives it a vintage feel doesn't it?

How about leaving the ring alone and covering up the in-between space? 2 large faceted bicone crystals between each.
Bugle beads at a slant! What, are we playing Knots and Crosses now?! 

And finally, faceted tear drops. I still have to add findings, etc. for this bracelet.

Download the pattern here - 

We invite you to join in before all patterns are taken. Let Ninetta or me know which pattern you wish to tat and share in modern style.