Friday 31 December 2021

a future perhaps

Pin It now!
 

My last post for this year, with a potential doily design! 

Imagine if my hubby felt it looked like our tatted doilies, then something good is rubbing off on him, LOL. He was scrolling for some notebooks/sketchbooks and immediately bought this for me. There is a vinyl dustcover and blank pages of good thickness. We all know what the sketches will be of ....

Wishing all my readers, followers, friends and visitors a very creative year ahead....

and stay connected...let's continue our journey together

Tuesday 28 December 2021

cupping hearts

Pin It now!

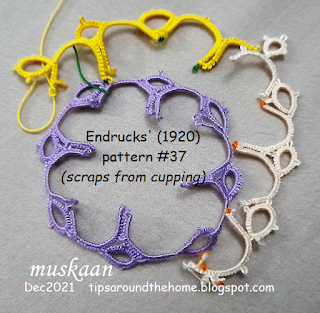
Over a year back, I struggled with cupping in this doily pattern and expert tatters offered several solutions and valuable advice. But I left it on the sidelines and only took it up again a week or so back. This is pattern #37 from Eleonore Endrucks-Leichtenstern’s German book ‘Die Schiffchen-Spitszen’,1920.

After tweaking some of the stitch counts in outer chains, it finally lays flat.... 
....but above is the fallout of my several attempts, without including all the retro-tatting and indecision that went on.
This was the crucial round (Round 4) which I just Had to get right and others would fall into place more easily. While weighing the numerous options, I hit upon my own solution which I bet you won't be able to identify! 
The above combo shows Endrucks' original model with my modified one. Can you guess the difference? 
HINT: It lies within the square/diamond motif.

Now I have tons to share about that motif, some of which is already written about/hinted at here - https://tipsaroundthehome.blogspot.com/2020/11/arranging-motifs.html
I had started to diagram the motifs to show the different paths, but this last week I haven't been able to allot time or focus to anything other than some actual tatting for an hour or 2 daily. So the pattern itself will also take time to be presented. My apologies for this inordinate delay, that will spill into 2022.

So what do you think? does the modified model look okay? I tried to keep the tweaks minimal, without disturbing the original shape as far as possible.

The doily is worked in Anchor pearl cotton, size 8 and measures just under 10.5 cms across from the extreme tips. Perle cotton is flexible to work with. But would the tweaks hold up in mercerised cotton? Only one way to find out - tat one more doily in size 40. 

But look what I discovered ... 3 possible heart patterns!  I Spy Hearts, as Anita would say! Here's what she wrote when I showed these to her - “Each heart design can be an individual heart, a row of hearts made into an edging, implemented into a design, etc. So much fun.”

Heart #1 - after round 5 ;

Heart #2 - after round 6 ; and,

Heart #3 - after round 8. the final round. I figured out a way to work it in one pass through a rough sketch.
Something to look forward to for the 2022 heart season in February ;-D


All links and details, including all modernised patterns can be found in the Endrucks 1920 Project document here -

Friday 24 December 2021

block your tree

Pin It now!

Guess what! Ninetta played Santa and shared a cute edging pattern as gift. One more inspired fallout from the 100 year patterns of Frau Endrucks.

Christmassy Edging or Bordino Natalizio by Ninetta Caruso – click to download the pattern pdf – https://drive.google.com/file/d/1kvgQKW6lXclzK8wIspwm6busbrI0e7Mu/view

When Ninetta first shared her prototype motif – yes, she couldn’t contain her excitement – I thought she was going to turn it into a star or snowflake! I guess it can still be done.

Pattern/notes for both single and 2-colour versions is included in the pdf. Anna Tedesco helped in it's translation to Italian, too.
There are several ways in which we can choose where to place which colour, in the 2-colour model. 5 such methods are listed in the Lock Join Plus series, and links are given for individual pictorials here - https://drive.google.com/file/d/17zsM3JaLO7r0ajg8VOnv5IcJ-kLNqEiU/view

Recently when she sent the longer version, my imagination went haywire! My first impression was that of a bird. (I roughly sketched some elements to highlight the shape over the tatted models...)
Is it a peacock? Is it a pigeon? Perhaps it is a Christmas rooster to take to mass (Misa del Gallo)? Or should it have been a turkey for Thanksgiving?

The tree itself can easily be adapted into a bell, too! Or perhaps a turban or an elf's hat?
Hubby got into the visual game and agreed with the bird analogies. But he loved the sense of movement in this white version. He felt there was some creepy crawly moving surreptitiously but couldn’t make up his mind whether it was a a snail, caterpillar or snake.

So, what do You see?

Mind you, though inspired by Endrucks’ Ninetta did not actually refer to any single pattern or motif when designing this! It was only when she sent the draft and asked me, that I told her about the similarity in pattern #17 block. The ‘blocks’ in this book have such a wide range of shapes, visual effects, as well as some difference in actual tatting, leading to infinite possibilities. Never-ending ideas! I have collated many examples – both original and also some variations by our volunteers, and will showcase them in future. Quite an eye-opener.

Hope you enjoy tatting this clever and cute edging (or any of the ideas thereof) and when you share on social media, remember to use the hashtag #Endrucks1920Project, so that your version comes up in a search.

You can find all of Endrucks' patterns (& derivations) in modern style here -
https://docs.google.com/document/d/17LEVftXweztBIOWh4sL4BB7bX65ssoOsOn4oXIgCepY/view

Many many thanks to Ninetta for this wonderful gift!

Thursday 23 December 2021

rose in my heart

Pin It now!
tatted by Jeanie 
https://tipsaroundthehome.blogspot.com/2019/12/hidden-treasures.html

 I woke up to devastating news this morning. Who knew that the angels I posted yesterday would see my own friend joining them. 

Jeanie was a very special friend. So many tatters have touched my life in various degrees during the last 8 years, but she was 1 of only 5 tatting cyber friends after whom even my hubby asked periodically. 

She approached me around 5 or 6 years back with some questions and it was always such a pleasure to discuss and debate tatting with her. She wouldn't rest till she understood the concept or principle, and never shied from questioning, learning, improving, perfecting. Boundless curiosity and positivity. The true hallmark of a good teacher.

A septuagenarian with a dream, a mission and despite whatever snags life threw at her, she never flinched and carried on relentlessly. I feel honored that she included me in her dream to publish a tatting manual-dictionary. She had worked on her book for 7 years when she emailed a digital copy for review and course-correction, if any. Oh, we had some spectacular discussions with mutual benefits. 

Graceful through all her ordeals during recent years, which set back her book and limited our conversations (she always came first, though), she still worked on it daily as much as she could. Tenacious and persistent, yet with a strong streak of perfectionism. She wanted her book to include the latest in tatting knowledge, and reflect her best possible ability, to fill in the lacuna in our tatting world where terms and definitions are often confusing or missing.

Self-effacing! She never bragged about her accomplishments. Whatever glimpses I got of positions she held or chaired or tutored, were when my search for something else threw up a reference to her.  Despite all her  experience and expertise, she was graciously willing to concede if/when she was 'wrong' and change accordingly. 

The last I heard from her was a short update about herself, knowing that I would worry if the silence latest too long. Even in the most dire times, I never detected any note of complaint - she was always like a warrior on the field. And a week back I found something to extend one of our discussions, and was thrilled to email it to her. I doubt now whether she got a chance to read it.

There is so much my heavy heart, with moist eyes, can continue to write about her. I will miss this sweet, strong lady tremendously. A true angel on earth who taught me many life lessons, my husband joins me in sending heartfelt condolences to her bereaved family and friends. 

May she continue to tat with the angels.

Wednesday 22 December 2021

tiny angel with big message

Pin It now!

 Recently Margaret shared a memory of her cute mini tatted angels (https://margaretsdesignercards.blogspot.com/2015/12/decembers-pinterest-challenge-choir-of.html) and it reminded me of the ones Anita Barry had shared last year (https://tipsaroundthehome.blogspot.com/2020/02/happy-birthday-georgia.html). 

Huh. turns out neither of us remembered to upload the pattern for the white ones, after Anita taught them at the Palmetto Tat Days 2020. Got the wheels in motion and no better time than the present to present these tiny dancing angels.

Itsy-Bitsy Angels pattern (click to download)
https://drive.google.com/file/d/1jWQGGWH5E5hMKZGG_cWkbEQ26o1Q0Lad/view

As you can see, this can be worked as a single angel or a row of angels. A rings-only design, the pattern uses a single shuttle, working the wings as folded SSSRs to work continuously. However these can be worked as split rings if one wishes to tat with 2 shuttles. 

The flexibility of this edging adapts to any shape we desire - a round or oval garland, a straight edging, a square or any other polygon! It can make a cute frame.

And, Laura Angel pattern
https://drive.google.com/file/d/12NJtxEWk6jyl_H0i2upSi_CNWZfWpaR9/view?usp=sharing

Hope you enjoy these quick tiny tats that carry a big message within them (read it in the pdf).
So get out those shuttles with leftover threads from all the snowflakes you tatted, and quickly belt out these little angels!

Many many thanks to Anita for sharing her patterns. 

Sunday 12 December 2021

inward picot with marker

Pin It now! Often a picot is required on the core thread. But when the core thread is pulled to snug stitches, the 'picot' would disappear! In order to hold this picot in place till we need it for joining, a temporary marker or holder is inserted in a loop of the core thread. Most common is the paper clip, but coil-less safety pin, scrap thread, stitch marker, etc, are also employed.

TIP: Always remember that the thickness of the marker/holder will affect the size of the picot formed. Hence choose a marker carefully.

This is a common enough picot and you must have your own method down pat. But if I am not careful mine turn out to be fiddly to handle (with marker getting in the way) and untidy or twisty. Yet this method gives the best visual result. So here's what I do to keep the inward picot tiny and neat ---

Inward Facing Picot in normal tatting –

1. Pull a longish loop of the core thread. Make the first DS. Then insert marker.
https://tipsaroundthehome.blogspot.com/2016/07/double-duty-due-to-delegated-dusting.html
2. Continue to tat at least 2 to 4 stitches, before snugging the stitches and closing the loop.

Advantages –
  1. Avoids any gapsosis in the knotting/chain thread, keeping the stitch before and after the picot close together.
  2. The picot on the core thread remains tiny or the required size.
  3. No twisting of chain/element.
  4. The marker does not get in the way of working.
2 motifs/repeats have been worked above....
...and when it is time to join, remove the paperclip and join through that tiny loop, taking care to not let it slide and hide! A crochet hook is handy.

Inward-facing picots in direct tatting
 – 

For direct tatted chains, where reverse (unflipped) stitches are worked, Ninetta demonstrates how she twists the marker to hold the picot in place. https://youtu.be/d02yb-cKSLI 
This twist makes it easier to hold the picot and work unhindered.

TIP: It is important to realise that this twist adds some length to the picot. Hence choose a marker that is finer than the required picot size.
        Alternate solution: Once all stitches are completed in that chain, untwist the marker and pull the core thread taut. This will bring the picot to desired size.

We can actually use this twist for the normally tatted chain, too, instead of leaving the loop long as photographed above. And when it is time to snug, untwist and remove slack from the core thread.


There are many other ways to make such inward, downward, starter, or drop picots (https://ninettacaruso.blogspot.com/2017/10/fun-or-fan-in-direct-tatting.html). Since the most common is using a paperclip the above tips are limited to markers. 
This post is in response to a recently raised query.