Thursday 31 December 2020

mishmash 2020

Pin It now!


The year was such a mishmash, such a dump in many ways and creative individuals took refuge in their arts and crafts.

We had to step out of our comfort zone while staying in the comfort of our home
It brought us closer while keeping us apart
It kept our radiant smiles hidden while our masks became colourful and decorative
It revealed many truths while many were deliberately hidden
It altered the hierarchy of ailments and treatments
Old adages, conventions, and behaviours seemed to fall apart
Oh what a hodgepodge - normal, new normal, ultra new normal?
'It was the best of times It was the worst of times?'

So what will the new year unfold? Or will our mishmash continue ....
Whatever the future holds, humanity is resilient and hope springs eternal!
So let's celebrate each moment, each life, each other 💕

Sunday 27 December 2020

all links restored

Pin It now!

 O Happy Happy ! ! !

You have all been so very patient all these months. Now, after Six whole months there is no need to edit blogspot.in to blogspot.com when a link does not work. 

My usual tech-related problem solvers are Ninetta and Robin, and Ninetta informed me of broken links a couple of days after I had discovered them in late May. Then almost immediately I received a surprise email from ManTatter (from Craftree) offering to help me with the changes! He explained the process very clearly as well. 


With all the blogger interface transition at the time, I did not want to 'rock the boat' any further, although I had already asked about this glitch on their Help forum. Now, sitting cozily under warm quilts, with hot soup and my laptop, I have been restoring the links for the last 3 days so that we can step into the new year with one less glitch 🧐

Restoring the 4 pages/tabs was a snap in time! However, for the posts, I have had to individually open each one of my six hundred and forty published posts and do the replacements in html format. Easy task, but mindless and one still has to cover the distance. By the time you read this post, I will have done the remaining as well (2019 and 2020). 

I am extremely thankful to ManTatter for all his help and concern. Without you, I could never have been able to clean this up 🙏

Let me also take the opportunity to thank, once again, all the other generous tatters who have wanted (urged) to send me some tokens of their friendship or gratitude. It is my loss but you have warmed my heart. 💖


Monday 21 December 2020

embroidered motifs

Pin It now!

This is from another lifetime...so long back that I cannot remember exactly when. All I know for certain is I started embroidering these hankies in 1996. Yup, a lifetime back!

These are not my original patterns, though I might've adapted them a bit here and there. I've given them names just for fun ;-P

Orange Pansy

Hand-embroidered in single strand of vintage silk thread.
Stem stitch, blanket stitch for filling the leaves and flower, long and short stitches for center of flower, and buttonhole around eyelet.
For hanky edges I used regular sewing thread and machine-hemmed with decorative zigzags. 
This is an older image to show the sheen of silk threads.

The wear and tear is clearly visible. While the sheen does not wear off, the vintage silk thread can fray.

Blossoms' Corner
This is the only pic I have. One of my favourite hankies, I think got misplaced a few years back. I Love how even the tiny stitches are. 
Hand-embroidered in single strand of Anchor embroidery thread.
Stem stitch, satin stitch for red center, chain stitch for petal outlines, and either satin or fishbone stitch for the leaves.
This hanky had a violet hem.

Flowery Perch
This was my least favourite of the lot. Again, it's the only pic I have of it since the hanky is no longer with me.
Hand-embroidered in 1 and 2 strands of Anchor embroidery threads.
I chose to do shadow work (closed herringbone stitch) because of the parallel lines throughout the motif. Which is why it was done in 2 threads hoping for some little colour to show through. Too much work, but not the result I was hoping for.
It also has satin stitch for the bird and back stitch for center of flowers and beak.
The hanky edging was in green.

Hope you enjoyed this little foray into something other than tatting ;-P Embroidery was my first love, especially single-stranded. 

Related Posts

Sunday 13 December 2020

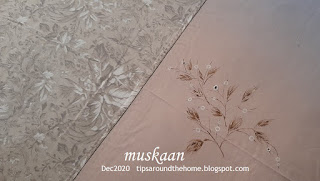
hiding fabric burn spots

Pin It now!
Several years back we gave a brand new bedsheet set to the laundry for a simple wash, instead of doing it at home. And it came back with a few burn spots! 

 My solution was to embroider around the spot burns in white buttonhole stitch (single strand) to prevent any possible fraying. I'm sure you can spot them in the image above, now that you know.

Then I tried to replicate a sense - a simple impression - of the printed part of the bedsheet, using freestyle brush strokes in a subdued colour.

Painted white circles to copy the 'burnt berries' on the twigs.
And done! Oh, I did a similar one on the plain panel on the other side of the printed one. I didn't take a pic of it, since it was a bit out of reach and I was lazy ;-P

Quick fix solution! This sheet has been on my bed for a couple of weeks now, before I thought to take pics and share. Hence the creases, if you will excuse them. 

Friday 4 December 2020

picot join to right part 4

Pin It now!

I haven’t picked up my shuttles in a long time despite spending all my free time in tatting-related activities and interaction. And I’ve been neglecting my blog, too – can’t let that happen!

Well over a week back, this is what I made quickly for an experienced friend.  She, too, like I, avoids the folded join when making a picot join to the right. I prefer to rotate the work slightly on my hand, repositioning the picot on the right such that it now comes to the left, and then execute the join normally. These are my detailed pictorials and article on the topic -

http://www.tipsaroundthehome.blogspot.com2016/03/demystifying-joins.html - about picot join
https://tipsaroundthehome.blogspot.com/2018/09/picot-join-to-right-part1.html - outward facing rigs
https://tipsaroundthehome.blogspot.com/2018/09/picot-join-to-right-part-2.html - chains and down join
https://tipsaroundthehome.blogspot.com/2018/10/picot-join-to-right-part-3.html - where we need this join.

What I did not explicitly show in Part 2 was what happens when all rings face inwards. She was under the impression that 'with inward facing rings no such rotation is required to execute the final join  since we are working counterclockwise'. Visuals are better than words, hence …

Picot Join to the Right – Part 4 

(joining last inward facing ring to the first using Rotate Work)

The following motif comprises single inward facing rings (4-4-4) separated by bare thread and joined to each in the round. 
 
1. 6 rings have been worked and the last, 7th ring is started. It needs to be joined to Ring. 6, so pull up a loop through the picot of previous ring. This picot is to the left of current work and we perform the action almost on autopilot, without any extra movement.

2. The same as #1, but laid flat to see clearly, The knotting thread is pulled through picot. Note- this can be pulled down for frontside tatting.

3. Now comes the point at which Ring7 is to be joined to Ring1. 
Where is this joining picot in relation to this last ring? It is to the Right. Try making the join without shifting the motif. 
4. Hence some form of picot join to the right is needed - be it a folded join, or a simple rotation, or whatever you are comfortable with.

5. Since we are avoiding the folded join, notice the slight counterclockwise rotation of motif while still in hand, to reach the picot. The movement is so subtle, that it goes unnoticed, unlike in a rosette with outward facing rings (Part 1
My own theory is that we need to rotate more when rings face outward, hence it is immediately noticed.

6. Loop pulled up through picot and shuttle being passed through it.

7. Join made and ring closed.

8. Motif complete. Tail ends hidden.

The principle to remember is this (TWoT Notes): Whether overall work (motif or lace) progresses clockwise or counterclockwise, whether we are working on the front or the back, the current element - Ring - is Always worked clockwise*, and Chain is Always worked from left to right. Hence when joining in a circle (last to first), whether the rings or chains face inward or outward, the joining picot on the first element will be to the right of current element, and a Picot Join to the Right will be needed.

*The only exception that comes to mind is a Reverse Ring where stitches are being added counterclockwise. 

UPDATE: A tatter graciously shared her feedback after trying it - this method works well in needle tatting as well!

Practice Patterns : 
For further practice, try this R1:4-2-4-2-4. bare thread. R2:4+2+4-2-4. and so on ... where each ring is joined to the previous ring through Two picots on each side. The last ring will need to be joined to the first 2 picots on Ring1.

Also consider inward facing trefoils or clovers instead of single rings. 
eg. this Clover Wreath Poinsettia is good practice for the picot join to right. It has both inward facing clovers as well as outward facing thrown rings that need to be joined in a circle.