Sunday 30 June 2019

spin away

Pin It now!
Firstly, thank you for your response to my design dilemma with respect to this snowflake. I do love blogging :-)

Snowflake #3 for Land of Laces25 Snowflake Project on facebook.

Spin Away Snowflake

Here’s what I have done with it finally.... 
I switched the rings around the central ring to face in the opposite direction, leading to the next rings having their broader side on the outside, and so on. 
It gave me the long arms, but a broad base tapering naturally to the tip unlike the blue version previously where the dendrites appear spindly.  
In that sense, the arm is an extension of the original yellow flake.
The 2nd chain segment could've been shorter in version 3. Instead I changed something else … 
This is the final version worked in Lizbeth size 20. 


Can you spot the change between versions 3 & 4 ? 
Which do you prefer - the green or blue one?

Since there was no clear consensus, and I Have worked on them all, the pdf contains all 4 patterns. You can pick and choose one or more, since each is a stand-alone.
I also included the 2-colour version merely to show the working sequence of shuttles.


The snowflake is worked in one-pass by climbing out of the central ring with a mock picot, as instructed in the pattern. However, here are a couple of alternate routes …

Alternate working :
  1. Pull out a length of thread from shuttle 1, work the central ring and climb out with mock picot. Use this tail to work the 2nd side of the first split ring, and then add 2nd shuttle when the tail ends. I used this in a couple of the models.
  2. Instead of starting with a central ring and climbing out, work the first ring as a mock ring (SCMR), and throw off the central ring leaving a mock picot between them. Then continue as normal, after rotating work and switching shuttles.
I’d still like to add some graduated picots on the lower chain segment to see the effect, but that will be for another day. Or perhaps some keen tatter will do it and share?!
It was amazing to see the response and wonderful tweaks made to the Paisley snowflake! And Gloria Nelson has entered her needle-tatted, graduated picots model in a Handy Hands draw! First time my pattern has been entered in any kind of competition/draw that I know of!

There are ideas spinning in my head, so watch out for more spin-offs on this pattern!

click to download free Spin Away Snowflake pattern 


Wednesday 26 June 2019

spin in some ideas

Pin It now!
I’m in a bind. This is the 3rd snowflake I’m making for the 25 Snowflake Project. It’s from a sketch dated 26th Oct, 2017.

I started my trial with 2 colours in order to keep track of the shuttles, since there are so many split rings.

Satisfied, I worked the yellow one. I was happy at first, but then the proportion of the arms to the center seemed off, leading to the 2nd prototype in blue.

But now the spinning/twirling effect seems to be lost, right?
As I was notating the pics, an idea hit me – I might be able to get back the spinning effect! I’ll have to flip the SRs such that the one at the base of the dendrite has a larger outer edge (as in the yellow one)!

Another idea I’ve been mulling over is graduated picots on the chain linking 2 arms – long to short to highlight the spin direction. Do you think that will work, or should I keep all decorative picots away?

What other suggestion can you offer to improve the design?
Do you like the design concept? It can also be worked without split rings, but that will be another flake for later.

All are worked in Anchor size 40. The yellow is 5cms and blue is 7cms tip to tip.

Waiting to hear your ideas....


Sunday 23 June 2019

an aspiring flake

Pin It now!

While hunting for something, I came across many snowflakes in various stages – from sketches to trials to completed-but-not-presented. So, despite having sketched 2 new designs after the Paisley snowflake, I’m taking this opportunity to reduce my backlog.

My Snowflake #2 for the 25 Snowflake Project started by Land of Laces on facebook....

Aspiration Snowflake

This is the snowflake that arose from my Aspiration doily trials in 2017. with an additional final round of spiky dendrites! I prefer curve to points, but this is a deliberate experiment. The reason is evident in the yellow trial piece below.

The size 40 white is pretty stiff and starchy and not enjoyable. It is also slightly thicker than coloured size 40s as can be seen between the original yellow trial piece and this white one.
I don't even like my stitches! Hence I’ve decided to change to another bold colour in 40 for trials, and may also play with Pearl 8 colours for flower flake versions.

This 4-round snowflake can be worked as separate rounds or in one pass. 
The written pattern is given for individual rounds, but the very same instructions can be applied to continuous tatting by working the last element of each round as split ring or split chain, with mock picots to climb out. Except for the central rosette, the white model is worked continuously.
In Anchor Pearl cotton size 8, it measures 3¼” tip to tip and just under 3” as a hexagon side. This is equivalent to Lizbeth 20.

I intended to make some picots longer in the coloured version, but didn’t quite get it right. Pearl cotton tends to mask a clean picot due to the fibrous nature of the thread.

There are numerous ways to tat this flake and is a prime practice piece for a study of This Way or Tat ? (TWoT) when different methods/techniques are used - such as SLT, reverse join, direct tatting (reverse or unflipped stitch), and so on.


Friday 21 June 2019

first doily pattern

Pin It now!
Repetition Doily / Snood
pattern pdf (click to download)
Please scroll down for an Update

Remember the doily/snood I was trying to design out of a mistake? Well, it’s all done, including the pattern writing! In size 40 Anchor, it measures 7 inches in diameter.


Continuing the design story …. I completed the final round with long twisted picots instead of simple double picots. I like how they arch and are sturdy, giving a sense of finality.

I wanted a relatively open center, hence tried a basic spirographic filling – like in string art. A quick trial above looked fine, and I was going to stabilize the long threads with another single round of beige in the center. I had even tacked the doily on fabric in an embroidery hoop! After several days I snipped it off..... 
 
… and this was the result ! A star is born ;-D
I overcame the odd number in previous round (15) by skipping 2 picots and joining to every 3rd picot, thus resulting in the star shape.

 
But those free picots bothered me and I snipped off both central rounds replacing those 2 picots with a long double picot parallel to the star curves! 
Double picots also follow the thematic repetition of outer brown rounds. Star remained the same.
Tadaa !!!


UPDATE (July 2019): This doily has long measured picots which are Functional. The pattern gives picot sizes for Anchor size 40, but what if one wants to use a different thread size?
I worked a short chain with same thread and found that a 7mm picot is equal to the width of 7 double stitches! And so on. Easy to remember and convert.
Just substitute 1mm tall picot with 1ds width.

While picots are normal throughout, the long picots differ in length in each round and a picot gauge is required. I have included the gauge requirement for each round in the pattern.

Each round in this doily is worked separately with shuttle and ball and easy elements. Writing/presenting the pattern was a tough ask! It took me days and days to simplify it as best as possible since the working sequence of the 9 rounds is not a regular order from small to large or in to out.
Jane McLellan kindly and quickly ran her eye through the final presentation with valuable feedback. She is my reliable go-to "glazometer" (((Thank You)))! 
I hope you enjoy the pattern. It is my first complete doily pattern that I have completed and written. My first - Aspiration Doily still awaits that day ;-D 

Sunday 16 June 2019

25 snowflake challenge

Pin It now!
Yesterday Dorota of Land of Laces announced her intention of designing and posting a new snowflake every Sunday till the end of the year. A minimum of 25 snowflakes.
I shouldn’t, but I did jump right in. And in less than 24 hours I have my own pattern all ready to post!
The challenge doesn’t call for originals, but just like the 40 Blossoms sprigs I challenged myself to, let’s see if I can be as successful with this. It will stretch me for sure, but hopefully I’ll out the better for it.
I will work all snowflakes in white Anchor size 40. Since I don’t want to be spending all my time perfecting each presentation, I will share the basic pattern with the prototype itself. I welcome you to test any you like and share your experience or any errors. And if you send me a pic of your work, I might be tempted to create a proper pdf by including your model.

The challenge is open to all but pics must be posted on a Sunday to facebook and/or Instagram and tagged to @landoflaces. And at the end of 25 snowflakes, send in a ‘group’ photo!

So here’s my first pattern as is.….

Paisley Snowflake
pattern with prototype
This 2-round snowflake can be worked in one pass by climbing out with a split ring, mock picot, and smaller split ring.
TWoT Note : Depending on how one climbs out and works the initial rings, the direction of the paisleys may change.
In Anchor size 40, it measures 6cms tip to tip.

Techniques used in prototype: rosette, picot join to right, 2 shuttles, ctm, fs/bs tatting, thrown/floating rings, lock join, Josephine Ring.
Abbreviations:
-  = picot ; + = join ; dnrw = do not reverse work ; rw = reverse work ; TR = thrown ring [switch shuttle before and after each thrown ring] ; JR = Josephine ring (with half stitch count)

Round 1 - Rosette :
ring : (4 - 3 – 3 – 4 ) x6. Join each ring to previous and the last ring to first. Tie & cut.

Round 2 – Paisley :
ring1: 6 + 6. dnrw
ring2: 6 +(to next petal) 6. rw
chain: 4, (TJR1: 8), 3, (TR2: 5 – 3 – 2), 3,
(TR3: 2 + 5 – 5 – 2), 3, (TR4: 2 + 7 – 9) rw
          chain: 15, lock join (to TR4). turn work, switch shuttle
          chain: 2 (- 2) x12. rw
REPEAT from ring1 for a total of 6 arms. Tie, cut and hide ends.

I can think of so many little tweaks to improve the design. For instance –
  • the Josephine Ring is barely visible due to the overlap. Perhaps if it were a small ring, instead of JR?
  • I like the overlapping arms, though.
  • There could be a JR at the tip of each arm to make it a bit more pointed. Now the snowflake looks more like a flower, right?
  • There could be picots along one side of the thrown rings to mirror the long picoted chains?

What do you think? Requesting brutal criticism!

Friday 14 June 2019

anchoring border

Pin It now!
This is a border I tatted may be 20 years back. I was still doing traditional tatting, with no distinct front and back side, and not bothered about any colour blips!

The pattern is shown as an off-center vertical border along a kurta front (‘Border in Tatting for a Kameez’). There is also a narrow trim along one side, which I did not make.
This is made of 2 strips repeated and linked lengthwise to create a broad lace. Notice how the rings face in opposite directions. One such strip is tatted for a pair for narrow cuffs or sleeves.

I tatted all 3 pieces – 1 broad & 2 narrow – intending to sew it on a kurta. Well, that kinda never happened and I ended up sewing the broad lace on my saree along the pallu (off-edge) when I realised the length was just right – a yard and quarter !!!

This pic shows the front and back; I sewed down the lace using 2 strands of sewing thread.

I have tried to maintain this handloom, hand block printed Kota cotton saree all these years. Ideal for summers and the broad lace anchors the lightweight pallu. But the heavy iron my presswala uses has left some discolouration on the brown thread. Oh Well, just another excuse to tat this pattern again ;-D 
The narrow strips are lying in one of my lace boxes – new and unused. Undecided what to do with them, since I don’t wear sleeves ;-P Will take pics and share when they emerge from their hiding place.
Don’t go by my working or the age-worn look, it is an absolutely enticing meandering pattern, worked in 4 pastel shades and modeled beautifully in the book. And of course, it was my favourite and only actual book I had for ages – Tatting Favourites, Book No 110T, by Anchor Design Centre, 1986. I wonder if I can take pics and show them (not the pattern but the modeled lace, and do a review of the book? Will it be against copyright rules to share pics?


Tuesday 11 June 2019

crown and sceptre

Pin It now!

I do love meandering designs! It takes some exciting moments trying to figure out the sequence, the best pathway; and then adding an additional level with directional tatting and colours. How could I not be enticed with this square that Natalia Haiduk (Наталия Гайдук) shared ?!


This time, I decided to go with single colour so as not to mess up a 2-colour placement with all that meandering going on! It is a needle-tatted pattern demonstrated in this video, and called Summer motif.
I quickly made a sketch and notated the counts. And then, as I worked, I wrote down more instructions regarding switching shuttles, reversing work, and so on. I haven’t asked for her permission to share the instructions, though. Would you be interested in the shuttle notation?


One has to tread carefully as there are rings that are left dangling for a while before being attached to a later element. I had to keep referring back to my diagram.

Love the mock ring - gives a much better shape to that crown-shaped motif. There is a slight overlapping of those large rings in the crown.

Doesn’t this square have a Victorian feel to it? Like an insignia with crowns and sceptres?! In fact the sceptre motif could so easily be an anchor!


Techniques I used: 2 shuttles - ctm, directional (fs/bs) tatting, thrown/floating ring, mock ring (with lock join to same picot), picot join to the right, lock join, common picot. 
Worked clockwise starting at one of the inner rings. 

Dimensions: In Anchor Pearl Cotton (size 8, 00134), 2½" sides and <3½" diagonally. 

There is only 1 mistake I made – the corner thrown rings are 5-5 instead of 6-6.
I also believe one can reduce a couple of stitches on the long chains leading up, or snug them even tighter. Notice how the first ones tend to curve.
I would Love to tat it again some day, perhaps in 2 colours or may be in single again, but with the little tweaks in my next.

Many many thanks, Natalia, for sharing your lovely patterns

Thursday 6 June 2019

chipping and churning

Pin It now!
..... but chip in please.

For over a month now, on and off, I’ve been chipping at the Tatting Resources page.
It was being neglected, and also becoming disorganized what with increasing links.
Updating it seemed like a good opportunity to overhaul. Reorganising into neater compartments, more logical categories, and consistent font.


It is tedious and time-consuming. The bright spots are when I stumble on to posts with 'forgotten' tips/techniques or 'new' ones. During my search I came across plenty of interesting posts and sites (quite distracting ;-D). And this one tops them all – images of Mary Konior’s very own tatted lace, many of which are in her books. They got to actually hold the lace at Tat Days!!

Categorisation is not easy. My friend Jane McLellan readily answered my questions, clearing the path. And I now see that she has added her tips and pictorial links on the right panel of her blog. Thanks, Jane :-)))

Mind you my page is Still very much a work in progress – with loads of links still left to add. There will also come a day it will revert to draft in order to systematize the formatting before uploading again. Just thought I’d share and ask for your opinion as well as input – if you find something missing, or would like change or to add, chip in please.

Soon there will be a new page dedicated to Designing – tutorials, lessons, process, diagramming, and so on.

6 months since I asked your opinion about my posts. Time to review - do you think there has been some improvement in my presentations? I've tried to consciously reduce the text. All left-aligned now ;-D I could put fewer pics, but it is so difficult to choose! 
And sorry, Carollyn, I have too much of a backlog to leave the posts up for long ;-P 

Wednesday 5 June 2019

back and forth

Pin It now!

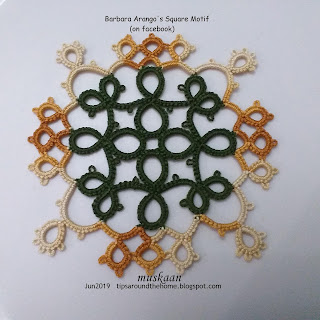
Barbara Arango spotted a bag where the fabric had tatting prints. She successfully converted the print into an actual tatting pattern – reverse-reverse engineering?!
I remember Frivolè and a couple of other bloggers have also done similar conversions.

And she generously shared a sketch of square motif pattern on facebook.

I chose colours and size to match Ninetta’s Quad 13 square which I made back in 2015. Both have a similar kind of composition in terms of tatting techniques - lots of thrown or floating rings.

I think the green kind of overpowers the tinted brown in the new motif. May be I should've made the inward facing large rings in the tinted shade to balance the colours?

TIP : It can be worked in one pass if both shuttles have the same thread. I would start with the right twin ring working clockwise and exit from the left twin ring worked as a split ring. Then continue around. Just one set of tails to hide at the end.

It is interesting how they both measure the same despite their open versus dense look. 
Both are 3” along the sides and 3¾” diagonally in Anchor 20.
Will take a pic of them together when I find Nin’s square. I liked it too much to give it away!

I enjoyed tatting this. Barbara’s are in all-white in finer threads and they look very pretty!

Many thanks to Barbara (and  Ninetta) for sharing their patterns :-)