Showing posts with label broad edging. Show all posts

Friday, 14 March 2025

lets go clubbing

Pin It now!

 aha, don't get the wrong idea! The reference is to clubbing of laces to create a new version! And being Holi, it's an excuse to play and party with friends today.

So, Bandini approached me with her pattern to do the presentation and also share with the community through my blog and I couldn't say no. She very cleverly joined two edgings on either side of a central braid giving rise to a broad tatted lace that looks quite different from its individual constituents. 

Lace Club Border by Bandini Maisheri (2025) -https://drive.google.com/file/d/1aVWxNtGBoRlK9Hmx3UScuKHMvillA-4o/view

This is my small WIP sampler in size 40 showing the central SR braid and one edging joined to it. 
The same edging is also joined on the other side of the braid in the border.
Except for the SR braid which requires two shuttles, the edgings can be worked with a shuttle and ball.

And here the 3rd edging is attached to the 2nd one for a medium-sized border.
Again this is done on the other side as well.
But you get the idea! You can pick and choose as many or as few edgings for the desired width.
Play with tatting in more colours and beads and this widens the canvas even further! More in tune with colourful Holi ;-D
You can even change the sequence of working each row to suit your preference. I chose a sequence which was simplest to present as a diagram and text.
 
She tells me that her mother has already tatted 9 meters of this border, no doubt for a saree!
And I like the term she used - 'clubbing'!

Another fun aspect is that each can be a standalone edging, too! So we get a LOT more in this pattern than a single broad border!

All details are in the PDF (click to download) - Lace Club Border by Bandini Maisheri (2025) - https://drive.google.com/file/d/1aVWxNtGBoRlK9Hmx3UScuKHMvillA-4o/view
Hope you enjoy playing with it!

Many many thanks to Bandini for graciously sharing her cleverly clubbed pattern !

Tuesday, 24 May 2022

graceful enthusiasm

Pin It now!

Reworked pattern from Frau Eleonore Endrucks-Leichtenstern’s ‘Die Schiffchen-Spitzen’, 1920, for Endrucks 1920 Project.

When enthusiasm wanes in one person, its flame may shift to another – that is what being in a group is all about! Somebody else carries the torch. It is what happened with pattern #41 after enthusisam was interrupted.
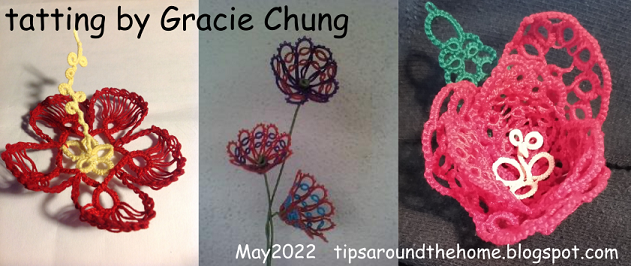
Since the diagram and text was already done, Ninetta and I decided to ask for a volunteer to tat the sampler. Gracie Chung stepped up and worked this beautiful lace.

Gracie sewed in beads and has pinned this sampler up on her office board. She wanted to tat a much longer length and had something more in mind. However tax season rolled in and she’s had to pause for a few months to focus on her job.
With these gems, the edging could easily be adapted into a crown or tiara!

 
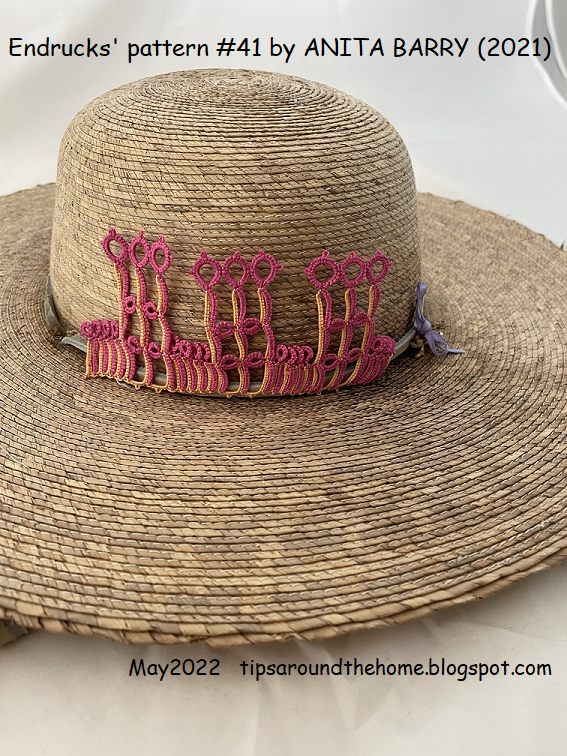
Imagine my pleasant surprise when Anita Barry sent in her secretly tatted sampler in 2 colours as a back-up, just in case this pattern was jinxed, LOL and got left in the lurch again! 

And this sampler is on display, too, sewed to the ribbon on her straw hat!
Isn't it wonderful when tatted lace can be seen in public as in both these cases.

In the end, the pattern pdf for #41 combines the work, tips, and ideas of 5 tatters. Hope you like the confluence.
Endrucks’ Pattern #41 pdf in modern style (click link to download) 

Gracie Chung sportingly shared something about herself.  In her own words –

I didn't grow up with the possibility to ever learning about tatting. No one in my family knows about it (I think). It's not until 2007 I chance finding shuttles in Joann's Fabric that I got curious about what shuttles were for that I googled it when I got home. The more YouTube videos I watched, the more interested I became and I decided to go back to Joann's to buy my first pair of the Clover Shuttles. And the rest is history.


I basically learned everything online, from Karen Cabrera videos, Jane Eborall's patterns and techniques, and then from your blog too.


My other hobby is reading. Mystery, cozy mystery most of the time. They don't clash, tatting while listening to audio-books is my ultimate relaxing method.


I think that's it. That's how I discovered the joy of tatting and trying to be more involved in the tatting world.

She also gave us permission to share her tatted lace pictures from her FB timeline. Here’s a glimpse into her range of colourful projects, starting with necklaces, bracelets, earrings, adorable butterfly hair clips, snowflakes and doilies, and flowers - both 2D and 3D!


I’m sure we can all recognise several of these designs and designers. It also showcases the diversity in Gracie’s tatting choice, though her preference appears to be jewellery.

And to gaze at some of Anita’s tatting- https://tipsaroundthehome.blogspot.com/2021/09/700-and-promises-still-to-keep.html

Ninetta says:

“I join Muskaan in thanking Gracie and Anita, and take this opportunity to thank all generous tatters who share their knowledge online. A lot of tatters have self-learned online like Gracie did! I am thinking of Marina Madzar, Pina Pinto, just to name 2 of our other contributors. A great reason for loving this project is that we are getting to know each other and have discovered that we are not lonely tatters, there’s always another enthusiastic tatter just round the (Internet’s) corner willing to help!”

With love and gratitude,
muskaan & Ninetta

Related posts –
https://tipsaroundthehome.blogspot.com/2022/05/enthusiasm-interrupted.html - #41 candle edging sampler using BDS
https://tipsaroundthehome.blogspot.com/2021/09/700-and-promises-still-to-keep.html - thanking Anita Barry

*********************
Endrucks 1920 Project is a community project, where patterns from Endrucks’ German book of 1920 were converted to modern-style presentations and pdfs. We welcome you to join our Facebook group “Endrucks 1920 Project” (please read the group’s description and rules before joining : 
https://www.facebook.com/groups/1235560633606162) where the fun continues with derivative tatting, new variations, activities, etc. all within the gamut of Endrucks’ patterns.

Using the hashtag 
#Endrucks1920Project when posting in FB or Instagram, ensures that your pic will show up in a search.

If you enjoy sharing and experimenting, or even test-tatting, the group is waiting for you! All info and links to patterns (original and modern), including model images, are in the Endrucks 1920 Project Document, here 
https://docs.google.com/document/d/17LEVftXweztBIOWh4sL4BB7bX65ssoOsOn4oXIgCepY/view There is still a lot to explore and extract, derive and apply and scrolling through this document will give you an idea of the possibilities and beyond.

*********************

Monday, 16 May 2022

enthusiasm interrupted

Pin It now!

Reworked patterns from Frau Eleonore Endrucks-Leichtenstern’s ‘Die Schiffchen-Spitzen’, 1920, for Endrucks 1920 Project

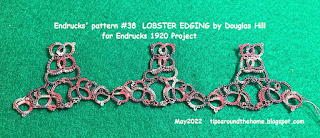
Did Frau Endrucks enjoy a plate of lobsters or perhaps watching them frolic in the water? Is it what inspired her edging #38? Are they holding claws for a dance or to avoid the traps?! Douglas Hill spotted lobsters, too, and named it the Lobster Edging

Lobster Edging (#38) pattern pdf:
https://drive.google.com/file/d/1EiWX78pK8oY8shFVGBFjdJIO0a4Y7fLh/view

I think it will be a good idea to include a diagram eventually.

This colourway does full justice to the arthropod. One could easily add a few beads and tweaks to strengthen the lobster motif. Great for applique and cards or perhaps a charm. Or how about a brooch, earrings, or pendant?

Incidentally, he preferred to tat it with a ball and shuttle rather than 2 shuttles, as seen in this WIP model. And to get the shuttle in position, a lot of shoe lace tricks (SLTs) were used.
Will this should make it easier for a needle tatter to follow the pattern?

He presented this pattern at the Finger Lakes Tatting Group mini-conference in September 2021, thus spreading the word about our Project.
When the lobsters are flipped, as in the above image, they give a very different look!

In 2020, Douglas had also chosen pattern #41 where he visualized the paired chains as a long row of short and long candles with the end rings acting as flames.

In order to get the long chains to stand straight, he wrote the pattern using balanced double stitch (BDS) in late 2021, but by the 3rd repeat in above sampler, he decided that the BDS did not work.

He was ‘frustrated… at not getting the pattern to work or look right…Ninetta and I tried to help with our joint review notes and possible options. However, he could ‘no longer boost his long exhausted enthusiasm’ and left this pattern as well as our Facebook group in Dec 2021.

The above is his working of pattern #7 which he chose in mid-2021. Again, not happy with his tatting, he forfeited the pattern.

Douglas is quite accomplished with the crochet hook, tatting shuttle, knitting needles and lace bobbins, including designing some spectacular crochet coats. Although he is not a regular blogger, do check out some of his works here - https://queerqrafter.com/ or on Facebook.
 
🦞🦞🦞🦞🦞🦞

AlenAlea Rako joined our Facebook group by adapting the pattern #3 edging into 2 square motifs that can be tessellated into a larger fabric if desired. She also graciously shared the pattern.

Two Squares (from #3) pattern pdf: 
https://drive.google.com/file/d/1eBwjp7wtMie1k2GeqrSUOerMH87uuu4A/view

In Square #1, she turned the corner inwards along the original sewing edge. This retains the beautiful lotus-shaped motif, with minimal changes to the original pattern.

Unhappy with the open space in the center of the square, she added an insert option for those who prefer denser lace. The insert is especially useful for larger lace fabric, providing additional sturdiness and durability.

It is always fun to ask ‘what if ….?’, and explore options! Hence this time, she turned the corner along the opposite edge resulting in an in-built denser flowery center. She shows us where we need to join motifs for tiling in her diagrams.

Unfortunately, Lea abandoned the pattern presentation maintaining absolute silence despite our private and public calls over the past several months. I have cleaned up the presentation (most of which she had approved earlier) and it is now available for all of us to enjoy.

Lea, too, is an accomplished tatting designer and hand dyes her threads creating beautiful colourways.

▦▩▦▩▦▩▦▩▦▩▦

Despite our best intentions life can get in the way of our commitments. Delays happen. Sometimes enthusiasm sags. Yet communication is key. As volunteering adults we should all be able to speak freely about any changes in commitment.

We thank both Douglas and AlenAlea for their contribution and hard work.

With best wishes and gratitude
muskaan and Ninetta 
💦💧💦💧💦💧💦💧💦

Related Posts
https://tipsaroundthehome.blogspot.com/2021/11/the-foster-child.html - pattern #7
https://tipsaroundthehome.blogspot.com/2021/11/willing-non-volunteer.html - pattern #7 adaptation
https://tipsaroundthehome.blogspot.com/2021/09/700-and-promises-still-to-keep.html - pattern #3
https://tipsaroundthehome.blogspot.com/2022/01/more-multiples.html - Square #3 using 2 colours
https://tipsaroundthehome.blogspot.com/2022/01/who-knew.html - Fruit Bowl from #3
https://tipsaroundthehome.blogspot.com/2022/03/bowled-over.html - Fruit Bowl pattern from #3

*********************
Endrucks 1920 Project is a community project, where patterns from Endrucks’ German book of 1920 were converted to modern-style presentations and pdfs. We welcome you to join our Facebook group “Endrucks 1920 Project” (please read the group’s description and rules before joining : https://www.facebook.com/groups/1235560633606162) where the fun continues with derivative tatting, new variations, activities, etc. all within the gamut of Endrucks’ patterns.

Using the hashtag #Endrucks1920Project when posting in FB or Instagram, ensures that your pic will show up in a search.

If you enjoy sharing and experimenting, or even test-tatting, the group is waiting for you! All info and links to patterns (original and modern), including model images, are in the Endrucks 1920 Project Document, here https://docs.google.com/document/d/17LEVftXweztBIOWh4sL4BB7bX65ssoOsOn4oXIgCepY/view There is still a lot to explore and extract, derive and apply and scrolling through this document will give you an idea of the possibilities and beyond.

*********************

Saturday, 23 April 2022

show-stopper or show-topper

Pin It now!

Lady with a Sunshade (3D)
Krystyna Mura has rolled out such a vast and enticing range of patterns from just ONE pattern that I cannot stop wondering whether this is a show-stopper or a show topper! And the following pics are only a glimpse of what more is in the pdf itself; not to mention some of the prototypes she sent in!

This is the original pattern #12 from Endrucks --- 
Sampler of Endrucks' n.12
She has provided samplers and diagrams for her modified versions, too. Her beaded version looks pretty as a cuff bracelet.

She extracted part of the motif to create a Bracelet with Coin Beads, a single repeat of which gives us this medallion ---
Medallion

The lower part of the original pattern/edging is quite a common motif used to make the skirts and gowns of Crinoline ladies and angels. I wonder who was the original designer? Any ideas? Or was it Frau Endrucks?
Anyways, Krystyna has used the same motif to design so many girls, ladies, and angels (and also one boy!) - both 2D and 3D, that it will take a while for them to walk down the ramp! Here are 2 of them (besides the lead pic) --- 
Girl in Shades of Blue
Christmas Angel (3D)
 
Speaking of Christmas, she has also derived numerous motifs, stars, ice drop, and a miniature tree, all worked in one pass and ideal for cards and decoration ---
Christmas-time Stars

And then there's music in geometry! Check out her sets starting from a Terzet through to 3 types of Sextets ---
Flowery Sextet

The world of animals and insects hasn't been forgotten be it the Bat and Butterfly in 2D, and a Peacock and Bird in 3D ---
Bat

Butterfly
Butterflies need nectar, hence flowers cannot be far behind! She shares the pattern for a Garden Cosmos (2D). In her gallery she showcases a 3D Pumpkin along with the following beauties --- 
Daffodil (3D)

Poppy (3D)

The amazing part is that most of her adaptations, whether flat or dimensional, are worked in one pass unless you want a speck of colour to highlight something. A case in point is this gorgeous doily below ---
Ball at the Royal Court Doily
She displays 2 more doilies, tatted in one pass. And she has promised me that she will be sharing the patterns! Can't wait to get started on them!

You can download the pdf here - Endrucks pattern #12 reworked and adapted by Krystyna Mura - https://drive.google.com/file/d/1E26K3FFgHygdkEKUvVHn-f0MFlENDsqA/view

Diagrams are colour-coded, self-explanatory and clear, depicting the count and sequence. What I love is how she boxed in the repeat sequence. You know how the starting (and/or final) motif in an edging is often different from the subsequent or middle repeats due to joins, etc. Her diagram highlights this without the need for text.
Personally, this is all I need – a good pic of the tatted model alongside these excellent diagrams – and no written pattern!
Krystyna also adds in a few effect/technique pics and tips/notes to explain her method of working.
The pdf is like a perfect booklet to keep us busy and happily engaged for a long time.

LEAFLIKE RING
Did you notice the little leaf in the daffodil and the Bat ears? An odd and unique shape, don't you think?
Well, this is Krystyna's adaptation of a dimple ring which she calls 'leaflike ring'.
Although she explains it in the pattern pdf, on my request she graciously prepared a separate tutorial pdf. 
Click on the link for Leaflike Rings tutorial pdf -


Tremendously Incredible work by this enormously talented and generous lady! I have still to detect how and where she extracted a few of the motifs for her ginormous adaptations! And she promises to share more of the patterns for her adaptations!

Scroll through the pattern #12 pdf and tell us which model you like best.


Find all pattern pdfs in the Endrucks 1920 Project document here - https://docs.google.com/document/d/17LEVftXweztBIOWh4sL4BB7bX65ssoOsOn4oXIgCepY/view
And if you tat any pattern from this Endrucks' collection, we welcome you to join our Facebook group!

                                      Many many thanks, Krystyna ....                                       
words fail me for all the wonderful effort you have put in!

Monday, 29 November 2021

the foster child

Pin It now!

Reworked patterns from Frau Eleonore Endrucks-Leichtenstern’s ‘Die Schiffchen-Spitzen’, 1920, for Endrucks 1920 Project.

Don’t these look like folk dancers with frilly skirts and knocking elbows! Now add a head to each to complete the ladies…. A single motif, with a bit of addition, could become an angel or Crinoline lady.

Endrucks' pattern #7 pdf (click to download): https://drive.google.com/file/d/1UDNg-1W6LJ3pyrn_Umz5f33BF01_92-E/view

This little pattern has interested many tatters and each ‘foster family’ loved and groomed it to their best ability. But each home wanted something even better for the foster child that they could not provide, hence the child travelled, leaving behind a virtual trail of trials and learning, until the final adoption.

adopting, not foisting, the foster child...
House #1 (Ayşe Özgür): An enthusiastic & immediate start but life halted for 10-11 months.
        Starts with chain and work moves form right to left. Good use of 3 colours.
House #2 (Douglas Hill): Enthusiastic choice in the 2nd volunteer list, and mutual collaboration, # 2 conceded that #3 (adaptation & tatting) was better.
        Starts with chain, with inward picots for bilateral symmetry, and work moves from right to left.
House #3 (Julie Santos Villegas): An immediate & willing response but later needed help which #4 provided, but health forced another shift.
        Starts with a ring and work moves from left to right..
House #4 (muskaan): Formally adopted and continued to maturity.
        Starts with a ring and work moves from left to right. With options shared.


TWoT (This Way or Tat?) and Diagram Notes :
original model
Considering Frau Endrucks did not like decorative picots, all her edgings have a line of free picots along the top side (as seen in her tatted model pics) ostensibly to sew down the lace along that side while the other dangled.
original diagram
However her diagrams are ‘upside-down’ and this line of picots lies along the bottom.

But there is a 3rd aspect. Her diagrams are read from left to right. Most of the patterns start with a chain, and when we actually tat a chain normally (not direct tatting) and continue, the working progresses from right to left (as in Houses 1 & 2).
I find myself doing mental & physical callisthenics in order to sync her diagram with the work in my hand. I like to know where/how my very first element faces, and where the threads emerge to continue – this orients me correctly till the very end. This is especially true for her patterns which involve frequent changes in direction.

Hence there are 2 solutions I have employed –
original diagram flipped
1. Try to start the pattern with a ring. It has obvious advantages, including CTM and hiding tails. It is how I presented this pattern, shifting the start from a chain to a side ring. (Julie had first started her adaptation sampler with the central ring and diagrammed it accordingly, moving from right to left). Now the work progresses from left to right as in the diagram. 
2. Draw a working diagram where we follow the pattern exactly as Endrucks has written starting with a chain, but the diagram shows this first element on the right instead of left. And the diagram then moves leftward (as in the flipped diagram above). No need for any brain callisthenics – simply lay the work against the diagram and you are facing the ‘right’ way.

One more common feature of several patterns is that the central ring at the base (from which chains radiate) is tatted at the end of the motif. The only reason I can think of is to make it easy for a designer to estimate how large the ring should be and avoid multiple prototypes. Anyways, several of our pdfs show this ring as per the original. I have always shifted it towards the start of the motif joining chains to it, rather than joining the ring to chains.

TIP:  Potential Pitfall : Joining to the wrong picot!
 
This is one area where I frequently made a mistake and had to retrace my steps! This final one I noticed too late but fixed it by carefully snipping the joined picot (and glued the cut ends), and sewed the correct picot in place. 
This is the 1st motif I tatted in early October to understand and explain the pattern to House#3. By November, I had to tat one more (no pic) to refresh my short memory and then went on to the sampler below ...
Each motif, especially with decorative picots, has the shape of a petal. 
Gather up a row of motifs to create a 3D flower! Alter the length and width 
and you get more layers and visual variety!
Of the 4 motifs in the sampler, the first 2 follow the pattern, each colour giving a clear idea of which shuttle forms the core thread, in other words, which shuttle is in the hand.

In the 3rd & 4th motifs, I added decorative picots along the top edge of the rings, and Catherine Wheel Joins in some chains for a smoother look. Remember to count the CWJ as 1 stitch (as in 4th); notice how smooth and symmetrical the inner negative space is? I also played with colour placement, using Reverse Join, Twist Work, etc. (see Lock Join Plus for more options).

This is one more idea I had – tat the entire motif with bilateral symmetry. The best part? No need for paper clips and inward picots - no BBT (block below tatting)! Notice the central ring is worked as a split ring and the innermost left chain is tatted first. 
But some tweaking is required especially on the right side ... when I get my bearings back ;-P

Before signing out, let me quote my partner Ninetta -
I would say one more time that this project taught us a lot also in terms of collaboration. The n.7 changed family but each time "we" added a new piece in the puzzle, that is always an improvement, for both understanding the pattern and learning how to present the modernized version.

Remember, you can find all of Endrucks' patterns (& derivations) in English here - 

Monday, 23 August 2021

more reflections

Pin It now!

Clearly I'm not done with that motif yet! This is the snowflake version from pattern #17 I mentioned here. With this snowflake, we will now have earrings/pendant; 2 square frames/lace (one by Reiko Akamatsu - see below); edging/insertion/etc.; and a hexagonal motif (round 1 of snowflake); all adapted or derived from the same pattern! And yet, it continues to entice me, though I will be holding off for now in order to concentrate on completing the main pattern pdfs for those on my list (there seems to be no end to the admin work on this project) so that we can see the 'completion' of Endrucks 1920 Project in November.

I continue with the name given to the edging by Ninetta - Reflections. Above is both a trial culminating in a prototype for the snowflake adaptation. The 3 arms on the left of the tail ends are the final count. Pattern will be shared for free later.

The snowflake is worked continuously in 2 rounds. Above is the first round and it creates a standalone hexagonal motif! With the right beads, it could be a beautiful pendant.
In Anchor Pearl cotton size 8, each side is 3cms; and across it is 5½ cms.

Techniques used: 2 shuttles, thrown/floating rings, large mock rings, downard/inward facing picots, lock join.

TIP: In order to get the beautifully domed arch as in the topmost arm, it is important to keep the joining picot between chain and end thrown rings longer than usual. This avoids any pull on the chain when the joining picot is small. This same tip works for the earrings, edging, etc.

Unlike the edging, I had deliberately avoided decorative picots in this pattern to gauge the bare look. The picots in the center were there only in case a central ring was needed. So I folded and sewed in the decorative picots in the center. 
Now that's a bit too bare, right?! Looks better with those picots around the central space.

Ninetta suggested onion rings for the large empty space - she drew over the pic I sent - and suggested we could have 2 versions with and without the onion rings.

And here are 2 trials on the same flake. I like the one on the right better. 2 picots create an interesting feature, don't you think? 

So, what do you think of this snowflake without decorative picots? Should there be more picots as in the Reflections edging here. And what do you think of the onion rings?

💚💙💚
Since I did not post her pic earlier when I shared my Superimposed Squares adaptation, here's how Reiko Akamatsu tweaked the straight lace into a square, adding some points to the originally curved portions and downplaying the smaller points (direct link to her pdf - https://drive.google.com/file/d/1JANNY3JWRJb-4BgLV5XEB4unDrrFhNQ7/view). The block chains create a denser curvilinear garland within!
And check out our gratitude post for a few more pics (and links) of this incredible artist from Japan.
 
Okay, here is my simple adaptation for comparison. Notice the tweaks she made and the effect has has created?

For all updates and details, scroll through the patterns & arrangements in the Endrucks 1920 Project