Friday 29 June 2018

Mock Rings 2 Lock Join

Pin It now!
Time passes swiftly!
The third post in the Mock Ring series … 
Before I begin, there are a few resources and examples that I have been collecting, some of which could have been included in the previous segments (under-over join). eg. Frivolé used the U-O join to great effect in the Victorian Trellis Doily here. (This doily, as well as many broad collars with mock rings, is from The Priscilla Tatting Book, 1915).  And Eliz’s exploration here
These, and more, will be listed at the very end of the Mock Ring series.

Lock or shuttle join is a more frequently used join to make mock rings. Many different variations are described in segment 2.

Mock Rings 2 : Lock Join  

For ages a lock join has been used to create a mock ring out of a chain. Many antique patterns are testament to this. Even today, lock join is more common than the under-over join as far as mock rings are concerned. Variations arise depending on where the join is made.

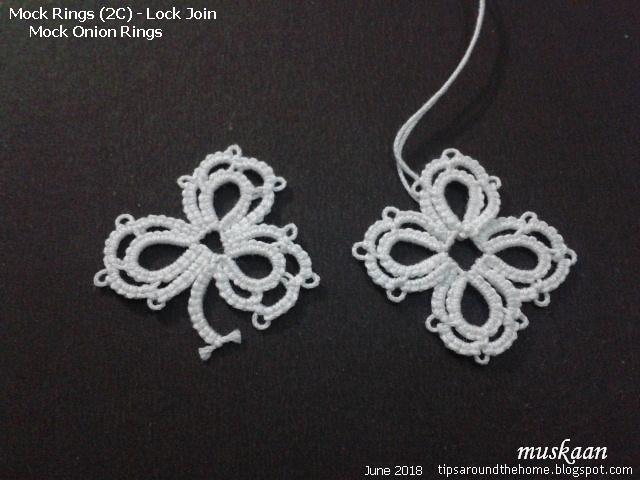
 Lock Join to earlier picot(s)
A chain can be tied down at both ends, through a picot on an earlier row/element to create a loop resembling a ring. It may be through a single picot or two closely placed picots. 

To distinguish separate rows, Row1 here is tatted in cream (shuttle & ball thread continuous). 
A 2nd row is worked over this, using the small picots to make mock rings. 
For Row2 shuttle contains cream thread joined to a ball of variegated thread for clear distinction.

2A. Lock Join: to same picot
A chain is linked to a previous picot to start a mock ring, and again to the same picot at the end of the ring. Thus the mock ring starts and ends at the same point.

 
When the picot on a previous row is reached, the chain is lock joined to it. 
Pull a loop up through the picot and pass shuttle through this loop. Then tension the loop.


Continue tatting the chain for desired length; 
pull up a loop through same picot to make another lock join...

A mock ring is formed. 

2 such mock rings separated and flanked by chains are made.
In 2nd mock ring, instead of pulling a loop up, the loop is pulled down through picot and shuttle passed for the lock join. This creates a tinier footprint as is visible when the 2 mock rings are compared.

2B. Lock Join: to separate picots
Picots may be placed close together on the previous row (the ring in Row1). Mock ring is formed by making a lock join each in separate picots, 1 or more stitches away. This gives a slightly open ring since the ring starts and ends at different points.

After anchoring the chain to one picot with lock join, 
continue chain and lock join to another picot.
Go around the ring joining to alternate picots. 
Antique patterns often cite these as mock or false rings, though modern notations simply instruct us to make chains.
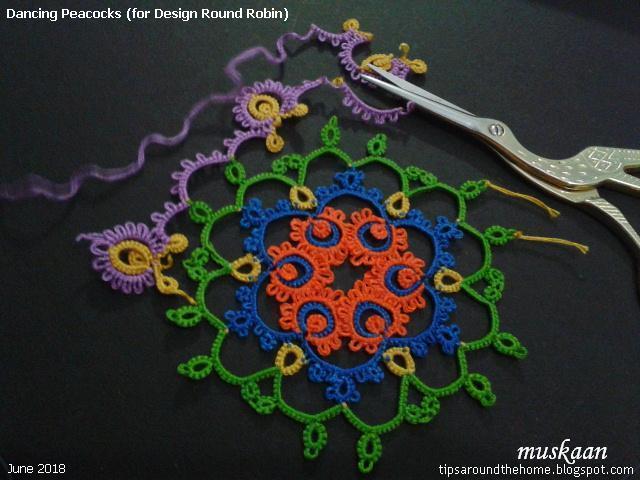
There are more variations in this category. Perhaps you can guess which? 

…. to be continued

Mock Rings 2 LJ mock onion rings

Pin It now!
Continuing from the last post … I’d like to point out that the categorisation I have adopted is not watertight. This is the closest I could get to organising the various types/styles of mock rings in an orderly fashion, choosing one main feature for grouping so that it becomes easy to remember and recall. Along with the similarity it highlights the slight variations.

Lock Join - Mock Onion Rings 

In previous segment the chain was converted into a ring by joining to picot(s) on a previous row. Now we move closer home with the join coming at the ‘base of the ring’. Here the ‘base of a ring’ refers to the bare thread between rings in a previous row or to a previous element.
When the chain is very close to the ring edge, it creates the impression of an onion ring. 

Traditionally an onion ring is made of usually 2 true rings encircling the previous one in flat layers - all starting and ending at a common point. However, if the layer(s) is worked as a chain, it becomes a mock onion ring.

2C. Lock Join: to bare thread between rings in previous row

In this variation, the join is made to bare thread between rings in a previous round. These chains give an effect of another ring encircling the earlier ring – a ‘rudimentary' mock onion ring.
The Shamrock Leaf in above collage is made in 2 continuous rounds. The medallion of 3 free rings is made first, leaving a bit of bare thread space between each. These are true rings.
An outer chain round is then added. Each chain is lock joined to the bare thread between rings, giving the impression of onion rings.

[ Reference for section 2C is from the Craftree thread: Are these very old onion rings?. It refers to a pattern on p.28 of The Ladies’ Worktable (1871, March 4). ]


2D. Lock Join: to bare thread/base of previous element 


In onion rings, with each additional layer, the size of ring increases and a large ring is difficult to close. So, instead of true rings, the outer layers are worked as chains in both needle and shuttle tatting. Each chain layer is lock joined to the space at the beginning of that layer. It now resembles a ring.
In the above collage, the 2 inner cream rings are true rings followed by a chain using ball thread. After encircling the rings, the chain is lock joined to the tiny space between two layers. We can continue to add more layers in similar manner.
In the Dancing Peacocks medallions, only the innermost ring is true. Switching between 2 shuttles with different threads provided alternating colours.

In the lead pic, the mock onion ring on the left is made with twin true rings, followed by 2 mock ring layers or chains joined back around. 

[ For more details on onion rings and mock onion rings - Types of Rings by Judith Connors
(free sign in to Craftree to access document) ]

This concludes Category 2 - Mock rings made with lock join. Even though lock join is an essential feature of the next set of mock rings, the 3rd category will focus on linking to a picot at the start/base of the chain itself. 

....to be continued

Related Posts

Wednesday 27 June 2018

exciting new projects

Pin It now!
Couple of days back my Mum-in-law asked for some tatted motifs for a new white Kota cotton saree. She needs 40 such motifs to be sewn all over, or a narrow edging along the lower edge & pallu.
No hurry. But I got excited and immediately sketched a few ideas. Finally settled on flower sprigs – simple flowers attached 2 or 3 together with some leaves. I’m hoping to make each one a bit differently to keep up my interest.

Here’s the first of Alibaba's 40 thieves !!! 
Blossoms Motif #1
  
Working with Lizbeth 20 threads, this is 2” long and 1” wide.

Hubby didn’t like the colour placement – perhaps the orange flower should’ve been on the yellow side. I’m keeping this for now and can choose the better ones later.


The pattern is notated if anybody is interested, and as a personal reference. My notes/jottings get scattered… plus here I can see the model alongside.

This is a single shuttle motif.

I would love to hear your thoughts and suggestions – plenty of room for improvement at this early stage.

Blossoms Butterfly wannabe ....
Leading up to the sprig, I did a trial with some scrap thread. Adjacent rings joined only 2ds from the base, causing the rings to fan out.
Design TIP: Attaching towards the base causes rings to spread out; for closely placed rings, attach higher up.

I stopped after 4 rings, but still had a short length of thread left. So I worked a smaller ring, folded it over the center, and lock joined back transforming it into a butterfly! I’ll try this again with 2 broader wings.

Treble Tatting - first attempts ...
And another source of excitement – Ninetta’s latest Treble Tatting ! Comments on her post give you a slice of the reception this technique received – need I say more ;-D

My quick first attempts… A couple of times the core thread got stuck while snugging the treble. I haven’t yet figured out why.
But the process is such a great combination of crochet (chain at the beginning) and roll tatting. I cannot fathom How her brilliant mind works to even think of something like this! It is the best crochet-to-tatting transformation I have encountered so far.

I tried to do it with a larger picot & more rolls (4 & 5 instead of 3) aiming for a double treble, but was not successful. Another idea is to make more chains and see what happens. I’d like to explore it further; but I’m sure Ninetta will come up with more variations :-D


wonder how the next thief will turn out  ;-P
stay tuned with tatting in hand

Sunday 24 June 2018

rotten core

Pin It now!
… or rotten pulp ?!


I've been spending the last couple of weeks bringing my four Design Round Robin doilies up to date. They had been neglected for the last couple of months, but now I am finally at par. I will share them in more detail gradually.
This post is merely about one rotten evening.

I was tatting the 3rd round on my Dancing Peacocks doily. Half way through I realised I’d been attaching it on the wrong side ! Much as I love fs/bs tatting, herein lies the disadvantage.
Not only can you see the colour blips in previous rounds (in pic below), but also how the stitches in the last round look more like rolled tatting with misplaced picots (purple in above pic) – a visual reminder that there is a distinct front and back side to tatted lace in directional and colour tatting.

About to snip off both threads, I remembered Jane McLellan's excellent pictorial directing us to snip rings and not chains.  I had stopped doing this ever since Carollyn's whip stitch method entered my tatting life, taking away all fear of hiding ends.

Fortunately, this round is mostly chains with stitches coming from the purple; tailor-made for the above technique. So off went the scissors on the mustard core thread and in no time I had rescued all the purple. Instead of cutting across the rings, I snipped through the core at the base of the ring.
For some of the stubborn points, especially near the lock joins, I inserted a fine crochet hook to make enough space for the scissor tip.

The unravelled thread is still wavy and vulnerable as seen above (these are 3 strands of Anchor embroidery thread). So I added another step -
I started winding this unraveled end on a new bobbin, giving it time to rest and recover. With the unused part of purple thread now at the free end, I started the round again with this ‘fresh’ thread. 
Turns out, I didn’t even reach the unravelled part in the corrected round - in a future post.

I lost my tatting and time, but did learn Aurora's method of capturing the inner ring in onion rings. Kathleen, who designed this round, used it and I followed accordingly. Aurora had shared it in the online class but I hadn't tried it out.
So not all was lost - new method learned, and pulp saved !!!  

Ahem..... the rotten core and pulp have twisted my arm to include their comment :
"Stop blaming the threads -- the fault lies in this tatter's scattered attention !"

happy tatting always ...
let's make sure our fruit and lace stay healthy :-))) 

Sunday 17 June 2018

wish to be a fish!

Pin It now!
Oh yes, you read it right! I do wish I could be a fish and stay in the water. It has been so horrid – hot and humid – here for the last 3 weeks that all one wants to do is laze in cool water or swim about like a fish. All energy is sapped out. We have been facing temperatures in the 110°F or 44°C range and no respite in sight.

So as I was saying, this adorable little fish tat-along came at the right moment!
I’ve admired this cute Kiss Kiss fish all along. Loaded my shuttles with thread and beads.

designed by Carollyn Brown

Size 20 Lizbeth – 132 Tropical Punch and 
pearl beads which are slightly larger than the required size 11

Day 1 – the tail fins and ventral part of the body.
Two long tails from each shuttle act as the padding for the body to allow the fish to keep it’s shape. I really like how she used the tails instead of adding thread separately!

Needless to say, the stitches are unflipped here (reverse stitch for encapsulation or padded tatting).

Day 2 – eyes, kissing lips and dorsal half of body.
With beads for eyes and lips in place, the encapsulation continues on. Dorsal and ventral fins are made with decorative picots.
After joining & knotting back to the tail fins, I simply tied a bow with the thread ends instead of hiding ends. Yup, lazy!

I thoroughly enjoy patterns that can be worked all from the front! And a sweet cute little fish is just so much fun! I do wish I could’ve taken pics against better background with seaworld props. But the weather does not permit all the physical activity involved ;-P I'm fried fish here ....

I intend to make this again with thread & bead sizes complementing each other. Perhaps then I will exert myself for a better background.

Carollyn has explained everything beautifully with stepwise pictures. She has given me permission to draw out a diagram for her patter pdf. So stay tuned to her blog !
It may be a small fish, but the designing is very clever - no small fry !

Thanks a heap, Carollyn, for this wonderful tat-along & pattern!
I still wish I could be this fish :-D


Monday 11 June 2018

I'm on the take

Pin It now!
Ummm, that news is Fake ! 
Nevertheless, I did succumb to Temptation. It was a Book!  How could I say no?
Aah, heart in hand, I refused. Not once but twice and again later. Even went to Amazon looking to buy it.
She was just so deliciously persistent.  How could I break her enthusiastic heart ...
Am I that heartless ?! ;-P
So these are what tumbled out from Denise’s generous hand into my grateful lap after travelling over 12,000 kms. She had an extra copy of Billie Heisler’s book and wanted to send it to me after reading this magic pathways post

And she sent so many friends along to keep it company ....
... hand dyed threads (never imagined I’d ever hold them in my hand) – one each of Marilee & Karen Solomon, metallic, marigold, … Lizbeth size 10 from the Sweet Tart mix (okay I had asked for just one length of size 10 in order to compare with my Anchor size 20s and put the size issues to rest).
The Marigold is her first attempt at native dyeing -- I'm glad she explained it, making me treasure it even more.

.... her own tatting – priceless! It is wonderful to be able to hold someone’s tatting in hand. This ice drop has an Adorable bee hovering around it!
Isn’t that heart the cutest – “made with love”!!! And all her thoughtfulness, too, is apparent in the entire packaging.
The pink ice drop looks like a pretty flower from both sides! Photo has watered down the lovely pink shade unfortunately. It is flanked by one of her prettified butterfly.

I’m still jumping with joy unable to focus on how to use these lovelies. Hope I can do justice to all she’s sent. Suggestions are most definitely welcome.

And to top it all – a friendly handwritten card (on the top left)!
She also inserted the latest Handy Hands newsletter and their Lizbeth catalogue! The catalogue couldn’t have come at a better time. 
A couple of weeks back I received my order of 2 Lizbeth packs – the Ice mix and Sunkist mix – in size 20. The balls have shade numbers but no names and I was going to go to the HH website to hunt down each. With the catalogue in hand, I simply ticked off the fun names.
I needed solid colours to use for my pattern samples/models. We easily find conversion tables between Lizbeth 20 and other brands, unlike Anchor. I have listed a few in the Resources page (click on Tab) and will soon add more. 

So many goodies and it’s not even my birthday yet ;-P

ps: I’m most definitely not on the take ;-P I have long standing offers from generous tatter/blogger friends which I have steadfastly declined (entire loss being mine).

Can’t thank you enough, Denise ! 
You are a gem & I treasure your friendship.

Friday 8 June 2018

that one magic node

Pin It now!
Inkscape hack #3

Be it any medium, I am a freehand, freestyle person. 100% accuracy and precision takes a huge toll out of me. Freehand makes me joyous, even if minor flaws creep in. Trading practicality and hedonism for perfection - my mantra or excuse?! ;-P

I had been pleasantly engaged in drawing a seemingly complex tatting diagram for my mate. It consists of many parts that are not all symmetrical. The many sized rings and chains not only face in different directions but some elements have lots of picots.

For picots, I find it easier to draw small straight lines individually with the Bezier (or pencil) tool – trying to orient as I draw. This gives me a quick first draft. Then I group them together and change their value, colour, etc.

Length and orientation may still need tweaking when the whole element/portion is done. Earlier, I would select each picot and use the arrows to do it. Not always convenient since the lines are relatively small and the arrows come in the way (how much can one zoom for each picot – my old compy can’t handle it ;-D)! Further, unless the Control key is held down, the thickness/value of the line changes. This meant an additional step to bring back the required value.

This time I discovered a very easy and sure-fix method that has multiple advantages. All we need is Just One Node! Quite magical, I’d say :-)

We can use a single end node to increase/decrease length and tweak direction. We can also shift the start/end nodes for proper alignment with other elements.
The greatest advantage, besides ease and speed, is that the thickness of the line does not change at all! And it is great when drawing asymmetrical diagrams

Robin’s tutorials cover symmetrically placed elements, and she uses the pencil tool to draw picots


I. Straight Line (Picot)
Choose just one ‘end’ node to change length or direction ! 
(see diagrams below)

Fig1 shows the first draft lines for picots. 
After selecting the picot to be tweaked, I choose Node tool. 
One can choose either of the 2 end nodes. The chosen one will become red coloured to show it is active. 
Then drag 'outwards' (in relation to the line/picot) to increase length (fig3) ; 
drag 'inwards' to decrease length (fig4) ; 
or drag sideways to right or left to change direction (fig5).

II. Curved Line/Arches (Chains) :
Choose just one node to shift arches - length or position ! 
(see diagrams below)

You might remember my quick and easy way to draw a continuous line of chains and create arches between two nodes. Sometimes, after changing the value or on close inspection I find that the points are not aligned correctly - 
one point may either not touch the ring (fig3); 
or may have invaded inside the ring (fig4); 
or may be misaligned (fig5).
All we need to do is select that point, convert to Node and move it in desired direction !

I'm sure this hack is nothing new. But for me it was an exciting self-discovery !!!

Related Posts :
Inkscape Hack #1 - drawing continuous chains
Inkscape Hack #2 - designing from pre-existing template 


hope this shortcut is helpful too...

Monday 4 June 2018

swept away

Pin It now!

Or more accurately, swept under the carpet during blogger’s spring cleaning! Probably dumped forever.

Blogger has discontinued comment notification through email (it no longer supports OpenID) for the last couple of weeks.
It’s a bit inconvenient, but I’ve found my extra steps to get around this mess since I don’t want to hamper ease, freedom and openness when leaving a comment. I don't want to moderate if I can help it.

Here’s what I do now ….
  1. When I publish a new post, I tick the “Notify me” box and voilà I receive your comments in my Inbox. I’ve done this for my last few posts but not the almost 375 prior posts.
  2. I now check ‘Comments’ on my blogger dashboard every day, to make sure nobody has left a comment on those past posts. I’d hate to miss a question …
((Huh, if only I can remember ! I forgot to click on notify me when I published ;-P ))

Further, since OpenID is out, only those with a gmail account will see their name/avatar in the comment. For others it will be published as 'Anonymous', in case some of you have been wondering. So make sure you leave your name or avatar so we bloggers know who to thank.

I hope my dear readers will continue to support and comment. You can also email me through my Profile page.

ZZZZZ