Showing posts with label FS/BS tatting. Show all posts

Sunday, 7 August 2022

mirroring

Pin It now!

 Only 8 more days to go and my heart is beating fast ....

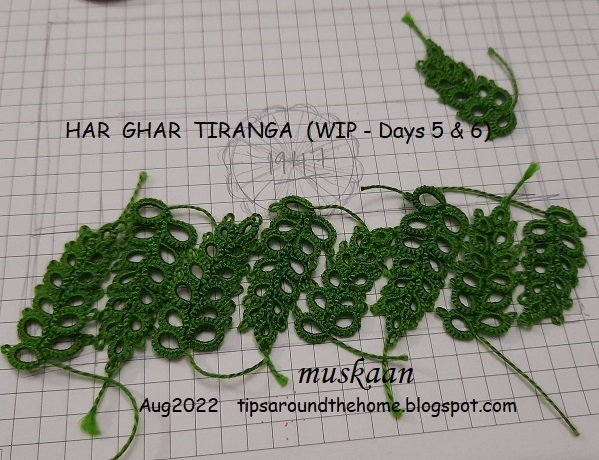
My messy heart after 6 days 💗

This is how I intend to place the leaves. In the background is the sketch for reference. The center is an outline of the coin. And there's one extra leaf but who knows it might come in handy once I start gluing.

Some of the initial leaves are shorter 'coz I added 2 extra leaflets along the way.
I have a shuttle filled with scrap lengths. Once glued, the empty spaces will be filled with the required number of leaflets.
This is the Laurel Leaf pattern (on page 7 of this pdf - https://drive.google.com/file/d/0B5MqI5ByadI4cjRaV3h3Qjgyajg/view?resourcekey=0-OQ9HULLWS0raSHIL0dR4Tg) In case it does not open, send the automated request.

TWoT Notes: Notice how the 4 leaves on left side face left while the 5 on the right side are bent towards the right? I followed the exercise set out in the pdf. Instead of starting the first ring frontside, simply start it backside (RODS or reverse order of double stitch ie., 2nd half st, then 1st half st.) and continue with the pattern working fs/bs tatting throughout. The leaf will curve in opposite direction.
No need to work out the mirror-image in the pattern!!!

Tonight I will try out the white pattern before working it for real. I've diagrammed it, but need to confirm stitch count, size, etc. 

Wednesday, 6 April 2022

honoured and humbled

Pin It now!

I wanted to share this post on 1st April but got delayed. My bag of expected and unexpected gifts had arrived just 36 hours prior!!! But let's start from the beginning ....

Last November I was approached by an awesome designer whose blog I have been following for some years now - Erika Tashiro, better known as Tat-Marmelo (or tass_tat on Instagram). She was going to publish her 1st book of doily patterns in English (the Japanese version had been published in September) and needed some help with the Techniques. How could I refuse - it was such an honour.

This is her fabulous Lotus Flower motif she sent. Each stitch is perfect, each chain arched evenly, the thread has a stiffness that I haven't normally encountered in Anchor, Red Heart or Lizbeth. The tatting is so seamless, that one cannot locate the start/finish. Such a joy to hold in my hand.
She offered me a generous fee and free books (up to 30!) I immediately declined the former but asked for 4 copies. When they did  not arrive after a month and she couldn't get any clear response from the postal service, she kindly sent me 4 copies by air, along with the motif. So now I have 8 copies, 2 messages in her neat hand, and all these goodies! I am truly humbled.
I have always admired her artistic patterns and had printed out a couple of her free patterns years back. To have them all compiled in this spectacular book is bliss. Colour-coded diagrams accompanied with textual patterns, tips, and techniques. Clear pics of tatted lace. Very high quality throughout. Impressive and inspiring!
In the foreground is a cute cherry blossoms pop-up card with birds. 

These small Clover shuttles are ideal for tatting with size 80, and am so happy these are bobbin shuttles since post shuttles refuse to move in my hand.

See that reddish circle? It is April Fool's (Reiko Akimoto) 2016 Rose Circle Doily. Erika remembered my attempt to decipher the inserted rings and sent me the diagrammed pattern and technique! One more doily coming up, besides all the lovelies in Erika's own book! 

5 balls of size 40 thread - yummy!!!

Erika's book provides plenty of minute engineering and visual tips for impeccable tatting using Jan's method. Normally we have a few simple 'rules' for directional or fs/bs tatting. Her minute observations have revealed aspects I never even considered. She has micro-managed Jan's method and the above motif bears witness. 

For years now, I do fs/bs tatting and often choose to start a ring or round backside. Erika has done the same and lays out her philosophy in a prioritized list of which elements/rounds to start frontside or backside.

Clover polar grids that double up as design guides and blocking sheets. The last pages in her book have these grids, too! These, however are made of non-woven fabric and I'm sure they are washable, too.
This cloth fabric from Atelier Shishicass, has 2 halves of large polar grid printed on it. Very functional and practical. Now I have no excuse (except laziness ;-P) to not pin out my lace instead of using the rolling pin.

'Tatting Lace, Marmelo. Pattern Book 1' has so many gorgeous doilies, motifs, and jewellery to tat. I haven't been able to start on any, but treat my eyes on them frequently. And of course, she made my ITD memorable!

I mainly helped with the techniques section, that too at the final stages, and did not deserve the Supervisor tag, but she insisted. It was such a pleasure to communicate and work with her. She has been very receptive to all my suggestions and made respective edits, including some on one of her patterns. Her graphic depiction of beading and some other schema and legends are so clear and I hope to learn and apply the same to my patterns.    

Erika has already started to design and tat in preparation for her next book! Yet for close to 2 years she worked on her book, leaving little time to create new designs. Her 'inside story' of the entire process with lots of relevant information is something any designer wishing to publish a book would find useful. She uploaded 3 consecutive posts, the last of which is for her English version - https://tat-marmelo.blogspot.com/2022/03/3.html

Many many thanks for the opportunity to work with you, Erika, and for all your generous gifts! I wish you success and creative satisfaction in all you do.

Wednesday, 2 September 2020

influential intrusion

Pin It now!
It all started when Grace Tan saw the intruding picot and brought out her long-stalled pattern. She thought it could be used in her serpentine pattern and simplify the working instructions. And I was one of the first few she roped in to test tat Endless Hearts Braid with Corner.
Grace adapted her heart patterns into an undulating length of lace - a clever symmetry - and a larger heart for the corners. The frequent directional changes take a bit of getting used to, but soon one can set a rhythm. It still needs some concentration, especially if one resorts to fs/bs tatting as I did, in two colours, trying to keep the blips at the back. I had to draw my own diagram for reference initially.
 
Inward facing  picots - She substituted the Intruding Picot (ip) with Ninetta's Face Inward Picot (FIP), although the ip worked for me (above pics) in the 3rd and 4th corners. FIP was my first time and it was not easy to tease out the leg in perle cotton. I followed instructions for the braid, using FIP in first 2 corners.
Encapsulating Picot Join (EPJ) - I got to try out this new blipless join that can link several elements together at a later time. As the term suggests, it is a picot join that encapsulates or traps another element or picot. More elements can be linked to the same point later as well.
Sometimes I got the EPJ looking almost invisible from the front, at other times a thread bulge was visible. I played with many tweaks, such as up and down loops, etc, but need more study in thicker thread to figure out how best to avoid that thread to make it consistently indistinguishable.
Layered Picot Join - My 'easier' alternate to EPJ -
1. Make a longer picot on the ring such that it can span the chain(s) that it intends to encapsulate.

 
2. Keep this picot at back of work and make a normal picot join through Both picots simultaneously. 
3. This is how it looks from the back. 
Note - these pics were taken when I was working backside. 

 
4. This is how it appears from the front - the join is invisible here.
5. This is how the hook will be inserted through both picots when working frontside.
And a 4th element can be joined to that same picot through the back. I love how clean the chains look - the join is invisible.
Drawback - the rings tend to lie slightly below the chains, but with sufficiently long picot, it can be avoided. Mainly, there is a colour bar at the back (clearly visible in #3).
Turn Chain (tc) - Of course there are several other ways to work this, as outlined in Grace's post. Overall, I limited myself to very few tweaks and substitutions, trying to largely stay true to the pattern. I have used many ways to turn a chain, but stayed with her version of turn chain which was to simply rotate the stitches in such a way as to reposition them, like this Twist Work (TwW).
There are also several applications to this versatile pattern! -
Add a drop crystal and beads for a beautiful V-shaped necklace or collar; or a square collar to sew on!
Without the corners, it is easily a braid, bracelet, bookmark, ring, choker, etc. 

In Anchor Pearl cotton size 8, the braid is 1" broad ; 2 hearts = 1.5" long. The entire frame is 3" on the inner edge and just over 5" at the outer edge.
All in all, a good learning experience with tons of ways to work it.

Romancing With Life - an autobiography by Dev Anand -
This all-hearts pattern seemed a fitting frame for this true karma yogi's life, work, and joie de vivre perspective. Ageless, who died at 88 with his boots on and with more energy and curiosity than his juniors by generations.

Dev Anand needs no introduction to Hindi film buffs and Indians in general (isn't that top left pic just great?! - the 3 great contemporary heroes). But my international friends, can you identify who he is with in the top right pic?! This hardbound book is a feel-good read for the most part, dwelling mostly on his various loves - be it nature, mountains, films/film-making, women, beauty, etc. There are more areas and depth one would have liked to read about, but it is understandable how the entire focus was on romancing.


Friday, 8 May 2020

captured onion rings

Pin It now!
Ninetta has been posting a comprehensive study of Onion Rings – their construction and variations – along with pictorials and tutorial links. A must-read for anybody wishing to learn, explore, or improve. A sumptuous dish!
My guess is that Marilyn followed one of those links to my blog and left a comment for help with captured onion ring
Ever since I tried it here for the first time, I have been hooked to this method and have used it consistently with good effect. I think this is a good excuse, and opportunity, to present a stepwise tutorial.

Captured Onion Rings
Kathleen Minniti's method

BACKGROUND :
Captured Onion Rings are a pair of concentrically placed True rings. These true rings can be tatted with the same shuttle, or with different shuttles for a 2-colour version.

Aurora Lozada first shared her Perfect Onion Ring method (pdf) in 2014 with the Online Tatting Class. She captures the inner ring between the core and working thread After making 1ds. Thus the inner ring is captured Between adjacent stitches of the outer ring. After closing the outer ring, the emerging thread is offset by the 1st ds. 

Kathleen Minniti improvised Aurora’s method to capture the inner ring Within the 1st half-stitch of outer ring. After completing the outer ring, the thread emerges from the center.

I can now understand Aurora’s method, but am still unsuccessful at executing it! Kathleen’s method is like tatting over tails, substituting the inner ring for the tail. I can do that - and if I can, You certainly can!  

Captured Onion Ring Pictorial - FRONTSIDE

I have used a single shuttle for the pictorial. 
Inner ring : 6 – 6.
Outer ring : 10 + 10.
1. Tat inner ring. Close ring and loop the thread around to start outer ring.

2. Hold in pinch.

3. Start 1st half stitch – under ….

4. …..over

5. 1st half-stitch seen clearly after the flip, but do not snug.

6. Pass the inner ring through the open leg of this 1st half-stitch. Follow the core thread (just as in tatting over tail).

7. Bring the leg to the base of the inner ring by wiggling your left index finger, and

8. snug tight. Make sure the stitch is as close to the base as possible, and that the core thread slides freely.
9. Make the 2nd half-stitch (over-under) and

 10. snug normally. 1st ds complete.

11. Tat around the inner ring, joining to the picot. I used the ball thread or onion ring join

12. Close the outer ring normally. A pair of concentric or onion rings is ready.


In the above ConcentriCITY snowflake, there are 3 concentric rings where the outermost is a chain or mock ring. To bring the shuttles in position, the middle ring is worked backside. This is what Marilyn was referring to. Hence here are a few pics showing the backside working of the captured onion ring.

Note: In directional or frontside/backside tatting, the sequence of half-stitches in a ds is reversed (hence called RODS – reverse order of double stitch) working 2nd half before 1st half-stitch. 

Captured Onion Ring Pictorial - Backside

In this pictorial, both rings are worked backside, but this is not compulsory.

1. Inner ring worked backside. Loop the thread around to start outer ring, and pass shuttle over-under to make the 2nd half-stitch.

2. 2nd half-stitch made, but do not snug.

3. pass the inner ring through the open leg of the half-stitch, following the core thread.

4. Snug the stitch as close to the base of inner ring as possible.

5. Make 1st half-stitch. 1RODS complete.

6. Continue around, joining to the picot, and close the outer ring normally.

7. This is how it looks from the front. (There is some inadvertent space left at the base - the ring should've been pulled close more tightly to avoid that pink line).

Note : This method is so basic that it can be used even for chains/ mock rings, etc. , either in onion rings or in other situations. 


Hope this answers your question, Marilyn?


Many many thanks to Aurora & Kathleen :-) 
My onion rings have certainly improved!  

UPDATE : Comparison of Captured Onion Rings - original and variations!

Wednesday, 19 February 2020

a chained heart

Pin It now!

I fell in love with it right away. It is such a wonderfully elegant heart with a bit of freeform thrown in – just the way I like it. So it had to go to The Most Special person in my life for our very special day.

This is Renulek’s Serce Od Serca or Heart from the Heart. Such a beautiful conversion of a bobbin lace heart to a tatted lace heart. The pattern is free here.
Made with Anchor size 40, it is <7 cms high and 8½ cms wide.

I must apologise to Renulek for bungling up. Despite frequent referencing and such clear diagrams, I ended up joining the last chain on 1st round on a picot rather than at the base of ring. Realised only when I reached it after the 2nd round. Had to wing it, which is why you see a long chain and no small ring.
My eye keeps getting drawn to it ;-(

TIP Notice how the orientation of my heart is opposite to that of Renulek’s? In traditional tatting this wouldn't be a problem, but with directional (fs/bs) tatting, there is only one distinct front side.
TWoT (This Way or Tat?) Notes - The reason lies in the very first ring. I followed the pattern, and tatted the ring frontside, starting with 8ds. Realising it was going to face the other way, I peered closely at her photos. Huh, her rings were backside, and chains frontside - knotty naughty ;-D. This same orientation was used in diagrams, hence the confusion.
However, if you want the heart to face like her’s, in frontside/backside tatting, 
start the ring by reversing the order of half stitches (shs then fhs), 
OR,
start the ring as 5-5-3-8.

It seemed a bit forlorn all alone on the card. These S-chains made with scrap threads, saved the day. There’s more tatted lace and stuff inside, but that’s our secret ;-P

Meanwhile I’ve been hooked on the S-chains, clearing out my scrap lengths. I have a few ideas to cook them in SOUP* when I have a good stock ;-P (This is how the S-chains look with picots)


Many many thanks, Renata,  hubby loved it !