Showing posts with label lock join plus. Show all posts

Wednesday, 23 June 2021

2nd shuttle or ball

Pin It now!

 A question was asked recently in the context of a specific pattern. The pattern contained chains that faced opposite directions in an edging. It would be an easy "switch shuttle" if one were to use 2 shuttles. But she wanted to know if it could be done with one shuttle and a ball?

Yes! Of course, the easiest way is to do a shoe lace trick (SLT) or overhand tie, but you know I avoid it as much as possible, preferring other options such as Reposition, Twist Work, Reverse Join, and/or Reverse Stitch, whichever is most effective at the time. (See https://tipsaroundthehome.blogspot.com/2020/07/lock-join-plus.html)

Here's a quick sampler I tatted to show one way of  How to Avoid Using 2 Shuttles - using direct tatting.

Please note that this is Not the original pattern, though the general shape, and direction of each element, is similar. I also made up my own stitch count.

1. I started with the middle ring, unsure how long the leftover thread would last. But basically, we are tatting ring and chain segments, reversing work (RW) each time.
2. Now here is where the chain changes direction and our single shuttle is not in position. To bring it in position, either do a SLT, or follow what I did -
Turn work (as if turning the page), and direct tat the chain ie. with unflipped or reverse stitched (as in 2nd side of split ring).
Notice the chain takes the colour of shuttle thread, unlike the previous chains. 
3. Reverse work after completing the segment. This brings the shuttle to the top ...
4. .... and tat the 1st ring of next repeat. It looks like a thrown/floating ring.
5. Rest of the motif is again worked as alternate chains and rings, with RW between each element. Repeat the direct tatted chain and continue for desired length.

TIP: If you want all chains to have the same colour, SLT or Repositioning at the start and end of chain would be a better choice, and the chain would be worked with normal flipped stitches.


A couple of days back I stumbled upon Jon Yusoff's How-to - Avoid using the 2nd shuttle . See, thrown rings using one shuttle !!!! 


One might inquire 'Why replace 2nd shuttle with a ball?

My answer is that it may be a matter of preference, sometimes mood! It can also be a means to reduce the number of tails to hide especially if it's going to be a looooong edging. Of course, one will need to either have 2 balls of the same shade (in order to reload the shuttle) or preload several shuttles before using the remainder of the ball for the 2nd thread.

One other scenario is when the rings are worked as mock rings (MR) or as self-closing mock rings (SCMR), a single shuttle and ball can work well.

Personally, I do not mind hiding ends, and 2 shuttles are more portable and manageable (a shuttle won't unravel if it slips off, unlike ball of thread). 2 shuttles also provide a lot of flexibility and freedom. 

As I always say, there's no absolute right or wrong in tatting. Choose what you feel comfortable with, or what the pattern demands, or how the pattern can be adapted to colour(s) and techniques. My point is merely Be Aware that there are several paths to the same destination, and with a bit of thinking ahead and adaptation you can travel any road!


You can find all tutorials here - 

Monday, 15 March 2021

balancing act

Pin It now!

Vintage pattern in modern format and pictorial showing some of the options available especially when using 2 or more colours.

Pattern Updated - March 17th, 2021 (in this colour). 

Pattern #1 (Happy Hands) from Frau Eleonore Endrucks Leichtenstern's 
book Die Schiffchen-Spitzen’,1920

Then - The above is an old model from 2015, tatted as per original pattern. Look closely and you will see that the left and right side of each motif is not a mirror-image; all chain stitches face the same way.. as in block tatting. It makes tatting very easy as seen in the notated sequence. You start with a chain, holding a picot with paperclip and work up and down towards the right.
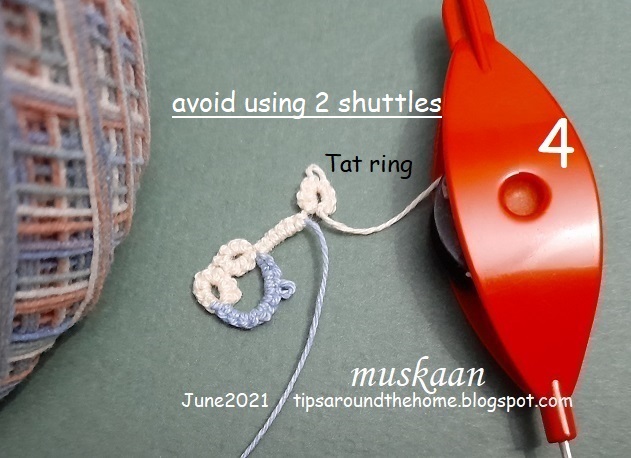
modern sequence of work
Now - We would shudder at the nonsymmetrical nature of the original! We now prefer that everything is laid out properly, symmetrically. And when using 2 colours, their placement is balanced. Which led me to the reworked 2-colour model inlead pic, and a pictorial to describe the steps as well as options we have. The modernisation involves a bit of complexity in tatting sequence, but it is the best/easiest of all I tried/could think of.

Notations/Abbreviations used : 
-,p=small picot; --=decorative picot; =lock join; rw=reverse work/turn work; SS=switch shuttle; dnrw= do not reverse work 
Techniques used :
2 shuttles; thrown/floating ring; lock join; fs/bs tatting (optional); reverse join (optional); 2-colour tatting (optional) and related colour placement methods like SLT, etc. 

NOTE: 2 colours are used in pictorial to highlight which shuttle is in play.
Shuttle 1 - blue thread ; shuttle 2 - mustard thread.
All joining picots are very small.

OPTION 1
When working with single colour, follow the directions from 1 to 15. 
    1. ring: 4-4-4--4-4-4. rw
     B chain: p 4•4•4-4. rw
    2. C ring: 8-8. dnrw, SS
    3. D chain: 4•4• SS
          E ring: 3-3. SS
       F chain: 4•5•
NOTE: As often happens with concentric chains, you may need to adjust the count with an extra stitch or half so that they lie flat.
  
    4. G chain: p 4•4•4-4. rw
TIP: For smooth curves, use CWJ (Catherine Wheel Join) instead of LJ (lock join) wherever possible
    5. H ring: 8+8. dnrw, SS
       I chain: 4•4• SS
        J ring: 3-3. SS
      K chain: 4•5• . rw  (Instead of lock join at end, I prefer making a picot join as in Motif#2)
    6. L chain: 3-3-3-3. dnrw, SS
First Motif Complete.
NOTE: Unlike the original, with our tighter stitches and tensioning, this edging tends to curve (as in lead pic). If you want a straight edging, make L chain: 3-3-3-3-3.

Leave bare thread space before starting nest ring (as seen in #7 pic above)
    7. A ring: 4-4-4--4-4-4.
    8. reverse or rotate work
    9. B chain: 4•4•4-4. rw

 
    10. Make ring C & chain D as before
    11. Join to ring E above and lock join to chain below. Keep Both threads on same side (I prefer to keep them above). Continue chain F
    12. Make normal picot join and continue to other side, as in 1st motif.
NOTE: I found this normal picot join is neater than the lock join used in motif#1. I had even tried the under-over join but was not satisfied. You can choose whichever join you prefer.

    13. 14. 15. – continue as first motif. 
Second motif complete. Repeat this motif till you reach desired length.

OPTION 2 - Tatting with 2 colours.
Reverse Join for bilateral symmetry of colours 
    16. After making F chain, start making lock join and
    17. Entrap other thread between loop and shuttle before tensioning.
    18. Notice the shuttles switch positions after Reverse Join. Complete 3rd motif. See how the colours are positioned.
 
    19. 4th motif continues with shuttle positions switched, and another RJ while crossing over to right side. Notice that there is bilateral symmetry of colours, but they alternate with the 3rd motif.
TIP : See Lock Join Plus tutorials for more options on switching colours (shoelace trick, reposition, twist work, etc.) whether within a motif or between motifs.

Thus we have several options on how to place colours, which join to use, which sequence to work, etc. It is up to the tatter to play around with the options to create and adapt. 
This will be converted into a proper pdf with stepwise diagrams and uploaded to the Endrucks 1920 Project document. There are more adaptations of this pattern in the works - sunflower coaster, beaded necklace, interlaced bookmark, besides the heart already shared. In fact there are now adaptations of the heart by inspired tatters which I will share in another post!
Yet another idea is from the multi-coloured Girotondo here. I can visualize each motif in a different or alternating colour, and the connecting chains in another colour, encapsulating the motif thread(s). I plan on doing this for the bookmark adaptation. 
I hope Frau Endrucks will not be too unhappy with our 21st century style....

Saturday, 10 October 2020

bonding with butterflies

Pin It now!

Together, we tamed the butterfly - Bandini and I !!!

The story goes back to July when I posted the Lock Join Plus series... 

We spotted a potential butterfly in the 4 individual motifs and Bandini Maisheri on FB took up the challenge to create a proper tatting model/pattern. She and her mother both tat and sell their wonderful work under the name Harsha Creation. Do check out the range of their tatted lace appliqued on purses, tableware, hankies, etc. - some are spectacular, some are elegant.

These are the 4 models she tatted, tweaking and improving with each as is clearly visible.


Each of the models has 4 white filler rings in the wings tatted separately and then the body and wings were worked around. The lovely antennae are tatted and joined later. 
This makes the pattern easier to tat, using up scraps (in multiple colours, if desired) for the individual rings, but more tails to hide.
I can't thank her enough for all the work she did in breathing life into the butterfly! If it wasn't for her initiative and perseverance, this project would've remained in the ever-growing to-do-someday pile. 

We finally agreed on her 3rd version and she sent me the count for testing. I've taken a break from the doily to test this (it's been waiting for over a week!) and it was quite an enjoyable experience tweaking and improving the models further. Hubby weighed in with his ‘expert’ comments, too! We are all now pretty happy with this. 

I started with the 2-colour version, working with 2 shuttles following the exact counts Bandini sent. It can be a good practice pattern for the various Lock Join Plus techniques
All 4 methods (LJ, Reposition, SLT, Reverse Join) were used judiciously to get the colours in place, yet work it all continuously.
collar, necklace, or doily anybody?!

Next came the pink model with certain tweaks and finally the purple one to everybody's satisfaction. That does not mean there aren't more tweak/decorative variants running through my head ;-D But everything will have to wait.

Named it Butterfly Bandhan aka Butterfly Bonding. 'bandhan'  means bonding in Hindi and it not only reflects the bonds that got this butterfly flitting, but also sounds similar to my co-designer's name. And if you are interested, we call butterfly 'titli' with soft sounds (a soft 't' sound does not exist in English).

Pattern for the purple one will be shared as soon as I complete the presentation. Will you be interested in tatting it? Please leave a 'Yes' otherwise I can spend that time on other projects ;-P
Love to hear your thoughts, which model(s) you prefer, etc. .....

Saturday, 25 July 2020

applying techniques rakhi

Pin It now!
It's that time of the year again - Rakshabandhan is round the corner and Indian tatters are already posting lovely tatted rakhis. Here's my rakhi for 2020 ... AppliTech rakhi/bracelet!

The portmanteau 'AppliTech' refers to the fact that it is kind of a test or trial or experimental piece for applying a few techniques. It started as an observation piece for the Lock Join Plus methods as posted here - https://tipsaroundthehome.blogspot.com/2020/07/lock-join-plus.html where lock join, reposition threads, SLT, and reverse join (and switch shuttle) were all used in batches, resulting in randomly placed colours on one side.

Then, in response to a question on facebook, I re-demonstrated what I had discovered last year - whether you hold the gauge above the core thread or below it (as in Ninetta's Tuft picot), provided it goes through the leg of half stitch, the final result is the Same!

All tutorial links here, including my study of picots (Interlocking, Mrs Mee, Tuft} - https://tipsaroundthehome.blogspot.com/p/tatting-resources.html
I will share my detailed comparison in next post, along with more observations.

I continued on to make the 3rd Josephine Ring placing the gauge above core thread.
Each ring starts and ends with 1ds, and has a picot after every half-stitch.
Each JR is made of 20 1st half-stitches with a 5mm gauge.

Many of us have already come across this beautiful Lavender sprig by tatting_art on pinterest or Instagram and she has uploaded a how-to video here (thanks for sharing the link, Karen Cabrera).

Next, I started mock rings with treble tat stitch. I started each chain with an Intruding picot which served as the starting picot for first tds, also to join back the chain into a mock ring!

Why mock rings, you ask?! Because I did not know how big the ring should be, what the count should be.  With mock rings,  I had the freedom to keep 'bending the curve' to gauge the chain length.  Hence, no tds count. 

Close-up of the dimensional/stacked flower. Bead was added before starting the last mock ring, by pulling up a loop...
Continued with the Priscilla edging (Fig 29 from her Tatting Book 3), though this time I followed a symmetry in colour placement. Lock Join and Reverse Join are used in alternating chains to move up to the next chain. By direct tatting (unflipped/reverse stitches) every alternate chain, I could tat all from the front. No RW or turn work!
Added findings after it reached 7" length. Anchor Pearl Cotton size 8.

Perhaps with a bit more effort, I could work the 2nd part of the edging to face opposite, rather than appear continuous. But there are a lot more things on my over-full plate ;-P
See you soon ....

Oh, but before I go, Sue Fuller taught my 2017 rakhi (in March) and Bonds of Love rakhi/bracelet (in April? she liked the blue, red, white version) in the Online Tatting Class earlier this year. I didn't get a hold of the logs, though, so have no idea what transpired in the class ;-D