SCMR is a mock ring, but not every
mock ring is a SCMR (self-closing mock ring).
While trying to explain this to
someone who used SCMR as a default term, I started to remember so many
different ways a mock ring can be shaped.
Mock Rings have been around for
centuries. A mock ring is essentially a chain that is joined back on itself to
create the impression of a ring. The difference lies only in the way the chain
is closed.
In order to avoid overload I will
break up the presentation into segments. This post covers mock rings made using
the Under and Over Join.
Mock Rings 1:
Under and Over Join

Once the tatted chain was
invented, it was a simple step to convert it into a mock ring using an Under
and Over Join - with or without a picot. Under and Over Join is a type of ‘across’ join, allowing us to move
threads to the other side across an existing element.

There are 5 stitches between every picot; each ring is 5-5-5-5 & chain 5-5.
1-A. Under and Over Join: Without joining picot;
Unattached rings
After a normal ring (cream), RW and 5-5 chain (above pic), we start working on a long chain (5-5-5-5) that will form the mock ring.

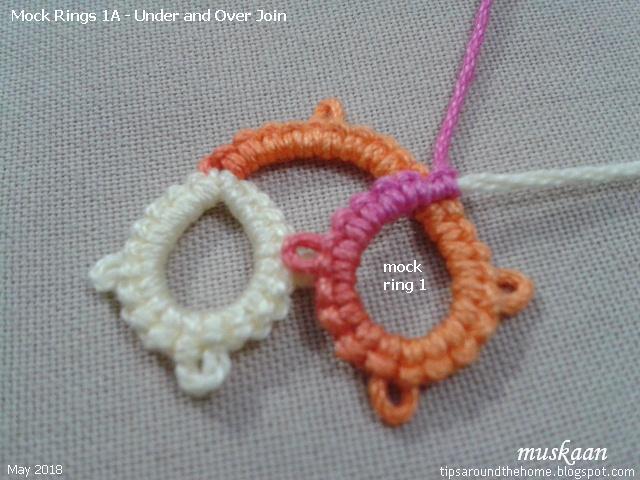
Place shuttle thread above and
ball thread under the chain. Continue tatting the chain normally, enduring that
the first half stitch after the crossover is nicely snug.
A mock ring is made, with the
chain (running scroll) moving across from above.
Note: Because of RW, the mock rings face the same side as the first normal ring.
We know this popularly as
Alligator or Capture Join.


Let’s see what happens if we
switch thread positions (ball above and shuttle under).
It is difficult to control the shuttle enough to get a
continuous chain above.
But it can be useful in directional (fs/bs) tatting
when working from the back side.

This method is useful when the
elements (in this case mock rings) are free/unlinked and the threads can be
positioned on either side.
But if the ring is attached to
previous element, here’s how the join can be made.
1-B. Under and Over Join: Without joining picot;
Attached rings

After linking the chain to
previous ring, both threads are in front of/above the chain.
Pull a loop of ball thread down
from under the chain, pass shuttle through loop, and snug tightly. Continue
tatting chain.

In this case, after linking the
chain, both threads are below/under the chain.
Pull a loop of ball thread up,
pass shuttle through it, and snug tightly. Continue tatting chain.

I made this in 2015, but am
unhappy with my work.

This is a view from the back.
Without a joining picot at the start, there is greater flexibility in shaping the mock ring, but one also has to be extra careful to see that the ‘join’ is snug and secure. Adding a small picot at the start of the chain ensures accuracy and stability. I will show this in next post, along with some observations.
…. to be
continued
Till
then, enjoy tatting all over :-)))
https://tipsaroundthehome.blogspot.com/2018/05/mock-rings-1-u-o-join-continued.html
https://tipsaroundthehome.blogspot.com/2018/06/mock-rings-2-lock-join.html
https://tipsaroundthehome.blogspot.com/2018/06/mock-rings-2-lj-mock-onion-rings.html
Mock rings can be very useful.
ReplyDelete...and I have barely scratched the surface so far, Jane ;-P I ws surprised at the variations in mock rings!
DeleteI must admit i also use SCMR as a synonym for mock ring and i now know better. Thank you for explaining it.
ReplyDeleteThe under and over join looks interesting but i think from the back it is not as smooth as a normal ring. The faux Celtic though looks like a great application. I can't think of a better idea of "jumping over a chain".
In a sense, that synonym is exactly what started the whole explanation (to tatter) and exploration, Lavi ;-D
DeleteInterestingly, Elgiva Nicholls points out that the U-O join was not considered as true lace because it did not lay flat!
I just posted my response to this on the one below too ooops :( and I get what you are saying. I realized that my current little project has onion rings and it is not my favorite with the big ugle loop showing but I guess that is what happends and I also used variegated thread and this shows up more I think too.
ReplyDeleteCarollyn, for purposes of clear distinction in pictorials, I use different threads in each shuttle/ball. Here I was particularly glad of the variegation which highlights every little detail (some ugly ;-P).
DeleteWow, great idea, I should try. You inspired me - thanx a lot :-)
ReplyDelete...and this is merely the beginning, Justyna :-D
DeleteVery interesting idea :)
ReplyDeleteAnetta, sometimes we forget the past. So it's nice to refresh our memory ;-D
DeleteMock rings are definitely more than just SCMRs. I'm fond of creating mock rings by joining to the same picot twice and of using a paperclip to hold a space and then joining to the space held by the paperclip. I find my SCMRs tend to be lopsided because of how tight I pull up the loop. The paperclip method doesn't tend to tilt.
ReplyDeleteThanks, Vickie :-) Yes, I'll be covering those methods (and more) as well.
DeleteInteresting observation about the lopsidedness in SCMR - need to see if mine behave in similar manner.