Sunday 30 December 2018

flower flakes

Pin It now!
along with hearts and angels!

You know how I enjoy extracting motifs and smaller designs from a larger pattern and highlighting them through colour. Don’t 
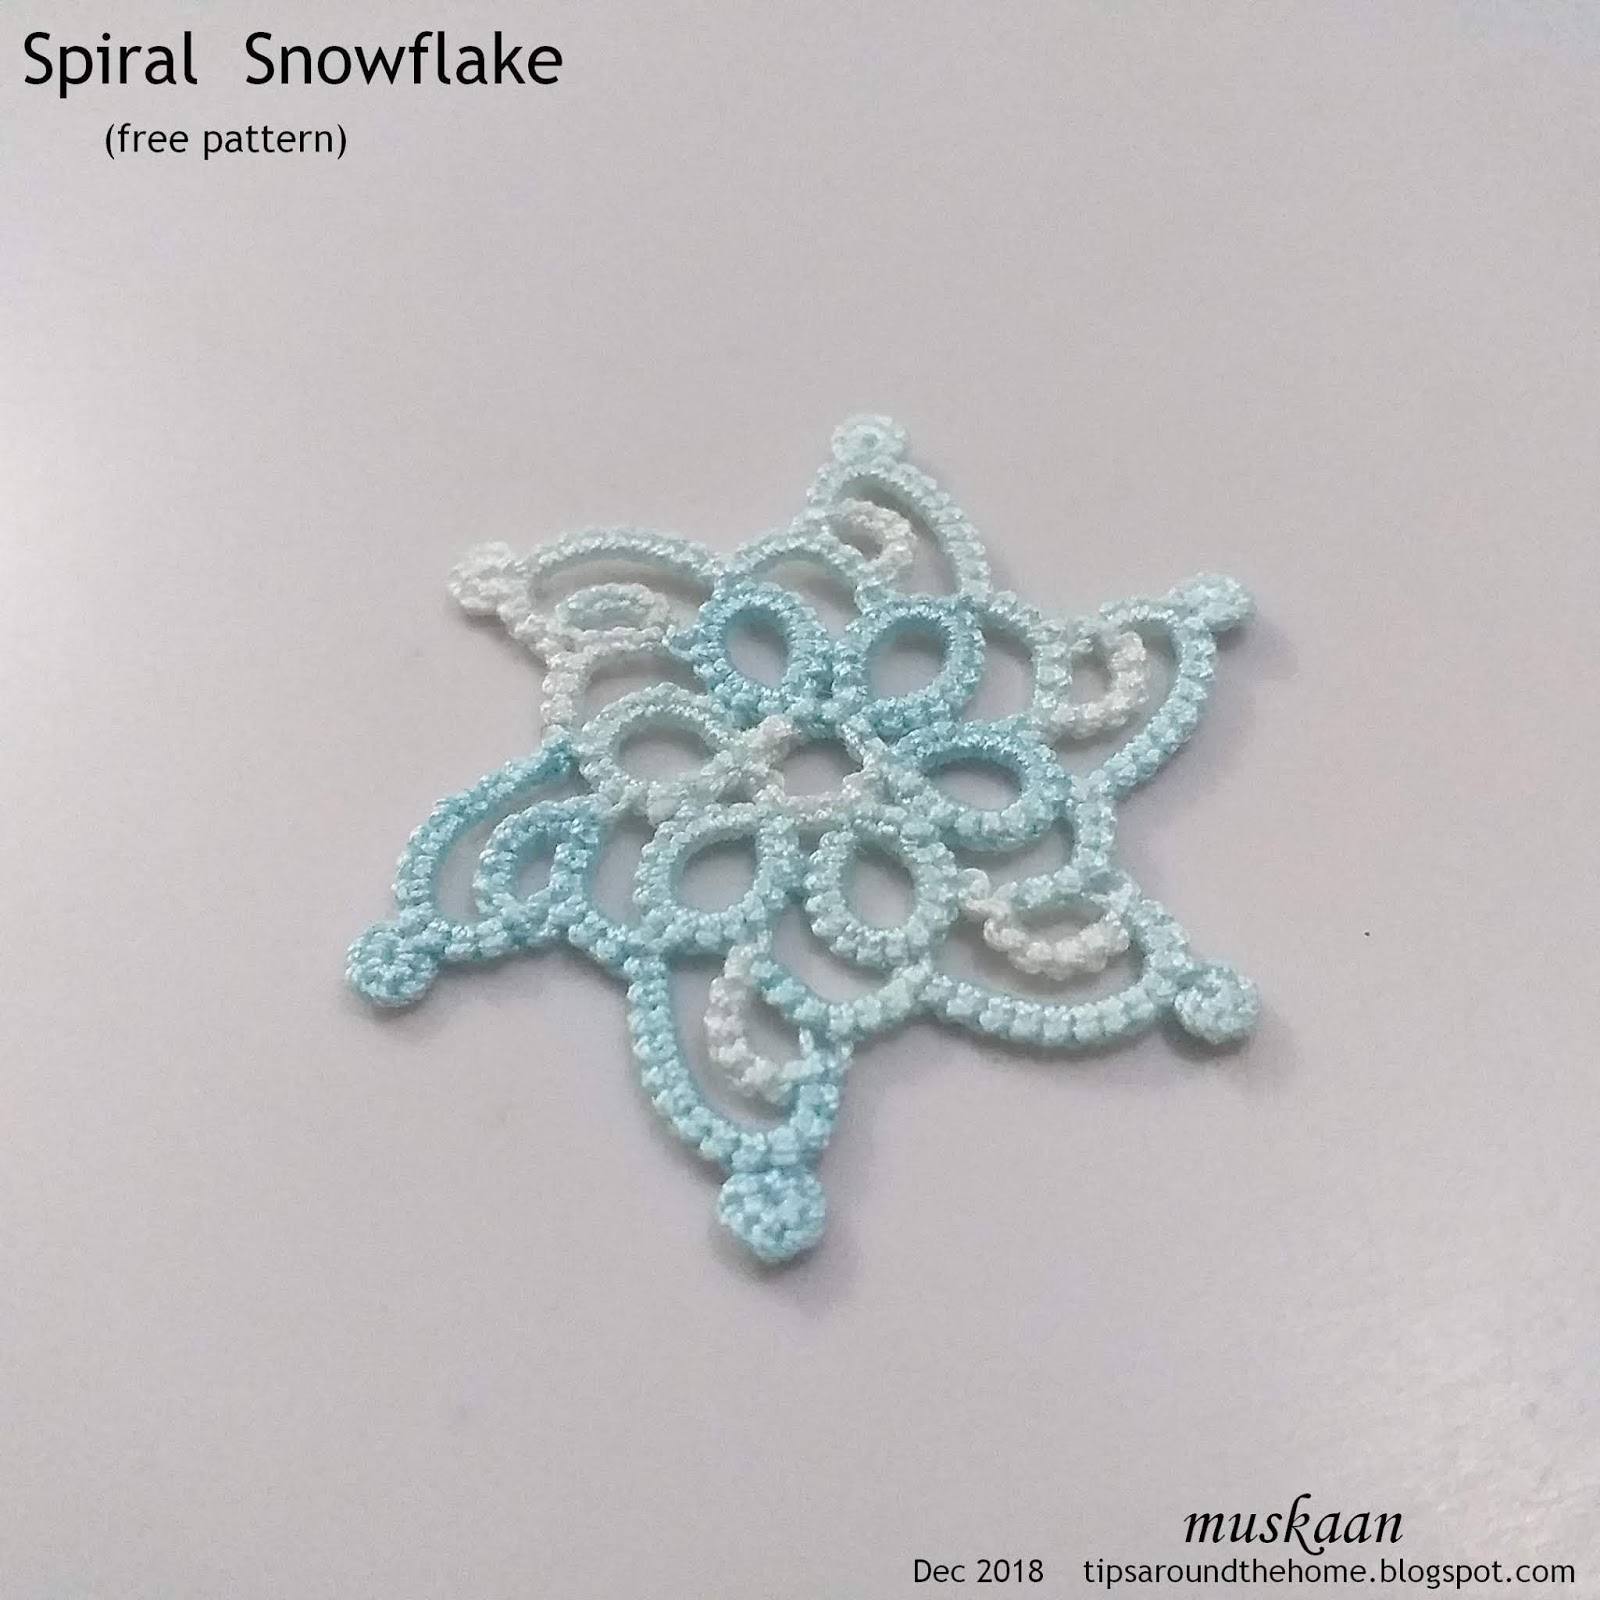
get me wrong – I love all-white snowflakes (such as this one), but the need to play around gets the better of me ;-P Perhaps I use colours as a Freudian cover-up to hide my tatting flaws ?! Also, the stiffness of some of the white threads is off-putting.

Sharon Briggs has been on a snowflake-designing spree for the past several weeks. And I jumped in with a few flowery expressions – flower flakes! These were made a few weeks back during my convalescence, with scarcely any notes. I don’t even remember my tatting order. A couple of them cupped a bit, but in the end they blocked out fine. Some of these could look good tessellated, hence I have included dimensions for both point-to-point and the length as a tiled motif.

TIP : All her snowflakes can be worked continuously. Due to use of colours, I worked some of the rounds separately, while in some one thread continued for some rounds. Working in one pass is optional – for those not comfortable with split rings and split chains, cut and tie after a round and start next round afresh.
Techniques I used : 2-shuttle, one-pass, ctm, rosette/rose medallion, daisy medallion, lock join, thrown/floating rings, dimpled rings, split ring &/or split chain to climb out/climb in, 3 threads (double shuttle).
TõT
Flower Flakes – stylised

1. Poinsettia
Anchor size 40 : 6½ cms as flake ; 5½ cms as motif
She called it "unimaginative". Hardly ! I could see a poinsettia there, though my model seems to be squatter than her's. I wouldn’t mind adding one more round to bring in a more petal-y poinsettia look.

2. Blue Bonnet (top view)

Anchor size 40 : >4 cms as flake ; <4 cms as motif
I came across blue bonnets in a story I was reading and loved them.... which is how I had visualized this in shades of blue. I wanted to make the outer round in a darker shade, except I'd have to use embroidery threads & didn't want to hamper my tatting flow.

3. Cattleya Orchid

Anchor white & Lizbeth purple splendour size 40 - 4½ cms as flake ; 4 cms as motif
I like how this turned out !!!

4. Madonna Lily

Anchor size 40 : 7 cms as flake ; >6 cms as motif
I simply love the ‘filigree’ and colours would probably take away from that look. Hence, a white lily ; the central ring could’ve been yellow, though. 
I'm hoping to give this another go in colours though - it's such a pretty pattern!
I’m pretty certain I mixed up 2 whites while making it – one was a tad finer, vintage.
TõT

Hearts and Angels
Sharon also has quite a few flakes with dimpled heart motifs.

I test-tatted this Daisy Ring Heart pattern.

Anchor size 40 : 7½  cms as flake ; <7 cms as motif
Despite using very small picots in the penultimate round, 
the outermost round required 7 ds chain segments throughout – just as Sharon had predicted.
But do you see the angels between the hearts?! 
Or perhaps bats if you want to mix in Halloween ;-P
Y
Ever since her first heart snowflake, I wanted to make only the heart in red. I’ll get to that, but for this December 22, 2018 pattern I used pink hearts against a cream thread.

Anchor size 40 : 8  cms as flake ; 7 cms as motif
I started with one shuttle and ball, ctm for the central ring.
Then I included a pink shuttle for the hearts. Since I couldn’t work the connecting chains with direct tatting (unflipped or reverse stitch), they were tatted with double shuttles – the 2 shuttles stuck together temporarily.
The 2 outer rounds were worked with single shuttle and ball again.
Y

The above pic was taken before I worked the pink hearts flake.

I now have 8 of her 2018 flakes tatted (2 more flower flakes here). 
There are still a few more of her flakes I’d like to tat in the coming days. 
Except she’s belting them out faster than I can tat ;-P What a bonanza for tatters !!!
TõT
Related Posts
flower flakes (the flower within)
heart flakes (the heart within)

Thank you, Sharon, for a fun-filled winter, and the promise of more to come!


Tuesday 25 December 2018

season greetings

Pin It now!
Compliments of the season
The coloured snowflake is for my friends down under who cannot celebrate a white Christmas ;-D

And since this post is already a tad late, why not include b-Elated wishes for Hanukkah !

I’m hoping Santa’s gift bag contains lots of joy, happiness, health, long life, 
and 
a whole host of tatting/craft supplies to spread around …

These card toppers were made in another lifetime, in another millennium. My sister & I made twin cards, often using different background and thread colour combos. Most of them got sent out over the years. But the joyous memory of making these still lingers.


These are patterns from a book lent to me by a friend while we were studying for our BEd – really wish I had the name of the book. Sis and I spent an entire holiday stitching these. These are so much easier and handier than the actual string art that uses nails and wires. And so much more practical to gift, share, send. 

Friday 21 December 2018

moth in a choir

Pin It now!

What's a moth doing in a choir of angels, you ask?! Tatting is full of surprises … read on.

We’ve all come across this beautiful angel by wiki on pinterest. Tereska recently made many. One of my friends asked me about recreating the effect of the central joins which led me tat it up.
Dimensions : 5cms wide x 3½cms tall in size 20 Red Heart

It is a very clever pattern using basic techniques and a long picot for the halo (top right inset) The first ring has a longish picot, too, for linking later chains. The head is a mock ring – simple chain linked on either side with a lock join.

Not wishing to continue with this thick thread, yet not wanting to throw away the piece, I cut & tied, then whip stitched back to the ‘neck’ where I curled the head back from the front, and secured it. Then snipped off the long picot to look like antennae. Kind of cute, eh? So That’s how this angel became a moth.

I started over in white Anchor size 40 and the finished angel is 2½cms wide x 4cms tall. Unhappy with my block tatting!
Techniques : ring, chain, lock join, central picot, long picot, block tatting, decorative picots.
TIP : It can be worked with one shuttle and ball, ctm, and for block tatting I worked from the front only, by resorting to direct tatting.
Wiki has some really cute tatted doodles on her blog.
ßßßß
An angel needs company, so I started on Ruth Perry’s new angel pattern
Again, my tatting leaves much to be desired. The size of joining picots is important here.
In Anchor size 40, it is 2½ inches wide and tall.

The head uses padded double stitch (pds or BDS or DDS), and a long picot is twisted for halo. Split rings and chains with decorative picots are used to tat the wings and body in one go.
The skirt of simple rings and chains is worked and joined on the go.
I like the lacy fulsomeness of this pattern! 
Note: One 7ds segment for the wing center (SR) is missing in the instructions.


ßßßß

Two’s company, but three’s a choir! Loved the angel earrings Bernice shared here. It is such an elegant pattern by Sezione Hobbystica and can be found here.

In Anchor size 40, it measures approx. 4¼ cms x 4½ cms

I scrolled through her site and found a great drawing app for tatting !!! Played with it a bit on my tablet - fairly easy and straightforward. But it opens only in Chrome.

Many thanks to the designers for sharing their beautiful patterns

Related posts
ßßßß

Wednesday 19 December 2018

heartfelt gratitude

Pin It now!

Your solicitous comments and emails have overwhelmed me !!! Your kind words have brightened my days and I am touched by your friendship…

Just wanted to let you know that the worst is now behind. Today should be the last of the cumbersomeness that clogs up my days, phew. I hope to get back into the mental and physical rhythm of tatting and blogging immediately and gain the lost momentum - as far as the short cold days permit.

Please don’t leave any comments here – wait for a proper tatting post ;-P
Know that I miss BlogLand and TatLand !


See you soon again J

Monday 10 December 2018

personal

Pin It now!
Hello all 😀

I'd like to take a few moments to apologise for not responding to my emails. I intend to, but the day slides by quickly. I keep thinking my health will improve enough to get back to my usual routine, but recuperation is slow and the cold days are short 😔

Hope to be back in full force sooner than later, so hang in there dear friends, correspondents, and readers and enjoy the festive season.  Can't wait to catch up with blogging and commenting and interacting with you.

With all my love
Happy tatting and keep smiling ❄🌹💗🌹❄


Monday 3 December 2018

flaky visits

Pin It now!
I had bought those Lizbeth 20 mixes in order to work my own patterns in that thread so as to have a more universal, uniform, comparable, and easily convertible measurement. Unlike the newer Anchor (Madura Coats India) size 20 which is all over the place and way thicker than a Lizbeth 20. With the finished dimensions provided earlier and now, you can easily see the difference in the old (Anchor 20) and the new (Lizbeth 20) snowflake!


So, when I saw the vintage motif pattern trend last week, it spurred me to revisit some patterns. And on my journey I noticed a little omission here and there, but am not well nor motivated enough to rework the pdfs/diagrams. Sometimes it is a boon if your patterns are not popular – the mistakes remain buried ;-P


I loaded 2 shuttles with Lizbeth size 20 thread and got to work. It felt good to tat a done pattern in softer ice-blue shades after all those colourful blossoms. I am sharing only tweaks here, with stitches inked in the respective picture. Links are provided for the detailed patterns.

T 

Hexagonal Motif snowflake
Instead of a central picot which accommodates all subsequent rings, I linked adjacent rings through very small picots. This also meant that decorative picots can be added in the central negative space.
Measurement: 1½ inches point to point.

Main techniques : 2 shuttles, ctm. Thrown/floating rings (TR) which require switching shuttle (ss) before and after.

R1: 4 vsp 2 p 2 vsp 4. rw
**Ch: 3 p 3 ss TR (2p2p2) ss Ch:3 p 3. rw.
R2: 4 + 2 p 2 vsp 4. rw.**
Repeat ** to ** till there are 6 inner rings. Finish off with chain.


Pentagonal Motif star or snowflake
Measurement: 3 cms wide.

Since I didn’t want to change the count, a central picot becomes essential here. Thus advantage of central picot is that it is easier to adjust the number of rings around. I bent a double loop across 4ds for the central picot. This picot is sufficient to hold the 5 inner rings. (see Stitches as Picot Gauge on page 5 of Measuring the Picot)

T


I had shared the design process for this flake and the reason why it had bilateral symmetry instead of a 6-order rotational symmetry. This time I ‘corrected’ it and all clovers have the same count.
Measurement: 3½ inches
[ Round 1 : 1¾” or 4½ cms  ; Round 2 : 2¼” ]

Techniques include :
2 shuttles, ctm ;
floating Josephine rings/knots (JK), hence 2 shuttles required for rounds 1 & 2;
lock join (missing in written pattern);
Victorian sets ;
padded double stitch or pds (2 wraps on each half stitch).
  • We can climb out with a split ring in clover and mock picot, thus tatting the entire snowflake in one pass.
  • Instead of slope and roll join, I used lock join throughout, and counted it as first half stitch.

Round 1 Clover
[Ring1 : 6 - 3 - 3
Ring2 : 3 + 8 – 8 – 3
Ring 3 : 3 + 3 – 6. rw.
Chain : 6 ss JK6 ss 6 rw.] x 6
Round 2
Chain : [12 vsp 1 lj , ss JK8 lj ss, 1 vsp 12, lj ] x 6
Round 3
Chain: [4N6 lj 2, 2pds – 2pds, 2, lj 4N6 lj]x6 
(4N6 = alternating sets of 4 half stitches 6 times) 

T         


I didn’t change a thing here, except for the thread of course.
 Measurement: 4 cms from point to point.

Techniques : 2 shuttles, ctm ; turn work ; lock join ; floating Josephine knots.

TIP : All chains in 2nd round can be worked from the front without turning work at all. Use reverse (unflipped) stitch for the 6ds chain. This is just like block tatting, and here instead of lock join pull up a loop of ball/shuttle2 thread, pass core shuttle through it, and tension.

T 


Again, I used small picots to link adjacent rings in central medallion instead of the original central picot. All the rest remains the same as in Version 2 of the pattern.
Thus each inner ring is (7-6-7), although one can add decorative picot, thus working them as (7-3-3-7).
Measurement: just over 2½ inches.

Techniques :
Graduated picots,
Floating dots
Floating Josephine rings

It is interesting how the dot is smaller than the JR, despite having exactly same count. Also notice the outline – dot has an irregular outline as compared to the smooth circle of a JR.

For a pointier outer chain, work the JR as a SCMR instead of a thrown ring. Although I like the gently curved chain.
T
Although not mentioned, all my tatting is directional – frontside/backside.


Winter is the season for tatting  ....
as is spring, summer, monsoon, and fall !!!
T