Showing posts with label holidays. Show all posts

Friday, 15 August 2025

independence day tatting

Pin It now!

 Well, I managed to finish it, almost. Chain for the necklace remains to be attached, but this will give a fair idea of how the Lotus Motif Necklace looks. 

My necklace with the Indian flag colours for #HarGharTiranga2025 using tatted motifs of our national flower - the lotus. Proud to celebrate our 79th Independence Day today.

Two motifs layered to give a lotus with more petals and layers. On top is the motif from my previous post (Anchor Pearl cotton size 8) while the larger one behind is with a thread I'd remembered buying and thinking it fit for ANKARS.

Kankri thread (in cones) that I'd bought back in April and boy, was it smooth sailing! No issues with either tatting or closing the large rings. It was super fun to tat. This is an artificial silk thread. However, the difference in the motif sizes is quite visible.

I made no changes to the orange petals - pattern shared here - https://tipsaroundthehome.blogspot.com/2025/08/lotus-tatting.html
However I did tweak the green rings as follows -  (from right to left, clockwise) 
ringF: 12 - 4 - 9. 
ringG: {lies above F}  9 +(F) 6 - 6 - 9.
ringH: {lies behind G} 9 +(G) 4 - 12. 

Another visual comparison of size. The larger motifs measure about 4.5cms across and 4cms high.

Another arrangement of the three motifs.
 
And joined into a necklace or a bracelet if you prefer. At present the length is 7.5 inches - just right for a bracelet.
I tatted a pair of white rings (Anchor Pearl cotton size 8) attached to adjacent motifs with a blue bead in the center. So all colours in my flag are included!
TIP: The center pairs are (8+8) while the end pairs are (6+6) with a bicone crystal between them. 
Instead of tatting over the first ring tail, I slipped it through the bead after closing the ring, and then tatted over it in the 2nd ring. And the 2nd ring tail was again slipped through the bead to the other side and sewed in. This way I have 3 threads through the bead, making it quite stable.

Its difficult to capture the effect and colours here unless I take time out to try out different backgrounds and brightness .... Hubby approves, so you have his word that it looks quite spectacular.
I haven't even blocked or processed the motifs.

The motifs tat up so quickly (when the thread is right, LOL) that I'd love to make a little scenery with them.


Wednesday, 13 August 2025

lotus tatting

Pin It now!

 Every year I try to tat something for our Independence Day celebrations.... if not a dedicated project, then using the tricolour in whatever I may be working on at the time. This year I felt it was much more vital given the international and more importantly our domestic situation where the parties who are in the opposition at the center keep peddling falsehoods and agenda-driven false narratives in order to show the world that Indian democracy is on shaky ground, the election process is flawed and manipulated, etc. They do not hesitate to bad-mouth the country and its institutions in their hatred towards the democratically elected Prime Minister. They cannot even digest our superiority in our  retaliation (Operation Sindoor) to the terror attack on Indian tourists by nationals from the neighbouring country! 

Lotus is our national flower and this is my prototype. 
Now you may ask where is the third colour?! Good question.
I had started by using this motif as a charm for a bracelet with a white tatted band/braid, sprinkled with some blue. Every colour has its symbolic value which I have explained in previous years.
Now I wonder whether I will have sufficient time.
Another idea is to tat a few more motifs and glue to a greeting card, with tatted blue/white chains representing water. 
Which do you prefer?
I chose ANKARS style stacked rings or ring on ring technique. Though incidental, I like the fact that this technique came from Russia. I've read more Russian literature than American!

LOTUS  MOTIF 
(prototype) Pattern by Muskaan © Aug2025  
Single shuttle. Starting from the left orange ring ....
NOTE - since this is a prototype, there are a few count changes made along the way for the petals. I am happy with the flower count but the green rings can be stacked a bit more. Hence some tweaking of count will be needed. 
Start ring by leaving a small loop and tail over tails. This loop is later used to make a shepherd's crook join at the end. https://tipsaroundthehome.blogspot.com/search?q=shepherd+crook
ringA: 19 - 4 - 15. dnrw
ringB: {lies above A} 15 +(to A) 5 - 5 - 15. dnrw
ringC: {lies above B} 15 +(to B) 6 - 6 - 15. dnrw
ringD: {lies under C} 15 +(to C) 5 - 5 - 15. dnrw
ringE: {lies under D} 15 +(to D) 4 - 19. dnrw
Attach green thread and cut and hide orange tail. [UPDATE: See updated pattern here - https://tipsaroundthehome.blogspot.com/2025/08/independence-day-tatting.html]
ringF: 10 - 4 - 6. dnrw
ringG: {lies above F} 6 +(to F) 6 - 6 - 6. dnrw
ringH: {lies under G} 6 +(to G) 4 - 10. 
Join to starting loop at base of ringA and cut and hide tail.
TIP: I will join rings F & H or make the segments longer than 6ds in order to make the overlap more visible.

I don't know how original this motif is - it seems pretty basic to me. If you have seen anything similar, do please let me know so that we can acknowledge the designer.

In Anchor pearl cotton size 8 (equivalent to Lizbeth size 20) the motif is 3.5cms wide and 3cms high.

I had trouble with closing the large rings with this thread and am thankful it did not break. It did flip the last half-stitch and I had to rectify it each time despite care and precaution while closing. After the first two rings I remembered Patty Dowden's Working with Large Rings tips and closed the ring in two phases (like in the dimpled yorkie) - https://tipsaroundthehome.blogspot.com/2015/03/experimenting-with-colours.html

Let's see what tomorrow brings - hopefully plenty of time to decide, tat, and complete for 15th August to celebrate #HarGharTiranga!

Thursday, 7 August 2025

celebration tatting

Pin It now!
We celebrate the brother-sister bond of Rakshabandhan on the 9th of August this year. So I had this strong urge to collect motifs into rakhis, as I have done a few times over the years. 

I had a collection of these rose and floral motifs from past test-tatting and tutorial exercises, and I had intended to arrange and attach them into a necklace or collar to celebrate International Lace Day (June 22nd, 2025). 

Both motifs are adaptations of the central rounds of Eleonore Endrucks' pattern E42 in her 1920 book, ‘Die Schiffchen-Spitzen’, and reworked by Paola Emilia Rotuletti (2021). (https://drive.google.com/file/d/1NgPuAzM83cjVoWvzFaiAIp7UDbuueBB0/view)

The small motif on top is the E42 Roses by Daniela Galli (2025) which she kindly shared for the ILD 2025. Pattern PDF - https://drive.google.com/file/d/1HiDjl4A_CkRcRGqpjhEItWqgEI1bGMhE/view 
There is a small and a large rose, both of which can be worked with a ball and shuttle in one pass.

The large motif below is the E42 Flower Motif by Muskaan (2023). It is my 6-repeat adaptation for my E42 Antiks Snowflake (2023). Pattern PDF - https://drive.google.com/file/d/1U5J5sjuAA7D0qGPOGnK9RJ83MKdNkWSZ/view

I had used the large motifs to demonstrate three ways of climbing out without the need for split chains. https://tipsaroundthehome.blogspot.com/2023/11/game-antics.html

I love lock stitch aka lock chains and simply picked up the knitting cotton size 10 threads in contrasting colours. I worked with one ball and shuttle. The rakhi motifs are all worked in size 20 crochet cotton from various brands.

 
Just so I remember for future, here's how I brought the motifs together with a Swarovski faceted bead (4.5mm) in the center. Pre-string the bead onto a length of thread and slide it to the center; bring both ends through the layered motifs; adjust and wind one end on a shuttle. 
Now from the ball pull off a length similar to one half of the first thread, leave it aside and start tatting a lock chain from the center. When desired length is reached, remove shuttle and again wind it with the other end and repeat the lock chain with ball thread on the other side. The bead remains locked in.

And for the tips, I inserted a bead through both threads at one end, tied a knot niched with the bead and trimmed off the tails. Repeated it on the other side. This seemed the quickest way to finish off the rakhi/bracelet.

The above large motif is from the original E42 center - notice it has 8 repeats.
In fact each E42 rose is also slightly different with tiny tweaks. It's fun to play around.

All together again. Rakhi traditionally has a thin string for tying. However, for a bracelet, one can use broader braids, which are shorter in length with relevant findings instead of ties.
Of course if tatted specifically for a bracelet or rakhi, one can embellish the motifs with beads, picots, etc. Mine are SOUP rakhis hence plain.
💥💥💥💥💥 

Now I had initially collected the motifs back in May with the intention of making a necklace or collar as stated at the beginning.
I played with arrangements using all the motifs at hand. The above could become a necklace with addition of beads and bling...while the one below could be a collar.

Besides these, I had several other arrangements, including asymmetrical ones but deleted the pics someway along the way.

After several possible arrangements, this is what I found the most appealing and settled on it. Tatted ring or curled ring connectors would be used to link adjacent motifs. However I couldn't get myself to accomplish even this simple task and the lace day passed by without any tatting. 

Who knows if the mood takes me I might even free the motifs from the rakhis and rearrange as a necklace. What is your verdict/preference? Leave as rakhis or make a necklace?

NOTE - These are free patterns but please name the designer and the pattern when you make and post And also use the hashtag #Endrucks1920Project.

Many many thanks to Daniela and Paola - always ready to help and share 💕

Related Posts
Antiks Snowflake pattern and more - https://tipsaroundthehome.blogspot.com/search?q=Antiks
Patterns for Rakhi/Bracelets - https://tipsaroundthehome.blogspot.com/p/patterns-designs.html - listed under Holidays, Festival and Jewellery - Hands.
Endrucks, Holidays and Jewellery directories also have some rakhi models -https://docs.google.com/document/d/1w1TZBg-HIzseGEUoJ-rko7tNbtSgZY5A18Oy2Y9Hh0Y/view

Friday, 14 February 2025

Vee bit late

Pin It now!

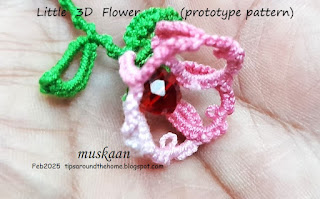
This little flower was tatted several days back and I was going to  post the pattern along with a pictorial for overlapping split rings. But that's going to take a couple more days to write the post and ink the pics. So this prototype pattern is for you to play with on Valentine's Day. A little late, but flowers are the flavour year round! 

Tatted in Anchor size 20 (similar to Lizbeth 10), the flower itself is only about 1.5cms high and 2cms wide. The rest is stem with leaves.

The idea came to me while preparing a pictorial for Barbara's overlapping split rings. These form the petals, joining each petal to the previous one and the last to the first. It is a simple picot join just like when you do stacked rings in ANKARS keeping one ring above the other.
If you don't want to knot the two threads at the start, these resources might be handy - 

Little 3D Flower
a prototype pattern by Muskaan © Feb2025

Abbreviations: SR=split ring ; vsp=very small picot; fhs=1st half-stitch; -=picot; shs=2nd half-stitch.

Start with two colours wound in two shuttles. Shuttle 1 - petal colour; Shuttle 2 - green colour.
With shuttle 1 in hand or as the active shuttle, start the first split ring ... (refer image above)

SR1: 9 vsp 3, 4fhs - 4shs, 3 vsp 9 / vsp 3.
SR2: 9 +(to SR1) 3, 4fhs - 4shs, 3 - 9 / 3.
Repeat SR2 two more times.
SR5: 9 +(to SR4) 3, 4fhs - 4shs, 3 +(to SR1) 10 / 3.

NOTE: I made 5 petals (5th not seen in above WIP image) but in the 5th one, I increased the stitch from 9 to 10 in latter half so that it overlapped better. Adjust to ensure the overlap remains consistent. Join 5th petal to the 1st one, arranging the overlap consistently.

FYI: (4fhs, p, 4shs) is the node stitch which creates a dimple in the ring.

Do not cut threads, continue for stem. You can string or join a bead to the center of the flower using any one the threads. 

Stem is a Josephine or spiral chain. Use whichever half-stitch you wish.
NOTE: For leaves I used the Petal Ring by Maimai Kaito (2016) Instagram, YouTube, following Lesson #178 by Karen Cabrera Unfortunately it was difficult to photograph the curvature and sharp tip of the leaf though it is visible in some pics.
Choose your own stitch count for the leaves. The upper leaf is slightly smaller than the lower one.
Continue the stem for desired length.

I see a lot of scope for improvement but that, too, will have to wait for another day. Feel free to tweak and improve and show me what you come up with! I went with tinted pink for a rose or cherry blossom. Which colour and flower would you choose to tat with?

Related Posts -

Friday, 16 February 2024

east to west heart!

Pin It now!

My Budding Heart pattern was published in the Feb 2024 issue of 'Talking Tatting' (No.58.3 quarterly newsletter of Queensland Tatters, Australia), courtesy of Judith Connors. I think this is perhaps the third or fourth pattern she has chosen for publication and it is such a huge yet humbling endorsement.

💗💗

Several versions have been tatted which I sometimes come across on different platforms, but to remind you of one very special version from Krystyna Mura (Poland) - https://tipsaroundthehome.blogspot.com/2021/02/palentine-day.html

💗💗

And most recently, is splocik's (Poland) play with the pattern - not one but four! Such cute versions and I love how she attached the dimple to the flower, thus anchoring the long outline. She shares her thoughts and process here - https://oczka2.blogspot.com/2024/02/zainspirowao-mnie-serduszko-frywolitkowe.html

💗💗

If you remember, this heart is part of the Buddy Hearts (2020) collection of 5 patterns, three of which were shared by Anita Barry(USA)! https://tipsaroundthehome.blogspot.com/2019/02/buddy-hearts.html. This set has been taught in the Online Tatting Class (Feb 2019) and published in the IOLI Bulletin (Summer 2020). Good to see the widespread reach of these little motifs.

You can download all 5 here (long version) - https://drive.google.com/file/d/1frJpMRiHu5fOEH9Zs3VANVGIURZA126_/view   and (short diagram-only version) - https://drive.google.com/file/d/1DZFxEDvEwe-rPUv1evgPaxic1sbaEnHC/view 

💗💗

I had a mind to tat a new heart pattern but couldn't manage my time and other commitments. However, it is definitely on my trial list and should be shared well before the next season of hearts.  

💗💗

💗Many many thanks to Judith, splocik, and of course, Anita and Krystyna!💗

Monday, 15 January 2024

barely in time

Pin It now!

This pattern was long since completed and waiting to be blogged on the 14th of Jan when we celebrate the entry of the sun in Capricorn. generically called Uttarayan (movement towards the northern hemisphere), a harbinger of spring and summer. A pan-Indian festival with numerous regional names and slightly different ways of celebrating. 

unblocked motif

It also indicates the beginning of the harvest season. Diversity apart, sesame or til and jaggery or gur are the two common ingredients throughout, though the resulting sweet is prepared differently in different regions, but distributed around. It is only in Punjab, where a bonfire is lit to celebrate 'lohri', that corn, too, is popped and distributed. This is why I was waiting to share the pattern. This year both 14th and 15th were celebrated, hence I'm really not that late, LOL.

pinned picots

You might remember the range of design possibilities of one motif from Endrucks' pattern #15 shared here - https://tipsaroundthehome.blogspot.com/2023/12/the-power-of-15.html

uncut picots

This time it is another doodle called E15 Ear of Maize, which with minimal changes can become a lavender sprig, any other inflorescence, wheat or other cereal spikelet, or even a feather. Perhaps you can come up with another idea?

snipped and trimmed picots

I have used 3 colours, but only one shuttle throughout. And you don't even need to hide the tails of the husk and stem! By force of habit, I forgot to do it in both models and hid most tails. Just leave ample lengths at the start and finish and trim later.

Hope you like this and enjoy tatting it. 

E15 Ear of Maize pattern pdf  https://drive.google.com/file/d/1GEms2X1Xmk1YHwrDz_3F7FiDLgIVpmz-/view

second motif
The motif actually jumped out when I saw Paola Emilia Rotuletti's E15 Star pattern worked in shades of yellow by other tatters!  

Add findings and we could have a pair of earrings or pendant? Perhaps even add beads to the kernels?

Tuesday, 9 January 2024

what a heart

Pin It now!

Hearts are great motifs to learn and apply new techniques, practice and hone skills, embellish, and create new designs! Look at where this tiny little heart has travelled so far .... without forgetting it's origins!

It all started with Endrucks' pattern #3 (1920), an edging which was reworked and presented by Anita Barry (2020), which inspired AlenAlea Rako to turn it into squares (2021), from which I espied a heart (2022) and Sue Bradham saw a butterfly (2022).

A few months later, when we chose this heart pattern for one of our games (Pretty Me Endrucks Aug2022), more adaptations came about! These include a key chain by Marina MadJar tatting, an enlarged heart motif and one-pass bookmark by Margaret Davies, a coaster by Ninetta Caruso, and a butterfly by Stephaine Mc (Tattimic). Pattern links here - https://tipsaroundthehome.blogspot.com/2022/09/aug-roundup-1.html

During our game and later, several arrangements were shared including 3-in-1 Earrings, Collar, Bookmark, and other ideas. https://tipsaroundthehome.blogspot.com/2022/09/playful-hearts.html


This heart continued to inspire and Ninetta, through her coaster, designed the Tat Me Snowflake (2 versions) in Nov - https://drive.google.com/file/d/1ZENvdgxihM0YI3Ar_UxP9lqRwprmFotP/view  

2023 started with the pattern being tatted and published by Judith Connors in their Talking Tatting, Feb2023 newsletter. She kindly permitted us to share her complete article  - https://drive.google.com/file/d/1aJ34xgaE67A0aI8LTj2xYpvx-NQLrBx1/view 

Later in June, Michelle Forclaz made additions to the hearts to make the Inside Out Flowers. https://drive.google.com/file/d/13L0NCvkqJM94Bnbnbf4ogVUzhhYjuaSN/view  The pdf also shows a few other adaptations she tried such as a little teddy bear, fox head, and butterfly.

Meanwhile tatters have often picked up the pattern and shared their versions, many with beads, and applications. And 2 new patterns emerged in December.

E3 Heart Butterfly by Jiamrat Supapol https://drive.google.com/file/d/19DWVrfGhrbb-l80icUsFiq4msQhmJTjl/view

and the E3 Heart Square Motif by Reiko Akamatsu where she adapted the E42 doily center to fit snugly inside the square. https://drive.google.com/file/d/1YxBre5DlW3RcW3ZJFY7-VrDnzvWeuN6m/view


For more heart derivatives, check the Hearts Directory - https://docs.google.com/document/d/1MpYw9XMB8Asz8zusj1ZpHvX8A8Ww424-rEVORtxcL1w/view
For more E3 pattern derivatives, check out the other Directories as well. We now have a composite doc listing all directory links (making it easier to reference, etc.). Endrucks Directories  - https://docs.google.com/document/d/1w1TZBg-HIzseGEUoJ-rko7tNbtSgZY5A18Oy2Y9Hh0Y/view

Please note that in this post, I have included pics of only the 'new' models that haven't been shared here so far. 

Hearty thanks to each and every Endrucksian mentioned here! Hope you continue your exploration and experimentation, sharing the beautiful results.

Monday, 1 January 2024

unlimited

Pin It now!

- Unlimited -

is my wish for all my readers as we usher in 2024! 

May we have unlimited ideas surging in our minds to use up our already unlimited stash of threads and embellishments; unlimited time to work our magic; unlimited peace, inspiring friends, and good health for a smoothly enjoyable journey ....

and

May we have the privilege of setting our own limits!

Thank you for being part of my journey and hope you continue to join me ...

muskaan

Monday, 26 June 2023

autumn fireworks

Pin It now!

 I should've posted this last night since I managed to complete the entire tree motif I had set out to do for the ILD. Hadn't expected to, so this was a huge deal. Of course it meant taking a digital break the entire evening.

The one behind is the new motif tatted correctly with 10 rings. Fresh off the shuttle, you can see that it does not lie flat. I had to stretch and tamp it down into submission since there was no time to block and dry.
Worked in Lizbeth (shuttle) and Anchor (ball) size 40 threads.
Pattern is #14 from Endrucks (1920) reworked and presented in modern format by Ninetta. Link to main EP doc is in the right panel of my blog. 

Angie pointed out that this could well be a fireworks display. I love the idea as it offers so much scope for frivolous colourfulness! 

This morning I have rolling pin blocked all motifs. They are drying at present and I will take pics tonight playing with arrangement. Then starts the next part which is still a bit amorphous.

Hope you had a wonderful day and weekend. Who knows after this hat-trick of posts, I might continue with a 4th one tomorrow ;-P

Saturday, 17 December 2022

heart angel bell play tag

Pin It now!

I was supposed to do this post in November, but I got entangled in other stuff and completely forgot about it! Better late, despite the extra task of re-inking the pics to change Nov to Dec.

Good friend Margaret Davies (https://margaretsdesignercards.blogspot.com/has been a very active participant in our FB events, sharing her tweaks and adaptations as well as her trials and patterns.  (https://tipsaroundthehome.blogspot.com/2022/09/aug-roundup-1.html). 

Back in July (https://tipsaroundthehome.blogspot.com/2022/07/heart-pattern.html) I had shared the prototype pattern for a heart extracted from Endrucks' pattern #37, even though I was not happy with it's proportion. Margaret jumped in to enlarge the heart. Such a simple and effective solution to raise the height by adding a ring on either side! 

ENLARGED ENDRUCKS' HEART by Margaret Davies - click on pdf link to download the pattern - https://drive.google.com/file/d/1G2AboS4amzg5HgLGKoZ6X-bGNrLZBLCt/view

When she posted her pic, someone thought it looked like an angel, and she again took up the gauntlet and converted the enlarged heart into an angel! We asked her to share her pattern for our November FB event and she enthusiastically agreed, sending in the written patterns. 

While tatting it to prepare for the game, #tagmeEndrucks, I noticed that it made a beautiful bell when turned on it's head. Thus we have 3 patterns in one - angelic!

ENDRUCKS' ANGEL and BELL by MARGARET DAVIES - pdf link to the pattern - https://drive.google.com/file/d/1aq202-ESOzP_DLlA1bQ1mz3unyTTrpwr/view

This is my completed angel, worked in 2 colours for the tat-along. You have seen parts of it in 2 earlier posts (links below) but not the complete model. This is such a versatile pattern in the sense that we can follow different paths, use different techniques, embellish in numerous ways, and use in different ways, too.

For the tat-along I deliberately left out the beads in my model though the diagram and written pattern in the pdf follow Margaret's beaded models.

I will need multiple posts to showcase all the models that came in, some with very interesting tweaks or displays. Stay tuned to be inspired! Meanwhile hope you enjoy our little gift to adorn your festive season.

Many many thanks, Margaret, and hope to see continued participation  ❤

Related Posts -
https://tipsaroundthehome.blogspot.com/2022/11/tag-along.html
https://tipsaroundthehome.blogspot.com/2022/11/lets-play-tag.html
https://tipsaroundthehome.blogspot.com/2022/11/teachable-moments.html