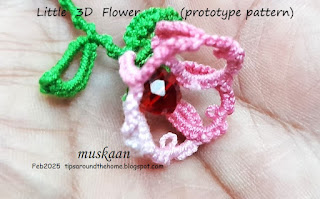
This little flower was tatted several days back and I was going to post the pattern along with a pictorial for overlapping split rings. But that's going to take a couple more days to write the post and ink the pics. So this prototype pattern is for you to play with on Valentine's Day. A little late, but flowers are the flavour year round!
Tatted in Anchor size 20 (similar to Lizbeth 10), the flower itself is only about 1.5cms high and 2cms wide. The rest is stem with leaves.
The idea came to me while preparing a pictorial for Barbara's overlapping split rings. These form the petals, joining each petal to the previous one and the last to the first. It is a simple picot join just like when you do stacked rings in ANKARS keeping one ring above the other.
If you don't want to knot the two threads at the start, these resources might be handy - How to start a SR knotless in two colours (PDF), and
Little 3D Flower
a prototype pattern by Muskaan © Feb2025
Abbreviations: SR=split ring ; vsp=very small picot; fhs=1st half-stitch; -=picot; shs=2nd half-stitch.
With shuttle 1 in hand or as the active shuttle, start the first split ring ... (refer image above)
SR1: 9 vsp 3, 4fhs - 4shs, 3 vsp 9 / vsp 3.
SR2: 9 +(to SR1) 3, 4fhs - 4shs, 3 - 9 / 3.
Repeat SR2 two more times.
SR1: 9 vsp 3, 4fhs - 4shs, 3 vsp 9 / vsp 3.
SR2: 9 +(to SR1) 3, 4fhs - 4shs, 3 - 9 / 3.
Repeat SR2 two more times.
SR5: 9 +(to SR4) 3, 4fhs - 4shs, 3 +(to SR1) 10 / 3.
NOTE: I made 5 petals (5th not seen in above WIP image) but in the 5th one, I increased the stitch from 9 to 10 in latter half so that it overlapped better. Adjust to ensure the overlap remains consistent. Join 5th petal to the 1st one, arranging the overlap consistently.
FYI: (4fhs, p, 4shs) is the node stitch which creates a dimple in the ring.
FYI: (4fhs, p, 4shs) is the node stitch which creates a dimple in the ring.
Do not cut threads, continue for stem. You can string or join a bead to the center of the flower using any one the threads.
Stem is a Josephine or spiral chain. Use whichever half-stitch you wish.
NOTE: For leaves I used the Petal Ring by Maimai Kaito (2016) Instagram, YouTube, following Lesson #178 by Karen Cabrera Unfortunately it was difficult to photograph the curvature and sharp tip of the leaf though it is visible in some pics.
Choose your own stitch count for the leaves. The upper leaf is slightly smaller than the lower one.
Continue the stem for desired length.
Here is one way to hide ends in the chain -https://tipsaroundthehome.blogspot.com/2019/12/open-treasures.html
Related Posts -


A beautiful flower that reminded me of your old post about the Morning Glory pattern. The flowers have the same vibe.
ReplyDeleteYou are right, Marja! 💗 An using the same colours enhances the similarity 😂
DeleteSo sweet, a lovely 3D flower.
ReplyDeleteThanks, Jane 💗
DeleteYour flower is so pretty!
ReplyDeleteStephanieW
Thanks, Stephanie 💗 Good size for earrings!
DeleteBeautiful flower 3D:)
ReplyDeleteGlad you like it, Anetta 💗
DeleteBeautiful 3d flower, love the design, will have to try it when i get time thank you
ReplyDeleteWould love to see your version, Margaret, whenever you can 💗
DeleteThese are beautiful! I've got these on my to-do list.
ReplyDeleteWow, thanks Wanda 💖 Will keep an eye out for your version!
DeleteFabulous flowers!!! :)
ReplyDeleteThanks, Sue 💖
DeleteIT is super, very beautiful , 🌺🌺🌺
ReplyDeleteThank you so much, Urszula 💖
DeleteThank you so much, Nin 💖
ReplyDelete