Showing posts with label Cluny tatting. Show all posts

Thursday, 26 September 2024

complimentary

Pin It now!
 Two complimentary copies arrived a few days apart!

The IOLI Bulletin Summer 2024 - Volume 44 Number 4. It has a spectacular display of vintage laces from various museums and places! I just sat ogling at their intricate beauty. 

And tatted lace was represented by a sole article - SOUPing the Cards by yours truly.
Long time readers of my blog might remember that I often sew or use tatted motifs in different ways. Once such is on greeting cards which I shared in the article along with a few tips and notes. 
https://tipsaroundthehome.blogspot.com/search/label/tatting%20SOUP

  
And then this arrived!!! Lilas Joublet's, who we fondly know as Lilas Lace, new book 'Cluny Tatting Experiences'. In mid-August she contacted me for my address which came as a complete surprise. It seems she had referred to my Cluny tatting tutorials/pictorials and wished to send me a copy as  acknowledgement! She also included a lovely handwritten message with her name 💗

I love the layout of her bi-lingual book. I have already watched a few of her videos (through QR codes) and am eager to try out a few of her lovely patterns. She has written the book as a kind of log or diary of her experiences with her entire Cluny tatting journey. 

Many many thanks to Liz and Lilas - these complimentary copies brighten up my tatting corner and my tatting-filled heart!

UPDATE: Please be careful while buying a book! Read why here - https://lilas-lace.fr/blog/2024/10/12/dont-buy-just-any-tatting-book/


Thursday, 29 November 2018

4 colour broad Cluny tatting

Pin It now!
Final installment of colour Cluny tatting pictorials.

This collage shows the progression of Colour/striped Cluny Tatting pictorials I shared this year. While stepwise directions are given for regular tallies (and a broad one below), the same concept can be applied to Hanging Cluny Leaves, as seen in the collage center.

Four-Colour Broad Cluny Leaf
(5 threads and 4 colour stripes)

Using 4 colours for Cluny tatting meant the coloured stripes would show better in a broad tally. Hence I resorted to a 4-Warp loom and also changed the leaf shape a bit.

Notes and Links :
  • My one small step really comes in handy here since multiple loops need to be closed in the end. It is done Twice in a 4-Warp loom because there are 2 top loops to close at the end.
  • Continuing with the braid from the 3 colour tally, I made a split ring, encapsulating the pink and yellow threads on either side. Then I brought in the 5th thread – blue and mustard was again used for the loom.
  • I recommend hitching the loom before actual weaving commences. These year-old pics do not show that step.
  • how to add new thread and hide the tail in the Cluny leaf.
  • how to hide loom colour blip on top.
  • Only major steps are shown below. eg. only one pass of a weave/wrap is shown. But remember to bring the thread back to the side where it starts.

Brief  Pictorial 
1. This is a 4-Warp loom. In order to close tally on the loom itself later, 
One Small Step is done twice – under the AB bar, and again under EF bar.

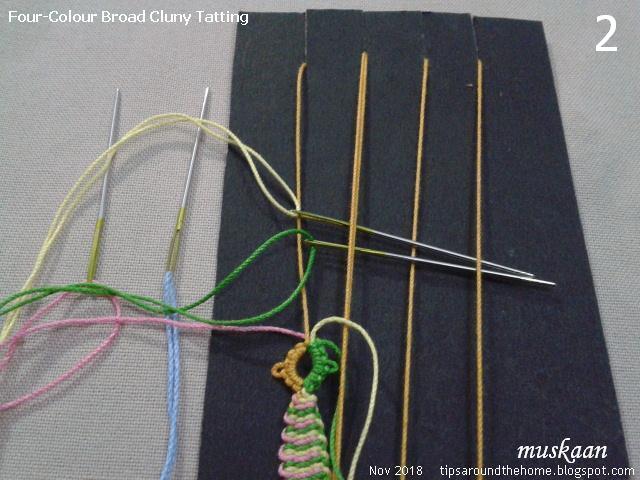
2. Bring 2 colours/threads to the right side, making a pass (under-over-under).
Before this step, I now find  hitching the loom helps center the tally and hide any colour blips. (not shown here, since these pics were taken a year back).

3. All 4 needles/threads are in place, 2 on either side.

4. Start weaving with green keeping yellow below: over-under-over-under to the left. 
Return to the right : under-over-under-over (not shown) to complete 1 weave or wrap.

5. Pick up pink from the left, entrapping blue within and move to right : over-under-over-under. Return to left : under-over-under-over (not shown) to complete 1 weave/wrap.

6. Pick up yellow, entrapping green, and make 1 weave/wrap as in step#4.

7. Pick up blue, entrapping pink, and make 1 weave/wrap as in step#5.
Remember to keep tensioning and packing down the weaves.

Note: In this manner, each needle/thread returns to it’s starting side, 
making a single weave colour strip.

8. Repeat from #4 to #7 to desired shape and size.

Note: colour placement and width of each colour strip depends on pattern and desired effect. 
(In the flame here I used 3 colours with broader stripes at the base)

9. The broad 4-coloured striped tally is complete.

10. Closing the tally and avoiding colour blip
bring pink & blue needles from under the AB loop and close loop by pulling downward at BC.

11. Pass green & yellow needles through the EF loop from above, ….

12. … pull off the EF loop from loom and close by pulling downwards at FG.
Then pull the remaining single loom thread upwards at I to finally close the tally (not shown).

13. One broad 4-colour striped tally made. 
The pic shows the tally first from the front, then from the back.


This collage shows the application of coloured/striped tallies in various projects.
3-colour pendant and diya flame prototypes.

I have a couple of practice patterns on the draft board for 3- and 4-colour Cluny leaves but may not be able to get to them till the new year. But stay tuned, one never knows when inspiration to weave may loom large on the horizon!
There are definitely some non-Cluny patterns in the next few posts! 

Thursday, 8 November 2018

Happy Diwali

Pin It now!

I’m a day late (maybe not, it is a 5-day festival!) because I couldn’t decide whether to post this mangled piece or not. It is my very first trial with lots of mistakes. Also the shape of the diya (earthen lamp) is not exactly as I had visualised or sketched. Nevertheless, mistakes and all – here it is, with best wishes to all...remember it’s the thought that counts !

Made with size 40 & 50 threads. I worked the diya in one colour wound continuously. For the flame, I added 3 colours on tapestry needles to weave a 3-coloured Cluny flame. The stripes go from broad to narrow, and there are 2 yellow shades in there, along with the maroon. Don't look too closely, as a courtesy to me ;-P

I will work this again in size 20 at a more leisurely pace and reshape the diya, too. Diya is my favourite symbol of the festival. See my previous attempts here (tatting) and here (mixed media).
I also intend to use this and another flame idea on a tatted candle for a more universal appeal and application. Hoping for better results ...

And an update on the “unending” Scrappy Doily – Round 6 is completed and it now measures 5”x4”. Yes, the oval shape has held with graduated larger rings around the acute curves.
In a moment of ‘un’decisiveness, I snipped off the tails. I want to continue with a few chain rounds, but realised that there are odd number of rings on this round! Have to work out how to overcome this imbalance before I continue. Guess I'll just add another round of mock rings taking care to even out the number. It will be another confirmation of the doily keeping it's shape.


happy festivities J

Tuesday, 6 November 2018

it's flying !

Pin It now!
............flying straight to you
butterfly tatting pattern

You’ve already seen these little butterflies in a couple of my recent posts (links at end) where I asked for volunteers to test tat the pattern. They have graciously obliged and with feedback from Jane McLellan , Bonnie Marriott, & Leta Fuller, I now have the final pdf to share with you.

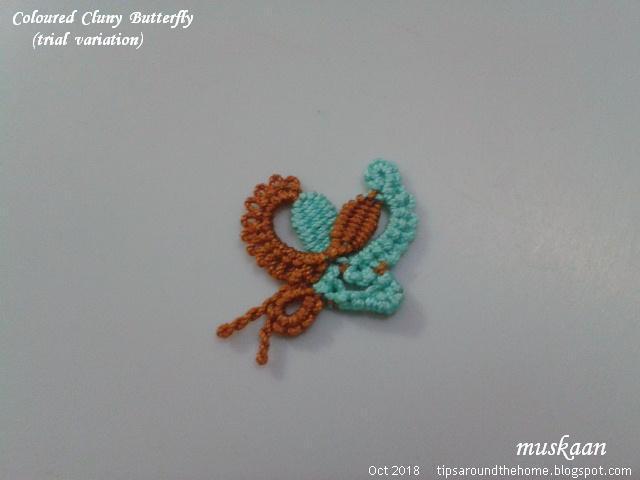
Coloured Cluny Butterfly

early trials/versions, with prototype
I have chosen only 3 models (versions 6,7,9) for the pdf, but each of the 9 that I tatted had a slight modification or variation – be it in colour placement, decorative elements, wing direction, element size, technique…..
The following images will speak for themselves. Arranged in chronological order, it simultaneously provides an insight into the design process. 
version 1
version 2
version 3
version 4
Measuring 2cmsx2cms in Anchor 20, I recommend a thick Lizbeth 10 or it’s equivalent.
version 5
This is designed as a quick practice piece for coloured Cluny Tatting. However, it can just as easily be done with one single colour, with thread wound continuously on 2 shuttles.

version 6
I used directional tatting (frontside/backside), but it is optional. 
version 7
Choose your favourite method of Cluny tatting or follow the pictorials listed in the pdf or in the Tutorials tab above
Leta wove her First tallies using this pattern and is happy (as am I) with how well they turned out!
version 8
version 9

As you can see, there are numerous possibilities, many more than are shown above. Bonnie’s friend saw these as cute earrings! Now that’s an idea to be explored further. Ninetta used treble stitches on the decorative chain for large wing.
Let your imagination take flight and soar alongside this little butterfly!

My sincere thanks to Bonnie, Leta, Jane M, Ninetta, And Anita  - 
you helped me fly  this little baby !

Related posts

Sunday, 28 October 2018

school photo day

Pin It now!
tatted butterflies, square and oval doily


In my previous post I uploaded a school photo day (of all the Coloured Cluny butterflies). But guess what, one of them was too knotty or too shy to face the camera! Found it only when it peeped out from under the looms! 
So here’s a special group photo in celebration, this time with an old teacher standing guard. 
Can you spot which one was missing? (answer at end of post)

A group of butterflies is called a “flutter”, so ...

Question 1 : What should a collective or group of tatters be called ????

This large butterfly is the Butterfly Medallion No. 169 from a 1916 Corticelli booklet. 
I found the pattern here. I followed the rewritten pattern, but some counts are missing.
I’d intended to work it in size 40 white for it’s delicate lacy effect. But with so many cuts and ties, what's the harm in colouring it up to highlight the floral wings?! 

 These are the individual pieces, to be joined later with a pretty trim around each of the ‘florets’. I had to add stitches to floret chains to accomodate the decorative picots.
Re-tatted the body and made twisted (floating) picots this time.

I continued but have already unravelled & re-tatted a number of times. 
With so much back and forth, I am no longer enjoying it. 
So did it get mutilated or transformed? 
To solve that mystery, stop by tomorrow – you may be in for a surprise!

Sparkle Fusion is Usha’s new medallion 
fusing together the dot picot string and variable treble stitches. 
I had the pleasure of test tatting it - her swirl join variation. Worked in Anchor size 20. 
A variable tds creates a nice little peak or scallop on the outer edge of the stitch! 

Scrappy Doily after 5 rounds 
In Anchor Size 20, it is now 4” x 3¼” – I got my oval !!! 
All those suggestions have helped. Too many tatters, unlike too many cooks, did Not spoil ;-P 

Placed on the grid to confirm. 
Click here for earlier musings & notes. 


The truant butterfly !


Question 2 : Should this Coloured Cluny Butterfly be called Ready to Fly butterfly?
One of the names has 2 votes out of 3 (not saying which!), but what’s your choice?

Eager to read your answers ....
flutter by with tatting , always

Tuesday, 23 October 2018

this baby wants to fly

Pin It now!

and needs a little nudge from volunteers. Remember the trial butterfly that I wanted to convert to Cluny tatting? Well, it's finally done and I have many little butterflies to show for my effort... 

This is a composite pic of my various trials and tweaks. 
My tatting mates Ninetta, Jane M, and Anita 
have already been of tremendous help with their enthusiastic feedback.

Worked in size 20 Anchor (or similar thick thread), 
the final versions measure 2cms x 2cms.

Techniques include -
2 shuttles with 2 different colours
Colour Cluny tatting
Lock chain
Under – Over or Alligator Join


I am now looking for a couple (more the merrier!) of tatters to test the written pattern.
Anybody interested, please leave a comment or email me . 

It is a fairly quick tat if you know the techniques, 
or it can act as a practice pattern for Cluny tatting.

Thanks in advance :-)

Saturday, 6 October 2018

3 colour Cluny tatting

Pin It now!
In the 2-Colour Cluny we worked with 3 threads – one on the loom and 2 for weaving. I showed how to add & hide the 3rd thread, how to alternate the 2-colour weave, and how to avoid colour blips when closing. We now move to 4 threads where 3 will be used for weaving. Since they are all different colours, we get 3-coloured stripes or bands on the Cluny leaf.

These pics were also taken last December. I discarded an entire set of pics for the 3-colour Cluny (3-CC), and re-photographed with more comprehensive steps, but have included 2 from that batch here. That first 3-CC is the one just before the split ring in some of the pics.

If I were to tat a 3-CC now, I would definitely follow Edwige’s first step which I called ‘hitch the loom’ to remove the blip at the bottom of my tallies. 

Three-Colour Cluny Leaf
(4 threads and 3-coloured striped Cluny leaf)


Try different number of passes or wraps for a banded or graduated effect. eg. in the collage above, the pendant is a hanging Cluny where I started with 2 wraps of each colour twice, then narrowed the stripes to 1 wrap each. A crystal bead had been strung on the loom earlier, between Warp1 & Warp3 (ie. the top loop).

Choose any order of weaving, place 2 colours on the left and 1 on right, and so on. Lots of possibilities!

I have used a card loom. But choose a loom of your choice - the principle & concept remains the same. 

Loom/Warp thread : mustard 
Weaving threads   : Colour 1 on the right – green;
                  Colour 2 on the left – pink ;
                  Colour 3 on the right – yellow.
Sequence of weaving : green, pink, yellow.
1 wrap/weave = 2 passes (across Warps and back to starting side)

 1. Wind the loom as usual, with 3 Warps, using mustard thread.
One 3-CC has already been made, followed by a split ring. 
Pink is hidden within the left side & yellow on the right side of the split ring.
I have threaded the weaving threads. Tapestry needle works well, but shuttles are fine, too.
TIP : Place the needle(s) on a flat surface when not in use, to avoid tangling.

 
2. Move green and yellow to the right – Under, Over.
NOTE : In order to avoid any colour blip, hitch the loom with the colour of your choice. 
(not done here, unfortunately)

3. All positioned, we are now ready to weave.

 
4. Move green to the left for 1st pass (Under, Over, Under) …

 
To add new thread: This is the stage where new thread can be added. In case of my first tally, I had to add yellow colour. The collage shows how I trapped the new thread within the first green pass. The tail can then be lined along/parallel to Warp2 or Warp3 to hide, and snipped after a bit of weaving. See adding new thread options here -

5. and back to the right for 2nd pass (Over, Under, Over).
1 wrap/weave complete.

 
6. With pink thread -
1st pass to the right (Under, Over, Under) …

 7. and back to the left (Over, Under, Over).
1 pink wrap made.

Keep packing down the weaves.

 
8. With yellow thread, keeping it above the green –
1st pass to the left (Under, Over, Under) …

 
9. and back to the right (Over, Under, Over).
1 yellow wrap made.

3 wraps made so far, one in each colour.

 
10. Start with green again, keeping it ABOVE the yellow.

TIP : Leave some slack along the edge, enough to span the 2 coloured wraps before it comes into play again. Pulling it too close will distort the tally edge.

 
11. Repeat steps 4 to 9 to desired size, shaping the Cluny leaf along the way.

 
12. To hide colour blip :
Insert all 3 needles through the top loop from below….

 
13. … threads are emerging out through the top loop now

 
14. To close tally
Remove top loop and start pulling Warp2 downwards till the loop disappears completely.
Notice how all 3 colours are emerging from the top, covering/hiding the mustard loom thread. 
For the next element, we can easily pick the colour we want to show.

 
If we skip step #12, this is what happens (tally on right in pic) – In my first 3-colour tally I forgot to pass the green thread through top loop before closing. That thread emerges from the right side, making it untidy and leaving some mustard blip.

 
15. Slip the bottom loop off the loom and pull Warp2 upwards to close it.

 
16. One 3-Colour Cluny leaf complete!

See the tiny mustard blip on the right side of tally base? 
This is the blip that hitching the loom prevents! 


My pictorials show only the basic Cluny leaf being worked in colours. But as I pointed out at the start, this colouring of a Cluny leaf works just as well for a hanging Cluny leaf, a Split Cluny or a broad Cluny (which will be the next in this 2018 Cluny tatting series). 

As a reminder, here’s a throwback pic of my trials shared here. Most of these are hanging Cluny leaves. I was trying to get the 'hang' of coloured Cluny tatting!