Wednesday 27 April 2022

from innie to outie

Pin It now!

 Ahem, not quite so graphic! The title of this post refers metaphorically to the Leaflike Rings shown in my last post.  https://tipsaroundthehome.blogspot.com/2022/04/show-stopper-or-show-topper.html

Krystyna Mura tweaked the Dimpled Ring to create this cute and usable shape. After making the dimpled ring, pull out the dimpled part ('un-dimple' the ring) and we have a ring resembling a leaf!!! Simple. I just had to try it despite the paucity of time.

Here I used the same effect for flower petals as well as the leaves on a Josephine Chain stem. 

The best part is that these leaflike rings can be made with a single shuttle or thread, since they are true rings.
However they can also be worked as Mock Rings, especially if the ring is too large. 

Above is my very first trial soon after reading the method, without referring to it. In my haste, the joining as well as the 'un-dimpling' became martyrs. 
I added a picot in the hopes of creating a pointier tip. And now it looks like the silhouette of a bird, doesn't it? Can you also see birds on a wire? 

I tried the bird idea, with a 3/4th profile and beads for eyes, and a mock ring for easy closure. I even added a tail. However, it is still incomplete and I haven't been able to get back to tweaking it to give it my visualized look. Some day soon ....

You can download the mini-tutorial with clear instructions prepared by Krystyna Mura by clicking this pdf link - https://drive.google.com/file/d/1gt1gVnkmc5MvjbbZoP9qQN1PwlVeIeKD/view
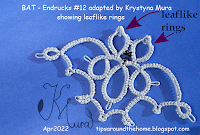
She has cleverly used these leaflike rings to simulate the eyes of a Bat! So how are You going to use this simple dimple un-dimpled effect?

Saturday 23 April 2022

show-stopper or show-topper

Pin It now!

Lady with a Sunshade (3D)
Krystyna Mura has rolled out such a vast and enticing range of patterns from just ONE pattern that I cannot stop wondering whether this is a show-stopper or a show topper! And the following pics are only a glimpse of what more is in the pdf itself; not to mention some of the prototypes she sent in!

This is the original pattern #12 from Endrucks --- 
Sampler of Endrucks' n.12
She has provided samplers and diagrams for her modified versions, too. Her beaded version looks pretty as a cuff bracelet.

She extracted part of the motif to create a Bracelet with Coin Beads, a single repeat of which gives us this medallion ---
Medallion

The lower part of the original pattern/edging is quite a common motif used to make the skirts and gowns of Crinoline ladies and angels. I wonder who was the original designer? Any ideas? Or was it Frau Endrucks?
Anyways, Krystyna has used the same motif to design so many girls, ladies, and angels (and also one boy!) - both 2D and 3D, that it will take a while for them to walk down the ramp! Here are 2 of them (besides the lead pic) --- 
Girl in Shades of Blue
Christmas Angel (3D)
 
Speaking of Christmas, she has also derived numerous motifs, stars, ice drop, and a miniature tree, all worked in one pass and ideal for cards and decoration ---
Christmas-time Stars

And then there's music in geometry! Check out her sets starting from a Terzet through to 3 types of Sextets ---
Flowery Sextet

The world of animals and insects hasn't been forgotten be it the Bat and Butterfly in 2D, and a Peacock and Bird in 3D ---
Bat

Butterfly
Butterflies need nectar, hence flowers cannot be far behind! She shares the pattern for a Garden Cosmos (2D). In her gallery she showcases a 3D Pumpkin along with the following beauties --- 
Daffodil (3D)

Poppy (3D)

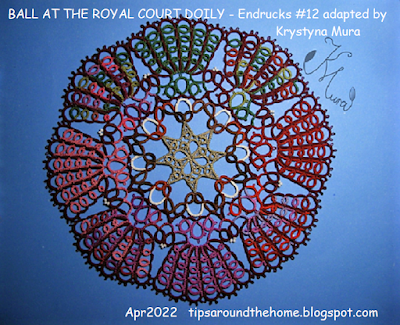
The amazing part is that most of her adaptations, whether flat or dimensional, are worked in one pass unless you want a speck of colour to highlight something. A case in point is this gorgeous doily below ---
Ball at the Royal Court Doily
She displays 2 more doilies, tatted in one pass. And she has promised me that she will be sharing the patterns! Can't wait to get started on them!

You can download the pdf here - Endrucks pattern #12 reworked and adapted by Krystyna Mura - https://drive.google.com/file/d/1E26K3FFgHygdkEKUvVHn-f0MFlENDsqA/view

Diagrams are colour-coded, self-explanatory and clear, depicting the count and sequence. What I love is how she boxed in the repeat sequence. You know how the starting (and/or final) motif in an edging is often different from the subsequent or middle repeats due to joins, etc. Her diagram highlights this without the need for text.
Personally, this is all I need – a good pic of the tatted model alongside these excellent diagrams – and no written pattern!
Krystyna also adds in a few effect/technique pics and tips/notes to explain her method of working.
The pdf is like a perfect booklet to keep us busy and happily engaged for a long time.

LEAFLIKE RING
Did you notice the little leaf in the daffodil and the Bat ears? An odd and unique shape, don't you think?
Well, this is Krystyna's adaptation of a dimple ring which she calls 'leaflike ring'.
Although she explains it in the pattern pdf, on my request she graciously prepared a separate tutorial pdf. 
Click on the link for Leaflike Rings tutorial pdf - https://drive.google.com/file/d/1gt1gVnkmc5MvjbbZoP9qQN1PwlVeIeKD/view


Tremendously Incredible work by this enormously talented and generous lady! I have still to detect how and where she extracted a few of the motifs for her ginormous adaptations! And she promises to share more of the patterns for her adaptations!

Scroll through the pattern #12 pdf and tell us which model you like best.


Find all pattern pdfs in the Endrucks 1920 Project document here - https://docs.google.com/document/d/17LEVftXweztBIOWh4sL4BB7bX65ssoOsOn4oXIgCepY/view
And if you tat any pattern from this Endrucks' collection, we welcome you to join our Facebook group!

                                      Many many thanks, Krystyna ....                                       
words fail me for all the wonderful effort you have put in!

Sunday 17 April 2022

Deaconess Butterfly 1916

Pin It now!

Back in 2019, I had tremendous fun tatting the Deaconess Butterfly (from 1916) using beads to pretty it up. Recently Cross-eyed Tatter left a comment asking for help. (https://tipsaroundthehome.blogspot.com/2019/10/beady-eyed.html). 

After reading up my notes as well as the rewritten pattern by Carolyn Groves (in 2002) to refresh my memory, and being in a diagramming mode, I decided it would be better to share a diagram than simply notate the model. So here it is ---


And here is the pdf link (click to download) - https://drive.google.com/file/d/1gDRWAwqyN7f6kdsu9yybtQj9-l_QpsFn/view

For the above beaded version refer to my detailed notes here - https://tipsaroundthehome.blogspot.com/2019/10/beady-eyed.html

It took me a while to do the diagram to my satisfaction since parts of the pattern can be a bit confusing especially if one is a visual tatter. 
Pay close attention to the sequence. 
TIP: There are multiple joins between the head and body, and body and tail. Hence make sure the picot is sufficiently accommodative. 

Cross-eyed Tatter already figured it out and was tatting it based on her last comment. For what it's worth, I hope this diagram helps tatters in future. I will also send it to The Online Tatting Class, since that's where I first tatted it as homework. 

UPDATE: Thanks to some good sleuthing by Gloria Nelson and Wally Sosa, the original source of the pattern is as follows: 'Butterfly Motif' by The Deaconess in 'Practical Tatting Book No.1', 1916. (Reprinted in the book, 'Tatting- A Potpourri of Patterns' by Handy Hands). The pdf and image above have been updated with this info.

That's it for now. Butterflies never go out of season! So, let's enjoy 🦋🦋🦋
And if you find a mistake, please holler!

Friday 15 April 2022

tatted ball or bead - a puzzle

Pin It now!

free pattern pdf

 For a creative person, inspiration can strike any where, any time, any how! Keep one's eyes and brain open all the time....

This is what Anita Barry wrote to me on Oct 31st, 2018 -
" 23 years ago my mother, a quilter, gave my young boys a quilted fabric "Amish Puzzle Ball. I looked at yesterday and saw a series of joined rings. I tatted the Amish Puzzle Ball! It's 3-D "
The above pic shows both the sewn and tatted versions. 

This also happened to be her First 3-D pattern! She filled the empty space inside with cotton.
She quickly sent me the pattern - written as well as a hand drawing.
Tatted Amish Puzzle Ball pdfhttps://drive.google.com/file/d/1rOEnNcKfYqdly8QitJiJcUibt-SvYYcF/view
It is made with 2 shuttles, ctm. It consists entirely of equal-sized rings and split rings. 
Using the same concept, the size of the rings can be altered to change the size as desired.
They could well be tatted beads!

The Italian Chiacchierino FB group is holding an event 'Braccialetto Pandorino' or pandora's charms with tatted beads. One example is this pallina or small beaded ball by Ninetta Carusohttps://www.flickr.com/photos/ninettacaruso/8743041975/
There are several variations and beautiful versions are being uploaded enthusiastically, worked in metallic threads, beads, and imagination!
This triggered my memory of Anita's tatted ball or bead. 
I had been so excited, that before the end of the day I had tatted the ball using leftover Anchor size 20.  Before closing the final rings, I inserted a playing marble inside. This was a simple trial tat and I hope to do justice to it some time.
I haven't found my original; only the image from 4 years back. And it led to Anita's pattern and diagram which had slipped my memory.
I surprised her with an Inkscape diagram (I am currently in drawing mode!) and we put together the pdf for all to enjoy.

Click on the blue text to download the single page Tatted Amish Puzzle Ball pattern https://drive.google.com/file/d/1rOEnNcKfYqdly8QitJiJcUibt-SvYYcF/view

Many many thanks, Anita, for always sharing your creativity and fun patterns 

with me and the tatting community. 

Sunday 10 April 2022

EP medley 1

Pin It now!

Activity in the Endrucks 1920 Project continues with tatters chipping in with their versions. Some are shared in respective blogs, others in our Facebook group. A section called ‘Gallery of Possibilities’ in the EP doc features the more clear variants or adaptations. [If any adaptation is accompanied by a dedicated pattern, it is shifted to the main entry of the respective pattern]. But beyond these are several more versions that can inspire us.

Although we can pin an image from a public FB page/group, it will not lead back to the source or provide any information about the tatter, pattern, etc. 

All these factors made me realize that sharing them through blogposts will not only reach a wider audience, but will also help us pin correctly. Under the title ‘EP medley’, I will occasionally share the projects (and blog post links) with due credit, for all to enjoy and pin correctly.

Description will be at a minimum, and images are in no particular sequence. More details and information can be garnered in the Endrucks 1920 Project Facebook group or the respective blogs. The medley is in no particular order. (links at end)

EP Medley #1 

pattern #17 adaptation

1. Recently Coretta Loughmiller uploaded 2 versions of ‘Upended Endrucks Snowflakes’, adapted from an adaptation! Check out her beautiful models and other details here- http://corettadeesign.blogspot.com/2022/03/endrucks.html

2. Molly worked a beaded version of the Upended Snowflake and draped it beautifully over a tree ornament. ---


3. Eulalia worked the same snowflake in 3 strands of sewing thread as a trial while incapacitated! ---

I had extracted a motif from #17 and used it in several adaptations, starting with the Lace Day earrings, edgings, snowflake. 
4. Marie of West Pine Creations tatted a beautiful rendition of the earrings here - http://westpinecreations.blogspot.com/2022/04/lacy.html

5. And this is Kathleen's lovely beaded version from last year. ---

pattern #1 + #40 combo:
6. Reiko tatted the central rounds of #40 and edged the circle with #1! Happy Hands know no limits :-) ---

pattern #2 adaptation:
7. Ninetta is still not back to blogging, and has dumped her images on me for the present! My tiny fragile shoulders carry a heavy burden, LOL.
This is her bracelet adaptation extracting and repeating only one motif from #2,  reminding her of fishbone. ---
Notice how cleverly she has attached the tatting to the clasp?! Seamless. The rings look like they are part of the clasp.

pattern #43 adaptation:
8. Agnieszka (Aga) tatted an exquisite Jewelry Set extracting a motif from #43. Her beautifully tatted necklace and earrings are displayed through several pics here - https://agaszowopapierkowo.blogspot.com/2022/03/komplet-bizuterii.html

9. Pop Maria followed suit adapting the motif slightly for a bookmark worked in her own delicious hand=painted thread, here - https://maryshandmade.blogspot.com/2022/03/proiectul-endruks-1970.html 

10. And several years back, Patty Dowden inserted some freeform tatting to create this yummy Strawberry Doodle using almost the entire motif.  ---


This is a small window into the possibilities with so much still to explore and adapt. Hope you enjoyed this display and will leave a comment if you want some changes in the presentation. 


All pattern pdfs can be downloaded from Endrucks 1920 Project document (EPdoc) - https://docs.google.com/document/d/17LEVftXweztBIOWh4sL4BB7bX65ssoOsOn4oXIgCepY/view
Endrucks 1920 Project FB Group - https://www.facebook.com/groups/1235560633606162
#Endrucks1920Project - https://www.facebook.com/hashtag/endrucks1920project
Endrucks 1920 Project Pinterest board - https://pin.it/16AYBmv

Wednesday 6 April 2022

honoured and humbled

Pin It now!

I wanted to share this post on 1st April but got delayed. My bag of expected and unexpected gifts had arrived just 36 hours prior!!! But let's start from the beginning ....

Last November I was approached by an awesome designer whose blog I have been following for some years now - Erika Tashiro, better known as Tat-Marmelo (or tass_tat on Instagram). She was going to publish her 1st book of doily patterns in English (the Japanese version had been published in September) and needed some help with the Techniques. How could I refuse - it was such an honour.

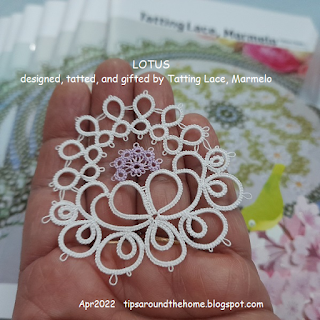
This is her fabulous Lotus Flower motif she sent. Each stitch is perfect, each chain arched evenly, the thread has a stiffness that I haven't normally encountered in Anchor, Red Heart or Lizbeth. The tatting is so seamless, that one cannot locate the start/finish. Such a joy to hold in my hand.
She offered me a generous fee and free books (up to 30!) I immediately declined the former but asked for 4 copies. When they did  not arrive after a month and she couldn't get any clear response from the postal service, she kindly sent me 4 copies by air, along with the motif. So now I have 8 copies, 2 messages in her neat hand, and all these goodies! I am truly humbled.
I have always admired her artistic patterns and had printed out a couple of her free patterns years back. To have them all compiled in this spectacular book is bliss. Colour-coded diagrams accompanied with textual patterns, tips, and techniques. Clear pics of tatted lace. Very high quality throughout. Impressive and inspiring!
In the foreground is a cute cherry blossoms pop-up card with birds. 

These small Clover shuttles are ideal for tatting with size 80, and am so happy these are bobbin shuttles since post shuttles refuse to move in my hand.

See that reddish circle? It is April Fool's (Reiko Akimoto) 2016 Rose Circle Doily. Erika remembered my attempt to decipher the inserted rings and sent me the diagrammed pattern and technique! One more doily coming up, besides all the lovelies in Erika's own book! 

5 balls of size 40 thread - yummy!!!

Erika's book provides plenty of minute engineering and visual tips for impeccable tatting using Jan's method. Normally we have a few simple 'rules' for directional or fs/bs tatting. Her minute observations have revealed aspects I never even considered. She has micro-managed Jan's method and the above motif bears witness. 

For years now, I do fs/bs tatting and often choose to start a ring or round backside. Erika has done the same and lays out her philosophy in a prioritized list of which elements/rounds to start frontside or backside.

Clover polar grids that double up as design guides and blocking sheets. The last pages in her book have these grids, too! These, however are made of non-woven fabric and I'm sure they are washable, too.
This cloth fabric from Atelier Shishicass, has 2 halves of large polar grid printed on it. Very functional and practical. Now I have no excuse (except laziness ;-P) to not pin out my lace instead of using the rolling pin.

'Tatting Lace, Marmelo. Pattern Book 1' has so many gorgeous doilies, motifs, and jewellery to tat. I haven't been able to start on any, but treat my eyes on them frequently. And of course, she made my ITD memorable!

I mainly helped with the techniques section, that too at the final stages, and did not deserve the Supervisor tag, but she insisted. It was such a pleasure to communicate and work with her. She has been very receptive to all my suggestions and made respective edits, including some on one of her patterns. Her graphic depiction of beading and some other schema and legends are so clear and I hope to learn and apply the same to my patterns.    

Erika has already started to design and tat in preparation for her next book! Yet for close to 2 years she worked on her book, leaving little time to create new designs. Her 'inside story' of the entire process with lots of relevant information is something any designer wishing to publish a book would find useful. She uploaded 3 consecutive posts, the last of which is for her English version - https://tat-marmelo.blogspot.com/2022/03/3.html

Many many thanks for the opportunity to work with you, Erika, and for all your generous gifts! I wish you success and creative satisfaction in all you do.