Showing posts with label E43. Show all posts

Tuesday, 25 November 2025

EP Medley 3

Pin It now!

Continuing from my last post, here are some more models that were tatted, derived, adapted or designed for the Endrucks 1920 Project. Due to the 20 tags limit in blogger, I had separated these from the previous EP medley as containing tatting around bezel and/or with beads.

E16 derivative - adaptation & rearrangements.
E16 Wrist or Slave Bracelet derived and tatted by Natalia Prokhorova (May 2025)
reworked E16 pattern: 
https://drive.google.com/file/d/1MuZTviUxkdBoz24xXglcn7wbO1rHuhm8/view
Now isn't this a beauty!!! Extracting two main motifs from the E16 pattern and positioning them into this gorgeous hand jewellery! 
Here's what Natalia says -
Motif 16. I slightly changed the central motif, made it more symmetrical and removed one row of the chain that did not fit into the pattern (too dense). I embroidered with beads that I found at home, so the choice was not rich. In principle, the pattern works, only some corrections are needed -in some places add a couple of knots, in others remove. I won't talk about other shortcomings. I can post the patterns if someone wants to play with them.

Ninetta is working on presenting this pattern where more pics will be shared.

E43, E16, & E12 adaptations & rearrangements
Three Fish Necklace - derived and tatted by Natalia Prokhorova (Oct 2025)
reworked E12 pattern: https://drive.google.com/file/d/1E26K3FFgHygdkEKUvVHn-f0MFlENDsqA/view 
Imagination knows no bounds! 
This is what Natalia says -
This is a necklace with three fish: the first fish is a pattern 43 from Manju Talekar + some beads, the second fish has the tail from pattern 43 (it used to be the head, it's movable) + natural shell, cast using the Guastalla Edda method, the third one is pattern 12 (the medallion - adaptation by Krystyna Mura), the middle is from the pattern 43 too. 

When I asked her whether there was any cultural significance to the fish, she replied - 
I just liked the pattern, but one fish wasn't enough, and two looked odd, so I had to make a third. Just in case, I tatted two more small motifs, but that was clearly too much, so I made earrings out of them, although they're rather poorly tatted. The pattern for the first and third fish already exists, with minor modifications, and it's unlikely anyone will make a shell of the same shape and size, so a separate file isn't really necessary....We love to eat fish, so from a gastronomic point of view, it is present in our culture. I live in Canada, in a small town also called "lobster capital".

E32 Heart Ice Drop adaptation by Lella Loops (Feb2025)
adapted from E32 Ice Drop by Ninetta Caruso: 
https://drive.google.com/file/d/1dT064jDn98F0_KEZabs51_GF9IxPyEQI/view
Simple yet clever adaptation and again a confirmation that needle can be used effectively to tat these patterns. 
Lella Loops says -
My needle tatted version of E32 ice drop by Ninetta Caruso, adapted for Valentine's day.
Two needles and little changes to reach the heart shape (or I tried to)
Well it worked splendidly, didn't it!
I just noticed that this pattern PDF has notated count on the model pic as a quick share. So we need to add the written pattern as well.

E28 & E24 combo adaptation & arrangement
by Manju Talekar (April 2025)
reworked E24 pattern: 
https://drive.google.com/file/d/1ZpHou6AOWM3LZJVbEMNB_gurWqtjazRx/view
We were pleasantly surprised when this cute bunny hopped into our FB group on April 1st this year!
Manju wrote -
Happy International Tatting Day 2025 !
Greetings from Bunny, popped out from E-28 Heart by Muskaan and E-24 pattern reworked by Ninetta, Thanks to you both for the pattern.
Happy Endrucksian tatting
Some day in future, we will ask her for the pattern and prepare a PDF. Hopefully before Easter 2026?

E32 application 
E32 tatted decoration for tealight candle by Marja Jalo (Nov 2025)
My blog list threw up a sparkling surprise on Sunday in the form of the E32 edging being used so effectively to decorate the tealight candle! Read more about the entire project and Marja's notes and thoughts in her blogpost here - https://solmujenlumoissa.blogspot.com/2025/11/e32-frivoliteettikoriste.html

Ninetta and I are forever grateful for the wonderful models tatted and shared ... each one inspires towards further play!

Tuesday, 18 November 2025

EP medley 2

Pin It now!

 What was supposed to be one post now has to be done in two parts because blogger has a new rule - only 20 tags allowed. Earlier the limit was 200 letters. All I can ask is that you bear with me and return to see the beauties in the next post as well.

Back in April 2022, it was my intention to share a mix of Endrucksian models from our members, showcasing the different effects, applications, adaptations, etc. as inspiration. Along the way there was so much to share from our games, and the burst of pattern PDFs that this fell by the wayside. Now I am trying to revive it whenever possible .... 

E28 & E39 combo adaptation

This is the E28 Gift Box with E39 Rose by Daniela Galli (March2022)
Daniela said - 
I try number 28 but I pull, I tighten the bows (chains) too much and the result is a little hat... I decide not to throw it away, this is the result .. I made a mini box
Although I cannot be certain, I think instead of 8 repeats she made only 5 (or is it 6?) repeats around; which is why there was so much cupping, LOL.
She repeated the cupped doily for the base and lid getting a nice box.

The box showing a partially open lid.

  
And she went on to decorate the lid with an adaptation of the E39 motif into a 3D rose, adding layers to the rose, and then some random tatted foliage and flowers. She has already adapted other Endrucks' patterns for 2D and 3D roses! Like the rose below ...

E42 application : 
pattern E42 Roses by Daniela Galli: 
Roberta Porati (June2025) tatted up some of the E42 roses along with some foliage-type fillers to decorate a comb! One can see blocks, rings, chains, and even some Cluny tallies interspersed around the roses. Although at the time this is what she said - 
I'm undecided whether to stick it on the comb or on 1 headband,....

E5 adaptation :
Debbie L Fister (May2025) extracted a motif from the E5 edging and adapted it for bookmarks, adding long tails. This is what she said -
The first 2 tatted as written version 1. # 3 tatted beginning at top & made in 1 pass. I think version 2 would have been the better choice. I never got the hang of tatting an anticlockwise ring.

E12 application :
pattern E12 Bat by Krystyna Mura:  
https://drive.google.com/file/d/1E26K3FFgHygdkEKUvVHn-f0MFlENDsqA/view

Cynthia Dooley (Oct2025), a needle tatter, worked up this flock of bats to brighten up a T-shirt! And  she chirps -
Daddy bat, Mommy bat, Baby bat on flight for Halloween. Sewn on to T-shirt. ... What fun.

Ideas spark when tatters come together to inspire with their tatted realisations! Ninetta joins me in thanking all of you and look forward to many more ...

Tuesday, 4 March 2025

very fishy business

Pin It now!

 Oh yes, a special treat for Pisceans and the rest of us as well, here's a fishy fishy pattern to enjoy! 

E43 FISH by MANJU TALEKAR

It started with a game we played in July 2024 - Pattern of the Month where we chose Frau Endrucks' pattern #43 to tat. The pattern had been reworked by Maria Grazia and Ninetta Caruso ( https://drive.google.com/file/d/1JRu7OggaSna0eXDRA2P18dRu6uE4-1J7/view ; https://ninettacaruso.blogspot.com/2021/01/testing-with-grace.html ). Several new derivatives and applications emerged from that game which will be shared eventually. 

Manju first derived this Granny Square from the same pattern and then she saw a fish and went ahead with the adaptation!

Her prototype. She used some clever little tweaks to get the shape and direction she visualised!

And once she tweaked it to perfection, she quickly belted out several more and made this lovely mobile!

This is my test tatting and as you can see the fish faces the other way! 
TIP: Happens in frontside/backside tatting depending on how you start the first element. This is a great a simple way to make a mirror-image model as in earrings.

Worked in Anchor size 40 thread. Wish I had a better bead for the eye - they were either too large or too small. I had tremendous fun tatting it, but getting the pattern presentation and diagram easy to follow/read took a toll. Fortunately, Manju had hand-drawn the entire fish and I could trace over it while diagramming.

And this is Ninetta's version. She was so eager to tat it herself and it really helped coz she noticed one mistake in the presentation which was rectified.

Wouldn't this motif make a great gift for fish lovers and fishing hobbyists, too? Tatters often ask for designs for men and here's a nice one! And the mobile arrangement is ideal for infant's crib or kid's room. And this fish would look good in solids as well as variegates!

Check out our Directories for lots of derivative patterns and ideas from Frau Endrucks' 1920 book - https://docs.google.com/document/d/1w1TZBg-HIzseGEUoJ-rko7tNbtSgZY5A18Oy2Y9Hh0Yiew

Manju has been a prolific and talented tatter in the Endrucks 1920 Project and has derived several patterns sharing them graciously. She enthusiastically draws and sends us the count. It is my  fault for not being able to keep up. Which is one of the reasons we decided to take a break from our games in the Endrucks FB group for this year.

Many many thanks to Manju for this lovely pattern and all the energy she brings!
And thanks to Maria and Ninetta for reworking and presenting the main pattern!

Sunday, 28 July 2024

tadaaaaa

Pin It now!
 

The versatile E43 3D flower had been finished and waiting on my bedside cabinet for at least a week now. Yet it was only the night before last that I finally took pics and also shot a short video. I will share the detailed pattern (the tweaks) in a future post. Here I want to celebrate its beauty, though it still looks so much better in real.

The video to get a true feel of the flower from all angles - https://drive.google.com/file/d/1gVlbyRb57Q5JKbBBTFt4-k9Iyl2kbwzi/view

After completing the three petals as shown here (https://tipsaroundthehome.blogspot.com/2024/07/so-many.html) I chose metallic thread and random beads to tat Josephine chain stamens. Many of the threads were short leftover lengths. Metallic thread combined with the spiral chain inherently make the tatted stamens stiff and stand up straight.

The stamens were inserted through the center of the flower, without any need to hide ends.

Calyx for the flower is also partially derived from the E43 motif. After the sepals, I continued with a 4-ring rosette to give the structure a conical 3D shape which could fit under the flower.
I used Catherine Wheel Join on the long sepals.

Here's how the calyx looks from behind. The entire flower does not need stiffening. However I did add a bit of diluted glue to the sepals solely because they were inserting themselves through the petals and it was difficult to take a pic.

All tails from the above insertions and an extra length of doubled up size 10 thread was used to make the stem. Here again I used a spiral chain, encapsulating all the tails and snipping them off at different points.
This is how the flower looks from another angle. 
Hubby loves it and one morning he actually thought a butterfly was perched on my cabinet!

If only I could get better shots. Thankfully the video shows it better.
Of the many I have designed, to date this is my largest tatted 3D flower, and worked in perle size 8!

Again from the top. Single petal (with Victorian sets) was shared here - https://tipsaroundthehome.blogspot.com/2024/07/what-heart-wants.html 

And one more. The petals can be tatted in one pass.

As stated before, this is derived and adapted from the E43 pattern from Eleonore Endrucks' 1920 book,
Die Schiffchen-Spitzen, reworked by Maria Grazia and Ninetta Carusohttps://drive.google.com/file/d/1JRu7OggaSna0eXDRA2P18dRu6uE4-1J7/view  and next month I will share my modifications/additions.
🌷🌺🌷🌺🌷

This flower is also my submission for the PICOT BINGO hosted by Natalie Rogers. It's been a while since I entered anything here, and I take this opportunity to cover 4 boxes in one strike -
💥Tat a Flora, 💥Josephine Chain, 💥Catherine Wheel Join, 💥Victorian Sets.
I left out Add Beads for another time.
This game can be played till the end of the year and details of the game are here - https://www.patreon.com/posts/picot-bingo-95729145?
🌷🌺🌷🌺🌷

And also submitting for the monthly SMALL DECORATIONS game hosted by splocik, the details of which can be found here - https://splocik2.blogspot.com/2024/01/mae-dekoracje-galeria-grudniowa.html. Do take a look at the June entries from several talented participants in a range of crafts here - https://splocik2.blogspot.com/2024/07/male-dekoracja-galeria-czerwcowa.html

🌷🌺🌷🌺🌷
Related Posts

Monday, 22 July 2024

January in July

Pin It now!

 Yes, it's July, but the delay in blogging is from my end. It completely slipped my mind to share this lovely January Snowflake creation by Sally Biggers with you here. Never too late ... or should I say a bit early, LOL.

We've had a few tatters who have combined or rearranged parts from two of Endrucks' patterns to create a hybrid design. This model is one such - a combo of E34 and E43. Sally set out with the specific dual aims of  combining two motifs/patterns and creating a six-sided snowflake. 

E34, from which the center is adapted, is actually an 8-repeat pattern. It was reworked and shared by Marina Mad Jar tatting - https://drive.google.com/file/d/11iVy2KdXkEJKW_4Hc_E4G4P29RuD1b9O/view

For the radiating arms, she chose E43 which was reworked and shared by Maria Grazia and Ninetta Caruso - https://drive.google.com/file/d/1JRu7OggaSna0eXDRA2P18dRu6uE4-1J7/view

The original patterns are from Eleonore Endrucks' 1920 book, ‘Die Schiffchen-Spitzen’ which has been trsnslated and reworked in the Endrucks 1920 Project.

It was while tatting this E43 (my 3D flower adaptation) for the pattern of the month game, that my memory neurons finally connected and nudged me into blogging.

Sally has clearly succeeded! Her use of different threads, including metallic, gives a beautiful finish. She explains her process in more detail in the pdf and graciously shares her pattern... 

E34+E43 January Snowflake by Sally Biggers - https://drive.google.com/file/d/1f4_Yo56bSduuO14473kMhcQ9wE-gVbEz/view

While this is definitely on my to-tat list, Ninetta beat me to it! Following is her version which she tatted in April.

A vibrant play with two colours! It would serve well as a coaster, too. Or how about joining/tiling them for a larger piece.

Hope you enjoy this pattern and let us know about it. UPDATE: I just found Sally's blog and you can read about this snowflake here - https://myartbarn.blogspot.com/2024/02/havent-created-post-here-in-quite-while.html

For more such patterns and other details - EP Links - https://docs.google.com/document/d/1w1TZBg-HIzseGEUoJ-rko7tNbtSgZY5A18Oy2Y9Hh0Y/view

A very special thanks to Sally, and to all who made this journey possible

Related Posts -

Monday, 15 July 2024

so many

Pin It now!

 Quite by chance I noticed that this is my 912th post since starting in Dec 2013. So many posts, hmmm, and yet not enough coz there are so many more that haven't yet seen this space. Hopefully in time. Today's post also shows the many potential forms the simple E43 petal from my last post can take. Many of these shapes were suggested by keen observers (listed at the end)! So many eyes :-)))

It is difficult to photograph a 3D model and I truly wish I could've done a better job or taken a video. Nevertheless, ... 

Please Note that in the right colours, with the right number of petals, and if and where the petals are joined, a range of flower impressions can be achieved, besides other shapes. Hence I am calling this a E43 3D Generic Flower. I still need to tat in the stem, pistil, sepals, etc. For pattern details - https://tipsaroundthehome.blogspot.com/2024/07/what-heart-wants.html . I will share the specific petal/flower pattern soon.

In the following, the join is made at the side of petal and at the base.

1. Three petals joined, curved inwards. In the right colours, it could be a spiderwort, a buttercup, a tulip (with unattached petals). And how about a butterfly (2 or 4 petal wings)?!
TIP: When joined, the petals (and flower) hold their shape though each one can be pushed in or out. If left unattached, stiffening or some wire would be needed to hold the petals in place.
2. Two petals facing each other. Could be a flower bud, pendant, fairy light bulbs, or even a strawberry!

3. Two petals could also become a clam shell, oyster with pearl, or a tulip bud. Perhaps even a little gift pouch.

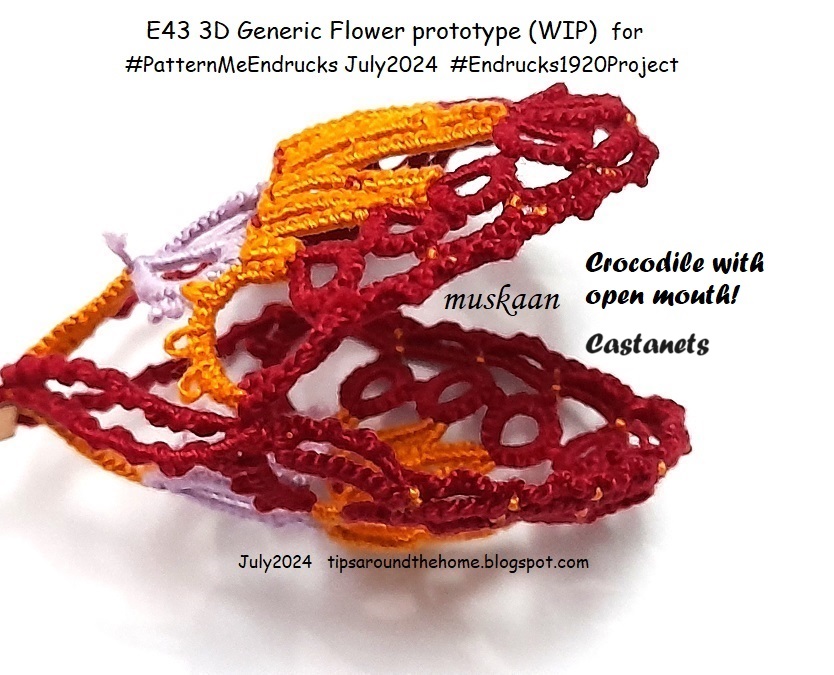
4. Two petals. Now this reminds me of an open-mouthed crocodile. Or castanets? Perhaps even a pair of oven mitts.

5. Two petals, another angle. These pics were taken at night when I was too lazy to get some pearls to insert inside. 

6. This is the 3rd petal. Now the entire flower with any number of petals and joined only at the sides and base, can be tatted in one pass, provided the outermost row is worked in one go at the very end. I had to tat this separately since there wasn't any forethought, LOL.

7. Single petal (#3) without the outermost additional trim around the rings. With beads and gems it would make a lovely pendant or earring.
TIP: For a more rounded tip, remove the middle ring of the trefoil.

8. Three petals joined. Don't you see a butterfly?

9. Three petals joined, facing inward. Same flower, but upended. Could be any number of decorative embellishment or jewellery. Perhaps even a candle decoration at the base.

10. Three petals joined and curved outwards. With the right number and colour of petals, and additional pistils, etc., this really would make a nice hibiscus or petunia.
 
11. And I have to share the lead pic again coz Anita saw this ... 
"This looks like a frightened lady. Can you see her? Her lavender eyes are wide open & picots look like eye lashes, and her orange mouth is open wide, with her orange hair standing straight up.
Or, an Alien. Hmmmm. What’s in my coffee today? Hahaha.
The lady in the petals.
Spell-bound flower, maybe?"

And what do You see? 
Giving credit to my friendly eyes ... what each one saw ...
  • Pendant - Maria Burgo & Vani Kattoju
  • Shell - Jane McLellan
  • Tulip - Ninetta Caruso, Anita Barry
  • Petunia, Hibiscus - Anita Barry
  • Open umbrella for a clown - Anita Barry
  • Spiderwort - Ninetta Caruso
Further, Ninetta has this to say -
"The E43 is like a festoon imho, you had a great idea to extract petals! This pattern has that last double chain over the rings, it "close" the drawing, something that is not present in the E14 even it is similar. So E43 makes a better petal than E14 (or E10)."

Related Posts -

 Thanks for all the friendly suggestions and nudges, ladies! There can never be too many!

Friday, 12 July 2024

what the heart wants

Pin It now!

.... the heart follows! I hadn't planned on playing the game of this month - Pattern Me Endrucks (July2024) because I wanted to focus on other tasks and had told Ninetta. Yet the heart yearns and one gives in to that knotty call. 

E43 Pattern pdf https://drive.google.com/file/d/1JRu7OggaSna0eXDRA2P18dRu6uE4-1J7/view

Some entries have already come in and wow, each of the participants has seen a different aspect in this motif and followed that direction! Can you blame my heart for wanting to join them? I could see an orange segment, but you know my penchant for complicating my life. So, while not a very unique idea or shape, I decided to go for a 3D flower.

Mind you, this is a prototype with a few mistakes, lots of retro-tatting, and Dr. Downplay ruling. Hopefully the next petals will turn out better.

My goal was to deviate as less as possible from the original pattern. 

My Notes, TIPS, and Future Ideas 

Since I wanted to work with two colours, here's how I started without tying the threads together -

A] Started with false CTM, pulling out a short length (A). from the shuttle.
B] Attached a marker/luggage tag loop to the starter picot (B).
C] Using A as core thread, finger-tat the chain using thread (C) from shuttle for the stitches.
D] 2nd shuttle with thread in another colour was added at the end of the chain. The A thread is cut short and hidden in the next element (tat over tails).
For more False CTM scenariosPart 1 ; Part 2 .

  • The tatting proceeds from right to left, unlike the diagram. I think the reason could be that if one direct tats the chain (reverse stitches), it will proceed from right to left. This dawned on me when I noticed the inset diagram showing the start! The written instructions are for normal tatting.
  • As it turns out, on reaching the other end, I decided to keep the chain maroon, hence you can see the colour difference between left and right.
  • In order to position colours lots of Reverse Join (RJ) is used.
  • Midways I decided to use the Catherine Wheel Join (CWJ). However I was tatting the return chain backside. I have done the CWJ from the back before, several times, including my cheat trick of a half-stitch shift! However this time I watched Marilee Rockeley recent video CWJ from the back sidehttps://www.youtube.com/watch?v=EqxTqb8UMww

  • The outer row of chains is done with Victorian sets or zigzag tatting. Continued down.
  • The left chain was made first and is a bit longer than needed.
  • I decided to use the small motifs on the sides (in original pattern) to cover some of the negative space. Added a 3rd colour to make the twin rings and cut off the thread. I've deliberately left short tails instead of hiding them.
  • Then picking up the original shuttles I continued with the chains to complete the first petal.
The shuttles are still attached and I can easily continue with the next petal. I'm thinking a total of 3 petals should complete the flower. While I'm not too thrilled with my colour choices, Dr Downplay rules! 
I have deliberately created a 3D version for the petal. Otherwise the motif lies flat.
You can find tutorial links to the terms mentioned, here - https://tipsaroundthehome.blogspot.com/p/tatting-resources.html

FUTURE IDEAS

  • This same petal, with a bit of tweaking can become a peacock plume! 
  • Or joining 3, 4, or more motifs in the round to create a broad round for a doily. And then design inner and outer rounds to complete the doily. This, however, will be a big project for another year!
  • And of course, orange fruit carpels/segments!

Do you have any suggestions for improvement or any more ideas? Please share ....

More to come; hoping to finish tatting this today so that I can get back to the other stuff.

Many thanks to Maria Grazia and Ninetta Caruso for the reworked pattern, and to Marilee Rockeley for her demo.

Related Posts -