Monday 27 June 2022

just for kicks and koels

Pin It now!

 I find myself mired, happily enough, in several tasks and commitments some with a definite deadline. It means that even though I've  been taking pics to share, and collecting patterns to share, blogging might have to take a backseat for a few weeks. I certainly hope there will be a few hours to spare once in a while to publish a post.

Pausing with a few quick shots ....

I don't like to throw away pruned twigs. This morning, when I snipped off a few overgrown shoots from our ficus plant, I put them in a little pot of water. Let's see how long they last.
And I stuck the Happy Hands Daffodil to brighten the greens 😄

Remember I told you how hubby has taken to displaying my lacework? These are a few on the dining table. There are a few more under the bowls. I took this pic over a week back, without proper lighting.

Same day same time, but a slightly different angle. I'm sure you can identify a few of them? 

Over a week back, while exercising in the morning, a female Koel alighted on the tree in front of our balcony. The plumage and beautiful mottled grey feathers were on full display and quite majestic. Unfortunately by the time I went in and brought out the phone, she had shifted. However, she was joined by a male.
I tried to take a good pic, but my skills are sorely lacking.
And in this video, my hands were shaking. 

Last year, we enjoyed the antics of a courting couple! The female would call, the male would approach, the female would hop on to another branch! This ritualistic dance step repeated several times and finally the female flew away leaving a desolate male behind. 

💗💖💗

Monday 20 June 2022

bag a gift

Pin It now!
....or gift a bag!

What's happening here?! I'm bonkers for sure. I left you with 3 motifs extracted from Endrucks' pattern #37, joined to form a multi-use ornament here - https://tipsaroundthehome.blogspot.com/2022/06/3d-multi-use-ornament.html
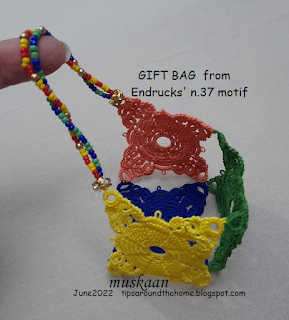
The beads were all snipped off and when I joined the 4th motif, this is what happened --- a gift bag!
4 motifs joined tip to tip. Then beaded strings brought the 2 free tips of opposite motifs together.
And we get a tiny gift bag. Good enough for little girls and their dolls, or for bigger girls and their balls (er, balls of thread)!
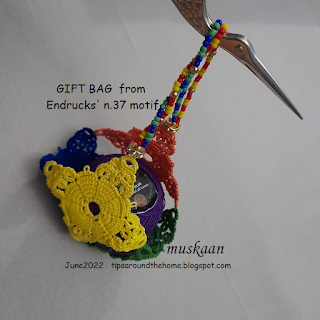
The stork is carrying a gift for sure !

 
Since the beads are again going to be snipped off in order to continue on my journey, I did not address the gaping holes between motifs. 

While the ball will stay put, a shuttle or any smaller object will slip through unless there is a fabric lining as is clearly visible in the video.

Instead of a fabric lining, one can use some tatted rings/elements to close that space (I used to and fro chains in this bag - https://tipsaroundthehome.blogspot.com/2021/10/bagatelle-to-bagaball.html). 
The Pony shuttle with Anchor size 20 ball gives you an idea of the size.

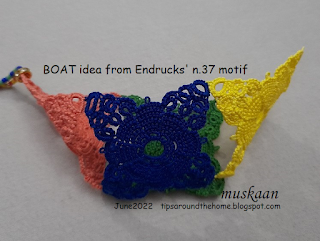
And this is another idea that crept in with the monsoons - a boat! Doesn't it remind you of our childhood paper boats? If we add more motifs to lengthen the sides, we get a longer boat or kayak, or whatever your sailor's heart desires!

Pattern pdf for the Square Diamond Motif  (I used the Mat modification)  - 

Before I sign off, here are 2 short videos showing the gift bag ....


And in a few days I will post the final 3D piece. 

Related Posts -

Tuesday 14 June 2022

3D multi-use ornament

Pin It now!


I would've liked to take pics/videos against a better background, but the weather does not permit too much movement, LOL.

A short video to see it 'in action'.

A tree decoration in June?! The seed took root early and this idea  branched out from another.

Remember this single motif bonanza? I picked up the discarded 'mat' - the one with a yellow and dark blue motif attached, in order to make a cube.  

As I joined the 3rd motif, I couldn't repress my playful mood and found it could be a cute ornament with some additional beads. In finer thread, it could also be worn as earrings or a brooch/pendant, or how about a bracelet charm?!
I used the Mat pattern for each motif - pattern pdf (click to download) :
https://drive.google.com/file/d/1wqAPnOUZwLJ9tEUk55wDZhAMw2qCNFSj/view
Worked in Anchor size 20.
Here it kind of looks like a partially open flower! Add a calyx and stem and we're good to go.

 
Continuing with my curiosity, I attached beads, crystals, teardrops, etc. Looks pretty festive, right? 
How about using it over a baby's crib (not within reach, of course!)?
 
What I would do differently is to have the 3 bottom teardrops suspended at different heights instead of the same.
When planned ahead, beads can be added during the tatting process. I would've placed beads a bit differently as well.
Another short video. 
It would look good as a window decoration, too. Or as part of a toran (door hanging/decoration) for door.

Time now to snip off all the beads. I have a feeling that joining a 4th motif could create a biscornu! Will try to see if the idea works.


All pattern pdfs and more, in modern style as well as links to the original book and patterns can be found in the Endrucks 1920 Project doc here -
https://docs.google.com/document/d/17LEVftXweztBIOWh4sL4BB7bX65ssoOsOn4oXIgCepY/view

Friday 10 June 2022

to and fro inspiration

Pin It now!

 Who inspires whom? What inspires what? How does it all work? Whatever the philosophical underpinnings, this is a simple post on what more the eye saw in Endrucks' pattern #3 besides the original edging, square motifs, and a fruit/flower bowl.

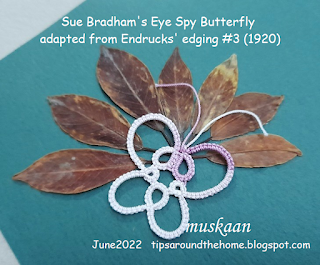
From Endrucks' edging #3, where I spotted a heart, Sue His Kid spotted a butterfly! https://tipsaroundthehome.blogspot.com/2022/01/more-multiples.html
And both patterns are shared for you to enjoy and prettify further.
I changed 28 to 30 ds chain in my model above. Work moves counterclockwise in fs/bs tatting 
My head is brimming with butterfly versions using techniques, effects, beads, etc.!  
In Anchor size 20, the butterfly is less than 4cms across and 3.5 cms high.

This is my Eye Spy Heart from the same source. I had sketched the idea over the Square motif (scroll down to the last pic in that post), but it got forgotten among all other projects. Sue's butterfly motivated me to work it out and believe me, the above model is both my prototype as well as the final piece, finished in less than an hour, and no blocking required, either!
Stich count is notated over the model itself. I deliberately went clockwise for the chains, so that they could be worked frontside. You are free to move in the opposite direction.
Please note that I made a mistake in chain H which I noticed only now. Chain H should be 6ds, just like chain E.

Work in size 10 thread, since the finished size is small. My Heart, in Anchor size 20, measures less than 4cms across and 3cms high.
2 shuttles, CTM. 2 split rings and 1 mock ring. 

UPDATE - Now both pathways for Heart are included in the same pdf - https://drive.google.com/file/d/1t3DhpAeXUBi4oZegOty-q5Ux-zfntdYf/view

Pattern with diagram - one of the pathways. 

The motif is worked clockwise all from the front, except for ringG. Hence reverse work (rw) only before and after ring G.


2 shuttles, continuous thread.

Sh1: r-A: 8 – 4 ∆ 4.

        r-B: 4 +(to ∆) 4 – 8. SS.

Sh2: ch-C: 3 (-3)x8, SS

Sh1: SR-D: 6 / 4 +(to A) 4. SS

Sh2: ch-E: 6

        SCMR-F: 4, rw

        r-G: 8 +(to ∆) 8. rw

        ch-H: 6, SS

Sh1: SR-I: 6 / 4 +(to B) 4. SS

Sh2: ch-J: 3 (-3)x8.

Tie off or tat a ring to anchor findings for earrings, pendant, etc.

💖💖💖

All pattern pdfs and links, including more extracted hearts and butterflies, etc., are listed in the Endrucks 1920 Project documenthttps://docs.google.com/document/d/17LEVftXweztBIOWh4sL4BB7bX65ssoOsOn4oXIgCepY/view


Thursday 9 June 2022

I am a hair model

Pin It now!

 My friend Jane McLellan has been asking to see a hair bun net modelled every time I tat one. Several other friends joined in this time, so here is a quick pic.

This photo was taken last night at the end of a long day out. Hence the hair and net is a bit messed up, but it was then or who knows when. Hubby obliged 💙. 

The occasion was such that I opted for a sari rather than the churidar set I had shown previously - https://tipsaroundthehome.blogspot.com/2022/05/snatched.html . This is one of my favourite sari and print - a pure handloom chiffon with hand-dyed Jaipuri Lehariya tie-and-dye. I have several in different colours, some in 2 colours. 

Originally, this blue sari was a crepe chiffon. We were told to never send it to the dry cleaners, nor iron it. My laziness ended up with the crepe effect flattening out to a flat chiffon. Still looks good, though - the vibrant blue is unbeatable.

I strung a white satin ribbon through the last round. All I need is an overhand tie and the 2 ends are wound around the base of the bun, one in either direction. There are several ways, but this is how I prefer it, since the tension can be adjusted easily (I keep it slightly on the loose side). 
Like I said in my earlier post, if planned early, beads could've been arranged in some inner rounds so as to be more visible.

And this morning, the ribbon was removed, the hair bun net slightly dampened and blocked, and back on the table as a doily. Cinderella's day out has come to an end, LOL

Monday 6 June 2022

vanity takes a fall

Pin It now! I am not happy with my work on many counts.
This is the completed Gooseberry Tree pattern from Erika Tashiro's 'Tatting Lace, Marmelo'.

The last time I showed you, 3 rounds had been completed - https://tipsaroundthehome.blogspot.com/2022/05/indulging-my-vanity.html

This is after 6 rounds. The 6th round was a doozy to control! the little rings and chains kept twisting. The black colour didn't help. I had to block it before continuing to the last round.

Adding a 4th colour - brown - was an afterthought otherwise I might've used it for the center round instead of black. I noticed how beautiful the combo of light and dark green in Erika's coloured version looked. The clovers could be distinguished yet the apposite clovers and chains created an elegant dense curvaceous circle, which I sought to replicate with the brown. However, I should've used a much darker shade to blend with the black clovers.

In the final round I substituted thrown rings with regular picots since I intend to use this as a hair bun net. I don't think it has altered the appearance much.

All those tiny rings are not Josephine Rings. They are small rings or dots.
The doily uses simple techniques - rings, chains, thrown rings, and dots. And several rounds can be worked with a ball and shuttle.

Erika works the 4th round in 3 colours. However, I stuck with black and yellow.

In Anchor Pearl Cotton size 8, the diameter is 8 inches, a tad larger than what I need. Hence I will string it through the rings. I wish I'd worked it in size 40 for a more delicate lace.
Lesson learned - never be vain! And try not to indulge too much in anything, LOL.

Friends have asked me to show the net in action. I am a bit tied up at present to undertake posing and modeling, but will try to definitely post all my 4 current nets. 😁

Saturday 4 June 2022

lemon juice in a jiffy

Pin It now!

I love the tangy sourness of lemon juice - a few drops perk up almost any dish. Yet, laziness often gets the better of me, since it also means taking out a lemon, washing/slicing/squeezing/deseeding. and then storing the rest of it back...yadda yadda yadda.

These are my 2 quick-fix solutions - tried and tested for decades now. Open fridge and voila, no cutting, no seeds, pure fresh juice!

1. Lemon Juice -
I buy veggies for the entire week, lemons included. Here I've gathered the materials I'll need - knife, lemon squeeze, and an air tight container. And lemons, of course! 

Cut each lemon in half, squeeze the juice in a wide-mouth utensil. Sorry, no pics with my messy hands! 

Pour into the air-tight jar. Sieve if there are any seeds. Refrigerate. It lasts easily for up to 2 weeks and still tastes fresh!

2. Lemon wedges/slices - 
When I don't have time to squeeze and store the juice, but need lemon juice immediately ....

Slice the lemon off-center so that the seeded part remains. Notice how I got 4 seedless slices, and I can choose the size of each slice depending on the requirement. Store in air-tight container.
However, seedless is not the only reason I do this. A half-squeezed lemon tends to spoil easily - it might have something to do with the skin being crushed. 
Hence, always store a cut slice that hasn't been squeezed, and it lasts for a long time.
The above 4 slices are for this pictorial. In practice, I simply slice off what I need and store the lemon. It works fine.

What tips do you have to store lemons?