Showing posts with label 25 Snowflake Project. Show all posts

Monday, 8 March 2021

minarets take time

Pin It now!

 ...to build ;-D Well, not so much to tat, but it still took me close to 2 years to get around to it! 

Minarets in the Sky was the 4th of 25 patterns uploaded on 7th July 2019. 

Within 20 days, Grace Atkinson had shared her non-overlapping adaptation, along with her sketched pattern! And it has taken me 20 months to follow her count and tat it ;-D
Above are Grace's models, with the left being her reworked/adapted version.

My original pattern pdf can be downloaded here (2 versions beaded/plain) - https://drive.google.com/file/d/1ZUGfdDEBtjH9yUSc71E3OCPF2-63SXMq/view?usp=sharing
And following are all 3 photographed together -
Notice the well-defined curves of adapted model? And none of the rings overlap. Every element has a stable niche - they are made to sit in their place and behave! The decision to post only after I had tatted it has been a good decision since this turned out to be an eye-opening lesson in designing/tweaking!

Design Tweaks by Grace Atkinson :
  1. Unlike the original, the inward rings at the center are joined at their sides as well, thus increasing stability. 
  2. She has linked the 2 large rings in the 2nd round, thus deleting all overlap and simultaneously broadening the sides, which is why the curves are more pronounced and the shape more pleasing.
  3. The dots at the sides are increased from 4ds to 5ds. This might enable easier closure of the tiny rings, but I don't think it makes much of a difference otherwise. I might be tempted to go with the original 4ds.
  4. In her diagram, the count for the small ring at base of the arms is given as 4½ which is how I tatted them (4½ + 4½). However, a close look at her model shows the rings are tinier! Did she work them as (2 + 2)? I would love to try it with the latter. (I will update after asking her).
  5. The side chains of the arms are also joined, which is another factor in keeping elements in their place.  
Worked in Lizbeth size 20. It needed a bit of shaping and blocking, which I believe would not be required if those base rings had been (2 + 2) instead of (4½ + 4½).

All my snowflake patterns can be found here (along with adaptations) - https://docs.google.com/document/d/1r4OmXX_c5LjFebMN2UbSNiYqXYETLmoridK0X1YIQco/view

Many many thanks, Grace, for taking up the challenge so successfully,
and teaching me more details about designing through your tweaks.

Thursday, 14 January 2021

hidden pathway

Pin It now!

I know many of you must feel that the hidden rose should stay hidden and not be seen so frequently, but what can I do when hidden assets keep surfacing?! How many secrets are hidden in this little snowflake? 

This time it is yet another pathway discovered by Melanie Cervi (or Mel as we fondly know her) who was put off by the paperclips required in my original instructions. So she set off into the woods, clearing away the trees in her path (thankfully, not literally) to leave a trail without clips!!! 

Sequence notated

When she emailed me a month back, I honestly could not figure out how she did it. Clearly my mind was blocked: any which way I went, at least one clip was required. It was only when she posted her instructions here, that I was amazed and amused ;-D In the above model (tatted by Mel), I have inked the sequence. Tatting progresses in clockwise direction and is made in one serpentine pass. 

So this takes the sequence toll to FOUR! We have 4 ways to work this snowflake ... so far ;-P 

You can find links to the pdfs and posts, as well as the rose, ice drop, and heart adaptations in my Snowflake doc here.

Don't forget to skip over to Mel's blog to read her instructions as well as ideas for future experiments and trials - http://picotsnkeys.blogspot.com/2020/12/year-muskaan-floated-idea-of-hidden.html . I've put it on my to-tat list.

UPDATE: Mel made a tatted biscornu using the snowflake patttern! Check it out here - http://picotsnkeys.blogspot.com/2021/06/biscornu-finished.html


But before I leave, here's another lovely pair tatted by the talented Anna Tedesco and shared on facebook. Sorry for poaching the image, Anna, but it is just too cute! Anna has a facebook group - Tatting Art where you can scroll through all her gorgeous projects.


Many thanks, Mel and Anna - keep the spring of inspiration alive 💖

Thursday, 29 October 2020

tree in time

Pin It now!

Digging through my tatting stuff for another project, this tree pattern sprung up! I had sketched the pattern in January, but didn't get around to uploading.  

Wonky  Spunk  Tree   

free pattern pdf

This was the final motif of the 25 Snowflake Project from last year. All patterns are listed in my patterns page, as well as in the Snowflakes' Google-Docs file (which needs a bit of updating).

This is tatted in 3 parts, though one can climb out with split chains to avoid cutting and joining. It is based on a sketch I showed here.

Worked with one shuttle and a Red Heart size 20 ball, ctm. 
Final measurements : 6 cms wide and approx 8.5 cms tall.
This is a prototype, but worked quite well the first time round! It is very wobbly since most rings are unattached. It was deliberate, so that I could insert a string of beads later, as desired.

Under fairy lights, shadow play gives it a 3-D appearance. Despite being floppy, it is good to glue down on a card or to sew as an applique.

Here it is with a string of assorted size 10 to 12 beads. Notice that there are 2 strings. I used a sewing needle with firm thread, joining to each free ring, as well as at other points.

Finally, these larger size 4 beads in assorted colours were sewn in. I thought they would work as baubles :-) With a bit of pre-planning, some of these 'baubles' could be left to dangle. However, in this case I needed them to join the free elements between layers.
It can be used as a tree ornament, but will require stiffening.

This time I simply inserted a couple of the model pictures to my pattern image and converted it into a pdf. Each of the 3 parts (A, B, C) is in a different colour. Here's the pdf link again.
This is kind of freeform - easy to change size and shape. making each model exclusive and unique, as in Nature! Hope you enjoy tatting and gifting.

Monday, 17 August 2020

hidden option

Pin It now! With the plethora of techniques available and the keen eye of a tatter, any pattern can be simplified to suit personal skills! Here is one such example; the 2nd will be in my next post.

Natalia showed me her working of the Hidden Rose Snowflake in 2 rounds instead of the original continuous serpentine one-round working. But this, too is made in one pass.
Incidentally there is already a degree of simplification I introduced with a 2nd working by moving in clockwise direction! Now we have a 3rd degree! Options galore - now you don't have an excuse for Not tatting the snowflake ;-P (scroll down for all the links)

Natalia Shakhnova's adaptation - 
I Love her insight! She works the 6 inner rings first, as a circle of split rings and then continues on to make each arm! There will be lesser scope for mixing up shuttles and directions, and probably easier to work in 2 colours if desired.

In her own words - 

And here is the comparative photo she sent ... notice how compact her 2nd snowflake looks where she works it in her 2-round method?! Like a few other tatters, she has opted out of the lock chains, using only regular chains. The roses look a bit more compact and filled in, though the lock chain texture is missing.

See more adaptations here - https://tipsaroundthehome.blogspot.com/2019/12/hidden-treasures.html and 2 patterns here - https://tipsaroundthehome.blogspot.com/2019/12/open-treasures.html. Incidentally Anita will be teaching the heart motif at Palmetto Tat Days this year.


All my snowflake patterns with updates - 

Many thanks, Natalia, for sharing your alternate working :-)

Bloggers, does your lead pic show in the blog feed as a thumbnail? I noticed some blogs continue to show the thumbnail in my feed, while others no longer show up. I tried a few different tweaks, but no luck. I got in touch with Jane McLellan & Ninetta, and we've all been sharing notes. So do You have any answers on how to get the thumbnail to show again?
Thanks

Friday, 22 May 2020

peacock in the snow

Pin It now!

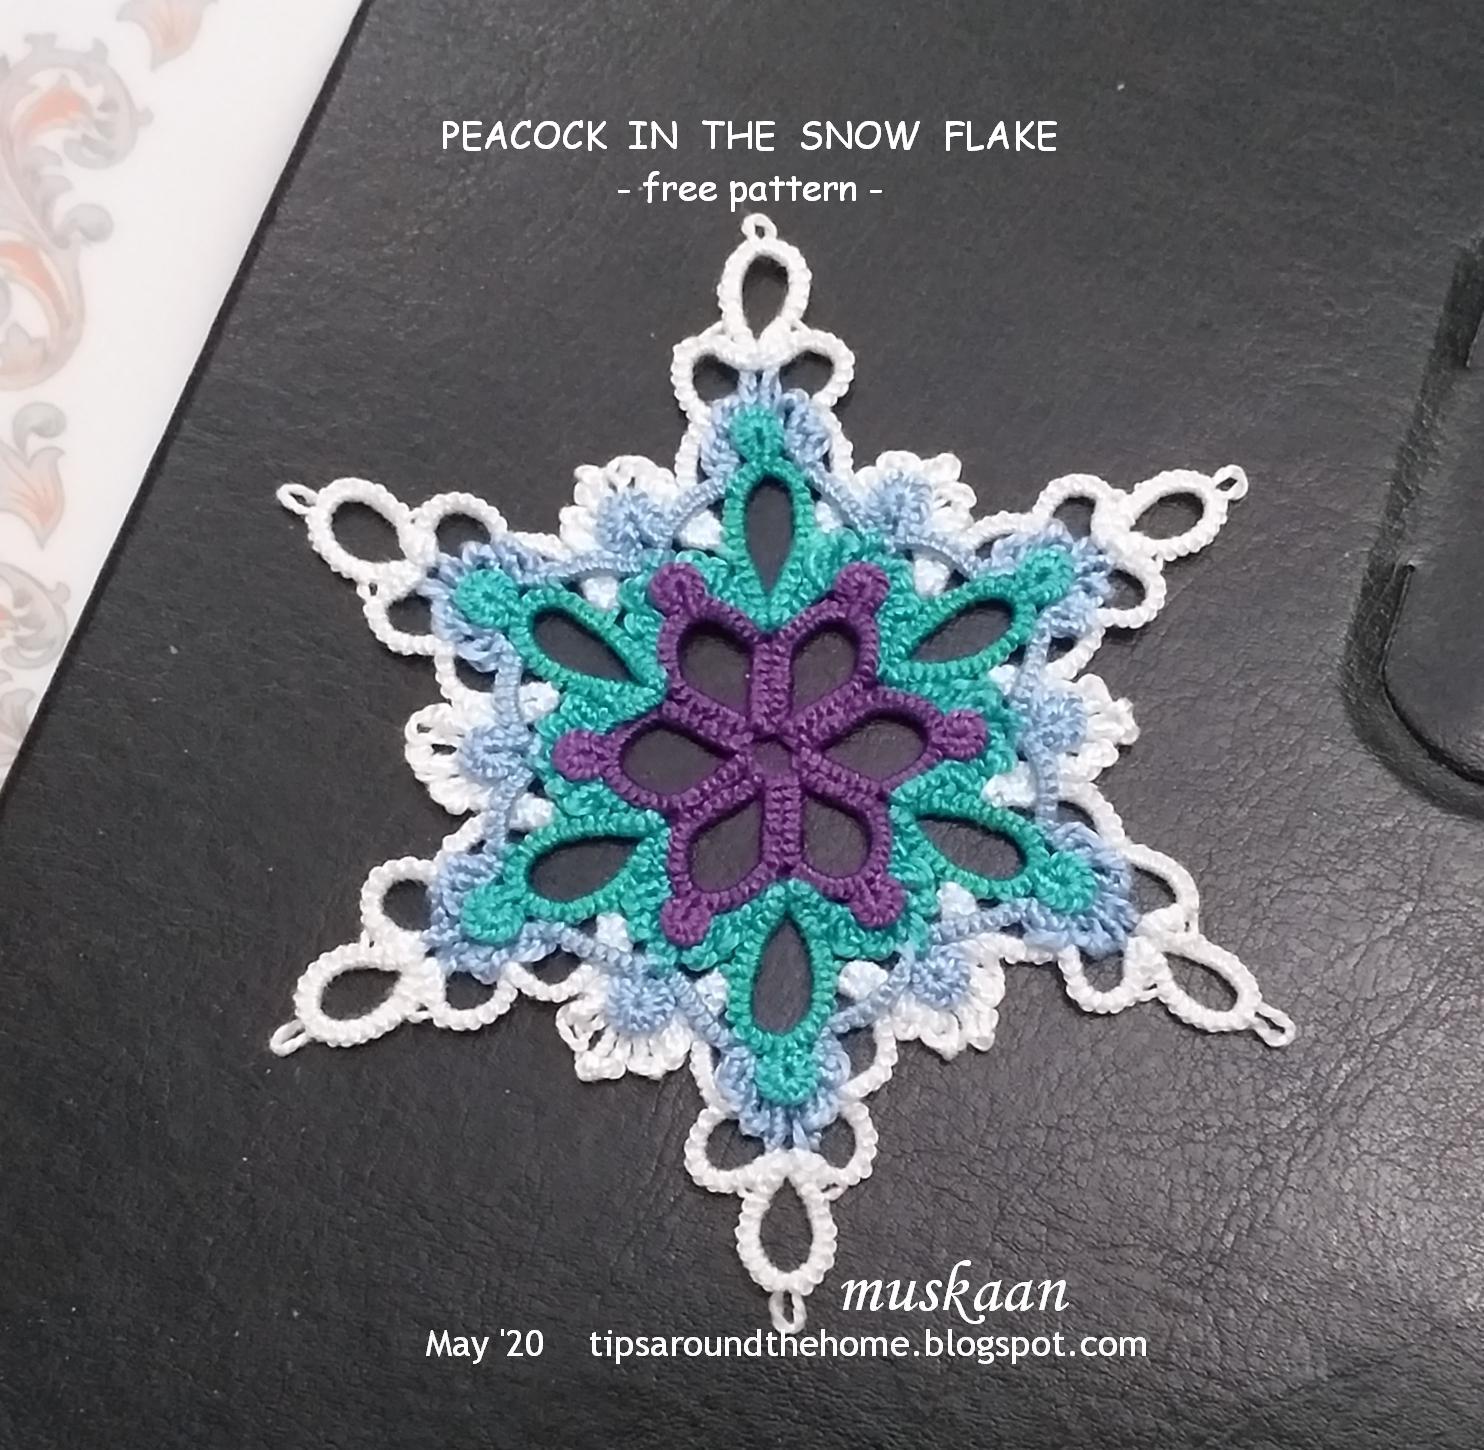
Whoever heard of a tropical bird prancing and showing off it’s plumage in snow? A bird that dances in the rain! It can only happen in lace where creativity knows no geographical bounds.
Yet, I stuck with cool colours for a seamless transition.

2 flakes stacked, creating a lovely effect and design!

Peacock in the Snow flake
Pattern is finally ready and converted to pdf which includes details, along with a close-up pic. Contact me in case of any problem. Hope you enjoy this layered flake. 

The story in pics ....
Round 1
Round 2
Round 3
2 together as motifs for a larger fabric.
Round 4
It measures 10 cms in Anchor Pearl cotton, size 8 (similar to Lizbeth size 20)
An extreme close-up to show details.

2 together as motifs for a larger fabric. Each side is 5 cms.

Hope you enjoy it as much as I did creating and playing with it!

Download pdf here


Monday, 27 April 2020

dancing in the snow

Pin It now!
In January I was contacted by Craftree’s jmjtat. Her guild, ‘Fiber Frenzy’ from the USA had decided to work on my snowflakes as a tat-along through to August, to be displayed in September. They ‘really liked the variety in style and techniques in my collection’! Many were interested in the Peacock in the Snow flake of which I had uploaded only prototype pics. She requested me to release the pattern.

As I had written earlier, I felt the theme was not complete, since white snow was missing in the flake! I finally got around to designing and tatting the final round of snow.
I kept tweaking the treble stitch arches through the round, but now feel confident of what I want for the final.
In Anchor Pearl cotton size 8, it measures 9.5 cms tipwise, and 5cms as hexagon side.
Each round is layered tightly hence ruffles slightly, but settles flat with quick blocking with rolling pin. Can’t say if I have the stamina to test a few versions to get it sorted. We’ll see.

Just wanted to share the first complete look, though. What do you think?

See the white sewing thread across the purple rings in pic below? My prototype had picots and I wanted to see how it would look without them. Hence sewed them to the back – laziness personified ;-P
But look at how beautiful the arches really look from the wrong side!!! From the front, they are partially hidden by the Josephine rings. However, JRs are part of the peacock motif, so I’ll simply reduce the half stitches in each.

And I really have some ideas to re-tat a variation without the JRs so that the arches are in full view! 
And to make flowers with these arches – getting ahead of myself ;-P

Waiting for your comments - answers and suggestions !

Wednesday, 11 March 2020

hidden directions

Pin It now!
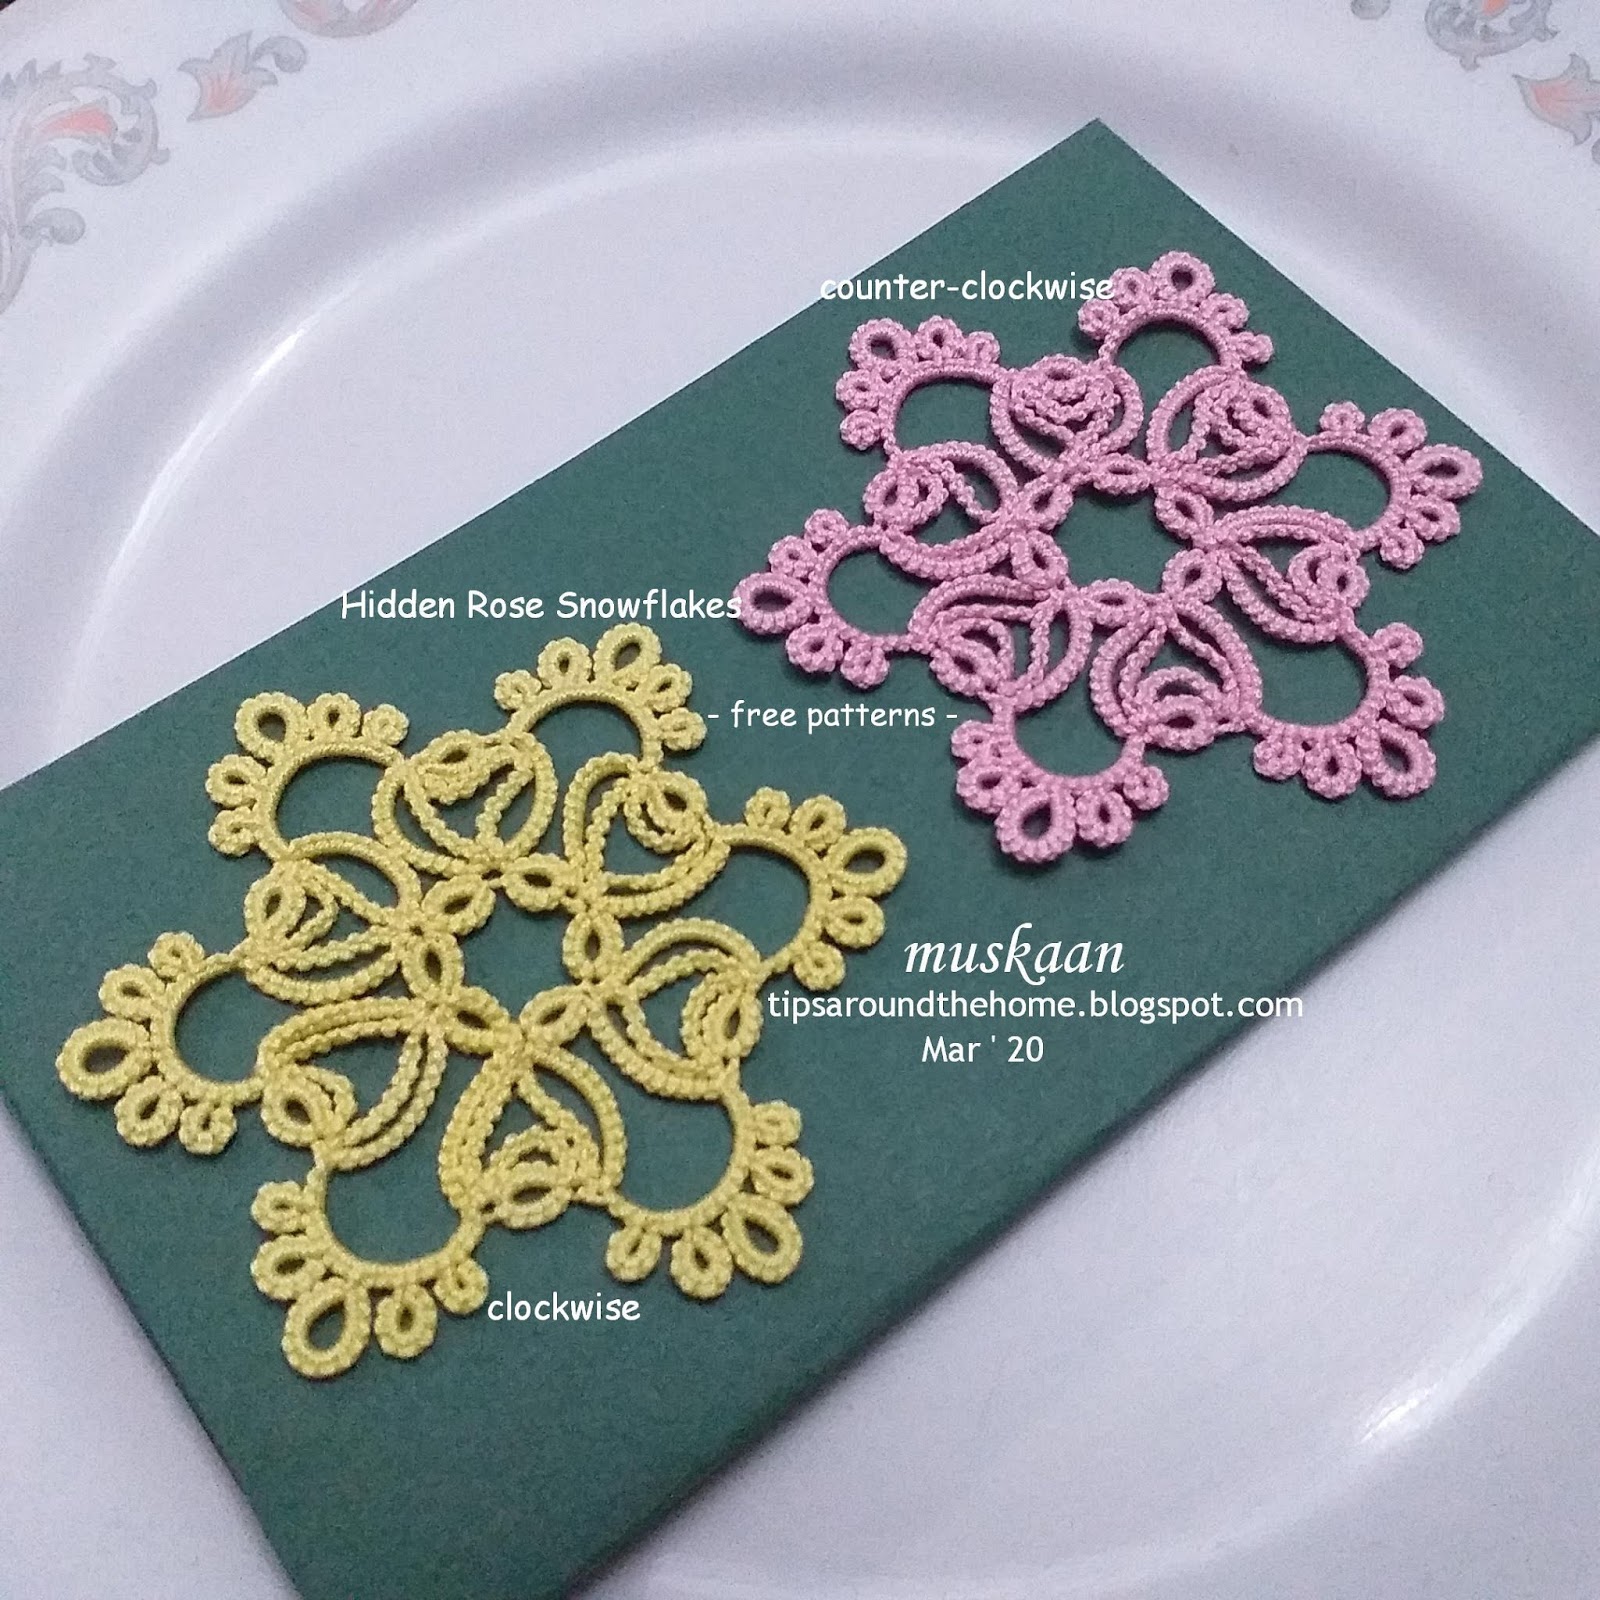
Hidden Rose Snowflake worked Clockwise 
Click to download pdf

Months back I received feedback that a group had difficulty working the snowflake because the sequence of tatting went counter-clockwise. At the time, I was working against a deadline of sorts, but finally in January, I tatted another snowflake in clockwise direction. It has taken me several more weeks to present the pattern. If there is any error, please let me know. Otherwise, simply choose the shuttle that seems to be in the right position, to tat the next element, especially if both shuttles have the same thread colour.


Tatters now have a choice, but clockwise is certainly easier. And yet, this is still not the complete picture. As with many patterns, the method you choose can alter which is the working shuttle (held in the hand). You can choose to start at a different point/element. If you use 2 colours, depending on their placement, you may need to do an shoelace trick (SLT). We are spoiled for choices!


TWoT Notes : Notice how the inner and outer ‘horizontal’ rings go round clockwise in the yellow flake, and counter-clockwise in the pink flake, reflecting the sequence of work.
The above pic gives an idea of how they would look as tessellated motifs.

And when placed one above the other. Doesn’t this look cute when layered? And those pink outer chains bridging the yellow ones form a nice design element. Something for the future again ;-D
Click to download the clockwise Hidden Rose Snowflake pdf.


Tuesday, 31 December 2019

leap into a new year

Pin It now!
In a couple of hours earthlings will begin to usher in and celebrate the new year. 
A couple of pics of, perhaps, my most ambitious designing challenge to date ..... the furious flurry of the 25 Snowflake Project. I thank you for patiently following my 7 month long journey, and many have thrilled me with their enthusiastic response through actual tatting and tweaking!


I wish all my beloved readers, friends, and followers a hugely creative year ahead with peace, happiness, and good health.
You have all brightened and enlightened my life :-)))


I have made a couple more versions/variations since this pic was taken and will gradually share all patterns.
Find all snowflake patterns here.
I'm glad many of these are flower flakes or summer flakes -- with record winter spell -- chilliest and longest spell for over a Century !!! 

Monday, 23 December 2019

finito

Pin It now!
#24 & #25 in Land of Laces' 25 Snowflake Project.

Phew, it's done! The last 2, in the nick of time. And yet, I feel, actually I find, there are still so many ideas on my drawing board yet to see the light of day. And a couple midway on my shuttles.
Anyways, plenty of time for all that.

First, season's greetings to all my readers. Almost everywhere I see/read, the weather is playing havoc or is pretty 'un'seasonal. Hope good cheer prevails over and above the weatherman's predictions.

#24 is a throwback idea from 2016. This stacked adaptation is called Double Dotted Snowflake. I had liked how the twin dots appear close together, forming a virtual circle,  under the arches. I need to tat one more to confirm that it works as neatly as when 2 separate motifs are stacked. But more details, along with pattern, later.

And the final, #25, is a deliberately wonky tree which has spunk to be seen as crooked ;-p 

I came across this graphic card with this sketch in one of the blogs a couple of months back (can't find that blog now), and Loved the freeform sketch with character!

It was easy to convert to tatting, but beading took me a lot of time.

UPDATE : Pattern for this tree motif is posted in pdf here.

Now I need to take a group photo of all 25(+) models for this project. Wonder how I'll fit them all in one frame ... i have an idea, but like so many, execution belies imagination ;-D

Thursday, 19 December 2019

monkey business

Pin It now!
Snowflake #23 in Land of Laces’ 25 Snowflake Project

Why did I title this post ‘monkey business’? I’ll tell you in a bit. Let me start from the beginning.

It was an amazing start in a sense. After a few beaded trials that needed more figuring out, I finally decided what I would do. But no lessons learnt, sigh. It ended up as a square. I think it looks superb as an ornament – pendant, earring, brooch?
While it holds well, if one wants to wear it, I think some stiffening will be needed otherwise the swinging beads will fold down with gravity. 
I wish I could capture the beautiful sheen & shine.

For the snowflake project though, I started a new one without beads. Folded rings are not often seen in snowflake patterns and I repeated the top ring inside the negative space as well. Lots of folded rings (need to practice, so don’t look too closely) and I like the overall design! 
Anita Barry spoiled it for me!!! I was pretty happy with my latest star but she saw a monkey face in it! She’s such a Goose. Now all I can see is a Monkey, too, or perhaps even a Lion or Tiger face. She even suggested a name like Monkey Mania and is determined to call her's 'monkey face'! Grrrr, I’m too Chicken to use it because then all everybody will see is that darned monkey!
I still know which name will stick, though ;-P
And do you see a Butterfly? I saw it while tatting and is worth pursuing.

While I have finalised the count, this star model can be considered a prototype since there is a bit of tweaking going on. So if you have suggestions, please do share. I might incorporate them.

It is too cold for me to work at my desktop for long, hence pattern will have to wait. I also want to make this a 6-armed snowflake. Then all 3 patterns can be uploaded in one go.

Meanwhile I have worked the first trial of #24. Should be able to work and share in a couple of days. 

Saturday, 14 December 2019

Gotham Towers

Pin It now!
Snowflake #22 in Land of Laces’ 25 Snowflake Project

Taking in view the majority opinion in previous post, this is the 3rd round added to the snowflake. Since it has numerous possibilities (time is running out, & I am involved in helping out friends ;-P), I am counting it as #22, with 3 more to go. 

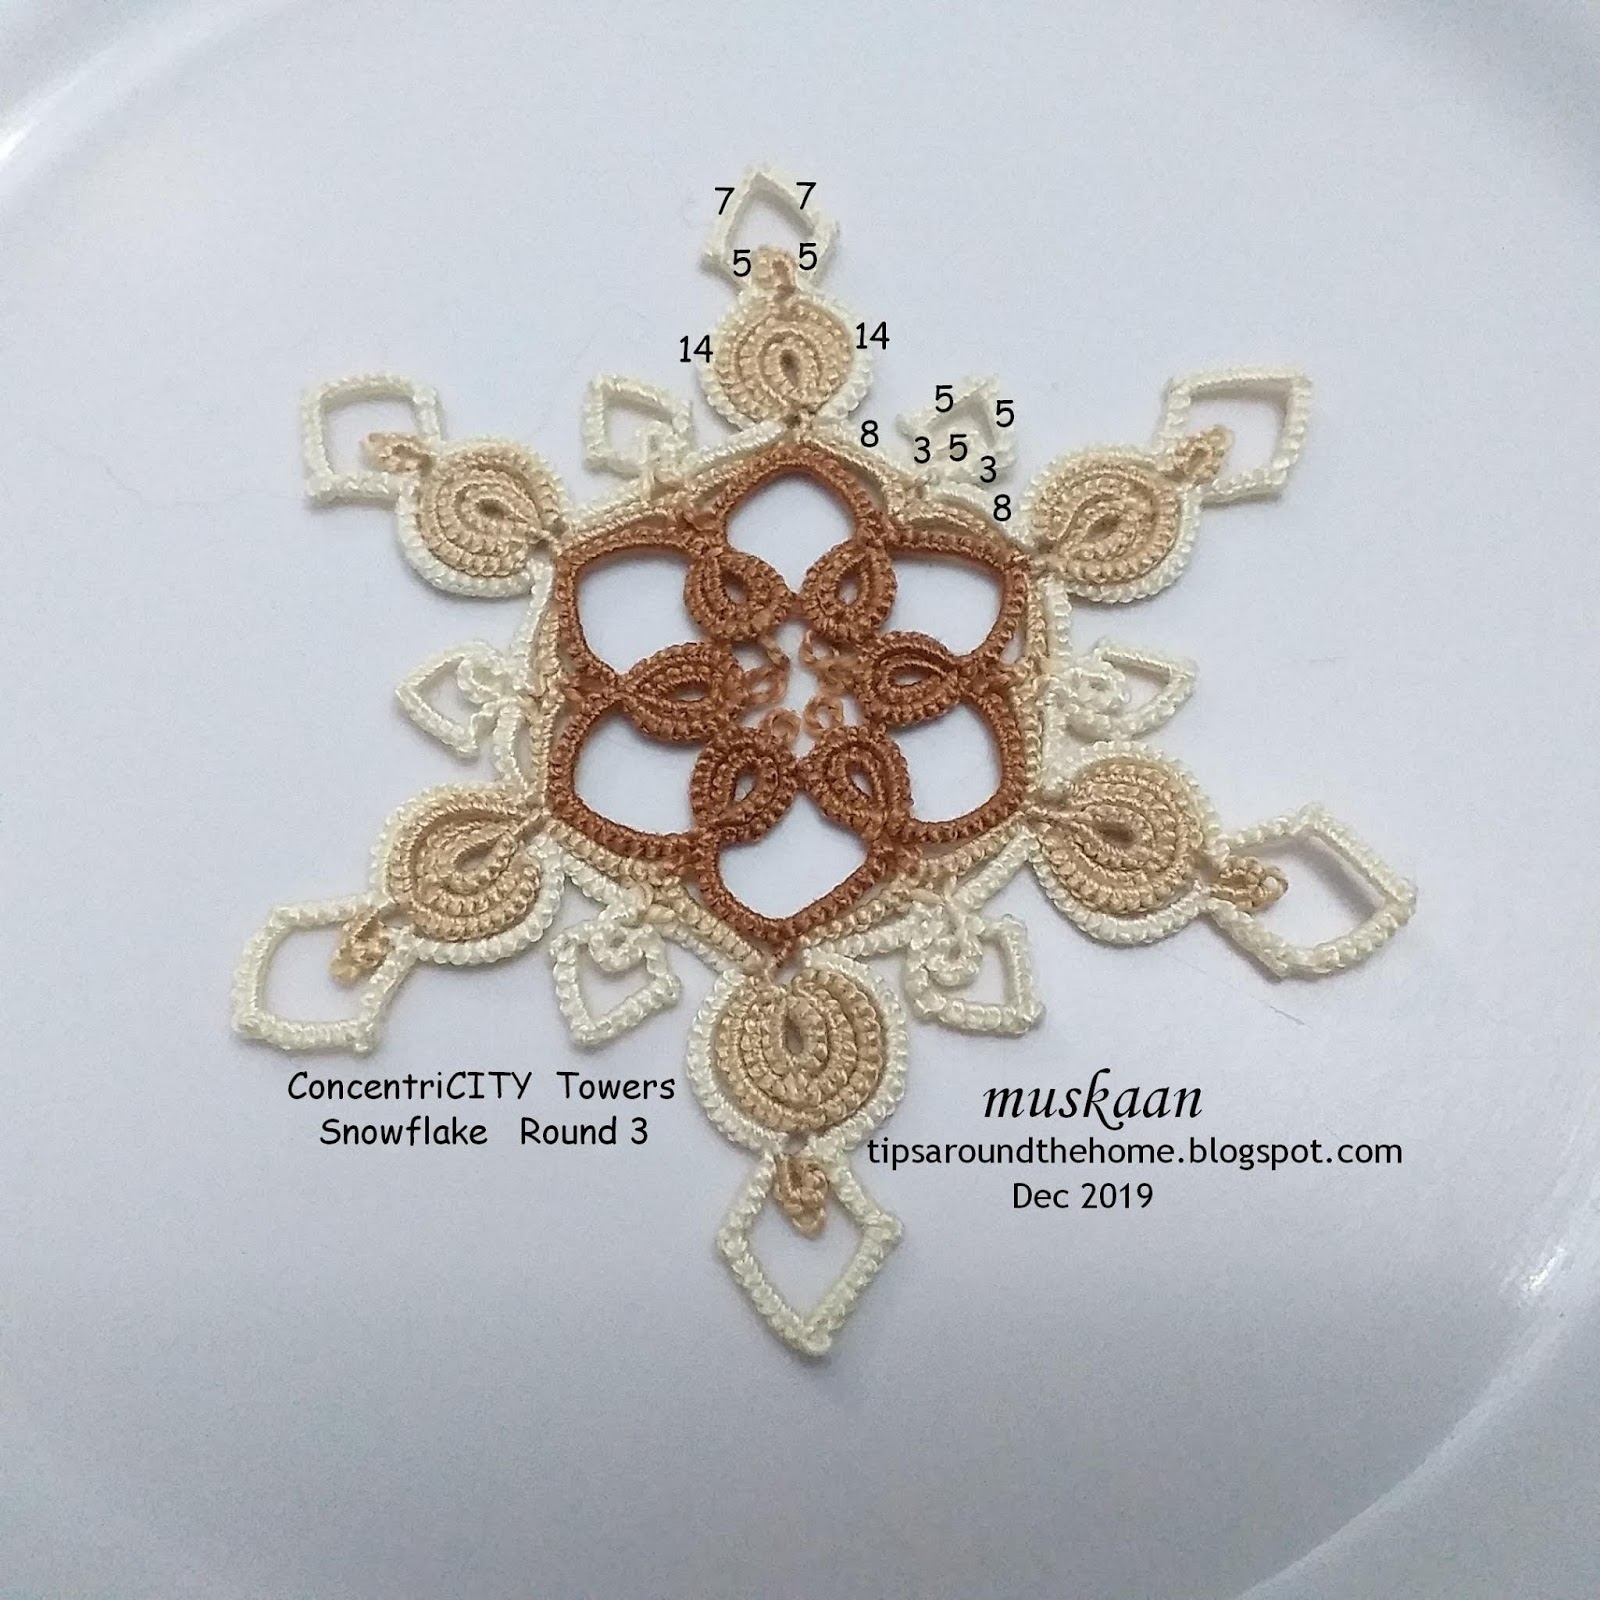
ConcentriCITY Towers snowflake
pattern
For some reason I was just not into this round – I hated my tatting, the curves in the chains were not sitting right, so many options kept invading my head, and I just slogged through somehow. I was almost on the verge of calling the 25 snowflake project over. After blocking it, though, I am fairly satisfied, and want to continue on.

Rounds 1 & 2 remain the same as shared here.
The only difference is the small ring at the tips is (3-3) instead of 5ds.

Since one tatter preferred written instructions, here is the entire written pattern. Choose your favourite method for making onion rings, pointed or angular chains, & joining 2 picots together. If required, adjust the stitch count so that the concentric rings & chains lay niched.

Abbreviation/Notation :
OR = onion ring ; -/p = picot ; + = join ; RW = reverse work ; Ch = chain ; -- = long picot ; 
SS = switch shuttle ; rs = reverse (unflipped) stitch - optional ; ^ = dot picot with Only 1 first half stitch (not 1ds) - optional ; 1SSCMR = self closing mock ring made of 1 stitch.

Round 1 : ball and shuttle, continuous thread
OR1: 6 – 6.
OR2: 7 – 3 +, p 3 – 7. RW
Ch :  2 –– 8 – 8 –– 2. RW
This forms motif#1. Repeat 5 more times, joining each new OR2 to that of previous motif, and also the last to the first.
Note : None of the chain picots is joined. They all remain free.

Round 2 : 2 shuttles, continuous thread. Refer pictorial here .
Attach thread to BOTH picots on adjacent chains of previous round. I joined them simultaneously, but you can choose your own method, keeping it consistent throughout. See Eliz Davis’ study. 
 
Ch : 2 –– 6 lock join
OR1: 6 – 6.
OR2: 9 + p 9.
Ch : 12 + SS mock picot R: 3 – 3. mock picot SS, 12, lock join
Ch : 6 – 2, lock join through Both picots.
This forms motif #1. Repeat 5 more times.

Round 3 - TOWERS : 2 shuttles, continuous thread.

Attach thread to the outside of any onion ring formation, and continue around the triple onion ring.
The ‘towers’ are made of curved chains where I used reverse or unflipped stitches. To avoid this, you can RW, and switch shuttle.
You can choose your favourite method to make the points. There are numerous options, including a seed bead, which I have listed at the end of the post.
To create the point at the top, I made 1ds SCMR, and the points at the side are made with 1 first half stitch dot picot. 
  
Ch : 14, lock join, 5rs, SS, ^ , SS, 7, 1SSCMR, 7, SS, ^ , RW 5, SS, lock join on other side of        OR ,
Ch : 8, lock join through Both picots,
Ring: 5.
Ch : 3rs, SS ^ , SS, 5, 1SSCMR, 5, SS, ^ , RW 3, SS, lock join on other side ring, and again          through both picots.
Ch : 8, lock join
This forms motif #1. Repeat 5 more times.
Block into shape.

NOTE : I found that when I made the ^ on the right side and continued with unflipped stitches, there was a tendency for that point to get sucked in. You may notice it on some of the spears. My solution : Make the ^. Then reverse work. Leave a loop of core thread as if you were tatting a SCMR. Work the 3 or 5 stitches, and only snug the chain. This keeps the point intact.
I really should’ve used another method to change the curves of the chain, and I did try a couple, but somehow settled for this finally. Not happy with my work.

In Anchor Pearl cotton size 8, this measures 4”. Side of hexagon is 2”.

FUTURE IDEAS
-         switch colours in onion rings, alternating the colours, as in block tatting.
-         use Victorian set for alternate onion rings.
-         change the tower curve from ‘spear’ to ‘trident’ (as in above trial pic)
-         padded double stitch (balanced ds) for sturdier spear chains
-         concentric chains for the towers (as in trial pic)
-         beads-          
-         Lee Buchanan gave me another idea to explore at leisure, to grow the tips as in real snowflakes.   
          

POINTED  CHAINS
A few options to make pointed chains : Scroll through for tutorial links (many are listed under different headings/sub-headings)   
-         Shoelace trick (SLT), switch shuttle or reverse work
-         Frivole’s one-stitch SCMR  
-         Jon Yusoff’s pointed chain 
-    Martha Ess’ folded chain (2 half-stitches) [node stitch - Elgiva Nicholls]
-         Usha Shah’s dot picot (or a half stitch dot picot as in pattern, to reduce 'bulk')
-         Ninetta Caruso’s right angle
-         Daniela Mendola’s mimosa knot