Showing posts with label layered effects. Show all posts

Friday, 19 April 2024

bracelet query

Pin It now!

Early this month I was approached by a lady, Beata S, to help with a bracelet pattern. She showed me a pic and I immediately thought of a single shuttle pattern. However, the rings were so clearly overlapping, that it created some confusion and I veered towards interlaced split rings. That I was seeing the image on a small screen didn't help either. I can't show that pic for obvious reasons,

I asked my PIC Ninetta for confirmation and she quickly came back with a couple of WIP pics and it was such a relief. 

This bracelet is almost as basic as they come, quick to tat up, and a great way to embellish or use as a lanyard, jewellery piece, etc. It has dimension, texture, and strength. 
The following pics are a very quick stepwise pictorial using thick thread and large pearl beads. The size of ring will depend on the size of the bead - let the ring be just a tad larger.

1. String beads onto to shuttle thread and tat a ring.
Slip the bead towards the ring just tatted.
    Each ring is 12 ds ; 4mm pearl beads ; size 3 thread.
 
2. Leaving just enough bare thread to span the distance between previous ring and bead, tat the next ring.

3. Pass a crochet hook through the top of the previous ring and pull up the new ring through it,  centering the bead in the previous ring.
4. Continue these steps for the desired length.
Many variations are possible, obviously, including more than one bead in the center, seed beads around the ring, etc. 
Check out Ninetta's numerous Russian-inspired versions here - https://ninettacaruso.blogspot.com/2019/08/russian-inspired-bracelets.html

5. This is how it looks from the back. Notice the bare thread between rings. It can be avoided by using seed beads to cover the bare thread, thus making the braid reversible with kind of a dual look.

I really wish I could have made a better version - intended but not executed. Perhaps in future. At present I am working in fits and starts.

As soon as I was satisfied, I typed out instructions to Beata, and told her I would send the pics in a bit. I had barely uploaded the pics when I received her beautiful version! She was not only quick, but so neat! 

It is always satisfying to answer a query and be of help. And we learn in the process, too. I have often had to delve deeper into a technique to answer a question, thus improving my own understanding. 

UPDATE: (19th April 2024) Beata Saifer just sent me this new image of her bracelet and graciously permitted me to share it here ---
Thank you, Beata! It's been nice corresponding and chatting with you!

UPDATE (May 2024): Corina Meyfeldt used a different method (Collar Rings) to achieve the same result. https://cmhandmade.blogspot.com/2014/07/hello-jaden.html

UPDATE (July 2024): Mad Jar Tatting had uploaded a video demonstrating how to tat this braid. While the outcome is the same, she tats a line of alternating rings and beads to desired length. Then she starts weaving the rings. https://www.youtube.com/watch?v=rIrGNrkWHJE - Ring with Beads in size 20

Sunday, 21 June 2020

forever young

Pin It now!
Flowers in nature, wilt; in thread, they stay a-bloom for generations! The tadaa moment for my Peony has arrived …..
I don’t remember ever seeing a peony flower in real life, but Goggle images came to my rescue at various stages, and structured my visualization. Eg. peony stock image and this

 
In the last post, the round wasn’t complete. Above pics show the completed Round 8.

Stephanie L (on fb) shared another 4-shuttle method of interlacing (or is it interlocking or simple overlapping or layering here?!) and I immediately decided that this would form my final round.

 
My first trial to confirm colour and count.... I thought the light shade hazed out the pink. Switched to a medium dark instead. 

With both shades on the darker side, the pink flower is better highlighted and nicely framed. 

PEONY pattern continued (final Round 9)
Pattern for rounds 1-8 and related Notes can be found in the following posts -

NOTE
  1. 2 shades/threads preferable for the overlapping to show up better.
  2. 4 shuttles (or 2 shuttles continuous with respective balls) in 2 pairs, ctm.
  3. Worked in Anchor size 20 ( Lizbeth 10).
  4. 10 mm Picot Gauge. The long picot is 8ds across, in case tatter wishes to use other thread size/brand (refer Section IV-B, page 5).
  5. Instead of reverse work (rw), switch shuttle and work direct chains (with reverse or unflipped stitches).
  6. Only the odd numbered rings (in this case, dark green) are joined to Round 8.
  7. Decide the manner of overlap and maintain it throughout the round. All odd rings join to each other and even rings to each other, through the long picot. 
  8. For an easier version of Round 9, skip the interlaced rings and work only the dark green part (simple rings and chains) using one shuttle and ball.

Starting Pair :
R1 : 6 --- 5 + 5 --- 6. rw
Ch1 : 9 - 9. rw
R2 : 6 --- 5 - 5 --- 6, rw
Ch2 : 9 - 9, rw
Overlapping Rings and Chains : 
In above model - The long picot of Ring1 is inserted from front to back (over-under) through Ring2 from  to be joined to Ring3. 
Chains also overlap front to back - Chain2 in front of Ring3; Chain3 in front of Ring4, and so on. 

Start next ring from behind previous ring as in model above -
R3 : 6 +(R1, after passing picot through R2) + 5 --- 6, rw
Ch3 : 9 - 9 , rw

R4 : 6 +(R2, after passing picot through R3) - 5 --- 6, rw
Ch4 : 9 - 9 , rw
Repeat from R3 onwards all around, remembering to overlap the rings and chains correctly.

Final Pair :
R79 : 6 +(R77, after passing picot through R78) + 5 +(R1) 6, rw
Ch79 : 9 - 9 , rw
R80 : 6 +(R78, after passing picot through R79) - 5 +(R2, after passing picot of R2 through R1) 6, rw
Ch80 : 9 - 9 , rw
TIP : It is easier to finger tat the very last ring (R80) after snipping off a sufficient length, or to work it as a self-closing mock ring (SCMR). It becomes easier to maneuver the overlap correctly before joining to respective picot. 

Measures 8" - kind of a mini doily?

Instead of 10mm, one can have 9mm picots. This will create a straight line of picots when joined, instead of this wavy interweaving. I deliberately chose 10mm to keep with the semi-structured, slightly natural and textured look of the doily.

Hubby was a bit hesitant during the early repeats of this round. But once close to the end, he was pleasantly surprised and actually felt the inner darker red shades and yellow could have been broader. I think a few more pink rounds wouldn't have been amiss either.

I have some design ideas to add more rounds, but that will be for a future day. I might even work out a beginner-level version.  

This one round took longer to tat than all the previous rounds together, and adds a lot of weight! But I am happy with the outcome. Of course, it can be changed to suit individual taste. And the best part – one can stop at Any round one wishes and call it done!!!

I wrote a teensy bit about this favourite and very handy book here.

This has been an unintentionally long digi-break, but I managed to get some tatting in. And now I am excited to show you what I believe is possibly a new picot technique – very easy, versatile, and functional. I'm calling it the Intruding Picot ;-P So stay tuned …. And happy tatting always :-)

Friday, 22 May 2020

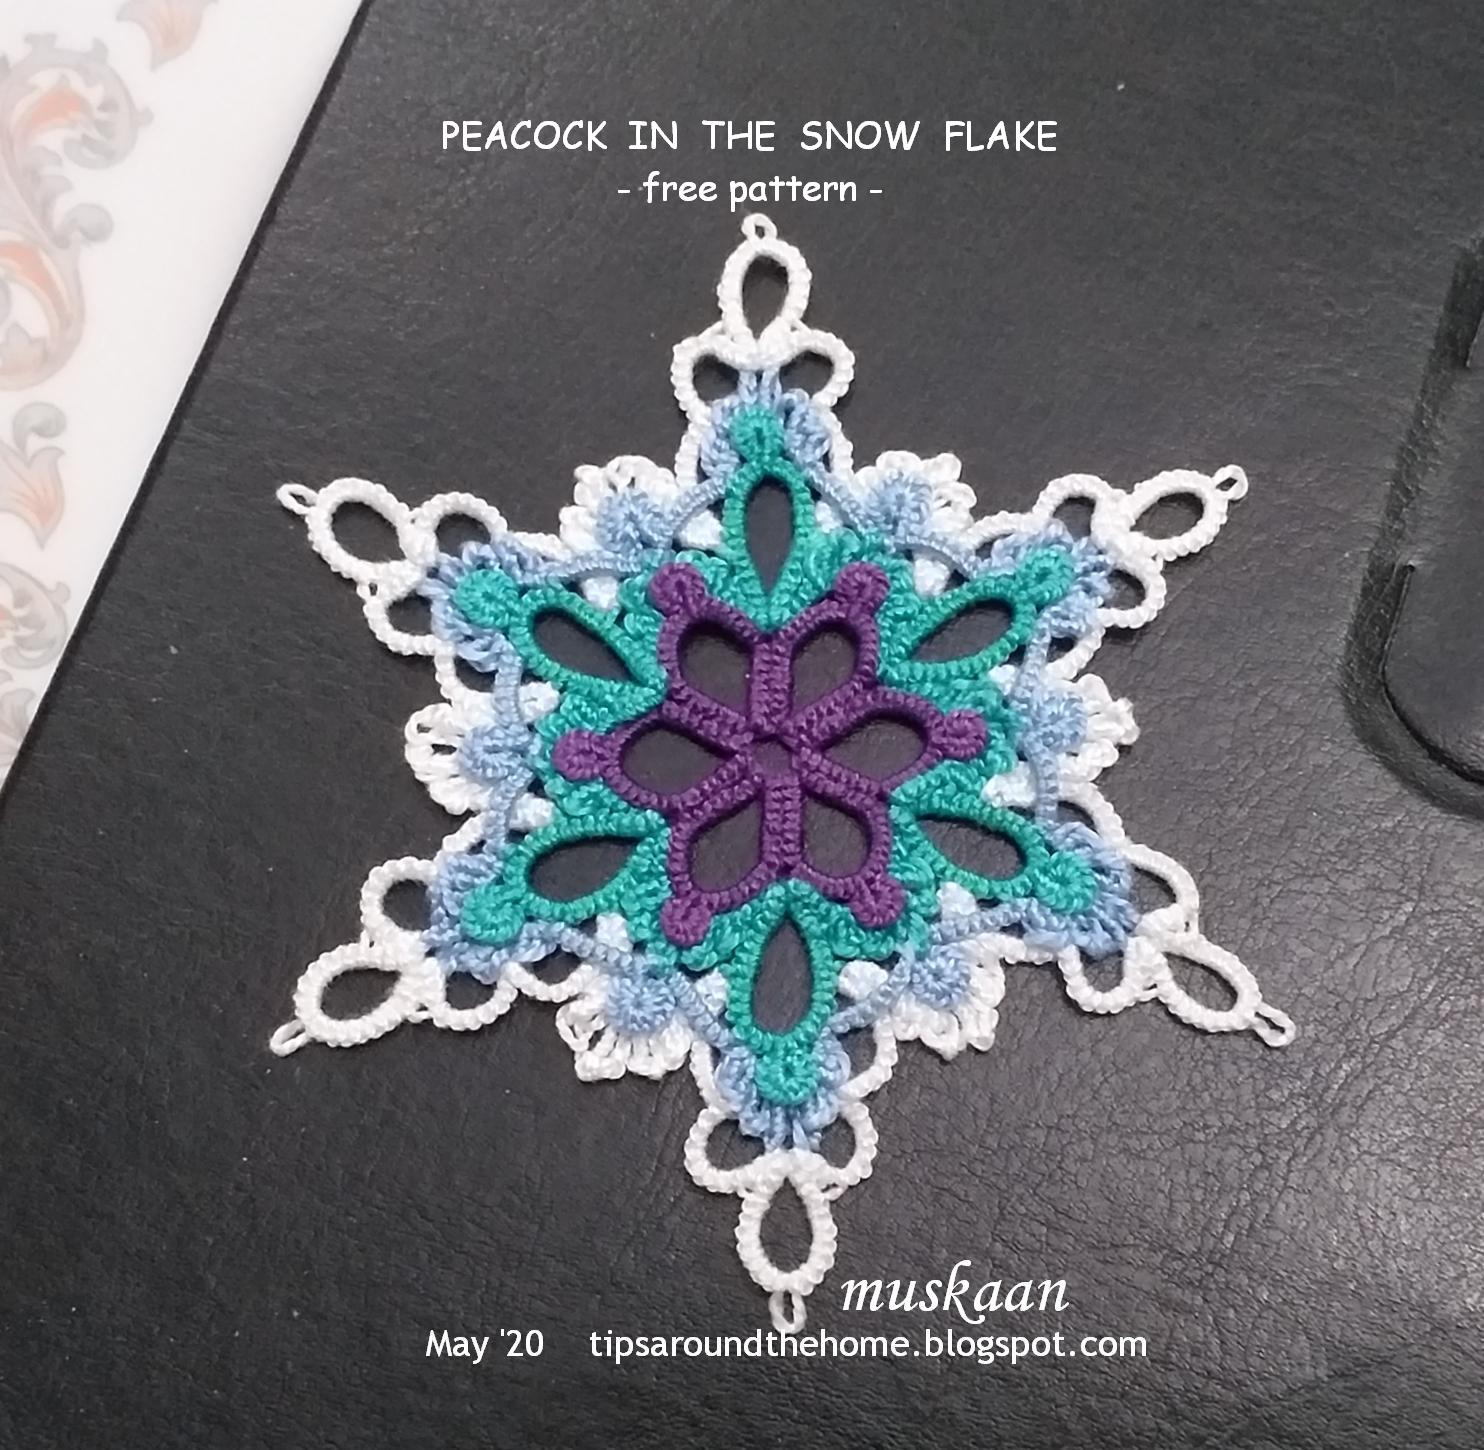
peacock in the snow

Pin It now!

Whoever heard of a tropical bird prancing and showing off it’s plumage in snow? A bird that dances in the rain! It can only happen in lace where creativity knows no geographical bounds.
Yet, I stuck with cool colours for a seamless transition.

2 flakes stacked, creating a lovely effect and design!

Peacock in the Snow flake
Pattern is finally ready and converted to pdf which includes details, along with a close-up pic. Contact me in case of any problem. Hope you enjoy this layered flake. 

The story in pics ....
Round 1
Round 2
Round 3
2 together as motifs for a larger fabric.
Round 4
It measures 10 cms in Anchor Pearl cotton, size 8 (similar to Lizbeth size 20)
An extreme close-up to show details.

2 together as motifs for a larger fabric. Each side is 5 cms.

Hope you enjoy it as much as I did creating and playing with it!

Download pdf here


Monday, 27 April 2020

dancing in the snow

Pin It now!
In January I was contacted by Craftree’s jmjtat. Her guild, ‘Fiber Frenzy’ from the USA had decided to work on my snowflakes as a tat-along through to August, to be displayed in September. They ‘really liked the variety in style and techniques in my collection’! Many were interested in the Peacock in the Snow flake of which I had uploaded only prototype pics. She requested me to release the pattern.

As I had written earlier, I felt the theme was not complete, since white snow was missing in the flake! I finally got around to designing and tatting the final round of snow.
I kept tweaking the treble stitch arches through the round, but now feel confident of what I want for the final.
In Anchor Pearl cotton size 8, it measures 9.5 cms tipwise, and 5cms as hexagon side.
Each round is layered tightly hence ruffles slightly, but settles flat with quick blocking with rolling pin. Can’t say if I have the stamina to test a few versions to get it sorted. We’ll see.

Just wanted to share the first complete look, though. What do you think?

See the white sewing thread across the purple rings in pic below? My prototype had picots and I wanted to see how it would look without them. Hence sewed them to the back – laziness personified ;-P
But look at how beautiful the arches really look from the wrong side!!! From the front, they are partially hidden by the Josephine rings. However, JRs are part of the peacock motif, so I’ll simply reduce the half stitches in each.

And I really have some ideas to re-tat a variation without the JRs so that the arches are in full view! 
And to make flowers with these arches – getting ahead of myself ;-P

Waiting for your comments - answers and suggestions !

Sunday, 29 September 2019

the jinx of 13

Pin It now!

I don’t much care for the supposed jinx of this being the 13th flake ;-P But this back from the old snowflake/star has me stumped for a weird reason. It uses my Overlapping Split Rings effect. More effects here, including a square arrangement.
MUTANT  SNOWFLAKE - 
design evolution
Here’s some history –
1. This was a trial prototype from 2016 in Anchor 20. At 5 points/arms, it lays flat.

2. Elaborating on the idea, I converted it into a 6-point flake using Anchor Pearl cotton size 8. There was some cupping. I left it in my tatting box overnight and in the morning, it was pretty flat, and more so after some quick blocking.

I went back to my Jottings about cupping/ruffling and worked in the corrections in next trial... 
Basically cupping occurs when outer round is tight. To avoid it, decrease inner round or increase outer round.

3. Wondering how it would look in a single colour, I chose Anchor 20, but the center rings are 1 stitch short (to reduce the center and tackle cupping). Major cupping which did settle after tugging and blocking!
The split rings have 1 extra stitch and this translated into a slightly different more roundish overlap.

4. Fell back on the maroon pattern using Lizbeth 20 threads. And guess what, I had to make 8 repeats for the flake to lie flat by itself!

Pearl cotton differs in it’s looser twist when compared to Lizbeth, but they tat up to the same final measurements. So what just happened?!!

I was ready to share the 8-armed snowflake which is part of the reason it is called Mutant. Seems like the thread and picot characteristics can lead to anywhere from 5 to 8 arms ;-D
It is a mutant in terms of it’s faux Celtic effect. Not true Irish, a bit of a freak ;-P

The online tatting world has blessed me with some excellent friends. Jane McLellan came to my rescue recently; this time is was Ninetta Caruso & Anita Barry.

They sent me possible reasons, solutions, options and enthusiastically volunteered to tat the flake, too. They were ready to count from the image, but I managed to quickly type them some shorthand notations. They will be doing it today.

Would you like to read what these experienced designers/teachers have to say? It is a design bonanza - insightful designing tips, and if you are interested, I’ll share in my next post.

So, what do you think – would you like to tat this 8-armed snowflake or are you a stickler for 6 dendrites?!

UPDATE (Oct 2025) - Unfortunately I haven't yet been able to put together a post about our joint experience, observations, and the final pattern. However, Ninetta had shared a pic of her lovely, vibrant version here - https://ninettacaruso.blogspot.com/2019/10/distractions.html 

Thursday, 19 September 2019

duh moments

Pin It now!
Seems like ages since I tried/learned something new besides my designing project.
I scrolled back through my posts and the last interlacing project remains in limbo and it was May when I did this

Meanwhile Ninetta has been posting so many enticing new effects and patterns, sigh.

Now when I need my beadbox, I try to do multiple projects with beads in one go. It’s like sewing – I pile up my sewing projects and then sit at the machine at a stretch.


Perfect time to try Ninetta’s Interlacing Methods. Loaded one shuttle with the magenta pearl cotton (size 8) and used this for all 3, changing only the chain and bead colours.

I started with her ring and chains method first. Clear instructions and pictures – enjoyed it tremendously. This is the Second Method.


Trying to capture the double-chain from different angles to show how lovely the effect is.
The curled ring finish looks like a rose!


Time to try the beaded method (First Method). see Duh Moment #2 below !
I alternated the bead colour for fun...

TIP: It is easier to pull the ring(s) through using a crochet hook.

Duh Moment #1.
After both trials, I kept thinking that the very last chain should be half the length of the earlier chains. Notice how it sticks out in both versions?
She already factored it in… if only I had carefully read through her bracelet patterns!!!

Duh Moment #2.
While working both, I didn’t really notice any difference in the interlacing methods.
No difference because it was the 2nd method again, stupid!!! 
Guess when I realised it – just now when I went back to her post for correct reference and terms, etc.

Her giggly earrings had caught my imagination right away. It tats up real quick and looks so pretty. Oh, but the number of beads to be loaded!!! I need to adjust the rings a bit more to make them settle properly.


I hope it doesn’t turn into a Duh Moment #3 – I’m sticking my neck out here… 
It appears that her First Method of interlacing is kind of a transition between Second method and the earrings. Interlacing by pulling 1 ring in 2nd method; 2 rings in 1st method; and multiple rings (graduated size adds a braided effect) in earrings.


Keep them coming, Nin, I’ll surely catch up in one life or another ;-P

Monday, 20 May 2019

Russian Bracelet and Brooch

Pin It now!
 aka The Importance of Polyester !
BRACELET PARACORD 
This link was shared in a fb group and it was fun to come back to 3D tatting.
But I decided to do a short beaded version for earrings. 

One can start the split ring braid with a normal ring.
For the ring and chain scroll I chose to work with shuttle and ball continuous thread instead of 2 shuttles, with beads strung on ball thread.

I made 16 chains with 8 beads on each.

Really, for better results, for the intertwined elements to keep their shape, polyester thread is an essential.
This is how it looks from the back....

... and against a black background.

Simple Anchor size 40 thread and size 18/0 seed beads. Final measurement – 2¼” long, ¾” broad.  
I tried another pattern. This time the DOUBLE-SIDED BROOCH. This pattern is made of 5 individual rosettes or medallions. After all 5 are completed, they are interlaced/intertwined. I’ve done this type before, though not so dense.
I have no trouble tatting large rings. However, in order to get a stiff ring, I increased the stitch tension. You can see the mess I made (even broke the thread once while closing a ring, and then switched to mock rings).
I’ve decided to scrap this project. No use until I have the right thread. What has been your experience? Any tips?

It’s a pity I couldn’t get better results – the video demonstrations are very clear! I’ll jot it down as gaining some more experience :-D