Showing posts with label vintage tatting. Show all posts

Sunday, 5 January 2025

last and first

Pin It now!

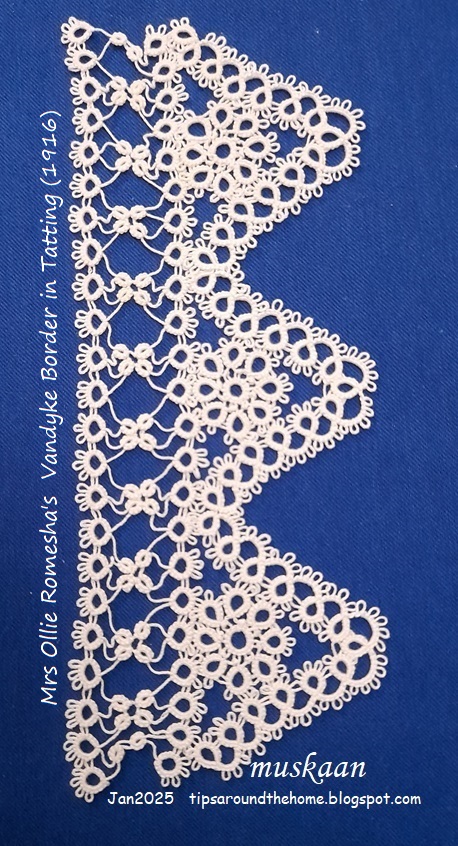
 So this is the last thing I tatted and the first I picked up at the turn of the year. And I have my tatting buddy Anita to thank for it. She was on a determined mission to finish off her ongoing works before the new year came around. Impressed and motivated, I chose this sampler I had shared here and finished it on the night of 31st Dec 2024 with an hour to spare! 

And in 2025, I picked it up again to hide the tails, block and photograph it. Notice the thread going across at the top? I won the thread chicken race!!!

Pattern is Vandyke Border in Tatting by Mrs Ollie Romesha  published in Needlecraft Vol. VII, No. 8, April 1916 and the PDF can be downloaded here - https://www.antiquepatternlibrary.org/html/warm/tatting.htm

One headside motif showing wheel surrounded by a scroll.
NOTE - The pattern calls the circular medallion a 'wheel'. However the correct term for this classic formation is 'daisy'. https://tipsaroundthehome.blogspot.com/2024/03/counts.html

My Notes - 
1. Pattern calls for starting the scroll at the ring indicated by white arrow. I started with the one indicated by orange arrow.
2. 4ds is missing in the pattern for ring indicated by blue arrow. All 5 rings are identical.
3. Pattern calls for tatting the scroll first and later tat the wheel (daisy) joining it to the scroll on the go. I preferred tatting the wheels separately and joining the scroll to each. 

A single motif turned around looks like the letter A! In Anchor size 40, it is 4cms high and just under 4cms wide.

Three repeats without the footside or sewing edge is more pliable and can be used for a collar, necklace, etc.

4. This lace is worked in four parts as per original pattern - wheels, pointed edge, two rows of a straight edge on the upper side. Worked with one shuttle (and ball only in scroll) throughout. 

5. Continuous Tatting in Wheel using Slip Stitch - Determined to keep it vintage, I did not use any continuous tatting method to climb out of the rows in the lace. However, the wheel is an exception where Mrs Ollie works it in one pass using only one shuttle. She works the central ring then instructs us to close the ring and 'fasten thread to 1st picot and tat ring ....'. Basically leave a very short bare thread space, make lock join in 1st picot, and start outward facing ring. I recently learned this is called a SLIP STITCH - leaving bare thread to span the distance in order to climb out at a different point. We've all used this in some form, some situation or other. Now we have a term (Judith Connors' An Illustrated Dictionary of Tatting, 2007 ed.) and Judith patiently clarified it for me. In a future post I will elaborate on these situations, one such being this Rosette Enchained snowflake .

6. In Anchor mercerised cotton size 40, measurements for 3 repeats: 7cms high x 17cms long. Without the footside rows, the triangle is 4cms high. 
Not happy with the bare thread lengths in the footside rows. I used a 5mm gauge. 4mm would've been better. My fear, despite the trial, came true, sigh.

From this upturned side, the peaks remind me of temples in India.

I hope to use this short length on a greeting card or card topper once I visualise what else should go into the composition. Your suggestions are welcome.

Related posts

Tuesday, 10 December 2024

incomplete

Pin It now!

Suddenly the month is slipping away fast and I have ton of tatting to do. I hadn't been able to tat for almost a month due to life interruptions which put me back a whole lot. Prioritizing is the need of the hour or what's remaining of this month. 

This is the Vandkye Border in Tatting by Mrs. Ollie Romesha which I had hoped to complete before showing. I've decided to postpone it's completion hence sharing the WIP pic. It was published in Needlecraft Vol. VII, No. 8, April 1916 and the PDF can be downloaded here -https://www.antiquepatternlibrary.org/html/warm/tatting.htm   

Vandyke formations are inspired by portraits painted by 17th century Flemish artist Anthony van Dyck and refer to the distinct peaks or points like in the V-shaped chevron strips. I decided to go with this edging despite the bare thread space that kind of terrifies me. Then there was the headache-inducing task of transcribing the old text into short notations or diagrams. I took the plunge! 

However I tatted the flower medallions first unlike what the instructions stated. Decided it would be more comfortable when joining. 

There is one minor omission in the written pattern (part of the pattern is missing). The image of the tatted model was of great help.

The sewing side consists of single shuttle work with lots of bare thread. I started at the right to gauge the length of bare thread. It turned out to be a wee bit tight when the final row is tatted above. Started afresh at the left end, but have left it for the present. Once my other time-bound commitments for this month are done, I'll get back to this and share more details. 
Worked in Anchor size 40.


I am submitting this for Natalie Rogers' PICOT Bingo game, striking off the block - Tat an Edging. Now this game is another project I probably won't be able to complete despite starting in January itself. At least not in the way I wanted to. But never say die, LOL. 

Saturday, 7 October 2023

rosettes

Pin It now!

 In tatting, we often come across different names for the same technique/effect and the same name for different techniques! (jot it down to various reasons - historical, linguistic, ignorance, non-standardization, ....).  One example of the latter is Rosette. This historical term refers to at least three different styles as evident in the collage below!

Our newest game in the Endrucks 1920 Project FB group involves the third motif and it seemed a good opportunity to address this situation and refresh my knowledge.


They are arranged along evolutionary lines -

1. Single ring with picots aka central ring. Tatted with a single thread. This was a common starting medallion in numerous antique patterns, and the thread was tied and cut after each! Now, we climb out with a mock picot or if possible, we work it as a thrown ring for continuous tatting.

2. Outward facing rings, often called a daisy or flower. Again, tatted with a single thread and the rings are joined to each other to create beautiful medallions. It helps that joining on the go was discovered. The number of rings can determine the shape and size.

Rosace is a term used by several non-English speaking tatters, to address this formation. eg. Maria Papia's earrings (https://www.youtube.com/watch?v=wbqLn8xTaGU) and Lilas Lace's pictorial of Edwige Renaudin's Double Rosace (https://lilas-lace.fr/blog/2014/02/28/diy-a-double-rosace-diy-une-rosade-a-double-rangee-danneaux/)

3. Concentric chains around a central ring. Each chain segment is joined to the picot below from the previous round. The entire medallion is worked continuously, but requires two threads. Obviously this came into existence after the discovery of tatted chains.

In the sample above, the consecutive chain rounds are niched closely into a compact circle - like a dartboard. However, if the chains are made slightly longer, with more of an arch on each chain, it gives the appearance of a flower - a Rose or wild rose as Sharon Briggs calls it (https://sharonstattedlace.blogspot.com/2008/05/tatting-wild-rose.html).


This is all I have. Have you encountered the term for another formation? Please do share.

My main references for the above, besides online resources already listed (including Craftree), are - Elgiva Nicholls' 'Tatting: Technique & History' 1984, and Judith Connors' 'An Illustrated Dictionary of Tatting'. And all three tatted samples above are from derivatives of Endrucks' (1920) patterns 42, 20, and 37.

UPDATE: (9th Oct 2023) - Perhaps I should've spoken about the origin of the word rosette, etc. But here's a comment by Stéphanie Mc (Tattimic) on my FB post and quoted here ---

I'm pretty sure it comes from French.
In French, the word "rosette" can take about 10 different meanings. It usually refers to something circular with a circle in the middle, but not necessarily.
Also, when the suffix "-ette" is added to a noun - let's say "rose", haha-, it refers to a smaller version of that noun. So a "rosette" is supposed to mean "a small rose", at least in some interpretation of the word, of course.

 Well, she is absolutely right! 

My sincerest thanks to all mentioned!

Thursday, 18 August 2022

a bonanza of happiness

Pin It now!

 I wonder if you remember my intention to write a series of 3 articles for the IOLI Bulletin, about our Endrucks 1920 Project (which got published in the Summer issue); how one simple pattern spawned a bonanza of derivatives (this will be published int he Fall issue); and lastly on Frau Endrucks and her book/presentation (in the works). 

So, for the 2nd article the first pattern in her book was chosen. Several reasons but what tilted the scales was the fact that so many tatters had adapted or adopted the basic motif from the edging and transformed it into different shapes and styles. It symbolised the collaborative cooperation of our Project; without this coming together, the Project could never have been carried out so successfully, and continue to carry on. I have tried to capture this comity of our international tatters through the bracelet. 

Happy Hands Linked Bracelet - muskaan


Colours were chosen to represent our diversity of backgrounds - different lands, different races - yet our hands worked together. I will share the pattern and more beading details in the next couple of months.

Happy Hands Edging with Corner - Antonia Lai


Antonia modified the edging slightly by adding an extra ring, spacing out the motifs and making it easier to tat/join to previous motif. However, she also designed a 90 degree corner and shared it enthusiastically! It is a clever design - shift one motif outwards and we have a corner. And the edging can be sewn over the fabric or around the fabric - both work perfectly.

pattern pdf: https://drive.google.com/file/d/1fsiET9ZJvXSD0kcAMKsuUNZt-rznFkO9/view

Lea Di Palma

Lea followed the original pattern (https://tipsaroundthehome.blogspot.com/2021/03/balancing-act.html - that pdf needs some tweaking) but instead of using 2 shuttles she worked with a ball and a shuttle. Notice how flexible the edging is to embellish the curvilinear table runner neatly. 

Happy Hands Brooch - Lea Di Palma

 
One single motif in metallic thread and selectively placed crystals - such an elegant brooch for her equally elegant dress. As you can see, it is a quick tat, too. Pair it with matching earrings and we're ready to party!

You can choose your favourite method to add the crystals in the center of the rings, and one crystal is looped over the picot. Findings as required.

Happy Hands Heart - muskaan

 
Remember this heart from the same motif? I tatted the dark one recently to confirm the shuttle changes. It was so depressing to find a fault which was traced back to my original pictorial! Hence all diagrams and pdfs were/are being updated.


Pam Hemenway had enthusiastically and kindly shared her needle tatting notes. All this is included in the pdf now, along with some ideas to arrange the motifs.

pattern pdf: https://drive.google.com/file/d/1RdV42A2FzkVsNH1cBNsX8TdD6pCBl7s2/view

This heart spawned quite a few patterns! 

Happy Hands Mermaid Fluke/Tail - Sue Bradham

first shared here -  http://hiskid66.blogspot.com/2021/03/inspired-by-muskaan.html
Sue felt the heart looked like a mermaid's tail. Hence she adapted it, adding a body, and working it all in one pass! She graciously sent her notes which Ninetta Caruso helped to decipher into a shareable pattern.

The body is such a clever and perfect design with overlapping rings giving the impression of scales. After tatting the tail (heart) and climbing out with a split ring, one shuttle is cut off and the scaled body is tatted with a single shuttle.

pattern pdf:
https://drive.google.com/file/d/1N4OAs_KhhX3LG1L348eFAX9EJJbwvN2b/view

These are a few of the spawned patterns from #1, with lots more to show. Over the next several weeks many more pattern pdfs will be shared as and when they are finalised. Meanwhile you know where to find all the modernised pattern pdfs - in the Endrucks 1920 Project document

Many many many thanks to Antonia, Lea, Pam, Sue, and Ninetta 
 - words fail to express the gratitude and happiness towards your continued contribution.

Monday, 16 May 2022

enthusiasm interrupted

Pin It now!

Reworked patterns from Frau Eleonore Endrucks-Leichtenstern’s ‘Die Schiffchen-Spitzen’, 1920, for Endrucks 1920 Project

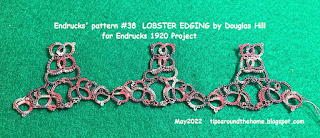
Did Frau Endrucks enjoy a plate of lobsters or perhaps watching them frolic in the water? Is it what inspired her edging #38? Are they holding claws for a dance or to avoid the traps?! Douglas Hill spotted lobsters, too, and named it the Lobster Edging

Lobster Edging (#38) pattern pdf:
https://drive.google.com/file/d/1EiWX78pK8oY8shFVGBFjdJIO0a4Y7fLh/view

I think it will be a good idea to include a diagram eventually.

This colourway does full justice to the arthropod. One could easily add a few beads and tweaks to strengthen the lobster motif. Great for applique and cards or perhaps a charm. Or how about a brooch, earrings, or pendant?

Incidentally, he preferred to tat it with a ball and shuttle rather than 2 shuttles, as seen in this WIP model. And to get the shuttle in position, a lot of shoe lace tricks (SLTs) were used.
Will this should make it easier for a needle tatter to follow the pattern?

He presented this pattern at the Finger Lakes Tatting Group mini-conference in September 2021, thus spreading the word about our Project.
When the lobsters are flipped, as in the above image, they give a very different look!

In 2020, Douglas had also chosen pattern #41 where he visualized the paired chains as a long row of short and long candles with the end rings acting as flames.

In order to get the long chains to stand straight, he wrote the pattern using balanced double stitch (BDS) in late 2021, but by the 3rd repeat in above sampler, he decided that the BDS did not work.

He was ‘frustrated… at not getting the pattern to work or look right…Ninetta and I tried to help with our joint review notes and possible options. However, he could ‘no longer boost his long exhausted enthusiasm’ and left this pattern as well as our Facebook group in Dec 2021.

The above is his working of pattern #7 which he chose in mid-2021. Again, not happy with his tatting, he forfeited the pattern.

Douglas is quite accomplished with the crochet hook, tatting shuttle, knitting needles and lace bobbins, including designing some spectacular crochet coats. Although he is not a regular blogger, do check out some of his works here - https://queerqrafter.com/ or on Facebook.
 
🦞🦞🦞🦞🦞🦞

AlenAlea Rako joined our Facebook group by adapting the pattern #3 edging into 2 square motifs that can be tessellated into a larger fabric if desired. She also graciously shared the pattern.

Two Squares (from #3) pattern pdf: 
https://drive.google.com/file/d/1eBwjp7wtMie1k2GeqrSUOerMH87uuu4A/view

In Square #1, she turned the corner inwards along the original sewing edge. This retains the beautiful lotus-shaped motif, with minimal changes to the original pattern.

Unhappy with the open space in the center of the square, she added an insert option for those who prefer denser lace. The insert is especially useful for larger lace fabric, providing additional sturdiness and durability.

It is always fun to ask ‘what if ….?’, and explore options! Hence this time, she turned the corner along the opposite edge resulting in an in-built denser flowery center. She shows us where we need to join motifs for tiling in her diagrams.

Unfortunately, Lea abandoned the pattern presentation maintaining absolute silence despite our private and public calls over the past several months. I have cleaned up the presentation (most of which she had approved earlier) and it is now available for all of us to enjoy.

Lea, too, is an accomplished tatting designer and hand dyes her threads creating beautiful colourways.

▦▩▦▩▦▩▦▩▦▩▦

Despite our best intentions life can get in the way of our commitments. Delays happen. Sometimes enthusiasm sags. Yet communication is key. As volunteering adults we should all be able to speak freely about any changes in commitment.

We thank both Douglas and AlenAlea for their contribution and hard work.

With best wishes and gratitude
muskaan and Ninetta 
💦💧💦💧💦💧💦💧💦

Related Posts
https://tipsaroundthehome.blogspot.com/2021/11/the-foster-child.html - pattern #7
https://tipsaroundthehome.blogspot.com/2021/11/willing-non-volunteer.html - pattern #7 adaptation
https://tipsaroundthehome.blogspot.com/2021/09/700-and-promises-still-to-keep.html - pattern #3
https://tipsaroundthehome.blogspot.com/2022/01/more-multiples.html - Square #3 using 2 colours
https://tipsaroundthehome.blogspot.com/2022/01/who-knew.html - Fruit Bowl from #3
https://tipsaroundthehome.blogspot.com/2022/03/bowled-over.html - Fruit Bowl pattern from #3

*********************
Endrucks 1920 Project is a community project, where patterns from Endrucks’ German book of 1920 were converted to modern-style presentations and pdfs. We welcome you to join our Facebook group “Endrucks 1920 Project” (please read the group’s description and rules before joining : https://www.facebook.com/groups/1235560633606162) where the fun continues with derivative tatting, new variations, activities, etc. all within the gamut of Endrucks’ patterns.

Using the hashtag #Endrucks1920Project when posting in FB or Instagram, ensures that your pic will show up in a search.

If you enjoy sharing and experimenting, or even test-tatting, the group is waiting for you! All info and links to patterns (original and modern), including model images, are in the Endrucks 1920 Project Document, here https://docs.google.com/document/d/17LEVftXweztBIOWh4sL4BB7bX65ssoOsOn4oXIgCepY/view There is still a lot to explore and extract, derive and apply and scrolling through this document will give you an idea of the possibilities and beyond.

*********************

Sunday, 17 April 2022

Deaconess Butterfly 1916

Pin It now!

Back in 2019, I had tremendous fun tatting the Deaconess Butterfly (from 1916) using beads to pretty it up. Recently Cross-eyed Tatter left a comment asking for help. (https://tipsaroundthehome.blogspot.com/2019/10/beady-eyed.html). 

After reading up my notes as well as the rewritten pattern by Carolyn Groves (in 2002) to refresh my memory, and being in a diagramming mode, I decided it would be better to share a diagram than simply notate the model. So here it is ---


And here is the pdf link (click to download) - https://drive.google.com/file/d/1gDRWAwqyN7f6kdsu9yybtQj9-l_QpsFn/view

For the above beaded version refer to my detailed notes here - https://tipsaroundthehome.blogspot.com/2019/10/beady-eyed.html

It took me a while to do the diagram to my satisfaction since parts of the pattern can be a bit confusing especially if one is a visual tatter. 
Pay close attention to the sequence. 
TIP: There are multiple joins between the head and body, and body and tail. Hence make sure the picot is sufficiently accommodative. 

Cross-eyed Tatter already figured it out and was tatting it based on her last comment. For what it's worth, I hope this diagram helps tatters in future. I will also send it to The Online Tatting Class, since that's where I first tatted it as homework. 

UPDATE: Thanks to some good sleuthing by Gloria Nelson and Wally Sosa, the original source of the pattern is as follows: 'Butterfly Motif' by The Deaconess in 'Practical Tatting Book No.1', 1916. (Reprinted in the book, 'Tatting- A Potpourri of Patterns' by Handy Hands). The pdf and image above have been updated with this info.

That's it for now. Butterflies never go out of season! So, let's enjoy 🦋🦋🦋
And if you find a mistake, please holler!

Friday, 25 March 2022

bowled over

Pin It now!

Can you imagine an edging taking on the shape of a bowl?! Paola Bevilacqua did just that! For the life of me I still cannot imagine how she visualized it in the first place!

free pattern (pdf link below)
This is the prototype she shared in the Endrucks 1920 Project FB group in January. She also uploaded stepwise pics with the pattern and I was immediately tempted to tat it. If you remember, I posted my version here - https://tipsaroundthehome.blogspot.com/2022/01/who-knew.html along with my notes. And now you can see how horrible my bowl is compared to this, since I did not tension my long chains properly. 
 
Paola tatted another version in metallic thread, and has removed the 2 side 'branches'. So we now have a choice to work it either way. 
The bowl can hold anything you wish to make it unique. Fill it with colourful eggs - it will make a good motif for a handmade card?!
It was so gratifying when Paola loved my idea of placing flowers in the bowl and immediately adopted it by adding these freeform sprigs and flower!

And here's the good news - the pattern is now in pdf and available to enjoy. It is a one-page diagram-only presentation. 
Fruit Bowl pattern by Paola Bevilacquahttps://drive.google.com/file/d/1OiSq1LijwjST84u_QnSSIpW2jBOLLegW/view  (click on the link to download)

Many many thanks to Paola for continuing to share her creativity with us! Grazie mille, amica.

Find all modernised and adapted pattern,s in the form of individual pdfs, from the Endrucks 1920 Project here - 

Sunday, 13 March 2022

one month several years

Pin It now!

It's been a month since I last picked up my shuttles today, and boy did it feel good! All my time away from life activities was being spent on the compy trying to complete presentations, diagrams, reviews, or other backroom Project stuff.

This is a prototype of Linked Happy Hands Bookmark - an adaptation of Endrucks' pattern #1 edging. If you remember, I always felt they looked like arms extended above a head, and linked together, which is why I gave it a name.

I first tried the idea of cross-linking in 2015, using size 20 Red Heart thread. Too thick, but the contrasting colours bring out the interlinked 'hands'. 
This time I picked up the straight edging in Anchor size 40 (https://tipsaroundthehome.blogspot.com/2021/11/from-one-to-many.html) to continue and see how I could turn the corner. 
I have deliberately kept it simple for now, with lots of picots to provide choices for whatever might follow later.

Because, my goal is to tat each motif in a different colour to represent the collective diversity of our Endrucks 1920 Project, like I explained in the last para here - https://tipsaroundthehome.blogspot.com/2021/03/balancing-act.html.

So what do you think? Any ideas or suggestions?

There is a lot of pattern #1 related activity and adaptations going on in our FB group. It is the pattern I have chosen for the next article to send to IOLI Bulletin. It was chosen after consulting with Ninetta and a lot of thought, for various reasons, one of them being that many tatters had gotten involved with adaptations from this motif, including needle tatting. It was also 'modernized' while still retaining the 100-year old flavour. Thus it seemed like the perfect reflection of what our Project represented - a community effort to modernize patterns from the 1920 book. There are some spectacular models that have come in but a couple are under wraps for now. Hopefully I'll be able to showcase them all in my blog a few months down the line.

Endrucks 1920 Project details , links, patterns, ..... - 
This doc is also in the process of being updated and reorganized. Takes time, though. And this time I have a deadline to meet, hence tatting will continue for the next few days, yay!


Monday, 29 November 2021

the foster child

Pin It now!

Reworked patterns from Frau Eleonore Endrucks-Leichtenstern’s ‘Die Schiffchen-Spitzen’, 1920, for Endrucks 1920 Project.

Don’t these look like folk dancers with frilly skirts and knocking elbows! Now add a head to each to complete the ladies…. A single motif, with a bit of addition, could become an angel or Crinoline lady.

Endrucks' pattern #7 pdf (click to download): https://drive.google.com/file/d/1UDNg-1W6LJ3pyrn_Umz5f33BF01_92-E/view

This little pattern has interested many tatters and each ‘foster family’ loved and groomed it to their best ability. But each home wanted something even better for the foster child that they could not provide, hence the child travelled, leaving behind a virtual trail of trials and learning, until the final adoption.

adopting, not foisting, the foster child...
House #1 (Ayşe Özgür): An enthusiastic & immediate start but life halted for 10-11 months.
        Starts with chain and work moves form right to left. Good use of 3 colours.
House #2 (Douglas Hill): Enthusiastic choice in the 2nd volunteer list, and mutual collaboration, # 2 conceded that #3 (adaptation & tatting) was better.
        Starts with chain, with inward picots for bilateral symmetry, and work moves from right to left.
House #3 (Julie Santos Villegas): An immediate & willing response but later needed help which #4 provided, but health forced another shift.
        Starts with a ring and work moves from left to right..
House #4 (muskaan): Formally adopted and continued to maturity.
        Starts with a ring and work moves from left to right. With options shared.


TWoT (This Way or Tat?) and Diagram Notes :
original model
Considering Frau Endrucks did not like decorative picots, all her edgings have a line of free picots along the top side (as seen in her tatted model pics) ostensibly to sew down the lace along that side while the other dangled.
original diagram
However her diagrams are ‘upside-down’ and this line of picots lies along the bottom.

But there is a 3rd aspect. Her diagrams are read from left to right. Most of the patterns start with a chain, and when we actually tat a chain normally (not direct tatting) and continue, the working progresses from right to left (as in Houses 1 & 2).
I find myself doing mental & physical callisthenics in order to sync her diagram with the work in my hand. I like to know where/how my very first element faces, and where the threads emerge to continue – this orients me correctly till the very end. This is especially true for her patterns which involve frequent changes in direction.

Hence there are 2 solutions I have employed –
original diagram flipped
1. Try to start the pattern with a ring. It has obvious advantages, including CTM and hiding tails. It is how I presented this pattern, shifting the start from a chain to a side ring. (Julie had first started her adaptation sampler with the central ring and diagrammed it accordingly, moving from right to left). Now the work progresses from left to right as in the diagram. 
2. Draw a working diagram where we follow the pattern exactly as Endrucks has written starting with a chain, but the diagram shows this first element on the right instead of left. And the diagram then moves leftward (as in the flipped diagram above). No need for any brain callisthenics – simply lay the work against the diagram and you are facing the ‘right’ way.

One more common feature of several patterns is that the central ring at the base (from which chains radiate) is tatted at the end of the motif. The only reason I can think of is to make it easy for a designer to estimate how large the ring should be and avoid multiple prototypes. Anyways, several of our pdfs show this ring as per the original. I have always shifted it towards the start of the motif joining chains to it, rather than joining the ring to chains.

TIP:  Potential Pitfall : Joining to the wrong picot!
 
This is one area where I frequently made a mistake and had to retrace my steps! This final one I noticed too late but fixed it by carefully snipping the joined picot (and glued the cut ends), and sewed the correct picot in place. 
This is the 1st motif I tatted in early October to understand and explain the pattern to House#3. By November, I had to tat one more (no pic) to refresh my short memory and then went on to the sampler below ...
Each motif, especially with decorative picots, has the shape of a petal. 
Gather up a row of motifs to create a 3D flower! Alter the length and width 
and you get more layers and visual variety!
Of the 4 motifs in the sampler, the first 2 follow the pattern, each colour giving a clear idea of which shuttle forms the core thread, in other words, which shuttle is in the hand.

In the 3rd & 4th motifs, I added decorative picots along the top edge of the rings, and Catherine Wheel Joins in some chains for a smoother look. Remember to count the CWJ as 1 stitch (as in 4th); notice how smooth and symmetrical the inner negative space is? I also played with colour placement, using Reverse Join, Twist Work, etc. (see Lock Join Plus for more options).

This is one more idea I had – tat the entire motif with bilateral symmetry. The best part? No need for paper clips and inward picots - no BBT (block below tatting)! Notice the central ring is worked as a split ring and the innermost left chain is tatted first. 
But some tweaking is required especially on the right side ... when I get my bearings back ;-P

Before signing out, let me quote my partner Ninetta -
I would say one more time that this project taught us a lot also in terms of collaboration. The n.7 changed family but each time "we" added a new piece in the puzzle, that is always an improvement, for both understanding the pattern and learning how to present the modernized version.

Remember, you can find all of Endrucks' patterns (& derivations) in English here -