Saturday 30 November 2019

piece my heart together

Pin It now!
Snowflake #20 in Land of Laces’ 25 Snowflake Project

This 
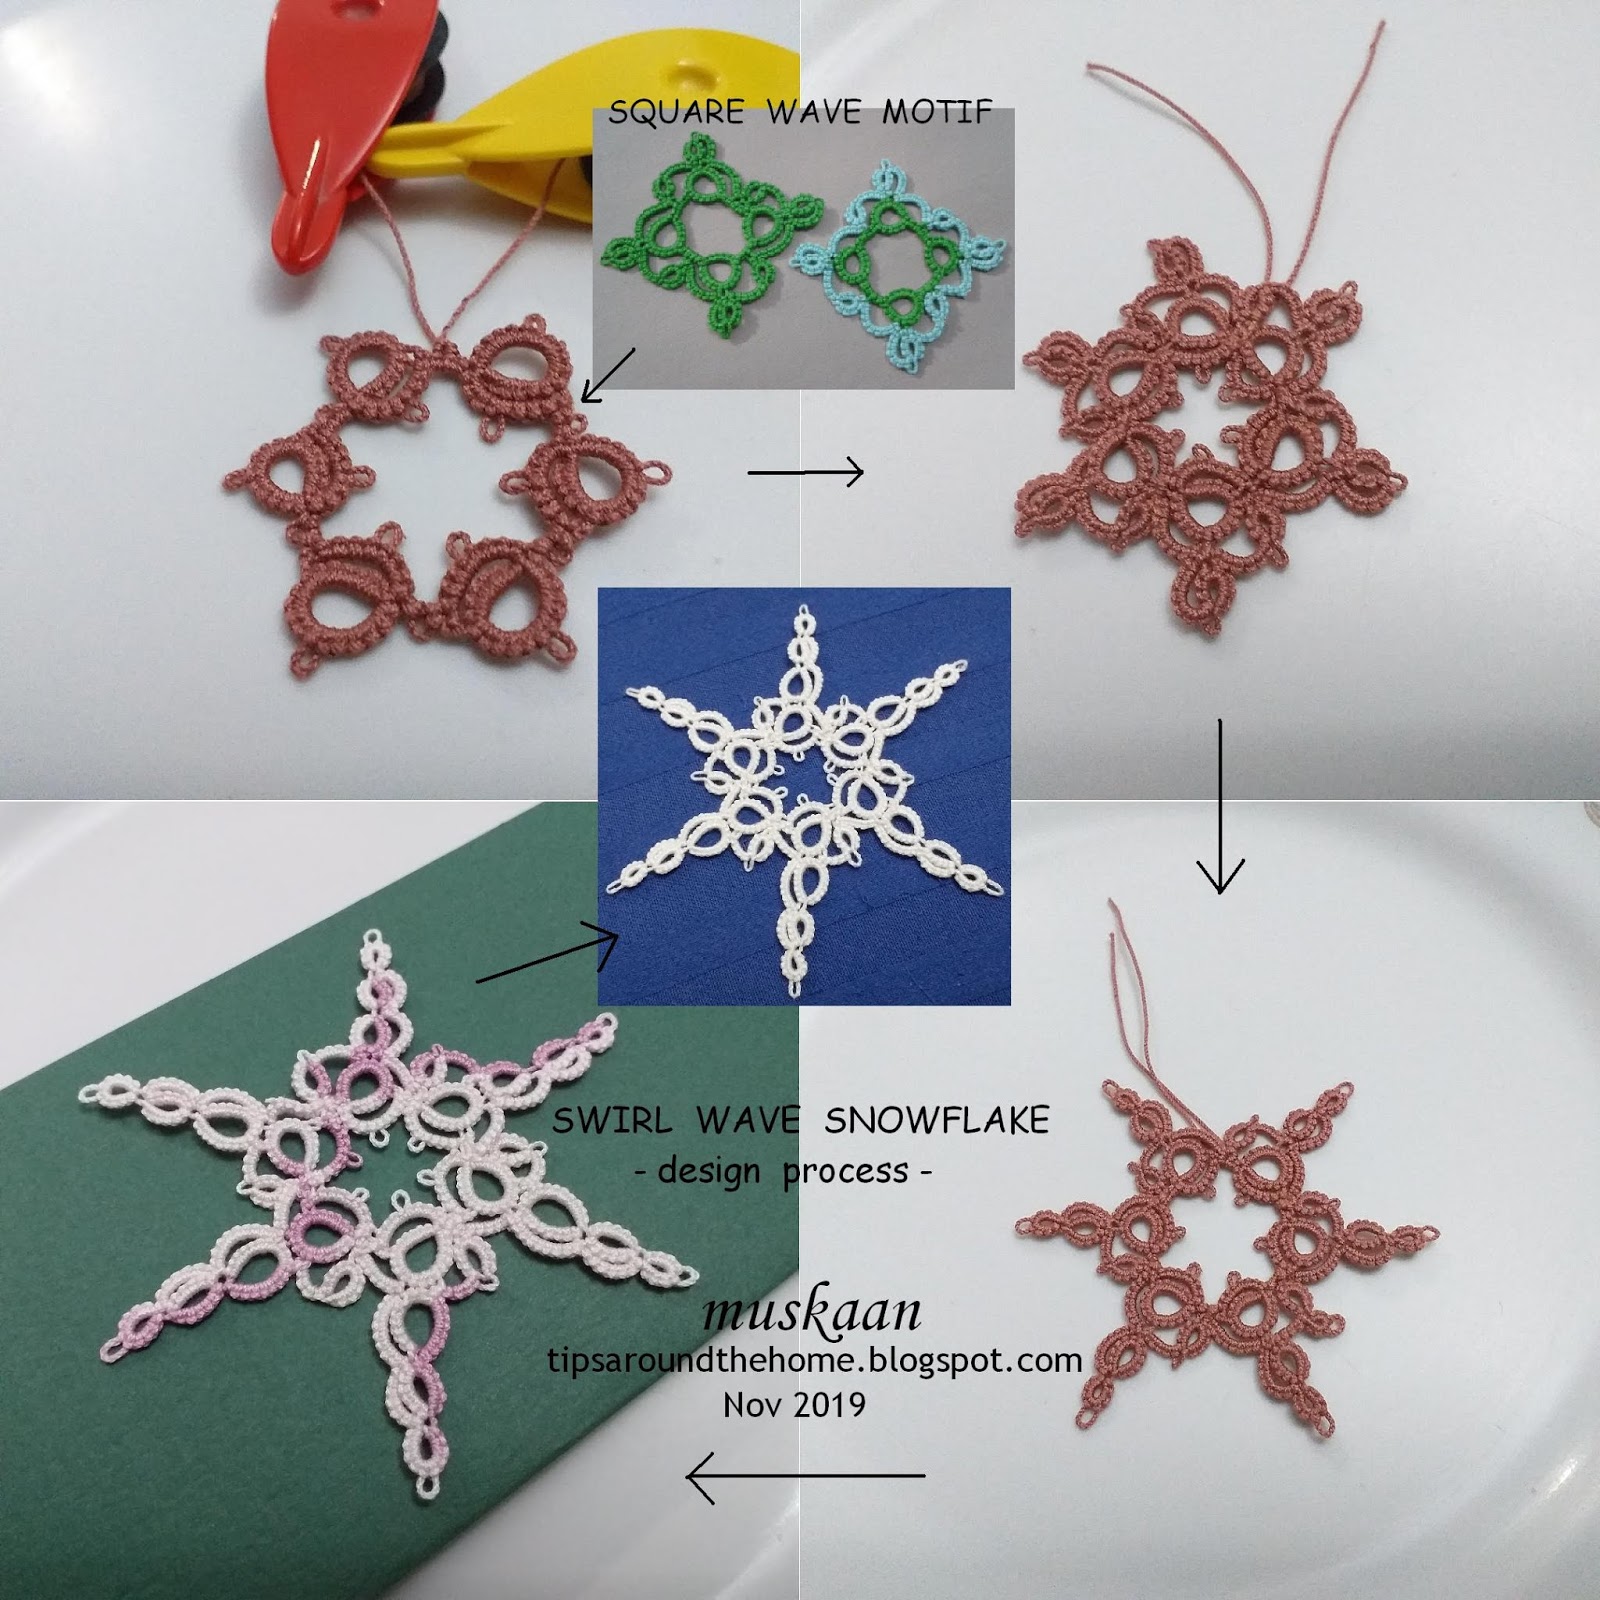
snowflake Can be worked in one pass. But I chose not to. I enjoyed creating it in patchwork style, since it was easier to guesstimate during designing trials. And I had this idea of using rainbow colours in the outer hearts. With no ends to sew in, it was fun!

I made 2 joins between adjacent hearts in this round. When it started cupping, I snipped off the outer picot and everything fell flat ;-P

After the inner round, I made 1 heart & ring motif. On top left you can see my chain trial around that motif. Seemed workable, and I went ahead with the 6 hearts. I used a circular polar grid to keep everything in place, and also to figure out the lengths.

On the outer round, my idea was to have 2 rings joined in a pointed fashion to create a kind of star round visually. In the first 2 repeats (clockwise from 7 o'clock position) itself it became clear that the diameter was increasing. Hence tried without any rings. Then in the last repeat I tried a single ring. With blocking, and stacking the double rings, the flake laid flat and I chose single ring for that bit of snowflakiness!

The center is not anything unusual. I’ve seen something similar. But just so I wasn’t creating something from the recesses of my memory, I checked Sharon Briggs’ blog for her designs last year. Phew, her’s are a bit different. However, she did use the outer heart & ring combo in this heart pattern. So, while not deliberate, I can surely see my inspiration derived from her designs.

Both Anita Barry and her husband (thanks, P! 💖) felt the outer heart should have one stitch less. Tried it, and Loved the shape. So, the red one in size 40, has that tweaked count. My feat of messing up he chain arches was unfounded,  I think? And I added picots in the center - a bit denser now, although the rainbow one is again without picots, since I cannot decide. 

I’ll share the pattern for Heartland Snowflake tomorrow when I finish my rainbow model. Hope you like this 20th flake; 5 more to go. Technically I count 20, but if I include all the versions/variations, the count is already at about 40! Not bad for a tentative start in June!

Wednesday 27 November 2019

disATtraction

Pin It now!
Obviously I was attracted to this snowflake – you know I have a weakness for flower flakes, right! And I would've made it... eventually ;-P 

When Ninetta asked if I would test her diagram I jumped at the distraction. I didn’t realise what a This Way orTat (TWoT) lesson or reminder really it would turn into. There are truly multiple ways to work this pattern, and oftentimes the tatter simply follows her default method without even realising. For instance I came across a number of Paisley snowflakes facing the other way, I'm sure unintentionally.

So anyways, I have worked my model based off Ninetta’s original diagram (since revised and uploaded here), hence the block stitches face the other right. Further, I did not reverse work after the 1st inner ring (which has a central picot) since I wanted to work the block chains frontside.
If I were to make this again, I could start with a wrongside ring & RW for the sake of uniformity.

This is my default method for block tatting. I use 2fhs at the end of a normal row and 2 unflipped shs at the end of direct tatting row, to turn. I find it keeps the rows snug. However, it’s been a while & I could’ve used some practice!
Due to this turning method I did not need a paperclip to hold a picot. (I needed to refresh my memory, hence first block has a paperclip.)

UPDATE - I have also used a single half stitch for rising to the next row in block tatting and it looks much better. Will have to confirm which I use in future. Memory can be so fickle ;-( 

Both my rounds are worked in clockwise direction from the front.

TWoT Notes : Reverse work, how one starts the first row of a block, switching shuttles, etc. all can cause a change of direction to what the designer has presented. As long as one is aware, one can make informed choices.

Notice how the 2nd round goes around the block with stitches facing the same direction as the latter? Cleverly sneaky way of fooling us into thinking it is a 6-row block!!!

Can you spot the difference between this latest chain-around-block repeat and the earlier ones? The chain here surrounds the block with All stitches facing outwards, creating a petal-like effect. Overall, though, I don’t think it really makes a difference which way the chains face, right? You can’t really tell – our brain ‘corrects’ any slight difference.

Be sure to leave some more space between the 2 blocks in round1. I had to pull them apart to allow round 2 elements to squeeze in (4 chains in the same space!). I could’ve done a much better job, but am still happy – it’s such a pleasing design! I think I’ll make another in size 40.

The printable pattern is uploaded here and the related post is here.

It was such a fun distraction and I got a beautiful mug coaster to admire daily :-D.
Worked in Anchor size 20 (my shuttles had been preloaded for my 20th snowflake trial), the flake measures 9½ cms tip-wise, and 4 cms as a hexagon side.

Thank you, Ninetta, for the pattern as well as the chance to test tat :-)))

Tuesday 26 November 2019

sidetracked

Pin It now!

It’s really not difficult to sidetrack me! Happily so, as far as the actual tatting goes. That my own work goes into pending, well nothing new there ;-D

Marina posted her stacked rings earrings on facebook and I took a shot at it. Very simple & quick, can use up thread left over on shuttle, can adapt to suit bead and thread size. She posted a series of process pics with notated instructions. Very clear directions and hints at how to adapt.

I used Anchor 20 thread and a 9mm pearl. My rings are 30ds each, but I could’ve gone up to 32ds. My first try with 34ds ring didn't work out. Since the size of this Mercer crochet cotton is equivalent to a Lizbeth 10, it holds it's shape well.

Gold finding wouldn’t gel with the midnight blue & pearl, hence it was converted into a pendant.
It took less than half an hour from start to finish!

TIP : Use a thread that slides easily since the rings are large.
One can add smaller beads to embellish the rings. 

At first glance they had reminded me of Ninetta’s giggly earrings which are a bit more elaborate, but the same principle is appliedStacked or interlaced rings using a single shuttle. 

Many many thanks to Marina for sharing her fun pattern.  

Tomorrow I will tell you about my other distraction (or attraction ;-P) ….

Sunday 24 November 2019

3 wave patterns

Pin It now!
Snowflake #19 in Land of Laces’ 25 Snowflake Project

I wanted to share more of the process of the large snowflake, but sharing the patterns before I relegate the task to the pending tray.
The square is where it all started, leading to the small and large snowflakes. The small snowflake was easier to do after my failed trial here (top right in collage). It showcases the swirl/wave effect more than the large flake.

All 3 can be worked in one pass, continuously.
  
Abbreviations/Notations, in order of appearance –
ctm = continuous thread ; = picot ; vsp = very small picot ; SS = switch shutte ;
SR = split ring ; ch = chain ; lj = lock join ; rw = reverse work ;
–– = decorative picot ; rs = reverse/unflipped stitch (optional)

Square Wave motif
muskaan ©Jan, 2018

Worked in Anchor size 20 (equivalent to Lizbeth 10). It is a tiny motif, hence better worked in size 20 or 10.

2 shuttles, ctm
Round1
split ring: 6 – 3 vsp 6. SS
chain :   2 – 2, SS
Repeat 3 more times and join back to A.
Tie and cut, or climb out with a split chain : 2/2, mock picot
Round2
SR : 4 / 4. SS
ch : 6 lj, SS
SR : 4 / 4. SS
ch : picot, 7, lj, 8, lj
Repeat 3 more times around. Tie & cut.


Swirl Wave snowflake - small
muskaan ©Nov, 2019


In Lizbeth size 20, this measures 2”.
It can be repeated and joined as a motif for larger fabric, each side of the hexagon measuring 1”

2 shuttles, ctm

Round1
A-ring: 7 – 8 vsp 6. rw
B-ch: 1 – 4 –– 4 – 1, lj to vsp,
C-ch: 1rs vsp 1rs.
Alternate C-chain : rw after B, SS, chain: 1 – 1 , SS.
Repeat 5 more times, joining last B chain to first. 
Climb out with last C-chain as follows –
To climb out one can make the last C-chain a split chain (1 / 1). However, since it is only 1 stitch, using Patty Dowden’s Ring on Picot method is simpler :
Pull up a loop of Sh1 thread through the picot on C, pass shuttle through from back to front, and leaving just the tiniest bit of bare thread behind, start the split ring. Work the 2nd half of SR with Sh2, again leaving a bit of bare thread on the back (enough to span the 1ds) and complete the SR.
The bare threads are not visible on the back, and the front also looks similar to the rest.

I have taken stepwise pics of this process. If anybody is interested, let me know & I will post the pictorial.

Round2
D-SR : 5 / 5. SS
E-ch : picot, 5, lj to nearest picot on ring, SS
F-SR : 5 / 5. SS
G-ch : 6, lj, 8, lj, SS
Repeat from D 5 more times.
Tie and cut and hide ends.


Swirl Wave snowflake - large
muskaan ©Nov, 2019
In Lizbeth size 20, this measures 3”.

2 shuttles, ctm

Round1
A-ring: 6 – 3 – 5 vsp 6. rw
B-ch: 1 – 4 –– 4 – 1, lj to vsp,
C-ch: 1rs vsp 1rs.
Alternate C-chain : rw after B, SS, chain: 1 – 1 , SS.
Repeat 5 more times, joining last B chain to first and last C-chain to base of first ring with a lock join.
To climb out : split chain (1/1) or the ring on picot option explained above.
Round2
D-SR : 5 / 5. SS
E-ch : picot, 4, lj to nearest picot on ring, SS
F-SR : 8 / 3 + 8. small mock picot
G-SR : 6 / 6. small mock picot
H-ring: 5 –– 5. SS
I-ch : 7, lj, 9, lj, 6, lj. SS
Repeat from D 5 more times.
Tie and cut and hide ends.


In case of any error or doubts, please let me know. Hope you enjoy these patterns :-)

My 20th snowflake has dimpled rings (hearts) and is worked in bits and pieces but no ends to sew in. I’m still tweaking it …. I’m calling it Heartland snowflake!

Tuesday 19 November 2019

swirl wave snowflake

Pin It now!
Snowflake #19 in Land of Laces’ 25 Snowflake Project


UPDATE : patterns for a small and large version of this snowflake shared here.

As I said in my previous post, my playbook started out differently with a square motif, and one of the plays led to the small, quick-tatting silver linings snowflakes. But the major strategy was yet to play out. And here it is now.

This collage encapsulates the entire design journey, excluding the silver linings flakes. 
The starting point - Square Wave motifs can be seen top center
To convert to snowflake, following changes were made (top left pic):
1. increase the points from 4 to 6,
2. convert the split rings into normal rings
3. add chains in the inner space to span the rings, and
4. shorten the chain between rings.

The outer round was similar to the original motif, but there was squishing (top right pic).

In the bottom right model, I tweaked the count, and added more rings to lengthen the arms for a more flaky look. But I was not happy – the center seemed too large & unstable, and the arms seemed too thin.

I asked for suggestions on facebook, but the majority liked it as it is. A few tatters made some very good suggestions, answering each of my questions. I tried them as well, rejecting those that did not work out or I did not like. You can see many little tweaks in the bottom left model.

In the center, against the blue background is the final version in Lizbeth size 20.

So what's the verdict now? Do you think this game is won or do you have any suggestions for improvement?

The central negative shape changed a bit when I added a joining picot (I really like the original, and it could be used in an ice drop), but there is still a small star/snowflake outline and overall it is stable, holding it’s shape.

It is made in one pass (2 rounds), using 2 shuttles with continuous thread. 
Although there is a (1 vsp 1) chain, I did not use a split chain to climb out. I'll explain next time.
I just realised that I still have to upload the square motif pattern. So the snowflake as well as motif patterns will be uploaded soon. 

I still have heaps of ideas for variations, one of which is to add picots along one side of the arms, to broaden the arms just a tad using asymmetrical split rings, and 3rd, which will change the look of the swirl center, but give me 12 arms...that might well become a 'new' flake! 
This flake can also be converted into a non-split ring design for those who dislike SRs, but the character might change a tad - the asymmetry might vanish - needs thinking...!

Many many thanks to all the facebook respondents –
it is precious to have such feedback and support !!!

Friday 15 November 2019

silver linings playbook

Pin It now!
Snowflake #18 in Land of Laces’ 25 Snowflake Project

The playbook contained strategies for a different game. I tried to convert a square motif into a snowflake but the punch was missing, the huddle too wide. I asked on facebook and received many good responses. Linda Reiff suggested lengthening the inner chain, which led to the following versions (thank you, Linda!). And when even beads have ‘silverline’ in their title, there is no other name better suited than ….

Silver Linings snowflakes.
UPDATE : this is now a single-page pdf with legend


The brown models are tatted in Anchor size 20, without beads.
The short chain can be worked with reverse/unflipped stitches. In such case, the 2nd shuttle can be replaced with a ball. See options on how to change chain curves here.

I thought both these designs look fairly basic. But I’d like to stress that I did not copy anybody’s pattern. It emerged from my motif to snowflake conversion (to be shared next) and the ensuing discussion.

The beaded models are worked in Anchor Pearl cotton size 8. I used size 13/0 Miyuki Transparent Silverline Round Seed Beads.
Beads are pre-strung on both shuttles, and the colour of beads tells you from which thread/shuttle the bead comes.

Beads on the line indicate ‘down beads’ ie. they are moved on the core thread from the shuttle in hand.
Beads above the line indicate ‘up beads’ which are already in the ring loop or on the chain thread.
For right-handers, the former come from the right hand thread, while the latter from the left hand thread.
The snowflakes range from about 1¼” to 1 ¾”.
 
I have used a different format for the pattern in order to save time - I have 7 more patterns to create in this project! Feel free to ask in case of any doubts. Only the first motif/repeat pattern is diagrammed. Remember to join the inner chain to it’s previous counterpart, and also the last to the first.


Wednesday 13 November 2019

beads on a roll and twist

Pin It now!

2 years back, when I revisited my 2015 pattern, based on feedback from Georgia’s class, another idea struck me. Could we tie a bead to the floating or free-standing twisted picot? Yes, why not!
In fact measuring and twisting the picot becomes easier for starters.

This shows a self-closing mock ring (SCMR) being made, hence you see a red shuttle for the core thread, and the yellow for the stitches and picots. These were taken in May 2017. 

All we need to do is determine where we want the bead. Then make an overhand knot/tie at the base of the bead. 


Tighten the knot, and keeping the bead at the tip, measure an equal length of thread from bead to core thread. Hold the thread in a pinch at this point and start twisting. Follow it with a double stitch. 

Click here for detailed Twisted Picot tutorial.  The original tutorial was recently taught at Camp Wanna Tat. I hope it went smoothly without too many twists and turns?!

Since bead is knotted or tied on the picot thread, it is easier to do with a 2nd shuttle. It can be done on chains or on mock rings. We will need very accurate placement to tie beads on true rings – not practical, though theoretically possible.

Usha Shah graciously made 2 videos for bead on twisted picot on my request (thank you, Usha)

TIP : For making a twisted picot, or after adding a bead to it, slide your left thumb over the thread/bead to gently hold in position. This makes it easier to handle the twisting. It also keeps the twist confined to the required length of thread. Using this slight touch, one can make fairly long twisted picots.
The fun part is, if the twist is good, one can actually let go of the picot when tatting the first stitch!

Fast forward to Sept 2019, while working another model using Red Rose metallic thread, I wondered about MULTIPLE BEADS on the twisted picot.
Initially, I slipped in 3 beads instead of one, spacing them while twisting the picot. 
After a while I noticed that the beads had clumped together at the tip!!! Perhaps it was the thread (metallic with a pearl cotton core), or may be they automatically gravitate to the tip?
Solution - knot the beads to avoid rolling!

I tied the 2 lower beads (green & yellow), spacing them out, but left the topmost (red) free. Then measured double the length (from red bead down to core thread) and started twisting. The pic below shows the outcome...beads stay in place.
The long picots appear branched due to these multiple beads tied at intervals. Fun to make as well.  

I went a bit berserk with some of the picot lengths! But I also noticed that only lower beads needed to be tied down to keep them in place; the one at the tip is better left untied.
In the lead picture, some of the earlier picots have untied beads. These had to be rolled back manually into position for the photo shoot ;-D 


Sunday 10 November 2019

frozen or flowing?

Pin It now!
Snowflake #17 in Land of Laces’ 25 Snowflake Project

This is a very basic design, but highly adaptable and versatile in the effects that can be created. I have tons of ideas (listed at the end) for the icy rivulet flowing between the glaciers or bergs.
I deliberately used colour blip as a design element here by joining a bit differently.
And I also discovered something that I will share in another post with proper pics!
The one in cream+blue, was worked first and some of the kinks were ironed out in the smaller one. I am preparing a 3rd model using Lizbeth size 20, along with a pictorial on how to join the 2nd round. It will be included in the pdf.

But pattern first… (be warned – there are going to be more!). You may use your discretion to tat this in one pass, in one colour, etc. Following is what I did …

Find tutorial links here for : add new thread to chain ; dot picot ; dot picot string ; false CTM – parts 1 & 2 ; Catherine Wheel Join (CWJ)
Josephine Ring with picots by Nadezhda Malysheva : https://youtu.be/HFCimyOpoXI  (Thank you Barbara Slodka, for sharing this video link!!!)


Icy Rivulet Snowflake

In Anchor size 20 it measures a tad over 5cms.
2mm picot gauge for JR

Round1: one shuttle only.  --- = long or double picot
Ring1: 5-1—- 6-6—-1-5.
[Ring2: 5+1+6-6—-1-5.]x5, joining last ring to the first. Tie & cut.
Alternate: climb out with split ring.
Round2 (Rivulet) : one shuttle only, in contrasting colour
Join to lower beam/bar of the double picot, from behind.
Dot Picot String: 4 dot picots, closely spaced, lock join, 4 dot picots, lj to lower bar of double picot & upper bar of picot. Repeat 5 more times.
Instead of cutting, I continued the next round using this as core thread and adding cream thread for the stitches.
Round3 : 2 shuttles
[Chain: 6, switch shuttle, Josephine Ring: 1ds, 20hs (with 2mm long picots held on gauge), 1ds., switch shuttle, lock join, 6, CWJ to upper bar of double picot.]x6

NOTE :  The intention is for all arches to lie close to each other, without overlapping. Hence a bit of tweaking may be required. Some of segments are not symmetrical (1 extra stitch or dot picot), but not visible.

Icy Rivulet Star

Can you see the white ‘V’ with a bit of colour in the center, at each joining point? 
This is deliberate but will show better with more contrasting colours.
In Anchor size 40 it measures 3½cms.
2mm picot gauge for JR

Round1: one shuttle only.  --- = long or double picot
Ring1: 5-1—- 6 vsp 1 vsp 6—-1-5.
[Ring2: 5+1+6 vsp 1 vsp 6—-1-5.]x4, joining last ring to the first. Tie & cut.
Alternate: climb out with split ring.
Round2 (Rivulet) : one shuttle only, in contrasting colour
Join to lower beam/bar of the double picot, from behind.
Dot Picot String: 3 dot picots, closely spaced, lock join to 1st vsp, bare thread, lock join to 2nd vsp {this bare thread acts as a picot to link next round}, 3 dot picots, lj to lower bar of double picot & upper bar of picot. Repeat 4 more times.
Instead of cutting, I continued the next round using this as core thread and adding cream thread for the stitches.
Round3 : 2 shuttles
[Chain: 6, switch shuttle, Josephine Ring: 1ds, 12hs (with 2mm long picots held on gauge), 1ds., switch shuttle, lock join to mock picot below, 6, CWJ to upper bar of double picot.]x5


Future Ideas :
I want to see how it looks with more rivulets flowing between the ice.
I also want to change the nature of the rivulet by substituting dot picot string with a beaded string, Josephine chain, picoted chain, lock chain, and many more.
I might even try adding a few picots or beads to the outermost round.

Let your imagination lead you on :-)

Question – Do you like the denser Josephine ring better or the one in the star? Or perhaps somewhere in between? I will hold off the 3rd round in my Lizbeth model till I hear back from you.


Congratulations to Georgia Seitz and her team – 
the Online Tatting Class celebrates it’s 20th birthday today !!!