Showing posts with label OTC 2019. Show all posts

Friday, 16 February 2024

east to west heart!

Pin It now!

My Budding Heart pattern was published in the Feb 2024 issue of 'Talking Tatting' (No.58.3 quarterly newsletter of Queensland Tatters, Australia), courtesy of Judith Connors. I think this is perhaps the third or fourth pattern she has chosen for publication and it is such a huge yet humbling endorsement.

💗💗

Several versions have been tatted which I sometimes come across on different platforms, but to remind you of one very special version from Krystyna Mura (Poland) - https://tipsaroundthehome.blogspot.com/2021/02/palentine-day.html

💗💗

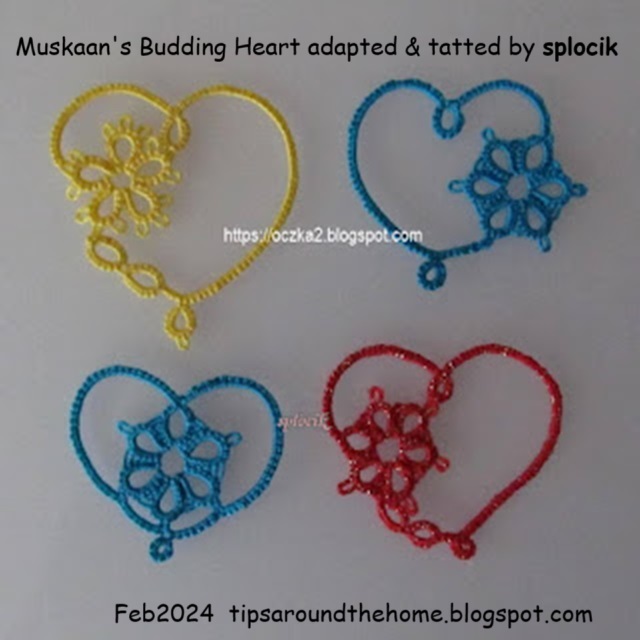
And most recently, is splocik's (Poland) play with the pattern - not one but four! Such cute versions and I love how she attached the dimple to the flower, thus anchoring the long outline. She shares her thoughts and process here - https://oczka2.blogspot.com/2024/02/zainspirowao-mnie-serduszko-frywolitkowe.html

💗💗

If you remember, this heart is part of the Buddy Hearts (2020) collection of 5 patterns, three of which were shared by Anita Barry(USA)! https://tipsaroundthehome.blogspot.com/2019/02/buddy-hearts.html. This set has been taught in the Online Tatting Class (Feb 2019) and published in the IOLI Bulletin (Summer 2020). Good to see the widespread reach of these little motifs.

You can download all 5 here (long version) - https://drive.google.com/file/d/1frJpMRiHu5fOEH9Zs3VANVGIURZA126_/view   and (short diagram-only version) - https://drive.google.com/file/d/1DZFxEDvEwe-rPUv1evgPaxic1sbaEnHC/view 

💗💗

I had a mind to tat a new heart pattern but couldn't manage my time and other commitments. However, it is definitely on my trial list and should be shared well before the next season of hearts.  

💗💗

💗Many many thanks to Judith, splocik, and of course, Anita and Krystyna!💗

Sunday, 10 November 2019

frozen or flowing?

Pin It now!
Snowflake #17 in Land of Laces’ 25 Snowflake Project

This is a very basic design, but highly adaptable and versatile in the effects that can be created. I have tons of ideas (listed at the end) for the icy rivulet flowing between the glaciers or bergs.
I deliberately used colour blip as a design element here by joining a bit differently.
And I also discovered something that I will share in another post with proper pics!
The one in cream+blue, was worked first and some of the kinks were ironed out in the smaller one. I am preparing a 3rd model using Lizbeth size 20, along with a pictorial on how to join the 2nd round. It will be included in the pdf.

But pattern first… (be warned – there are going to be more!). You may use your discretion to tat this in one pass, in one colour, etc. Following is what I did …

Find tutorial links here for : add new thread to chain ; dot picot ; dot picot string ; false CTM – parts 1 & 2 ; Catherine Wheel Join (CWJ)
Josephine Ring with picots by Nadezhda Malysheva : https://youtu.be/HFCimyOpoXI  (Thank you Barbara Slodka, for sharing this video link!!!)


Icy Rivulet Snowflake

In Anchor size 20 it measures a tad over 5cms.
2mm picot gauge for JR

Round1: one shuttle only.  --- = long or double picot
Ring1: 5-1—- 6-6—-1-5.
[Ring2: 5+1+6-6—-1-5.]x5, joining last ring to the first. Tie & cut.
Alternate: climb out with split ring.
Round2 (Rivulet) : one shuttle only, in contrasting colour
Join to lower beam/bar of the double picot, from behind.
Dot Picot String: 4 dot picots, closely spaced, lock join, 4 dot picots, lj to lower bar of double picot & upper bar of picot. Repeat 5 more times.
Instead of cutting, I continued the next round using this as core thread and adding cream thread for the stitches.
Round3 : 2 shuttles
[Chain: 6, switch shuttle, Josephine Ring: 1ds, 20hs (with 2mm long picots held on gauge), 1ds., switch shuttle, lock join, 6, CWJ to upper bar of double picot.]x6

NOTE :  The intention is for all arches to lie close to each other, without overlapping. Hence a bit of tweaking may be required. Some of segments are not symmetrical (1 extra stitch or dot picot), but not visible.

Icy Rivulet Star

Can you see the white ‘V’ with a bit of colour in the center, at each joining point? 
This is deliberate but will show better with more contrasting colours.
In Anchor size 40 it measures 3½cms.
2mm picot gauge for JR

Round1: one shuttle only.  --- = long or double picot
Ring1: 5-1—- 6 vsp 1 vsp 6—-1-5.
[Ring2: 5+1+6 vsp 1 vsp 6—-1-5.]x4, joining last ring to the first. Tie & cut.
Alternate: climb out with split ring.
Round2 (Rivulet) : one shuttle only, in contrasting colour
Join to lower beam/bar of the double picot, from behind.
Dot Picot String: 3 dot picots, closely spaced, lock join to 1st vsp, bare thread, lock join to 2nd vsp {this bare thread acts as a picot to link next round}, 3 dot picots, lj to lower bar of double picot & upper bar of picot. Repeat 4 more times.
Instead of cutting, I continued the next round using this as core thread and adding cream thread for the stitches.
Round3 : 2 shuttles
[Chain: 6, switch shuttle, Josephine Ring: 1ds, 12hs (with 2mm long picots held on gauge), 1ds., switch shuttle, lock join to mock picot below, 6, CWJ to upper bar of double picot.]x5


Future Ideas :
I want to see how it looks with more rivulets flowing between the ice.
I also want to change the nature of the rivulet by substituting dot picot string with a beaded string, Josephine chain, picoted chain, lock chain, and many more.
I might even try adding a few picots or beads to the outermost round.

Let your imagination lead you on :-)

Question – Do you like the denser Josephine ring better or the one in the star? Or perhaps somewhere in between? I will hold off the 3rd round in my Lizbeth model till I hear back from you.


Congratulations to Georgia Seitz and her team – 
the Online Tatting Class celebrates it’s 20th birthday today !!!
Tuesday, 29 October 2019

beady-eyed

Pin It now!
Some patterns are meant to enjoy! That is precisely how this vintage butterfly felt when Georgia announced it for this week’s class.
The Deaconess Butterfly 1916, re-written by Carolyn Groves in 2002. When I went hunting for a Deaconess butterfly, I found her old site!
It is a well-written pattern, with clear instructions. But I also kept referring back to the model image(s) frequently, to stay on track. It is worked in one pass. A very clever presentation by Carolyn Groves.
I decided to play with beads. Small projects are ideal to try out ‘new’ stuff. And not everything was planned ahead. I unwound the shuttle to load seed beads, etc.
The ‘stuff’ that went on here –

  1. Black and orange beads pre-strung on yellow thread and the green seed beads on blue thread.
  2. Twisted (floating) picots for antennae. 
  3. Eyes and orange beads are ‘up’ beads- they need to go in the ring loop before starting the ring.
  4. Long beaded picot –On the tail ring I made a very long picot. After completing the butterfly, I put 4 black beads over it with a hook, then snipped the picot in the center and tied a knot to keep beads in place. Snip off excess ends.
  5. Rhoda Auld’s method for bead in center of ring. This was new to me. I Love it for various reasons and am eager to try out a few more ideas with it. I used it for all 4 wing rings.
The collage shows how the bead is hooked over blue thread and the loop is held with a holder pin/paperclip. This pin passes through both the loop And the picot. When it is time, a loop is pulled through both simultaneously to make the join. The bottom left is a back view to show join.

  1. Frontside/backside tatting meant I used down and up picot joins respectively. 
  2. Avoiding colour blip in Lock join – I did try my own method, but the thread is just too thick to hide it completely. And I was colour-blinded ;-P I thought the yellow blips could camouflage as tiny beads! 
  3. Ninetta’s blipfree join was used in a couple of picot joins, and as usual I counted the join as 1ds. 
  4. Elaine Gan’s Reverse join came in handy thrice, to switch threads/colours. 
  5. Green seed beads in place of all the picots on wings.
  6. In Anchor size 20,  the  butterfly is 2½” wide and 1¾” tall. A good size for brooch, pendant, or hair ornament
Phew, that’s it. I'm happy, though - getting more confident with beads! If you like this butterfly, fine, otherwise think of me being beady-eyed at the time ;-P

Oh, and I added a center to the Wreath snowflake prototype. It looks more like a flower now! This stitch count won’t work for an ice drop version. I added a faceted glass bead and wound the threads to make a suspension loop for ornament.


Many thanks to all for bringing joy fluttering into our TatLand!


Monday, 25 February 2019

due credit

Pin It now!

Ninetta’s Curled Ring Ice Drop that I posted here was taken up in Online Tatting Class on Feb 18th along with Ninetta's original post/pattern.
Undue credit was given to me (not that I'm complaining when my name is linked with that of my very talented friend's ;-P). I’d like to reiterate again, that the pattern is Entirely Ninetta’s. Arguably perhaps the only ‘contribution’ I made is the following :
  • using 2 colours that highlighted the curled ring effect ;
For 1st (top) motif, load one shuttle only with seed beads
  • not tatting the entire pattern thus making it look more like an ice drop. In the original the last round turned it into a square with floating hearts in the corners ;
1st (top) motif made
  • using the word Celtic/faux Celtic. Reason: the gem is encased using 2 motifs. Remember Rosemary Peel's famous square motif where the 2nd motif is interwoven through elements of 1st and then a 3rd round is added which connects and holds the 2 motifs in place? I was reminded of it here. EXCEPT ....
For 2nd motif (seen from back) wind thread ctm. Silver used here.
What Ninetta did was curl the rings (immediately after closing each) through 1st motif, thus securing them in place and also forming a pocket to insert the gem. So while a 2nd motif was tatted, it was not 'separate', joining as we go. 
For this reason, only 2 rounds performed the function making it easy to stop at this stage; the 3rd round in her original pattern merely added decorative value.

Many more stepwise pictures are posted in Ninetta's blog in the link provided above.

lll

What if the 2 motifs actually were separate? This is how they would look (I have increased the size of silver rings to 12-12)....
A Celtic variation in progress
Notice how the upper and lower motifs are completely separate, then placing them over each other, the silver is interlaced, and the gem inserted before interlacing the last ring. However, the silver rings are floppy and need another round of tatting to hold them together. 
Ninetta's curled rings engineered the feat without the need of another round as pointed above. 

lll

We thank Georgia, again, for her interest in this beautiful design and for sharing it with the class. I only wish I could attend the same way as a year back. Over-enthusiastically, I would sometimes attend even the first session which starts at about 0030 hrs my time! No wonder it affected my health and constitution. I miss the motivating and learned company! 
Congratulations are also due - she completes 40 years of tatting !!! Wishes for many many more to come J

Friday, 15 February 2019

curled and celtic

Pin It now!
Overcoming the lethargy to work with beads means I take the opportunity to work a few projects in quick succession! This time it is Ninetta’s ice drop with curled rings. Well, it does have another round with treble hearts, which changes the circle to a square. I stopped at 2 rounds since this appealed to me even more.
The variegated didn’t quite turn out as pretty as I'd visualized. And as you can see, using it for the curled rings makes it look too busy. Went with silver (on right) and snipped off the earlier part.

TIP : To get the curled ring to look like a heart, insert the ring (the picot end) from below and fold/curl from above. This difference is clearly visible between the first 2 curls on the left.

As recommended, I chose a 2cms glass pebble. Yet for some reason it looked like 8 repeats would be too tight a fit, so a 9th was added. No, didn’t need it!

I like the clever way she used 2 motifs to interlace and trap the cabochon within! Faux Celtic along with curled rings and more – nice!! You can see the underbelly in Ninetta’s post – I forgot to take a pic. 
UPDATE (Feb 25) : Please read continuing post with some more pics and a WIP variation. This pattern was taught in Online Tatting Class on Feb 18th.

I have one more ice drop pendant to show you next time ... stay tuned :-))) 

Monday, 11 February 2019

simple in spring

Pin It now!


Vasant Panchami, also spelled Basant Panchami, is a festival that marks the arrival of spring, celebrated by people in various ways depending on the region.’

The Hindi word for spring is ‘basant’ and from it is derived the colour ‘basanti’ which is similar to the yellow of mustard flowers. (Remember my 2017 spring garland with it’s mustard fields, etc.?)
By chance, but perfect timing!
When I saw Elaine P Gan’s Rose Heart, I wondered whether 2 shades of yellow would work well here.
This is my first project from any of her patterns, though as you know, I’ve been a frequent user of her reverse join! And, through Sue’s test tatting, I have admired how she puts together patterns using simple motifs and fairly basic tatting.

Worked in Anchor size 40 (00293 & 00302), with ball and shuttle.

No heart should be alone!
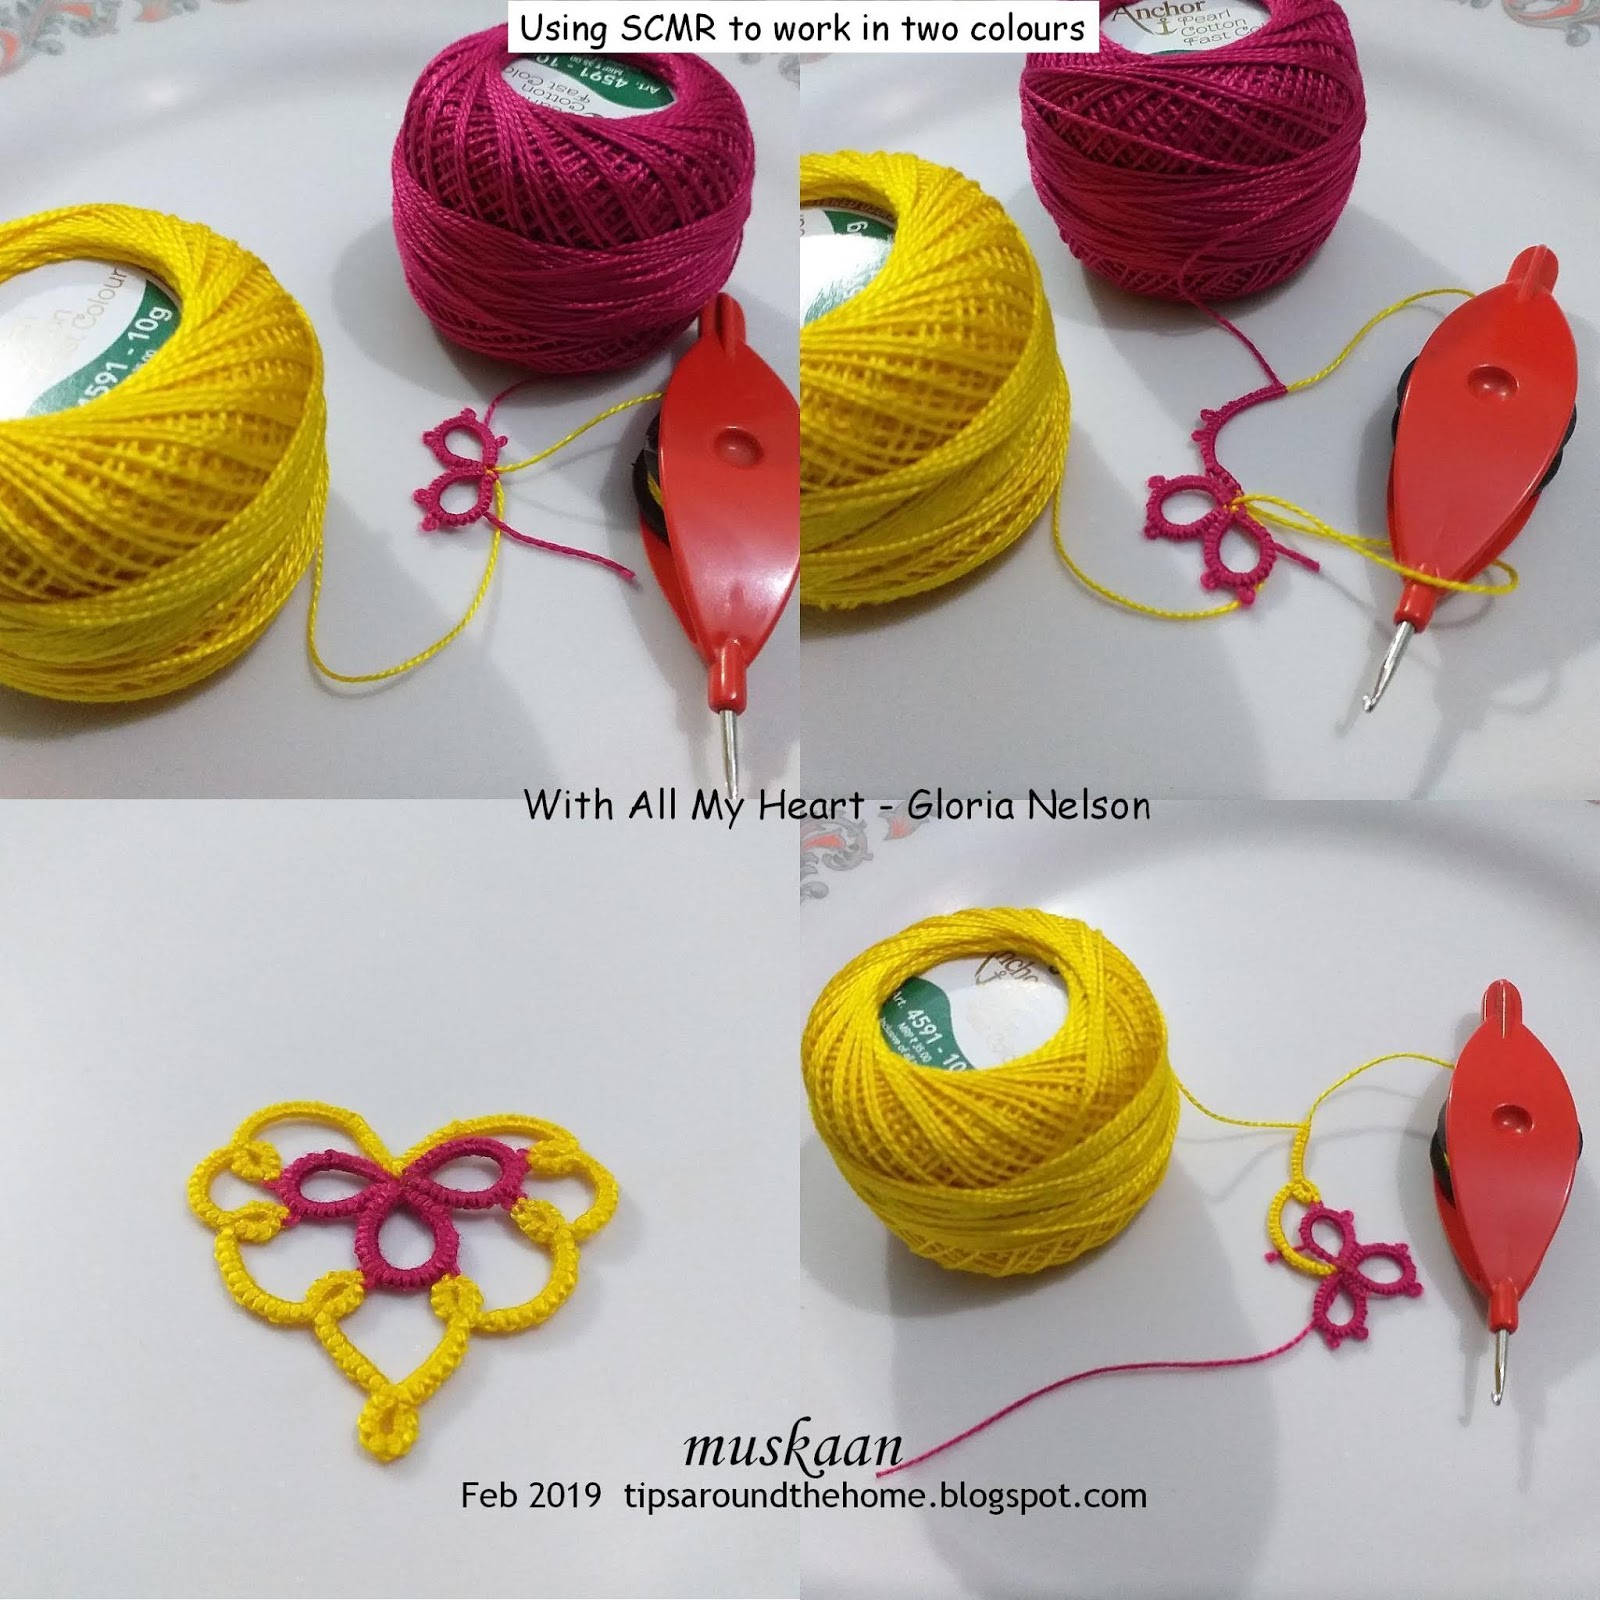
I’ve been seeing lovely models of Gloria Nelson’s With All My Heart in facebook and liked it’s simple elegance. The outline appears like a free-flowing scroll!

A clover is arguably the simplest heart shape in tatting. So why not highlight that with a contrasting colour? How to do it without too many ends to hide???

Aha. SCMR – self closing mock rings! And all worked with one shuttle only! Same as what I did with the very colourful scrappy doily
I wound yellow in the shuttle without cutting it from the ball. The magenta is ball only.
Work all 3 clover rings as mock rings using yellow core thread from shuttle.
Then snip off the magenta (with tail to whip stitch later) and continue the outer round using yellow ball thread.
The thrown/floating ring at the bottom is also worked as a mock ring.

Worked in Anchor Pearl size 8 (00291 – shuttle & ball ctm & 04380 ball).

Both hearts measure approx. 4cmsx4cms (bit longer than wide) and are quick enjoyable tats. And I used Ninetta's blipless join again. 
I like the contrast of these designs - one frilly the other stark. Yet both so beautiful. Although I worked both as simple motifs for now, Gloria's pattern is for a beaded lanyard and Elaine has used hers on a card.

AND, Buddy Hearts will be taught in the Online Tatting Class by Georgia today ! All are invited and hope I can join in.  With frequent and long spells of illness over the past year, I haven't been able to attend regularly,  if at all  :-( 


Thursday, 7 February 2019

Buddy Hearts

Pin It now!
Sharing 5-in-1 Buddy Hearts patterns !!!

The pattern presentation would’ve been completed in November last year, if it weren’t for, well, life. Just so happy to be able to do it at least before Valentine’s Day!
the original notated pic Anita sent me!
There are 2 pdfs. 
The short version only has diagrams and is a single page printout.
The long version has diagrammed & written patterns, along with tips for impeccable tatting from Master Tatter Anita Barry. It also has a write-up about out design process and relevant details, which anyone can use to create their own heart patterns! Anita wrote her patterns while I wrote mine. So even if you decide to print only the diagram-version, I still urge you to at least read the long version for the insights. And, of course, for the tremendous time & effort we put in ;-P

Since I had already posted my thoughts here, I invited Anita to write about her journey. Which is when I realised our diametrically opposite approaches to designing our respective hearts – reminds me of centrifugal v/s centripetal forces!

See, where Anita goes from the out in, having drawn the heart first, I chose the decorative piece first and then drew an incomplete heart outline which was ‘completed’ with leftover motifs forming one side.
Further, her hearts can be worked continuously, whereas my hearts are a combo of separate pieces – the floral spray and the heart proper, and worked in 2 thread sizes for better effect.

Read about both approaches in the pdf. And oh, there is a bonus heart pattern in the bundle – 5 complete patterns for our tatting buddies, and one slight variation.

Click to download pdf :
And

Anita's models of Inside Your Heart & Cross My Heart
my Budding Heart - original & with variation
I used a CWJ in my Budding Heart models,
though not indicated in diagram. 
Blossoms Heart with & without butterfly
Anita's bonus pattern - Daisy Heart !
my rendering of Anita's Daisy Heart in
Anchor size 40 (maroon) & Lizbeth size 20.
♥♥♥♥♥♥♥
Enjoy J
And in Anita's words – “Think happy thoughts”. 
Connect with your buddy and spread new tatting hearts around !

♥♥♥♥♥♥♥

Update : Taught in Online Tatting Class on Feb 11, 2019