Showing posts with label metallic thread. Show all posts

Monday, 3 January 2022

feeble firsts

Pin It now!

Believe me, I have never done bauble tatting! Oh, every year I think I will embellish at least one bauble, but all for nothing. In December 2021, the admin of the Italian FB group 'Chiacchierino: Filo Amore e Fantasia' held an online event with my MatheMagical Star pattern and several tatters used it to cover their bauble ornaments. All this really inspired me to do one..er 2, er 4.

Due to paucity of time and energy, I settled on using whatever motifs I had on hand - a SOUP (Sewing On/Using Pieces) moment. These 4cm ornaments will soon celebrate their 20th buy-day! At the time we didn't have a lot of options in this city and since the tree was decorated only the 1st 2 years, I am hesitant to buy. Next time I will certainly include more beads and crystals, more flamboyance. Perhaps I Should buy a few good quality and larger sized baubles. This little exercise has got me excited and more confident.

In chronological order - 

Bauble #1 - This edging is draped diagonally and temporarily taped down behind. (don't look behind!). But in Anchor size 20, it is too thick. A daintier edging/insertion would look better. And a tiny motif or 2 on the bare side spaces? 
Interlaced Cumulus pattern - https://tipsaroundthehome.blogspot.com/2020/05/puffy-clouds.html
Bauble #2 - There is no good angle to capture both flakes in a pic. These are in Lizbeth 20 and perhaps the reason I put them together. Spin Away above and ConcentriCity below.
I used a matching blue metallic thread to join the 2 flakes together. It really isn't difficult! Without cutting the thread from the reel, I sewed through the picots, and finally adjusted the tension and positions before snipping, tying, and hiding. Keeping the thread on the reel gave me a lot of leeway with no fear of running short.

Bauble #3 - This is the small version of the MatheMagical Star in size 40 - the only one that ... the others were too large for this bauble. And I kind of liked how the crystals sat like a crown on top.
On the underside is the Folded Fun Star. I hope you can see how I went a bit adventurous and joined the 2 stars.
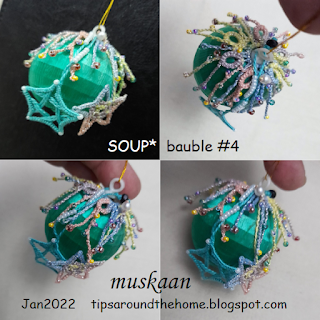
Bauble #4 - Messy but looks better in real. I was going for an organic look by not tying down each twisted picot. But very difficult to photograph.

I simply sprinkled a few of my snowflakes instead of suspending them - yup lazy. Hubby even offered to put up a string of lights but I hope to be better prepared next time.

It happens Every year! I let the sunny days slip by and when I finally get around to decorating the tree, the sun gives me the slip! So the pic comes out insipid. Oh well, this should be a staunch reminder to start early this year!

I really want to thank all the wonderful versions shared by tatters around the globe - in the event (one tatter inserted it inside a transparent star ornament; and others who used beads in exciting arrangement) as well as ornaments in general - that got my juices running, finally. Feeble firsts, but determined to be better later this year!

All the star and snowflake patterns can be found here -https://docs.google.com/document/d/1r4OmXX_c5LjFebMN2UbSNiYqXYETLmoridK0X1YIQco/view

Friday, 25 June 2021

fumble fingers

Pin It now!

 I swear if you watch me do beaded tatting you will forget how to tat with beads! My fervent wish is that a beading friend sit beside me and help me use the tools and materials I have effectively and efficiently. I simply fumble my way through, taking a ginormous amount of time even for simple patterns. And nothing comes simpler than this earring pattern!

Remember I told you about receiving many gift patterns around ITD this year? This simple one-shuttle earring pattern is a special gift from Jill McLean! Here is my journey ....

1. My first trials with new metallic thread (Natvarlal brand) failed. The single thread broke soon after starting my 1st attempt. 
So I used 2 threads above, but while closing the ring, one thread broke. Had to be abandoned.

2. Played safe on my next trial, using size 20 metallic thread.  
My only variation was using 2 different coloured beads. The yellow ones (up beads) went around the hand on the ring loop, while the blue ones (down beads) were pulled from the shuttle. 
Stringing beads didn't require too many brain cells - load all of one colour, then all of the other!
TIP : One can work the small ring as a SSSR hiding the tail without any sewing! (Miranda pictorial ; Marilee video)

3. Friends urged me to use my silk threads. So here's one Opella silk skein (all 6 strands) along with faceted bicone crystals in 2 colours - the inner green are a tad smaller than the outer silver crystals. 
I used metallic silver thread to make jump rings for the 2 teardrops. Huh, they don't look too bad in the pic, but I had a tough time getting them into shape, especially doubled up. 
Here the large ring took patience while closing - had to slide the stitches to the left in batches till the ring finally closed. 
This time the small ring on top is a split ring, sewing in tails on either side after making an overhand tie. 
TIP : But there's a way to end on a SR without sewing, too.

4. How would it look if the size of beads was inverted? So, large black wooden beads on the inside and small seed beads (17/0) on the outside! 4 seed beads per wooden bead. 
This time I decided to make a mock ring and was going to make onion rings, but switched to a red Swarovski crystal surrounded by seed beads instead. Both used Floating Beads methods.
The black beads are strung through 5 strands of Anchor silk thread on shuttle1; and silver metallic thread with seed beads on shuttle2. 
My idea was to have the red colour show up in the stitches between the black beads. How wrong was I! Unless I used reverse (unflipped) stitches, the red is hidden. Felt like a fool, but didn't feel like undoing the first few stitches, so continued.
QUICK TIP : Tatting with Metallic thread 
This metallic thread is pretty much a wire with silver thread wrapped around it and it was difficult to get a flipped stitch, especially the first half stitch.... till I hit upon a little movement!
1. Floating beads at the start, and an open chain in progress which will be joined back into a mock ring using a lock join.
2. Making the 1st half stitch. The silk thread does not have enough strength to make the metallic thread flip. With any free finger/thumb, gently push the loop indicated by arrow ... push it upwards and it's a Flip!!!
[The inset shows how direct tatting would've worked.]
3. And there it is - the 1st hs. The 2nd half stitch poses no problem. 

And that's it for now. Other ideas percolating in my head will have to wait for another day.
Isn't it amazing how simple variations and combinations can create a range of effects?!
Design TIP The size of the down/inner bead, besides the size of thread used, affects the size of the earring as is evident above. The up beads do not affect size of ring. 
The double layer of beads adds stability of shape and structure, besides the visual effect.
And this is such an easy but versatile pattern that one can make a pair for every dress!

Many many thanks, Jill, for your gracious, exciting, and enjoyable gift ...
made me push my beading boundaries 💖

Tuesday, 5 March 2019

a Celtic flip

Pin It now!
Remember how I wondered about a Celtic variation here? This is how I went ahead to complete a Celtic variation of Ninetta’s Curled Ring ice drop.

Notice there are no curled rings here, but the beaded rings are raised. I was hoping for more of a water lily effect.  

The pattern for 2 motifs/medallions remains the same as Ninetta's original (I have inked the count in the pic above for easy reference).
BUT, I flipped the cabochon, switching the motifs in the process : the lower one is now in the front/on top, and vice versa.

I didn’t tat a new one, simply added to what was already tatted. One can call this a prototype variation if you will,  with scope for improvement. 

For outermost green round, after the first lock join to previous round, I continued with the Slope and Roll join. It looked better.
There was a very geometric and open shape after completing the green, hence I added more silver rings in the empty spaces to look more like petals. If properly planned, a full round of 16 silver petals would give it more of a lotus/water lily effect. 

as seen from the back
I still don’t understand why the outline is more square than circular despite all chains being 7-7 ! Anybody?

In Gautam (green size 8) and Red Rose (size 20) metallic threads, the motif/pendant measures 4½ cms across and 5½ cms diagonally. The cab is 2cms.

Friday, 15 February 2019

curled and celtic

Pin It now!
Overcoming the lethargy to work with beads means I take the opportunity to work a few projects in quick succession! This time it is Ninetta’s ice drop with curled rings. Well, it does have another round with treble hearts, which changes the circle to a square. I stopped at 2 rounds since this appealed to me even more.
The variegated didn’t quite turn out as pretty as I'd visualized. And as you can see, using it for the curled rings makes it look too busy. Went with silver (on right) and snipped off the earlier part.

TIP : To get the curled ring to look like a heart, insert the ring (the picot end) from below and fold/curl from above. This difference is clearly visible between the first 2 curls on the left.

As recommended, I chose a 2cms glass pebble. Yet for some reason it looked like 8 repeats would be too tight a fit, so a 9th was added. No, didn’t need it!

I like the clever way she used 2 motifs to interlace and trap the cabochon within! Faux Celtic along with curled rings and more – nice!! You can see the underbelly in Ninetta’s post – I forgot to take a pic. 
UPDATE (Feb 25) : Please read continuing post with some more pics and a WIP variation. This pattern was taught in Online Tatting Class on Feb 18th.

I have one more ice drop pendant to show you next time ... stay tuned :-))) 

Wednesday, 13 February 2019

Goldilocks meets a friend

Pin It now!

Remember how I couldn’t introduce you to Goldilocks since she was already in bed? 
The wait is over. Meet Goldilocks and her friend, Elana! 
Well, opposites attract again (see comments here)! Gold / silver; tiny / large; warm / cool; quick project / long project; AND our two friendly designers from different hemispheres!

Closing the spiral ring using metallic thread was a tad dicey. Anyway, after making it with single shuttle, I switched the shuttle thread to regular cotton size 20, using gold for the visible stitches.
Lenka shared some nice pics on how to add beads in spiral rings. Do check out her beautiful applications of the spiral rings. 

Red Rose metallic gold size 20 & Anchor size 20. size 16 seed bead & crystal teardrop.
2+ cms across & 3+ cms long without teardrop.

Jane McLellan’s Elana has long been on my to-tat list. It is such an elegant pattern.
And I wanted to stick with blue and white. This is actually my 2nd attempt; the first being left aside after 4 repeats for 2 reasons. But read what happened in next post here. (Update)

Notice the missing chain in first round? I used the double ring & chain sequence. And the rings on the back are 5-5-5.
I used bead as picot gauge method to load bead with a crochet hook only when it was time to link. Yet the small Pony shuttle bobbin had to be loaded twice.
Adjacent Ankars motifs are slightly tightly packed with some overlap – perhaps my seed bead was too large?
But I love how it looks despite the thick white thread! And finally another struck off the unending list
Blue glass gem - 2¼ cms x ½ cm high. The pebble is not absolutely clear but has shaken snowglobe effect.  Anchor white 20.  3½" diameter

2 projects, but so many techniques have been incorporated! My knid of tatting ;-P
And now that I have my beads and gems out, there are a couple more projects queued ;-D

Tuesday, 15 January 2019

celestial razzle dazzle

Pin It now!


an adaptation of Sharon's Dec 28 snowflake. Although “undecided”, I am so glad she decided to share the pattern.
In the pics the sparkle seems spotted. Part of the reason is that a single metallic wire is twisted with cotton thread. In real this wire creates a stronger and nicely cohesive shine. 

I loved how the elements in this flake seemed to fan out! Which is why I waited to tat it in metallic threads thus magnifying the radiation and radiance! So this time I have a sunflake with a few differences, if you can spot them?


What I did differently :
  • Increased motifs to 7 instead of 6 because there was cupping.
  • Worked the 2nd round with thrown rings, instead of chains-only.
There was ruffling as the rounds were added, but roll blocking flattened it okay. Made me think I could've retained 6 dendrites! The cupping is NOT a reflection on the design; it is my own shortcoming with such medallions.

What I could’ve done differently :
  • Make longer joining picots in inside facing gold rings, thus keeping the motif count to 6.
  • Reduce the gold & increase the silver.
  • anything you would like to suggest ???
In Red Rose size 20, it measures 11cms. Now to attach it within a large enough frame to hang in the window, letting it razzle and dazzle as it catches the sun’s rays.


Related posts
one more sunflake (Lene Bjorn)
unintended 7-armed Ice Snowflake (Nancy Tracy) mistake discovered over a year later!
intentional 7-armed superbowl snowflake (Georgia Seitz) for the blocking pictorial.

Friday, 11 January 2019

new and old

Pin It now!

metallic thread, background, snood


As promised yesterday, this is the medallion (not blocked) I started immediately, using Red Rose metallic thread.
The thread is nice to tat with – soft and smooth - but very strong. It is so much easier than using 2 or 3 strands of metallic embroidery thread.
I did consciously loosen my stitch tension. And no extra half stitch at end of rings. 

TIP to close ring: While closing rings, pull evenly till almost the very end, then another tug towards the left (for right-handers) to close that final gap.

TIP to retro-tat: I had to un-tat a ring. It felt safer & easier to undo half stitch at a time (using the blunt head of #10 crochet hook) instead of forcing open the ring. After a few stitches were taken out, it was easy to pull open the ring loop wider and quickly unravel the rest.
ùùùù

Playing with camera settings for background using same metallic thread medallion. Didn’t know my phone camera had such a wide range – these are only a few I selected to upload. The top right is 'autumn'.


ùùùù

And a UFO from mid-2016! I kept finding and losing it in my closet. But this time when I found it, I felt energized to complete it. Perhaps Eliz's perseverance rubbed off on me. Also, I need to replace this 2017 snood because some of the end chains have frayed due to daily friction.
It measures about 5½ cms across (in size 40) while I need at least 7 cms. So off to the drawing board to chalk out some rows. I intend to use a dark shade - brown or black - to keep the spinning wheel in focus. Now to decide how to fill that space - a daunting task.

ùùùù


Thursday, 10 January 2019

up-lifting Anchor

Pin It now!

Anchor aweigh!
Tatting away :-)

I just Had to share my excitement with you. I had a huge shipment arrive yesterday that included mainly Anchor and Red Rose threads and a smattering of sewing/knitting/crochet accessories. Yup, still doing the happy dance ;-P

These are some of Anchor Pearl Cotton size 8. Absolutely gorgeous colours, silken, sheen, and soft texture. It’ll be my first time with these. I saw them first in Usha’s tatting and now bought all the shades that Pony Craft Store has. I started cataloguing and counted 67 balls (10 gms each; Art 4591)!

These are top-ups or new shades in Anchor size 40 and size 20 (20 gms each; Art 4054).
I think the Anchor 20 balls I’ve been buying since 2013 from my retail store and another online store were fakes (or has Anchor improved it’s quality since then?)! No wonder I kept ranting – they are thicker than the ones here. But I had no way of knowing coz the labels and price were exactly the same.
Oh well, a huge weight lifted off the Anchor brand now! Uplifting Anchor, ahoy ;-P

Now these are new entrants Red Rose metallic threads size 20. There are over 20 beautiful shades - solids and variegated - in the online store. Each ball is 100 gms!

Here’s the whole thread stash straight out of the carton, including Anchor assorted embroidery threads – a pack of 25×2 shades (8m each; Art 4624). Sorry for that blurry image.

Over time I will do some proper thread/brand/size comparisons. For now, I need to catalogue and find storage bins and space, sigh !
But watch out for my first metallic medallion tomorrow ...