Showing posts with label measuring the picot. Show all posts

Thursday, 26 June 2025

quick tatting

Pin It now!

 I first shared a pic of my Fan Palm motif or pendant here - https://tipsaroundthehome.blogspot.com/2025/05/bead-tatting.html . Now I have the pattern ready --- 

Fan Palm Motif/Pendant by Muskaan (March2025) pattern PDFhttps://drive.google.com/file/d/16amEUnVT7ERSySRJqbMsj0af0Xu_MFsP/view

It is a simple motif that can be worked with a ball and shuttle and the beads are not pre-strung. 

It is a prototype I made to show beads over/on a picot. These beads are slipped over the long measured picots at the time of joining. Or they can be slipped over the picot while it is being formed, and held with a paper clip or marker. I prefer the former to avoid beads and clips getting in the way of smooth tatting. 

Measuring the Picot (including using beads as a picot gauge)https://drive.google.com/file/d/1Kk6rtyIUvo5JFA5u3vE3ruU2Z7zQ9fuq/view


I deliberately chose to do a mock ring since I did not know how big I wanted it. And then made an under-over or alligator join across the start of the chain. There are several ways to make the under-over join (alligator join is only one of them). Refer to my pictorials here - https://tipsaroundthehome.blogspot.com/2018/05/mock-rings-1-under-and-over-join.html  and https://tipsaroundthehome.blogspot.com/2018/05/mock-rings-1-u-o-join-continued.html

The diagram in the PDF is simply a guide. You can choose to tat with two shuttles if you wish to empty them of leftover threads. You can even work the mock ring as a true ring and without need for an under-over join. 

For a plain, flat leaf, avoid any beads on the picots. 

I used 4mm beads, but you can choose smaller ones and adjust their number accordingly. Oh dear, I've been so flaky lately that I forgot to take a pic of this on a chain. Hmm, not too difficult to imagine, right?

This is such a quick tat, really, and easily adaptable to any thread and bead size. Or go all around for a floral motif! Hope you enjoy the pattern. 

Tuesday, 3 January 2023

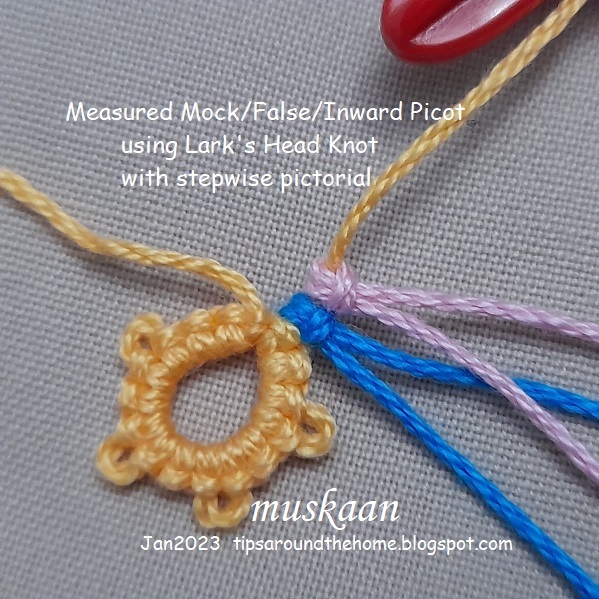
measured picot on core thread

Pin It now!

 It is difficult to get an accurate measure of an inward picot on the core thread which is held by a paperclip or coil-less pin, etc., till the time of joining. 

Then we have a mock picot where the norm is to make an overhand tie and then work the stitches. This is something I have never been comfortable with. 

And it is these that led me to use scrap thread to hold the space, by making a lark's head knot (LHK), which is exactly the size and form of a double stitch. Now this gives me an accurate measure of a picot even when it is on the core thread.

Measured Mock/Inward Picot with LHK pdf  (click to download) https://drive.google.com/file/d/1GciBBglABtYVt3Jew5zn6chqhMjLQuqG/view 


1 Lark's Head Knot = 1 Double Stitch

The best part is that we can alter the size as desired! 
For a very small picot, make 1LHK with a smaller size scrap thread;
for a regular picot, use the same tatting thread and make 1LHK;
for a longer picot, use thicker thread for 1LHK, or several scraps for 2 or more LHK. 
The possibilities are endless. The mock or inward picot needn't even be regular. You can easily have an irregular picot with a longer core thread side and barely any space on the ball thread side, if a future join is to be made only on the lower end. 
The marker/scrap thread can be removed once the element is joined and the core thread is locked either with a lock join or with a ring.
Notice how all the picots above are of the same size and all the stitches are the same with not a single thread or bar out of place.

I put together some pics in a one-page pdf to show the steps involved.  Measured Mock/Inward Picot with LHK pdf  (click to download)https://drive.google.com/file/d/1GciBBglABtYVt3Jew5zn6chqhMjLQuqG/view 

If you remember, I've used the LHK to join at the beginning - it was called luggage tag loop (Georgia Seitz). eg. Radiant Sun paper clip tatting, Blossoms motifs, etc. (click for search results and patterns). The LHK is also used to add new thread since it gives the appearance of a double stitch. 

Related articles/resources -
Measuring the Picot - https://drive.google.com/file/d/1Kk6rtyIUvo5JFA5u3vE3ruU2Z7zQ9fuq/view

Wednesday, 13 February 2019

Goldilocks meets a friend

Pin It now!

Remember how I couldn’t introduce you to Goldilocks since she was already in bed? 
The wait is over. Meet Goldilocks and her friend, Elana! 
Well, opposites attract again (see comments here)! Gold / silver; tiny / large; warm / cool; quick project / long project; AND our two friendly designers from different hemispheres!

Closing the spiral ring using metallic thread was a tad dicey. Anyway, after making it with single shuttle, I switched the shuttle thread to regular cotton size 20, using gold for the visible stitches.
Lenka shared some nice pics on how to add beads in spiral rings. Do check out her beautiful applications of the spiral rings. 

Red Rose metallic gold size 20 & Anchor size 20. size 16 seed bead & crystal teardrop.
2+ cms across & 3+ cms long without teardrop.

Jane McLellan’s Elana has long been on my to-tat list. It is such an elegant pattern.
And I wanted to stick with blue and white. This is actually my 2nd attempt; the first being left aside after 4 repeats for 2 reasons. But read what happened in next post here. (Update)

Notice the missing chain in first round? I used the double ring & chain sequence. And the rings on the back are 5-5-5.
I used bead as picot gauge method to load bead with a crochet hook only when it was time to link. Yet the small Pony shuttle bobbin had to be loaded twice.
Adjacent Ankars motifs are slightly tightly packed with some overlap – perhaps my seed bead was too large?
But I love how it looks despite the thick white thread! And finally another struck off the unending list
Blue glass gem - 2¼ cms x ½ cm high. The pebble is not absolutely clear but has shaken snowglobe effect.  Anchor white 20.  3½" diameter

2 projects, but so many techniques have been incorporated! My knid of tatting ;-P
And now that I have my beads and gems out, there are a couple more projects queued ;-D

Tuesday, 21 August 2018

The picot stands tall

Pin It now!
Many of us ‘eye-ball’ the picot. When precision is needed as in case of graduated, double/triple, interlocking/interwoven, central and tuft picots or in tatted hairpin lace, a gauge is required. Some ink/tattoo dots on their finger! I merely measure and cut some cardstock to use as a homemade gauge. To me, vertical meant looping the picot thread around the gauge, while horizontal meant laying the picot thread flat along the measuring side. 

But Robin pointed out that there are different interpretations (see comments) and it led to a lot of research ending in this article : Measuring the Picot.
I will use 2 images sent by her to illustrate how some tutorials/resources differ in their approach & terminology. One set speaks of how to hold the rectangular gauge, while the other talks about how the picot thread lies (in relation to core thread or the gauge) when measuring. 

 
            In A, the picot gauge is held horizontally, but the picot thread is vertical.
In B, the gauge is held vertically, but picot thread is horizontal.
But notice that the core thread remains the same throughout – horizontal!
Core thread is the only constant during measurement.
It lies flat (horizontal or on the X-axis)
irrespective of the picot thread or the picot gauge.
In A, we measure the height of the picot (5mm in this case) and the finished picot is of the same measure viz 5mm.
In B, we measure the length of the picot (10mm in this case) but when finished, the picot will measure 5mm.
Length of thread in any picot is twice the height of that picot.
Conversely, height of picot is half its length. 
In A, multiple picots can me made before slipping them off the gauge.
In B, only 1 picot at a time is possible.

Thus the seeming dichotomy is resolved. But this is not all. There are ways to use the gauge unconventionally; and ways to measure a picot without using any separate tool (see collage below) !!! These are all covered in the article, along with pictures – some stepwise. 

Part of the article was published in Bellaonline on July 12, 2018. More sections were added later, and refined further, to make it quite a comprehensive document.

Click to download the pdf of the complete article -

This article is a compilation of the many ways – old & new - to measure a picot. Each method has it’s advantages and it is entirely up to the tatter to choose the method(s) they prefer. The article makes no claim of superiority of one method or of one gauge over the other.

The contents of the article :
I.  Orientation of Picot Gauge – horizontal and vertical
II. Orientation of Picot Thread in Relation to the Core Thread – height (vertical) and length (horizontal)
III. Non-conventional  Applications/Uses
A.                  Direct Tatting (unflipped stitches)
B.                  Decorative Effects
C.                  Graduated Picots 
D.                  Multiplier Effect of Gauge 
E.                  BEADS as Picot Gauge
IV. Stitches as Picot Gauge – length and height
Recap / conclusion
References
¯¯¯¯¯

During the course of my research, many good friends helped with their own insights, though not everything was included in the final article. This post is to share this new information rather than repeat what’s in the article.

Historically, a pin was used to measure the picot loops. “Tatting. Edgings and Insertions”, Mlle Riego de la Branchardiere, 1861.
‘A Pearl Loop – After the number of double stitches are worked as directed, the thread which forms the loop round the hand is passed over the pin, invented for the purpose, facilitates the work.’
Since a pin has a circular cross-section, there is no vertical/horizontal dilemma here. The number of times one wraps the picot thread around it can alter the size of a finished picot.
This same technique is used by Jon Yusoff on modern gauges for extra long picotsThe collage above shows how to measure a 10cm picot using a 2cm gauge.

¯¯¯¯¯

Bonnie Swank (through Anita Barry) sent me her description derived from “The Art of Tatting”, Lady Hoare, 1910, page 20
“Pinching the ring and shuttle threads together then tatting the double stitch and sliding the new double stitch next to the previous double stitch.
This is a horizontal method of making the picot without a gauge.”
Lady Hoare suggests ‘leaving about the eighth of an inch of thread on both loop and shuttle threads….’ This is what we refer to as eyeballing.
¯¯¯¯¯

An elementary and universal method is to employ
the stitches themselves as a picot gauge.
If a gauge is not available, the stitches themselves can act as a gauge. Even beads can be used for measurement if size is known. The advantage of using one’s own tatted stitches as a gauge is that it accommodates all types & sizes of threads as well as individual difference in tension.
I used the height of a picot-in-the-making to estimate the size of central picot and arrived at the following thumb rule. Jane McLellan stepped in with trials, experiments and feedback to confirm the rule.
A thumb rule for measuring the central picot
around which rings will be linked :
1ds width for each ring.
(± half stitch to account for individual differences)
¯¯¯¯¯

While technically not a picot, it is a different way of using a picot gauge. Jeanie Schekel, in her unpublished book, calls it a folded picot gauge ideal for bare thread tatting and mignonette. She shared her images and also these video links –  Double picot gauge by needledreams and this video by mytattingplace which also shows how to get uniform half-closed rings.
¯¯¯¯¯

Coretta Loughmiller sent me many pics of the BTS and Picot Tool being used. Now this stepped tool, at first glance, defies the vertical/horizontal position. However the detailed markings of length and directional arrows helps us understand how to hold and use the gauge to measure either the height or the length of the picot thread and also bare thread. Gloria Nelson, the designer & manufacturer of this compact efficient tool, has been most gracious in our communication, even offering to send in more pics.
Such markings are a good way to avoid any confusion and communicate clearly - whichever gauge a designer uses.
¯¯¯¯¯

Martha Ess’ sliding gauge is ideal for graduated picots. She graciously gave me permission to use any of the photos and instructions!
¯¯¯¯¯

I’d like to sincerely thank each and everyone mentioned 
for prompt and enthusiastic help – over and above my expectations !  
And I cannot thank Robin & Georgia enough! 
Robin Perfetti has helped proof the multiple drafts carefully and offered valuable feedback/suggestions. Some of the words, thoughts & of course images, are hers. 
Georgia Seitz has provided us with a wonderful platform and opportunity to reach a wide audience through Bellaonline and her Online Tatting Class.