Wednesday 29 November 2017

mixing

Pin It now!

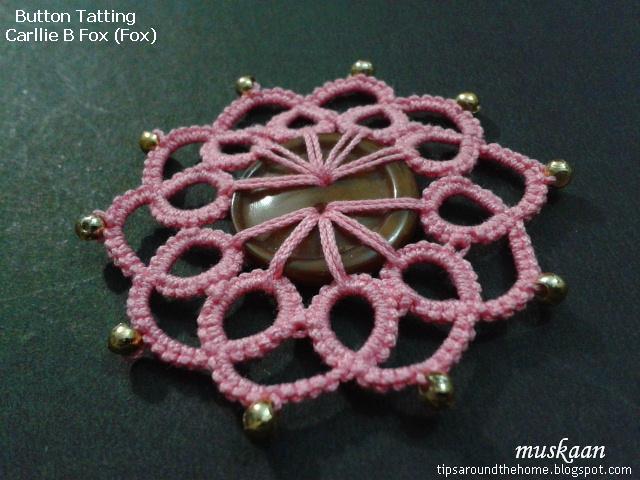
This month I Love Tatting consisted of working a pattern with at least 4 split rings. I kept tossing ideas in my head – so many to choose from! Jean Lugert’s rose was a top contender – it’s on my to-tat list. Or a pattern from Karen Bovard’s book? Then there were 2 of my own designs – one prototype done a couple of years back, and another – a split ring snowflake, no less – in my sketchbook. Also jostled with some braid ideas.
Finally fate intervened in multiple ways and I chose a pattern mixing colour effects, techniques, and events. And kind of apt – 3 colours for edition #3 of kocham frywolitke!
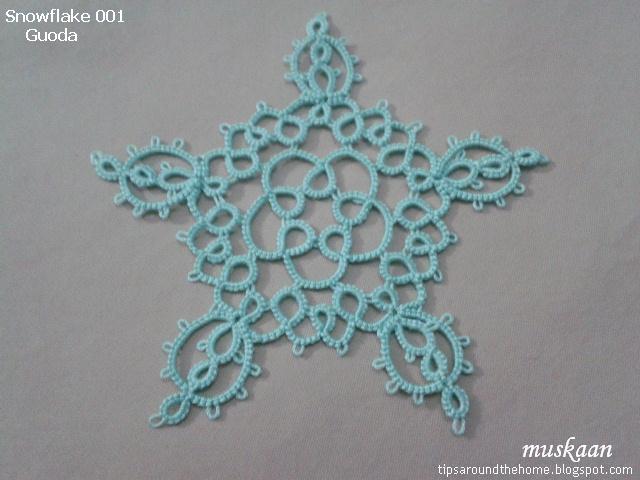
Adaptation of
Patty Dowden’s Mardi Gras Snowflake
for I Love Tatting / Kocham frywolitke 3
Googled Mardi gras colours and loved the 3 that showed up! Never tried this combo before, and in order to get the right shades, I chose Anchor embroidery threads – 3 strands of each colour.
My initial thought was to wind 1 strand of each colour, but discarded the idea.
And in order to use all 3 colours, with justice to each, I planned on adding another round.

Substituted single shuttle split ring (SSSR) with the 2-shuttle split rings (SR) to comply with the challenge. Incidentally, SR is a composite ring while SSSR is a true ring.


The path wasn’t easy! Here is my 1st attempt. Something was wrong, I knew, but it took me a long time to figure it out.
Decided to start afresh and made the very same mistake at the very same spot again!!!! 
This time I unraveled and re-tatted. Kept a close eye thenceforth ;-P

This is how the original pattern would look. It measures 6 cms.
One of the advantages of split rings is that one gets to play with colours in interesting ways.

The additional round is worked with 2 shuttles because of the thrown ring. But one can work the round with ball and shuttle by making it a mock ring.


Stitch count for this round is notated in the picture, but it can be changed to suit your preference and tension.
I deliberately used simple lock joins throughout.


It measures 8 cms now.

There are a couple of mistakes here but I’m still happy with the outcome. The purple chains create lovely petal outlines around the center (as do the yellow halves). And if we increase the stitches, the ‘petals’ will overlap!

I hope you give this a try some time - with SSSRs or SRs. Either way, it's a beautiful design.


happy tatting always J

Sunday 26 November 2017

fun reflection

Pin It now!
It is always relaxing to sit back and tat some one else’s pattern. And these florets are really cute and quick to work up.

Doily #10   Round 4
fun picot / zabawa "pikotek"

This is a repeat of the very 1st round where I used double picots. I didn’t elaborate earlier, so here’s how I did each –
Working with size 40, I pull out a 20cms long tail from the shuttle for the short chains. I used the tail to finger-tat reverse (unflipped) stitch.

Also, I like the rings a bit plump. Hence joining picots are very very tiny, thus ‘stretching’ the rings.
The double picot is 7mm high when gauge is perpendicular to core thread.

The doily measures 11.5 cms at this stage. In real it looks very pretty and complete.

I’m thinking of adding a 3rd colour for the next round.

Oh my, Agnieszka is so quick! I barely hit send and the next round is in my inbox!
She has a very systematic and clean presentation in 2 languages. She sends me the English version, obviously. The diagram for each round shows the sequence as well as the stitch count.

I’m beginning to see a few more bloggers participating. It’s great that we can work at our own pace. 

relax and enjoy – the tatting mantra !

Related posts

Friday 24 November 2017

multi-tatting

Pin It now!
squared and then some...
I’m getting pretty sick of pink, aren’t you? No option here....


Facebook-ers are already aware. I came across it on Craftree. Tat a Brussels’ monument in pink . Cathy de Greef (Canarithy) is calling for a tatted square in pink to turn the global spotlight towards tatting as well women’s rights. She already has a pattern here. However as long as the finished square is 1.18x1.18” in size 20/30 one can use any pattern.
With Anchor 20 this works out to 1.25”.
I started with a ring and went down instead of around. This is a medallion with a central/shared picot on first chain ! Switching shuttles accomplished the entire piece. The picots linking adjacent chains could've been slightly longer.
She will sew all squares together and adorn a monument with the fabric. The FAQ has all details. I’m not mailing it, just showing my support here. Many tatting groups around the world are already on the task - come join in.
ËÌËÌËÌËÌË

Friendly Anita Barry sent me a delightful presentation titled Taboo Tatting. Print the document on both sides of a page and fold to get 8 little pages of tips, patterns, and ‘puzzles’! It is very handy for travel-tatting. I love how inventive she is!   
eg. she chose a vintage square pattern. You know the 8 alternately small and large outward rings? And all those ways to avoid a twisted picot when joining last ring to first? Here, gasp, she deliberately chose to twist the picot when linking to previous ring.
And I thought I was so smart, thinking ‘why not increase the length of the picot slightly so that the twist is more visible?Dummy!! It simply increased the distance between rings!!! Unlike a regular long picot which can be squished and pulled into an elegant double picot, the twisted one will tend to stay straight and in place. I couldn’t accommodate all 8 rings without ruffling. Lesson learned – the square becomes a diamond.
Instead of regular decorative picots, I used my twisted floating picots.
ËÌËÌËÌËÌË

Still had 2 lengths of pink thread left over and some time. Beaded the ball thread and wound both scraps on a shuttle. The only ‘decorative’ button I could find in my stash only had 2 holes. But I finally tried out Fox’s enticing button tatting!  Oh it was so quick and enjoyable and instead of 12, only 10 repeats sufficed. 
Here I was smart ;-P I worked 5 rings in one hole then continued to next hole. It was easy to see that 5 more rings would take me around. Otherwise I could add one to the first side later.
I can see why this can be addictive, except I don’t really know where I’d use them all. She's been adding a tail to use as a bookmark. I can see this as a bookmark charm or pendant/jewellery.
The button is 2cms and with tatting it comes to 5cms across. An enclosed space medallion where the central space is covered with a button.
ËÌËÌËÌËÌË

Here I travel back in time. Without changing the stitch count, I worked my one-pass quatrefoil square medallion in the traditional way – tatting individual quatrefoils and joining as you go. One can play with colours in a different way here.
ËÌËÌËÌËÌË


Last but not least, I test tatted Guoda’s lovely first snowflake pattern. Her way of notating conflicts with what I am used to or familiar with. But then there are so many ways to skin a cat! Once I changed the diagram to my comfort, it worked smoothly.
I enjoyed working the LTROR (loop tatted ring on ring), and didn’t mind when the thread broke while closing the ring on 4th repeat. Not many patterns use the LTROR, preferring to substitute it with a SCMR. 
In size 40, it measures 8cms across. I can do a better job if I tat it again.
ËÌËÌËÌËÌË

hmmm, one square meal or tatting a square ?
Which would you choose ;-D

Friday 17 November 2017

a star is born

Pin It now!
Another new pattern for the, ummm, Medallion Series …

Penta Fleur medallion


This was made over a week back. Nothing much to write here. I wanted to throw off the central ring from a chain and this pattern was the result of that quest. It is tatted in one pass.

I do like the way the long/double picot completes a ‘petal’ and a 5-petalled flower emerges from the confines of a pentagonal star. Based on this I decided on the name and when I Googled it, found that Pentas or penta fleur really is a flower ! Also called Egyptian Star. How opportune is that! Except that I'd already completed it in green otherwise perhaps a red or pink would be more appropriate.

I used Anchor size 20 but we know that it is thicker than Lizbeth 20.
Measures approx 6.5 cms at the broadest points.
Tats up real quick but a picot gauge is required for the long picot. I used a 3/8” gauge held vertically ie. perpendicular to the core thread.

The first trial in tinted blue. Not all chains of same length; other minor tweaks also went on.

Incidentally, while making this, if I had joined the chains differently I get another pattern. I’m really eager to see if the idea works!

This is a diagram-only presentation. In case of any difficulty, you know where I’ll be ;-D

happy tatting always !


Monday 13 November 2017

binging on picots

Pin It now!

Who would've thought !
What can I say, it happens....

Remember adding picots to the doily challenge?
My plan was to repeat dot picots in the 3rd round of Frywolaga’s Doily#10. After tatting 3 chains, it just did not cut it for me. There was no enhancement - quite the contrary – almost tacky.
Out came the snippers and, hey what the heck, I fell back on our trusted, time-tested regular humble picots!

Why not go the whole hog? And it seems to works, doesn't it ?!
Measures just over 6.5cms in size 40 (without taking picots into account).

The unintentional upswing is how all linked rings (rounds 2 & 3) form continuous garland around.
Just like in my clover wreath pattern – when tessellated, the pair of rings from each motif form a floret! It was unplanned - the florets just emerged.
It amazes me how every little experiment offers learning, discerning, and designing opportunities!

This is turning out to be quite a fun learning experience :-)

binging laced with no calories – happy tatting J


Friday 10 November 2017

Am I the right person?

Pin It now!
Especially where picots on tatted lace are concerned?
I generally go for minimum decorative picots, preferring clean lines that show the design clearly. Not that I don't admire the lacy, airy effect of picots.

A couple of weeks back Agnieszka (Frywolaga) invited her readers to a fun picot challenge.
She usually makes 2 versions of her beautiful patterns – one with and other without decorative picots. This time she shared a picture of her Doily #10 without free picots and those interested need to put in picots where they wish. She sends out instructions for the next round when the previous is finished.

When I first set eyes on her doily I loved the simple lines and didn’t want to muck or clutter it up with picots (sorry, dear picot-ists, no offence ;-D). But when I received the 1st round pattern, I had to think slightly out of the box and came up with the following …

Here are my first 2 rounds worked in Anchor size 40 …
I used a double picot in round 1 enhancing the floral effect.
Measures 2.5cms
She shares her suggestion here

Dot picots in the 2nd round.
Measures just over 5cms


I hope to repeat both type of picots in later rounds.

It really is fun! And knowing the complete design, it becomes easier to plan ahead. Just hope I do a good enough job while enjoying the journey. If you wish to join in, the links above provide all the information.

What I did muck up, though, was this simple pattern - the Onion Ring Magic Square #2. I had no problem following the pattern or direction, yet stumbled on simple joins! Thrice rings are attached incorrectly. Noticed only in the picture when the negative space seemed wonky. 

Since I wanted only the one square, most joining picots in outer chains were discarded. (Next time I might even discard the free picots on inner rings ;-P)

Onion rings were tatted with same shuttle. Inner ring from backside, turn work, outer ring from frontside. Outer ring is looped from Behind the inner ring as I had done for the marigolds here.. I found it much quicker to work especially when not using 2 colours. This is the onion ring join used - very effective.


with or without picots, tatting is always lacy fun J

Wednesday 8 November 2017

CentriPetal

Pin It now!
Conflicting forces abound – centripetal, centrifugal – turning my brain mushy with overload at times and my hands work faster at others.
Randomly sharing some of the medallions I’ve been tatting over the last few days … Can you see them in the center of a larger design? 

My latest pattern – The Pinwheel !
There are few patterns with a central picot on chain and they usually have ‘spokes’ like the one here. I wanted something with curved chains and sketched this. But with the very 2nd chain I realized why they had to be spokes, unless one enlarges the picot vastly or one layers the chains as I resorted to here.
The little picots were meant for joining adjacent chains which was not logistically possible, but I kept them. I kinda like the sense of swirling, spinning motion in this piece.
Incidentally, I worked it with single shuttle attached to ball thread! The outer chains are Direct tatting ie reverse stitch (unflipped). All picots are very small. Lock join to the ring picot. Stitch count is notated on the image.
{õ|õ{

It is always so tough to estimate the length of a central picot (which is why we resort to other means). Moreover, according to Elgiva Nicholls a central picot should not be visible. 
I wanted to check out my Central Picot measurement tip/formula, hence chose a pattern from Lyn Morton’s ‘Tatting Patterns’Simplicity.
Central picot is all but invisible as it should be, but the earlier formula has been changed. If someone volunteers, we can give the new formula a quick test run. Please let me know – I realise it is busy-tatting season, yet…. 
This is round 1 of Simplicity .... and

my Layered Extension of Simplicity (round 1)
Using the same stitch count and central picot length as in original, 2 more rings were added, layering them consistently. This is how it looks. I have sketched an outer round for it. 
Or with a bead in center and more seed beads around, it could become a pendant, brooch or earrings!
{õ|õ{

ANKARS was another technique I wanted to revisit and chose this pattern by Verbena Creazioni.
This is the basic pattern for a pendant with beads. I think it works well even without beads.
But perhaps next time I will add beads. I’d like to add more rounds to this one and see where it goes. It is a modern variation of enclosed space medallion .
{õ|õ{

Finally, a central ring pattern from some Coats and Clark book
Worked in Anchor size 50, it is only the first 2 rounds. Worked in different colours, it shows the central ring clearly and I like how chains dip due to the small rings, creating a floral outline.

Here is the complete 3-round pattern - 3 motifs were linked to make a broad bracelet or bookmark. This was tatted and photographed 4 years back - when I rediscovered tatting. It has taken over my life since then ;-P
{õ|õ{

So, any volunteers, then, to try out the central picot measurement? 
Please leave a comment or email me

whatever the forces, center in on your tatting J


Sunday 5 November 2017

layering effects

Pin It now!
I’ve been revisiting a few techniques – both using layered or stacked rings - to refresh my memory.

Ninetta’s modern adaptation using a floating layered ring was my first stop. I converted it into a flower pattern. DH thought it looked like a lotus! Lotus motif is a fairly common sight in temple architecture, decorative ceilings in buildings/rooms, Jaipur-style paintings, etc. That settled the name ....

Lotus Medallion
(prototype)
In Anchor size 20, the finished flower measures 6cms across.

The inner medallion uses the same stitchcount and process as Dillmont’s original motif. Except that I made 6 rings instead of 4 – which meant I had to add 2 more picots to the floating ring. All details hereThis center can be made with a single shuttle and a long tail pulled out to work the floating ring and 2ds of split ring.
This is a modern variation of the rosette or enclosed space medallion.


I hadn’t planned anything specific. But this looked so forlorn that I had to do something to cheer it up ;-P
I continued with the layering theme, this time with chains. When did I last use 4 shuttles? Time to set them up :-D Tried out my idea with some scraps and ran out of the red at this stage. 

Starting again, I used light and dark shades of the same colour - this contributes to the 3D effect. 

Yes, those are dot picots in a diamond arrangement! Can't stay away from experimenting ;-P Here's how I worked it ... Dot Picot tutorial links here

Work a string of 3 dot picots with shuttle 2, and 1 dot picot with shuttle 1.
Note : When making this dot picot with shuttle 1, leave a very tiny bit of thread on both sides.

In order to make the make the single picot clearly visible, 
I used the Floating Beads with tatted rings method, tying an overhand knot around the base of the dot picot. 
The faux bead now rests at a slight distance from the chain.

Now start the chain close to the faux beads. 
When the chain is tensioned, the 4 dot picots form a kind of diamond shape. 

If one is using beads instead of dot picots, this round can be worked with 2 shuttles attached to respective balls. Pre-string 18 seed beads in each ball, and 6 seed beads in each shuttle.

Chains on either side of the faux beads have 10 stitches each. But this can be changed to suit one's taste.  
Chains are lock joined to the picots on inner medallion. But remember to overlap the new chain Before making a lock join with the previous one. Also keep the overlap direction consistent throughout. An under/over overlap as in the model helps when making the final chains and joins.

If using single colour throughout, one can climb out of the inner round with a split ring.

So what's your verdict ? And suggestions ? Colour choices? 
Once I have your opinion I will work another model and present the final pattern. 

happy tatting always J