Showing posts with label kocham frywolitkę. Show all posts

Friday, 12 April 2019

one from every garden

Pin It now!


Last week Amritha asked me to help her out with Jeanne Lugert’s 3D rose. I don't know which, if any of my tips helped her. But it was just the incentive I needed to Finally make one. Yes, it is my first time with this pattern and worked in Pearl cottons size 8.

And then I got carried away, hunting and collecting more 3D rose patterns, some being shared last month for I LoveTatting. (see what was made during that month here).
I am stumped by the range of styles and methods being used to create a 3D lace rose and just had to try each.

UPDATE : Carollyn asked about the leaves. I've given instructions in the comments, but here's a back view of the leaves using Daniela's Mimosa Knots at intervals. 

I intend to add leaves to complete each rose hence the tails are left uncut. For a better comparison, I stuck with pearl cotton. Mind you there are still quite a few patterns I still want to try, before wrapping up. Not to mention those with special techniques such as Cluny, inverted, treble tatting, etc.

A quick note on those done so far – from center, clockwise –

1. Jeanne Lugert uses a split ring braid and looks good both in single or 2 colours. I added leaves using Mimosa Knots. 

2. An idea from pinterest where 3 separate rosette medallions are made and then overlaid & sewn. Instead of snipping after each layer, I continued with the single shuttle.

3. Agnieszka uses only rings made with one shuttle and shares a small and a large version. I really like how these turned out, especially the larger one.

4. Rolled rose from kukkatatting uses rings and chains. I found it a bit difficult to string it into shape but it ends up larger than previous roses. 

5. The Jessica Rose by Sharren Sarver Morgan uses dimpled rings instead of plain rings. It gives a nice blossomed look.  

6. 2 red roses in Anchor size 20 are my own prototypes.

The above is taken from a different angle. I find it is more fun to work with single shuttle, tweaking the ring sizes as you go, but the split ring one is easier to pull into shape.  

Much as I liked the shapes of each of these, what I kept missing was a coiled center as in a real rose or rosebud. Took the plunge to try my own 3D rose. 
Single shuttle. I’ve curled the first ring vertically (I've used this to perch the butterfly on one of the Buddy Hearts), then curled the 2nd ring around this 1st one using a slightly larger picot and 2ds more. Then the rest of the petals are made. 
These are still nascent and the smaller one is still attached to shuttle. I’m still trying to perfect it. But what do you think of them so far? 

UPDATE : A new bud, using 3 vertical rings curled around each other and a 4th ring to complete the bud. Size 10 knitting cotton....


Thursday, 31 May 2018

I love floating

Pin It now!
The task was split chains and floating chains. I chose floating chains - 
also known as dead end chain, curlicue, or single shuttle split chain (SSSCh).

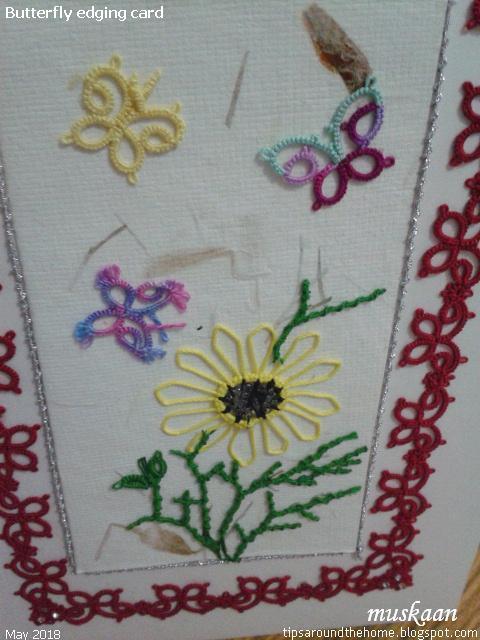
This black butterfly with curlicue antennae and the 3 with venetian picots (a variation of floating chains) was my earlier submission for the task. However I have a feeling that it was not appreciated by the ladies there. In any case I needed to complete the card topper.

I had gifted the earlier card to my SIL. MIL liked it very much, so this butterfly edging card is for her. For the card topper I used handmade paper with herbs embedded in it. I glued some folded paper underneath to raise the level slightly.

 
Rummaging through my many little scrap pieces, I tried to choose and arrange them into some collage (taking many pics to remember the arrangements) but finally settled on a fairly simple arrangement. I absolutely loved how Jane's Maltese Sunflower looked here, so that stayed obviously. And these were the only 3 butterflies that seemed proportionate.

Time to work on the foliage.... A helper thread worked wonders to wrap around the hand and hold the core thread taut while encapsulating. 
I mentioned this in my tutorial especially for fine thread, but didn't show it on the fingers.

All chains are spiral or Josephine chains. I like the texture and dimension they create without taking up too much space. In Anchor size 40, they are about 4cms tall maximum. 

While working on the foliage my Lizbeth specialty packs (size 20) arrived and I made one more butterfly using floating chain tipped with a Josephine ring for each antenna. 
Unfortunately it was too large for this scenery at 2-2/5×2 cms (2½cms high with antennae). 

 
The tatting SOUP has been arranged then glued! 
I deliberately followed the slant of the herbs in the handmade paper - it is what inspired this nature collage. But it still needs some balance and sparkle.

3 Swarovski crystals glued inside corner florets. 
Unfortunately, my stash was lacking in anything smaller for the rest of the florets. 

Added another little foliage on top of flower. 
And to echo the crystals, I tatted and glued a Josephine chain cord using metallic embroidery thread all around the topper. 
The core is size 40 crochet cotton for easier handling.

TIP: When making long JChs, I like to wind the chain thread on a shuttle too. 
It is convenient to dangle the shuttles and maintain the twist within both threads.


There seems to be something missing along the outermost edge or periphery - too plain. 
Any ideas to bring it all together? Another silver chain all around? 
Or 3 crystals in each corner? A mirror in each corner?

Check out what the others have made here.
With the exception of the sunflower, the entire card topper collage is worked with one shuttle and ball. A 2nd shuttle was used only in case of 2nd colour or for convenience. There is no dearth of techniques and effects that can be created with a shuttle - including the many variations of SSSCh or floating chain!

under appropriate headings. 

hope you have a great day with lots of creative tatting floating in ! 

Saturday, 19 May 2018

I love butterflies

Pin It now!

Garden soil had been split open to sow seeds and now those seeds have split into plants with lovely blooms, attracting butterflies to split open the pollen sacs and carry on the circle of life.
Hey, don’t split!!! Promise, I’ll behave … Just trying to clue you in :-D


You have already enjoyed & appreciated the lovelies made by friendly tatters. These are my versions of make me pretty butterfly fun. And the ‘split’ comes from this month’s I Love Tatting task set by Justyna – split chains, curlicues, etc. She has compiled an incredible list of tutorials and free patterns for inspiration!
I actually have something more in mind for the task, but till I find time to tat it, this will have to do. 

Tutorials for most of the prettifying techniques mentioned here are listed on these pages -

In chronological order … I have literally used scrap threads for most.
Venetian Picots for antennae, dot picots and graduated picots
Here, I made the same mistake Lavi made, but didn’t bother to rectify it. 
These were my very first venetian picots!!!
3¼ x 2½ cms in Anchor 20 cotton

Graduated picots and twisted picots (floating)
2 x 1½ cms in 2 strands of Anchor embroidery thread

Venetian picots for antennae & 4 picots
2 x 1½ cms in Anchor size 40 cotton
The Venetian picots worked out much better in this finer thread.

Right after posting the pattern, I tatted the above 3 versions. Some of the following versions were inspired by the butterflies flying in (Anita, Denise, Ninetta).

Twisted (floating) picots and seed beads
3 x 2 cms in 3 strands of Anchor embroidery thread.
This was inspired by Denise’s 3 beads in the lower half.

Dot picots and decorative picots
This is based on Anita’s stitchcount. I like the broader span of top wings.
2¼ x 1¾ cms in Lizbeth & Anchor size 40 cottons

Since this project was a spin-off from the Common Mormon caterpillar, there just Had to be a couple of butterflies in black and yellow ...
Beads and floating beads in different arrangements
I tried something different – beaded string wrapped around the lower rings. 
These are longer than I had visualized, but let them be.
The antennae uses floating beads (FB) or fringe on chain method.
2½ x 1¾ (or 2 with bead string) cms in Anchor size 40 cotton

The wooden black bead was too large and unseemly. So I decide to remove it. 
Wasn’t as easy as I’d thought. The FB method really does hold the beads in check ;-P
Then I remembered a tip on Jane McLellan’s blog about breaking unwanted beads. 
Yes, that worked! Once broken, I inserted a scrap thread for better grip, and knotted the tips.

Onion rings (Josephine rings inside the upper & graduated picot rings inside the lower halves), twisted (floating) picots, and Curlicues (dead end chains or SSSCh) for antennae.
3 x 2¼ cms in Anchor size 20 cotton
I started with a knot for each curlicue, serving to hold in pinch, 
and worked back with unflipped stitches.

Inward picots, decorative picots, long picots, a head ring, and Venetian picot for body. 
I followed Ninetta’s directions
2 x 2¾ cms in 3 strands of Anchor embroidery thread.
  
 
A couple of side views to show the 3D effect.
When making the Venetian picot, I left the scrap thread in it and 
this served well when joining the next ring to it.


I include the Venetian picot in this month’s kocham frywolitkę task because both the curlicue and this picot are standalone or floating chains. Although in the former the stitches are unflipped and wrapped manually, in the latter each half stitch is flipped but moved in place manually over the previous stitches.

I couldn’t resist a couple more pics.
 
The background is Monet’s White Clematis an oil he painted in 1887. 
The image is in this amazing book The Life and Works of Monet by Susie Hodge.

UPDATE : My latest butterfly with floating chains tipped with Josephine knots for antennae....


Do stop by to welcome this batch of butterflies :-)

UPDATE - New arrivals (2020) from talented tatters -
 https://tipsaroundthehome.blogspot.com/2020/07/welcome-intrusions.html

Monday, 30 April 2018

I’ve got you covered!

Pin It now!
And just in time, phew!!! What an exciting range of projects to start off this month’s task of covering a cabone ring. I want to make each and every one of them someday. It was Renata’s turn to choose this time – Summer in Circle.
This is my April submission for 'I Love Tatting'

Royal Wave Bangle
 with free pattern directions

I didn’t have any hollow ring except for my loads of now neglected bangles which are unfortunately all circular. And I wasn’t confident with a glass bangle, so went with this metallic one despite the golden knobs projecting along the circumference. They made covering it more difficult and despite my diligence, the green peeps out at places.

Turns out I’d forgotten and had to consult tutorials on cabone tatting. This was a good refresher after my first bangle
But this time I wanted to use 2 colours alternately as a personal challenge. I chose thread colours to complement the lovely beads Usha sent me. These are vintage threads and closer to a size 50 or finer than the Anchor size 40 they claim to be ;-P

TIP : The thread not in use is encapsulated/hidden within the visible colour. The trick is simple. Keep the ‘not-in-use’ shuttle dangling and encapsulation becomes easy. The thread tends to stay alongside the bangle. Merely ensure that you pull the thread taut before switching colours.

I used scraps of the purple thread and had to join new thread at least 3 times, using a simple weaver’s knot and then encapsulating all tails within the next few stitches. This tiny knot is not visible.

Basic Pattern is simple and can be adjusted to any bangle size. I didn't have any specific pattern in mind - just let my shuttles take the lead.

Round 1 - covering the bangle (cabone tatting)
ROUND 1 : 2 shuttles each with different colour
2 vsp 4 vsp 2, switch colour and repeat, till end.
Carry the previous colour along the bangle, encapsulated within the stitches.
I ended up with 18 repeats of each colour.

Round 2A - Rollicking Waves - overlapping/interlaced chains 
ROUND 2ARollicking Waves
Next I strung beads to the 2 balls and joined these to the 2 shuttles to continue the next round. This round is all chains with beads on picots. Chains are interlaced/overlapping, so before making a lock join, ensure the threads are in the right position.
Chain1 : 2 B 2 B 2 B 2 B 2 B 2. switch shuttle.
Start next chain behind.
Chain2 : 2 B 2 B 2 B 2 B 2 B 2. SS
Lock join Chain1 to nearest picot, and Chain2 to next picot, ensuring the under/over overlap.
Repeat to end.
Round 2B - Frolicking Waves- undulating, overlapping chains 
ROUND 2BFrolicking Waves
I tried something different ¾th of the way around to change the shape of the 'waves'. Made the chains longer and twirled them around the bangle, joining to a picot above. The overlap continued as before.
There are between 6-8 beads in each chain before joining. And both shuttle & ball need to be passed through the bangle.

Finished off with 2 strings of beads and a teardrop at the end.

Hubby was rolling his eyes when I was choosing a bangle, wondering what I’m going to do with them after so many years - I stopped wearing them ages ago but still have a huge stash. Gradually, as the tatting started taking shape (including the simple covering without beads), he was all excited and ideated… how I could make earrings, and so on. Yeah, he’s finally ‘getting’ tatting – I’ve got him covered ;-P

I can’t thank Usha enough for her lovely seed beads. They are a delight to work with!

Do check out the beautiful projects (and tutorial links) lined up for
Thank you Renata, for another inspiring challenge :-)


tatting brings in joyful waves of creativity and togetherness

Friday, 30 March 2018

I love tatting spring

Pin It now!
Spring – the season of new blooms, new leaves, stirrings of the avian community, flitting butterflies, love in the air and spring in the step! To top it all, is the Indian koel with it’s melodious cooing that starts out low and reaches a crescendo – one of the sweetest sounds (but don’t be fooled – it can be quite the mimic!).

Naturally, spring and/or Easter was the topic for this month’s kocham frywolitkę. The task was set by Justyna with a caveat – it must have yellow and green.

Recognise those dyed yellow feathers? 
Yes, they are from our trip to Boston and reenactment of the Boston Tea Party

My entry is this work-in-progress round robin doily. 4 of us are participating in an in-house round robin. It means the doily will not be mailed to the next person. We each tat each doily and only the design for each round is shared in the order of working.

We each got to start the center. This is Coretta’s center. I worked it in size 40 yellow. 
Mine doesn't show it, but she has a beautiful design with very interesting elements, including the free rings.

It was my turn to design the next round. After many trials and tweaks, without intending to, what emerged looked like butterflies!!! So I deliberately chose to highlight that group of elements to bring the butterflies to life.

TIP: To create the butterfly, instead of SLT, I kept making an unflipped 2nd half stitch in the colour that I wanted to show. This worked better for me.

I added a 2nd round in the center to secure the unattached rings of the central round. Although I worked them on the back like a calyx, these orange chains look good as a floret when worked from the front, too. And I might just cut it off and do it in the front once the other rounds are designed. This is how it looks from the back at present ....

This pic is shows the colours as they truly are. 
Scanning tends to subdue the richness.

But where is the green, you ask? 
Hey, I did place the doily on green leaves in the lead photo, didn't I?!
Okay, okay I know it is cheating.

Luckily, my eyes landed on the summer coverlet we are currently using. Huh, it is yellow with green lace!!! And although tatted ages back (and this photo was taken in 2013), I haven’t shared it on my blog yet.
This shuttle-only edging was tatted by my MIL much before my marriage (probably her first lace) and she used & reused it on her sarees, then got tired of it. When she gave it to me, I sewed it down to the new coverlet. 4 long rows, with 2 hiding the joining seams. I only had to tat a short length to cover the last mile.
Goes to show how durable tatted lace can be.

Both these are my entries to the March 2018 … 
Have I told you that each month's entries are summarised and posted by the task-setter on the 2nd or 3rd of the next month. You can check them out any time - real talent and creativity from all skill levels!

 Here’s wishing you good weather and friends
with tatting by your side always :-)