Showing posts with label painting. Show all posts

Monday, 23 December 2024

a no glass ceiling

Pin It now!


This is something I pulled out from my art archives, LOL. Made around the turn of the century and lying unused in a box in my now almost defunct yet stuffed art closet. 

I needed something for the Small Decorations game organised by splocik and for the last 11 months I've submitted various specimens of tatted lace. For this final month, too, I had a few small pieces and a to-tat list of a few more, which I was going to put together as tree decorations to hang as simple ornaments, to cover baubles, etc. However, this value addition didn't happen when I suddenly remembered I'd never blogged about this project. Had to look through several of my containers to finally locate them, but the search did throw up so many forgotten memories!

 
These are mostly leftover glass paints on transparency sheets cut into rectangles for bookmarks. All are freehand, free-style, painting outlines directly over the bookmark and then filling with colour.

 
The black outline is not fine and even in many of them because the nozzle wasn't cooperating ...perhaps because the squeeze bottle was running low on the colour. Yet I enjoyed giving myself a free hand, LOL.

 
These bookmarks remain unused because at times the paint tends to stick to the page especially in the hot summers we have here. Would a coat of varnish help? While I didn't try varnish, I did try to cover up the painted side with cling wrap. Nah, unless laminated, the wrap just spoils the look.
A failed idea and experiment.

The box contained another painting on an A4 transparency sheet - lot more detailed and fine, but the paint has peeled off in several places. Another one has remained fine, though. My largest glass painting (a Medusa), this one on glass was framed and adorned the study for several years. Now it is wrapped up and closeted.

Would the newer generations remember what a transparency sheet is? Are they still being used for presentations or put to some other use? 
I could've punched a hole at the top and tied a satin ribbon for a tail. But I was just plain lazy to collect the materials and put in those few extra minutes and effort. Part of the reason is that these are not going to be used as bookmarks and are too long to stand in for tree decorations. Hmmm, I could cut around the outline of a few of them, though! Now that's something for next year.

So these bookmarks are my submission for December. You can scroll through the beautiful range of  November submissions here - https://splocik2.blogspot.com/2024/12/male-dekoracje-2024-galeria-listopadowa.html

As requested by splocik, above is a collage of all my submissions for the entire year (there were two submissions in October).

I had tremendous fun thinking of what to present each month! And I didn't always have to make something special, though the game was instrumental in several. Glad I could complete the game!

UPDATE: December gallery - https://splocik2.blogspot.com/2024/12/male-dekoracje-2024-galeria-grudniowa.html ; collage of year-round projects by each participant - https://splocik2.blogspot.com/2025/01/male-dekoracje-2024-podsumowanie-i-3.html

Many many thanks, splocik, for organising such a fun event in a supportive and creative way. So much talent was on display through all the submissions!

Happy holidays to one and all!

Thursday, 29 June 2023

gifts galore 1

Pin It now!

 A few months back I received a bonanza of beauties from my tatting buddy, Anita Barry! She had been wanting to send me gifts for years and I kept declining. Then she got hold of my address and there you have it - unstoppable Anita 💖

The big haul!
This photo gives an idea about the relative size of the items.

Beautifully tatted motif in the key chain. Passed it on to hubby.

Her handmade pin cushions. There had to be lavender and the fragrance is heavenly!

The same pin cushions from the other side!

Lizbeth size 20 threads and a lot of shuttles. I was thrilled that they were all bobbin shuttles with a hook - the only kind that my hands seem to like, LOL

Her hand-painted shuttles straight from the beaches of Florida!

and the same on the other side.
These shuttles are a bit smaller and 'thinner' than the Pony shuttles I use. 
They are more dainty to hold and work with.

Ooo, such a charming pendant! Already strung on one of my chains.

Okay that flamingo scissors is quite the eye-catcher! 
Hand-painted rock/pebble; tatted medallion in size 10; and hand sewn needle case.

The needle book up close - look at all the tiny details!
 
No amount of trying could capture the tiny handmade lavender flowers on camera. 
One has to admire them in person!

And the inside of the book with special (easy threading) 
needles and pins.

I have frequently seen these scrap containers in blogs (notice the scraps she sent me, LOL?!) and used to think - well they take up too much space, not for me.
Realized only now that they collapse and lie flat!!! 
It is being much used already.

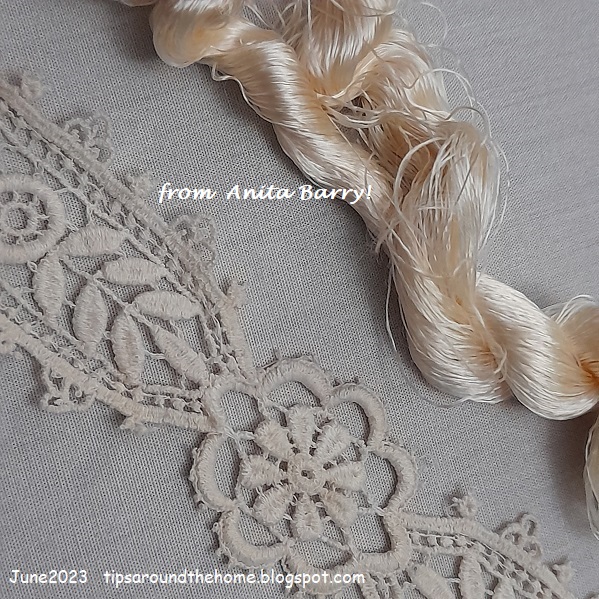
A vintage lace that she suggested I could use as a bookmark, which is exactly what I am doing.
The skein of silk thread is Really very special! It belonged to her mother. I have still not decided how to use it to do full justice to the gesture. In my earlier eyesight I would've started an embroidery project immediately.

Detail of the lace and thread.

The gifts came at a time when I was very ill and I couldn't use and enjoy them properly or fully. It took a while to even take photos. However, if you notice the lead pic, you'll see some books peeking out. They require a post all to themselves! So please come back tomorrow to celebrate my good fortune and treasure!

Thursday, 13 August 2020

passing fancy

Pin It now!


As if I didn't have enough 'pots boiling', I let myself be carried away with this! I finished the 12 florets for the bracelet mentioned yesterday. And they simply called out to adorn a tree. 

Can't say how many years/decades it's been since I painted something. But this is on my laptop using a Inking Stylus Pen (a Windows inking device for HP). I've tried the pen in the past weeks for a spot of this or that, but this is my first real experience.

Took me a couple of hours of relaxed brush strokes. So little to show for it.

Requires a Huge amount of practice and patience to improve (it is so much easier to mix and merge colours in oils and water paints, and so much paraphernalia to set up). But I'm not looking for perfection - only some fun (despite some cringe-inducing areas on that tree!) ;-D And I totally forgot the shadow!!!

Oh, and this is how the 'tree' looked before. We've all seen a barren tree, but have you ever seen a missing Tree Trunk  full of foliage and flowers?! Now you've seen it all, LOL.

These are in my flag colours - saffron, white, and green.
Now I must get back to assembling them into a bracelet like a proper tatter!


Saturday, 19 May 2018

I love butterflies

Pin It now!

Garden soil had been split open to sow seeds and now those seeds have split into plants with lovely blooms, attracting butterflies to split open the pollen sacs and carry on the circle of life.
Hey, don’t split!!! Promise, I’ll behave … Just trying to clue you in :-D


You have already enjoyed & appreciated the lovelies made by friendly tatters. These are my versions of make me pretty butterfly fun. And the ‘split’ comes from this month’s I Love Tatting task set by Justyna – split chains, curlicues, etc. She has compiled an incredible list of tutorials and free patterns for inspiration!
I actually have something more in mind for the task, but till I find time to tat it, this will have to do. 

Tutorials for most of the prettifying techniques mentioned here are listed on these pages -

In chronological order … I have literally used scrap threads for most.
Venetian Picots for antennae, dot picots and graduated picots
Here, I made the same mistake Lavi made, but didn’t bother to rectify it. 
These were my very first venetian picots!!!
3¼ x 2½ cms in Anchor 20 cotton

Graduated picots and twisted picots (floating)
2 x 1½ cms in 2 strands of Anchor embroidery thread

Venetian picots for antennae & 4 picots
2 x 1½ cms in Anchor size 40 cotton
The Venetian picots worked out much better in this finer thread.

Right after posting the pattern, I tatted the above 3 versions. Some of the following versions were inspired by the butterflies flying in (Anita, Denise, Ninetta).

Twisted (floating) picots and seed beads
3 x 2 cms in 3 strands of Anchor embroidery thread.
This was inspired by Denise’s 3 beads in the lower half.

Dot picots and decorative picots
This is based on Anita’s stitchcount. I like the broader span of top wings.
2¼ x 1¾ cms in Lizbeth & Anchor size 40 cottons

Since this project was a spin-off from the Common Mormon caterpillar, there just Had to be a couple of butterflies in black and yellow ...
Beads and floating beads in different arrangements
I tried something different – beaded string wrapped around the lower rings. 
These are longer than I had visualized, but let them be.
The antennae uses floating beads (FB) or fringe on chain method.
2½ x 1¾ (or 2 with bead string) cms in Anchor size 40 cotton

The wooden black bead was too large and unseemly. So I decide to remove it. 
Wasn’t as easy as I’d thought. The FB method really does hold the beads in check ;-P
Then I remembered a tip on Jane McLellan’s blog about breaking unwanted beads. 
Yes, that worked! Once broken, I inserted a scrap thread for better grip, and knotted the tips.

Onion rings (Josephine rings inside the upper & graduated picot rings inside the lower halves), twisted (floating) picots, and Curlicues (dead end chains or SSSCh) for antennae.
3 x 2¼ cms in Anchor size 20 cotton
I started with a knot for each curlicue, serving to hold in pinch, 
and worked back with unflipped stitches.

Inward picots, decorative picots, long picots, a head ring, and Venetian picot for body. 
I followed Ninetta’s directions
2 x 2¾ cms in 3 strands of Anchor embroidery thread.
  
 
A couple of side views to show the 3D effect.
When making the Venetian picot, I left the scrap thread in it and 
this served well when joining the next ring to it.


I include the Venetian picot in this month’s kocham frywolitkę task because both the curlicue and this picot are standalone or floating chains. Although in the former the stitches are unflipped and wrapped manually, in the latter each half stitch is flipped but moved in place manually over the previous stitches.

I couldn’t resist a couple more pics.
 
The background is Monet’s White Clematis an oil he painted in 1887. 
The image is in this amazing book The Life and Works of Monet by Susie Hodge.

UPDATE : My latest butterfly with floating chains tipped with Josephine knots for antennae....


Do stop by to welcome this batch of butterflies :-)

UPDATE - New arrivals (2020) from talented tatters -
 https://tipsaroundthehome.blogspot.com/2020/07/welcome-intrusions.html

Sunday, 3 December 2017

lazy or smart?

Pin It now!
When was the last time I posted something unrelated to tatting? Hmmm, probably a year back for the Pinterest Challenge in December – that cute little bird. It still sits on my bedside cabinet with pins stuck in it!

This time I'm sharing a very quick mixed media project involving painting and embroidery, done sometime around mid-2000.
These pics were taken quite a while back, hence not as sharp, bright, rich and clear as I’d like them to be. Apologies for the poor quality.
The background is a light yellow but not as washed out as it looks here.

I’d wanted to embroider a bedsheet for ages, but was fearful of it becoming an UFO. Once during our summer vacation we forced our Mom to give us separate bedsheets to embroider and she succumbed despite her valid fears of us not completing them. The sheets did get finished but only after she sat alongside and embroidered the remaining motifs over the months following the vacation ;-P

Going by that experience, I decided to do something quick but covering a large area. After scouring through my pattern collection, I zeroed in on my favorite book – Creative Stitchcraft. It has a beautiful Bouquet of Roses Quilt – red stem-stitch embroidery on white background.

I went for colours, but a mere stem-stitch outline would look too barren. So after I had enlarged the template – drawing manually, since I was excited to start immediately – and transferred it to the cloth I looked in my fabric paints box – I use Fevicryl acrylics.
I had a few left over from painting a free-hand saree border for my MIL earlier.

Diluted them and did a quick wash. A thicker coat of paint could've caused some stiffening of the fabric making it difficult to embroider, and taken longer to dry obviously.
There’s a bit of yellow paint in the rose petals, too.

I deliberately didn’t ‘stay within the lines’, keeping it a bit random with some unwashed areas or some overlapping of colours, to give it a natural shading.

Then simple stem-stitch along all the outlines.
I kept the stitches very short, using 2 strands of Anchor embroidery threads throughout.
Manoeuvering becomes easier when stitches are short. Abrupt curves, sharp ends, pointed ends, etc. can b e neatly managed. 
Mary Corbet has some excellent tips & tutorials which I had already figured out on my own. 

There is also a lovely Morning Glory border in the original pattern which I did not use here. This seemed fine on its own. 
Yay, it was all over within a week – from enlarging to the very last knot! 
Is this multimedia project smart or sheer lazy? You decide :-D

Bouquet of Roses pattern from the book "Creative Stitchcraft". (Better Homes and Gardens) Murdoch Books. 1991.