Showing posts with label tatting. Show all posts

Thursday, 29 June 2023

gifts galore 1

Pin It now!

 A few months back I received a bonanza of beauties from my tatting buddy, Anita Barry! She had been wanting to send me gifts for years and I kept declining. Then she got hold of my address and there you have it - unstoppable Anita 💖

The big haul!
This photo gives an idea about the relative size of the items.

Beautifully tatted motif in the key chain. Passed it on to hubby.

Her handmade pin cushions. There had to be lavender and the fragrance is heavenly!

The same pin cushions from the other side!

Lizbeth size 20 threads and a lot of shuttles. I was thrilled that they were all bobbin shuttles with a hook - the only kind that my hands seem to like, LOL

Her hand-painted shuttles straight from the beaches of Florida!

and the same on the other side.
These shuttles are a bit smaller and 'thinner' than the Pony shuttles I use. 
They are more dainty to hold and work with.

Ooo, such a charming pendant! Already strung on one of my chains.

Okay that flamingo scissors is quite the eye-catcher! 
Hand-painted rock/pebble; tatted medallion in size 10; and hand sewn needle case.

The needle book up close - look at all the tiny details!
 
No amount of trying could capture the tiny handmade lavender flowers on camera. 
One has to admire them in person!

And the inside of the book with special (easy threading) 
needles and pins.

I have frequently seen these scrap containers in blogs (notice the scraps she sent me, LOL?!) and used to think - well they take up too much space, not for me.
Realized only now that they collapse and lie flat!!! 
It is being much used already.

A vintage lace that she suggested I could use as a bookmark, which is exactly what I am doing.
The skein of silk thread is Really very special! It belonged to her mother. I have still not decided how to use it to do full justice to the gesture. In my earlier eyesight I would've started an embroidery project immediately.
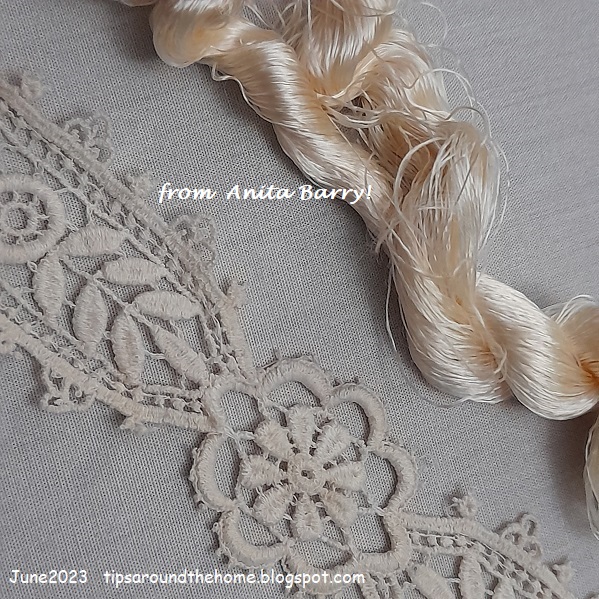
Detail of the lace and thread.

The gifts came at a time when I was very ill and I couldn't use and enjoy them properly or fully. It took a while to even take photos. However, if you notice the lead pic, you'll see some books peeking out. They require a post all to themselves! So please come back tomorrow to celebrate my good fortune and treasure!

Saturday, 3 January 2015

OMG ! It’s 2015

Pin It now!


Oh  Mighty Google gods …. They were too busy to respond to my simple pre-programmed ‘Publish’ setting for the 1st of this new year !
So, I start my 2015 blogging with a delay, in sync with the delayed snowflake tatting of 2014 ;-P


To all my followers & visitors – accidental or intentional – Thank you !
And here’s wishing you a very fulfilling 2015.

To all in Tatland, 
may it be an extremely cre(T)ative & Tat-isfying year ahead.


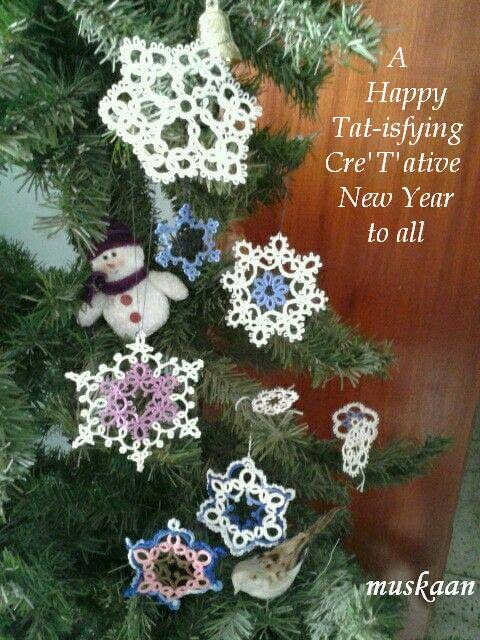
My pathetic attempt to dress up (part of) my tree so that I could display my snowflakes and a few forgotten motifs that popped out of the box (I don’t even remember why I tatted them in the first place, & why they weren’t used subsequently)! I hope to start early this year & decorate the tree in a more aesthetic & organized manner.

For the pieces that do have a pattern &/or source, starting from top (click on respective names for free pattern) :
Neemiss Snowflake prototype trial 


Few of my 2015 objectives :

  • Complete the crochet Memory Afghan (it is almost 70% complete, without the border)
  • Participate in Jane’s TIAS
  • Complete my Pink Chrysanthemum version of  Renulek’s 2014 Spring Napkin (the Right threads are Finally on their way)
  • Tat at least a couple of Snowflakes every month.
  • Try to design more & better patterns.
  • Learn & practice Inkscape & convert pics to diagrams.
  • Following from diagramming, convert my patterns to pdf.
  • Learn more tatting techniques such as clunies/tallies, Ankars, using beads, etc. etc.

In short ....
Learn Learn Learn Learn Learn
Practice Practice Practice
Apply Apply Apply
Improve Improve
Complete !

Saturday, 22 March 2014

Tatting a Doily - I

Pin It now!
      Renulek's 2014 Spring Doily/Napkin - My Work

Renulek started posting her pattern for the 2014 Spring Napkin/doily from February 10 onward. I got to know of it a week later & when I saw the photo with 3 rounds, I immediately liked the pattern & decided to follow along. 


My Interpretation / Conceptualization :

The major hurdle starts right at the beginning !!! What colors to use , where, when, ... which elements/rounds to highlight, which should go into relief.... Yeah, the traditionalists had it easy - with single white/ecru tatting all over :-))) Anyway, so all this went into how I chose & applied colors. To me, Rnds 2 & 3 looked like little flowers or petals going all around a central circlet of stigma & anthers. Hence the napkin began taking the form of a large Pink Chrysanthemum (read 'Peach') , intertwined with leaves, vines, stems .... I hope that has come through ...


Threads used, with Shade number

             
NoteRound 3, here, is circular. But one of the popular pins on my pinterest board, has the very same pattern (I haven't checked the stitch count yet) as a  Straight Edging / Bookmark  !!!


TIP : I'd like to share a great tip I got on InTatters (Comments #94 & 94) about why it is better to "tat the rings as true rings with the same thread used to tat the chains.... to keep the nice chain arches it works best if the core thread is a continuous uninterrupted thread that slips in the chain to adjust the tension. If it is rerouted up into the ring you loose that ability and it also breaks the continuous chain..." .     


I stopped at Round 8 for the present.
Reasons : 
1. Totally ran out of the peach color & this color is out of stock in the e-stores I checked. And if the official Shade Card is updated, then this shade is no longer being produced :-(
2. Didn’t know what to do with the doily. The size thus far, is something that can be sewn on to fabric, used as a table centerpiece, (or gifted) … & I can always continue in future.
3. I learned my lessons in these 8 rounds & wanted to get back to learning & familiarizing myself with tons of other techniques & tutorials

However, the doily, till Round 12 (& just one last round to go) looks so beautiful that I Am itching to continue….

I have tabulated my entire experience, with remarks & jottings, links to pattern for each round, etc. etc. in my previous post . It will be a kind of ready-reference for the future, just in case.

Sunday, 2 February 2014

Tatting Tutorial : Closing the Gaps -I-

Pin It now!

Closing the Gaps in Shuttle Tatting : 

"OTM" : Overlap, Tug & Manoeuvre Technique 

Annoyed at 'gaps' between tatting elements ?
Can't get the elements lined up closely ?
Suffer from gapsosis ?

We have All faced this problem, especially when learning to tat with a shuttle ! With practice, conscious effort, & individual inventiveness, this can be overcome for the most part. But it can still sneak up on us if we let our guard down for those brief moments !!! 

I have been tatting solo ever since I learned how to tat - about 3 decades ago! Consequently, I had to develop my own ways & means to improve & keep pace with the pattern. Over the years, I successfully conquered this nagging gap issue by my "OTM" method (I've coined the term especially for this post!). 

I never thought much of it, until I came across a query on InTatters about inadvertent space left between elements when tatting with a shuttle. Experienced tatters have chipped in with tips, advice, & tutorials. I thought I'd add my 2-bits as well, captured in photographs. Verbal explanation is not always enough! I'd have preferred to upload a video, but working alone, I could manage only snapshots. Hope it will be of some help at least to beginners. 


Now, for my well-entrenched & personally successful technique - I think I'll call it 
"The Overlap, Tug & Manoeuvre " or "OTM" !

I have tried to show how to close the gaps in 3 situations :
1. when making a chain after a ring
2. when making a ring after a chain
3. when making a ring after a ring.
(please excuse the quality of pics & the horribly intrusive thumbnail!):

I . From Ring to Chain :

Image I-A : After making the ring (in blue #20), the work is reversed (RW) & one is ready to make a chain using a contrast color thread (peach #20).

I-A. Starting a Chain after Ring

Images I-B & C : Make the first half of ds (FHS), extremely close to base of ring, almost overlapping the thread to the ring. ( Unable to show in still photograph, but the chain thread of FHS can be held in an overlap position in a pinch & the threads pulled - tugged & manoeuvred till the FHS is in place )
Then carefully, & slowly, pull the thread tight to close the FHS. If required, fidget with the shuttle (blue) thread to bring the half ds Flush against the ring - as close as possible!
When you are satisfied, pinch this half stitch & ring base tightly between your thumb & finger before you continue, so that the position is stabilized & maintained.

I-B. Manoeuvre FHS to base of ring
I-C. Tug, position, pinch/hold


Images I - D & E :
Now make the second half of the ds (SHS) & bring it close to the first half without messing with the position. ie. keep a tight pinch till the second half is extremely close to the first half, the 'close' & tighten it. Remember, tighten Only After you feel it is in the right position & the earlier half has not moved at all.
This explanation may seem more complex than the actual working; and with a little practice, it becomes second nature !

I-D. Complete the ds
I-E. Chain after ring with no gap!


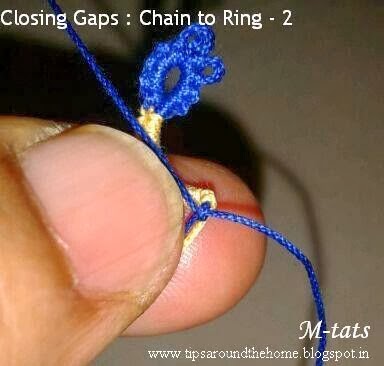
II. From Chain to Ring :

II-A. Overlap Ring thread to Chain End
I think this is much much easier.
Once the chain is made & tightened, one can start the loop of the ring from the very tip, overlapping the
chain slightly. Then start with the first half of the ds over this 'overlapping' loop.
Make it loosely, position it Flush against the chain (keep tugging & manoeuvring till you feel that the ds has reached the end of chain & has no more place to move). Only then, tighten the FHS; keep a firm grip over this
half ds between thumb & finger, & make the SHS, thus completing 1 ds of  ring. Remember, tighten Only when in position.


II-B. Start ring with overlapping the chain
II-C. Flush FHS against chain & hold tight


II-D. Make SHS, position & tighten.
II-E. No gap between Ch & R


TIP : Whenever one tats, it is extremely important to keep the yarn from twisting. If yarn twists, it becomes difficult to close a ring properly or to make the stitches correctly/neatly. The simplest way to untwist the yarn is to suspend the shuttle by the thread till it stops twirling around.

III. From Ring to Ring 

In the next post, since this is way too long already ! 
(Tatting Tutorial : Closing the Gaps -II - )  .... I will add the link later.

Now, a few more tips & links to what some other truly Experienced tatters have already done / shown / said in the same InTatters' Closing-the-gaps thread or elsewhere 
[Please note that there may be many more tips on other sites, but these are what I've come across so far. Feel free to add more links & tips in Comments] :
  • One superb tutorial is from Jon who coined the adorable & very apt term 'gapsosis'. I have been using this technique very successfully, for clovers, & larger rings or between continuous rings. It is truly ideal for clovers, etc.  (However, when working with a smaller & single ring & switching to a chain, I find this a bit difficult to apply. eg in my Waves edging. Instead, I fall back on my own method detailed below)
  • Through pinterest, I stumbled upon another great pictorial comparison of frontside/backside tatting . If one is just beginning, this, too, will prove a valuable experience.
  • Making an 'extra' half ds before continuing with the pattern. (I like this tip & will definitely try it out next time)
  • Closing the ring very tight can cause a gap to appear in the next element. Hence avoid a tight close. ( I am sometimes guilty of this tight close. Must watch out !)
How do You tackle this issue ?

Wednesday, 29 January 2014

Tatting : Learning is Fun with TIAS !

Pin It now!

TIAS and My Learning Curve

Still tatting with only single shuttle or a shuttle & ball ?
Wish to learn some more advanced techniques ?
And have Fun in the process ?!

This year, for the very first time, I entered a Tat It And See (TIAS) : Jane's TIAS 2014
I had come across the 'TIAS' acronym occasionally on Pinterest, but didn't really focus on it. Then, I stumbled upon it again on InTatters & that's when I decided to have a dekko. When I read Jane's Introduction, my mind was instantly made up - I was going to give it a try. 

Why? 

  • Firstly, because there were a few 'new' techniques involved that I needed to learn viz, the Split Ring (SR), how to join the second side of SR, the Catherine Wheel Join (CWJ) & the Self Closing Mock Ring (SCMR).
  • Secondly, I needed to get out of my comfort zone & try out these techniques. I'd been pinning them on Stitches & How-tos for a few months, but didn't get around to actually learning & using them.
  • Thirdly, Jane would "be available to give help at all times" ! How could I let up an opportunity to learn from experts & experienced tatters?!
  • Lastly, I could compare & contrast my work with that of so many others from All Across the Globe almost in real time !
And I'm so very glad I did !
Not only have I learnt the techniques set out, but am now open to the enormous possibilities ahead ! Boy, was I stuck in medieval times !!!

Before I post pictures of my progress , a few lines about Split Ring technique...

Split Rings (SR)

I had some pages of SR tutorials - with step-by-step pictures & instructions - printed from the net way back in 2000 (before the www revolution !). (Now that's procrastination !)
Since I hold my tatting pinched between thumb & middle finger (not thumb & index finger), I struggled with the SR initially. Even now, with quite some practice under my belt, my pace slows down a bit while doing the 2nd side of SR. And mine is definitely Not an elegant way to hold & tat the SR ;-)

The trick - extremely important , & something which I keep reminding myself - is to KEEP the Core Thread TAUT At All Times ! If it stays taut, the ds will NOT Flip, no matter what; each half stitch will slide easily into position.
And I have now started holding the core thread across the last 2 fingers for greater stability. It works for me.

Here are the photos with captions that apply Only to what I can see in front of me ; not guesses about the ultimate solution ;-)
Shark head?!

Bells or Blooms ?!
Yin Yang Bracelet ?!

Cute little florets !


Bluebells & Buttercups in Bloom

Flowers in a Pot or an upside-down Hat?!
Doffing One's Hat or Falling Ice-cream Cones?

Well, this is how far we've come. Waiting for Day 9 & more.....
Will update with latest photographs about progress.

My Experience thus far

  • each step is broken down into very small unobtrusive units.
  • very clear instructions accompanied with diagram/chart & specific pointers if required.
  • links to techniques & tutorials
  • pattern is added every 3-4 days leaving ample time to slip in those small tatting elements & upload pic at own convenience. 
  • this is not a competition, hence no deadlines & one can tat at one's own pace, place & convenience.
  • one can join in whenever one wants. I heard of it when Day 3 had already commenced... some are joining in even as late as Day 8.
  • easy access to Jane for any queries & doubts. She responds to emails promptly with all the help & advice asked for!
  • new & varied perspectives. It is always inspiring to see how others have positioned their day's work & what guesses they come up with & why ! How placing or seeing the piece from another angle can change one's perspective & view, ...
  • the choice of colors & yarn is so varied & interesting !
  • the mystery element ! While the final outcome is not known, daily guesses add to the fun factor. I'm sure even Jane, as the designer, must have her wondrous moments, inspired by comments from participants.
And I Must add : Through this TIAS, I am obviously learning new tatting techniques. But even more enjoyable is the vast talent, creativity & imagination that tatters from across the globe are bringing to this game ! Creativity - both literary (some truly inspired verses!), use of  such gorgeously diverse threads, juxtaposing pictures & tatting pieces, drawing & sketching, .... And real-time weather updates from so many countries & time-zones !!! A truly fun learning experience! Thank you fellow-tatters !

Last but not least, my thanks to Jane for her very prompt replies & help. One can truly count on her  !

It's never too late start ! Hope to see you on Jane's TIAS 2014 :-)

UPDATE : Here is the 2nd and final part of the TIAS 2014 : Learning was fun with TIAS (Days 9-16) with some jottings about the lessons learned ....

Thursday, 9 January 2014

Tatting Patterns I : 4 Vintage Edgings

Pin It now!
Your sewing project looks too plain?
Looking for some Vintage Edging Patterns ?
Leaning towards Tatting ?

An Edging can uplift And highlight any project from the mundane/uninteresting to a decorative, customized piece of work. Use tatting edgings & insertions to adorn throw & pillow cases, lingerie, garments, sleeves, collars, necklines, towels, kitchen linen, table linen, handkerchiefs, .... or create beautiful jewelry in the form of bracelets, chokers, necklaces, belts, etc.
I have a collection of Vintage Tatting patterns, collected from friends & magazines, over the decades. Unfortunately, I did not jot down the Original source. I will unhesitatingly give due credit if/when the actual source(s) to any of these patterns is found.

Some months back, I uploaded & shared some of the patterns & samples on Pinterest. All are on my board My Projects 4 : Tatting , & many are floating around {they keep re-surfacing from time to time, especially Shamrocks in a Row & Dancing Clovers ;-) }

I share, here, Four Vintage Tatting Edging Patterns.

But it is so boring & generic to simply call each one a 'vintage/tatting edging'. Moreover, how does one remember exactly which edging is being discussed or referred to? Hence, I decided to give them individual names based on my visualization of the end result.

1 . Waves

This is a pattern I took down from a friend’s tatting book back in the 80’s. Ever since I made a single-color sampler some months back, I have seen many beautiful variations / versions / applications of this pattern, especially in bracelets. These usually use a single color with or without beads. Some repeat the pattern as a 2nd row, joining the picots either chain-to-chain or ring-to-ring. In my notebook, this is the 1st of a 3-row sari lace edging / border pattern, which I will share eventually.
I have tacked on this narrow edging along one of my throw cases, as in pic.

Waves Vintage Edging with Tatting pattern, inked

TIP : Change the effect of this simple pattern by using only one color, using variegated color, adding another row where the 2 rings become 4 rings, adding &/or increasing the number of picots, etc.

Width : 1/2' (1 cm)
Length : 3 complete repeats (or 6 waves/chains) = 3'
(B-19. Row 1)

2 . Dancing Clovers

Another Vintage edging pattern sampler from my 'unknown' collection. Each clover repeat looks like they are holding hands & dancing , hence the name :-)
This is a Single Shuttle, one-pass pattern, with yarn lengths (instead of chains) to space out the rings. The trick, however, is to keep the lengths even & regular so that the edging lies flat.
Notice the use of Long & Short/Normal Picots? The largest ring has 10 Long/Large Picots separated by 2 ds each, creating a nice effect.

Dancing Clovers Edging Sampler, with inked tatting pattern

TIP : One can improvise this pattern by tying ball & shuttle threads together & tatting Chains instead of yarn lengths between the rings. However, chains will add bulk to an otherwise delicate, lacy pattern.

Width : slightly more than 1' (~ 2-1/2 cm).
Length : 2 repeats ~ 2'
(B-2)

3 . Shamrocks in a Row

This vintage edging also uses small & large picots. It is a 2-row pattern, using both ball & shuttle threads. Row 1 comprises 3 rings that form a shamrock, & a long chain. Row 2 comprises only chains that are joined to base of each shamrock. This pattern makes very good use of small (smp) & long (Lp) picots in Row 2.

ROW 1 : R 6-5-1, R 1-5-5-1, R 1-5-6. (These 3 rings form 1 Shamrock). Rw.
               Chain 16.
               Repeat to desired length, joining adjacent shamrock picots as in sampler.
               Tie & cut OR Turn & continue.
ROW 2 : Chain 2, smp, 4, 7 Lp sep by 2 ds, 4, smp, 2.
                Join to base of the 3-ring shamrock, Repeat to end.

TIP : To keep work neat & flat, leave a slight space at the base of the shamrock where Row 2 chains can be worked. 
Shamrocks in a Row Edging with tatting pattern

The arrow at end of sampler indicates where I Turned my work to start Row 2, instead of tying & cutting off the threads & rejoining again. It was possible because this is just a sampler.
When making the actual edging, it can be done by simply continuing along Without turning, Once the required length is achieved. OR. One can leave a tiny-tiny bit of yarn while turning (this is the space where Finally, the Last chain will be worked & tied off) & work Row 2 chains back along Row 1.
I hope this is clear? If not, I'd love to answer any doubts/queries... 

TIP : This edging can be worked with Only one row, too! Add a few picots to the 16 chain & it's done! However, the 2nd row does add a sturdiness & some body to the edging.

Width : ~  3/4 ' (2 cms)
Length : 4 repeats = 3'
(B-4)

4 . Crowns

This is an edging pattern I found via Pinterest, & modified to suit my purpose. Instead of a double round, I chose to do a single pass (the lower navy blue image in link). And, I modified the center ring into a Smaller half-circle so that each pattern repeat looks more like a flower slit in half. I actually wanted it to be an exact semicircle, with a flat base. But this looks good too, doesn’t it?
This is the altered Ring pattern : (-3-3-3-9 ). Starts with a picot ! ( I am lining up a step-by-step tutorial on how to start with a picot.)
I used this edging in a square throw / cushion case. And here are Two examples of  how this edging can be cornered : Cornering an Edging : Tatting

Crowns Edging with tatting pattern

Width : 3/4' (`2 cms)
Length : 1 repeat = 1'
UPDATE : This pattern is Originally called Anniversary from "Tatting with Visual Patterns by Mary Konior .

Yarns Used in the 4 edgings above, along with the Color Shades :

I Love Coats Anchor Mercer Crochet. The colors are fast & durable. They retain their sheen for years & years, despite frequent washing. I did use Red Heart for black color, but one of the balls had knots/breaks in the yarn !!! Never again.
I've used size 20 yarn throughout. I find it easier to work with - easier on my eyes - and the work progresses faster.

Coats Anchor Thread along with highlighted Shade numbers

TIP : Always buy a minimum of  TWO balls of the Same color when starting any tatting project. Why? Because, one ball can be used to load the shuttle while the other ball yarn can be used to attach to shuttle thread when working a ball-and-shuttle or 2-shuttle pattern. Now you won't have to break off the ball (or 2nd shuttle) thread Every time a shuttle reload is required ! I prefer this method to loading more than 1 shuttle, especially for smaller projects. Minimum breakage of yarn, minimum 'joins', hiding the 'knots', etc.
Happy Tatting, 
and
ta-ta for now...