Friday 30 April 2021

what were the thieves up to?

Pin It now!
(scroll down to see what Alibaba was up against!)

Boy, am I glad about not posting the 31-41 combo ideas in the unmasked post! Guess what, I found more combo ideas from 21-30 that hadn't been published after the 1-20 cornucopia display. Those thieves really like to play together coming out in different formations from nooks and crannies for Alibaba to collect and show the mutants/variants !!!
collage with motifs 31-41
Please note that these are shapes that emerge from playing with motif placement - possibilities that can turn to reality when joined properly and with a bit of cleaning up for greater definition of shape. And if worked in one colour and 2 shuttles, the shapes can be tatted in one pass - trace the path for another layer of fun! The motif number is indicated in each image. Blossoms Motifs patterns can be found under Nature 2D here. For shapes/ideas with motifs 1-20, see this post. Imagine the possibilities if I had played with all 41 motifs together instead of in batches!

Blossoms Heart #2
While the outline is mostly fine, the tip and inner dip should have more of a point.

Blossoms Butterflies #7-#10


Blossoms Wreath/Garland #7
 
This is among the smaller ones. There are medium and larger sized wreaths/garlands in the 1-20 post.

Blossoms Bookmarks #1&#2  
                    
With or without a tassel or tail, these make cheerful bookmarks. Rotate them and we have edgings! How cute would a single floral spray look as a tail for some bookmark?!

Blossoms Edgings #1 to#3
The vertical is now horizontal and becomes a meandering edging!


The above scalloped edging was shared earlier, but not clear enough. This time I have cropped and filtered the image and notated the number beside the respective motif. What a difference a simple enhancement does!

Blossoms Square/Frame #3

Blossoms Birds - flying or perched!
These might take a bit more imagination and shifty-eye ogling for the shapes to emerge. And of course a bit of tweaking to enhance the shape when actually tatting them. 
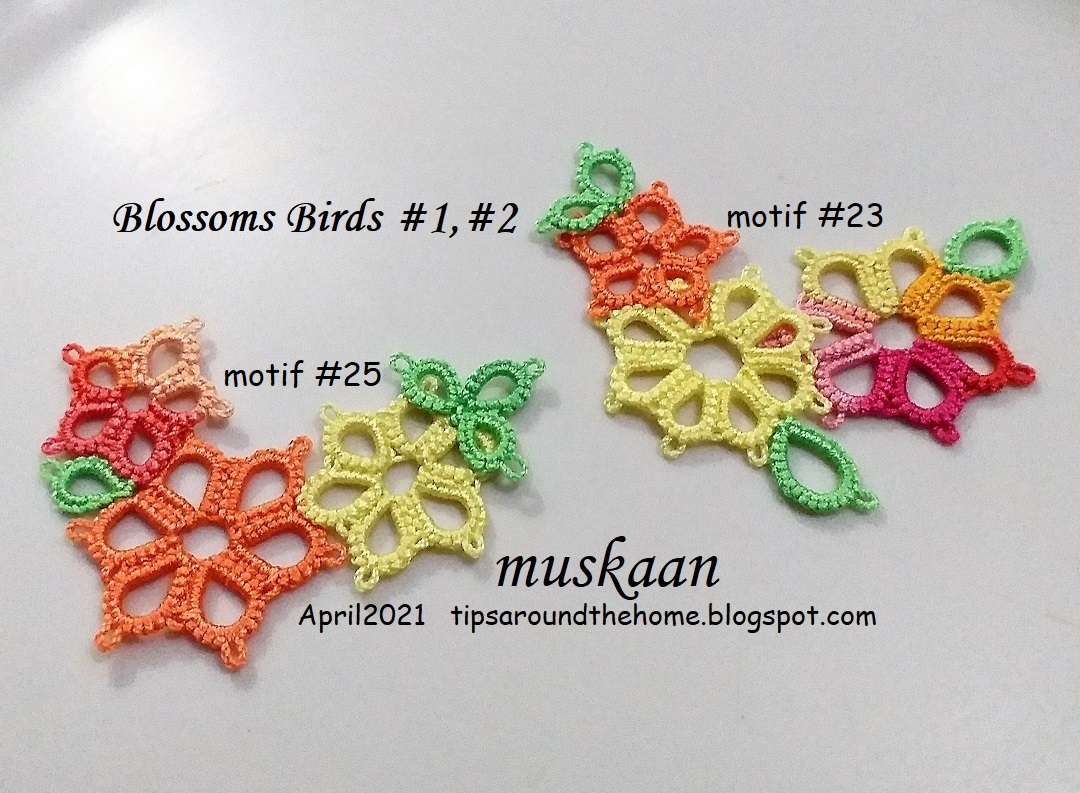
To me #25 looks like a a bird swooping down. Could work well as angel wings, too.
#23 could well be a bird in profile, just as the yin-yang combos below, especially #4!

Blossoms  Yin-Yang Bracelet/Pendant #3 to #6

This #4 really should've been under Birds, if I hadn't inked in the name.

A few beads in the right places, findings for attachment, and we have ourselves some beautiful bracelets or necklaces to suit a range of dress colours and seasons!

Blossoms Spinning Wheels
Motifs #21 to #30 arranged in a circle with curves of each motif parallel creates this spinning wheel effect. 
There are several gaps between adjacent motifs that need to be filled in order to make this coaster/doily stable. One reason for the gaps is that many of the motifs have been rotated so that their fronts are facing the camera...narcissistic much!
This is the same as #2 above, but I spot a heart in encasing the center space.

Besides all the above, 4 bouquets and a corner also emerged. And this butterfly and Blossoms Heart.

Phew, that's it for now. It took tons of time to locate and notate each motif but I kept the wind at my back to sail ahead instead of delaying further. Alibaba has to stay on top of his game!

So what was Alibaba up against ??? 
The 40 ingenious thieves (okay we now know there were 41!) had drawn lines in the sand within which Alibaba had to strategise. Following are the broad thematic parameters for Alibaba and 40 Thieves in Lace aka #BlossomsProject (2018).

  • 40 motifs of overall similar size, using Lizbeth size 20
  • single-shuttle motifs with thematic similarity
  • no identical twins allowed!
  • about half the motifs curving to the right and half to the left
  • 5 colours for rosettes juggling each for combo, position, spread, size, number of petals, overlap, etc. 
  • single shade green leaves ranging in number, placement, overlap, etc.

Wednesday 28 April 2021

all rounded up

Pin It now!

Alibaba took all of 7 months to round up all the 40 thieves but their notoriety knew no bounds! Imagine his surprise to find one more lurking around - their leader no less. And this 41st one was an illusionist - seemingly appearing as his own reflection. Hmmm, what a dilemma - which one was the flesh and blood version?! But our hero managed to crack the mirror and nab him in a trice!

Patterns for these 6 final motifs are below. But they gather together to create a few more larger pieces that will be showcased in the next post before the final reveal. Since I've already inked April on the former, I will have to post them before the start of May. So please don't get bored as the story continues ....

Worked in Lizbeth size 20, single shuttle. My previous posts have more details and I will give an overall round-up in next post. You can find all Blossoms patterns listed under Nature 2D here.

Blossoms Motif #36  
<2½ × 1¼

 
The reason I added a joining picot between a petal segment is because the next flower can have a free picot and also a bit of layered effect. This was not done in earlier motifs.

Blossoms Motif #37  
2½ × 1¼


Blossoms Motif #38  
2¾ × 1¼

 
Why should all leaves remain at a level with the rest of the spray? I joined the leaves above a flower in a few motifs. Here I made a leaf under the spray for a bit of a natural look.
See, I was getting bolder ;-D

Blossoms Motif #39  
2½ × < 1¼


Blossoms Motif #40 
2½ × 1¼


Blossoms Motif #41 
2 × 1¼

 
I found it extremely difficult to decide which way looked better. I finally chose the former and notated the stitch count below. 

So that's it folks as far as actual patterns go for this Blossoms Project. However, as I said above, the ideas continue and I invite you back in a couple of days to see Cornucopia #2 and the constraints under which Alibaba had to work.


Monday 26 April 2021

blossoms necklace

Pin It now! I can't remember when I last picked my shuttles! I did do a bit of Easter tatting, but the cute motifs are still not blocked/shaped, sigh. Not that I've been tat-idle, but it's mostly behind-the-scenes computer-work.

Nevertheless there is more than enough inspiration and eye-candy to admire and it satiates my tat-thirst to a large extent. For instance this gorgeous necklace adaptation by Daniela Galli inspired by the Blossoms motifs I posted last time.
This Sanblest metallic thread gives such a lovely effect and is quite popular for tatted jewellery. The Chiacchierino group is certainly belting out beautiful work using different shades of this thread.  
This is how it looks without the beads and findings. I love the length and one-pass tatting using 2 shuttles and climbing out with split rings. 
There is no limit to how far one can go with this semi-freeform motif if worked in one colour and 2 shuttles, or by joining individual single-shuttle motifs with a wider colour palette.

I would've preferred a bit more curvature to the floral spray, but that has been creatively addressed in this asymmetric Josephine chain! Bellissima!!!
This could make an elegant bracelet as well!

Yet another example of Daniela's creative mind and hands! Grazie mille, amica 💛💜💛
That's about as much Italian as I know without using Google Translate, but you can find her on Facebook!

All Blossoms Motifs patterns are being listed under Nature 2D. Some day I hope to compile the entire cornucopia in a separate pdf file with written pattern as well.

Tuesday 20 April 2021

unmasked

Pin It now!

 Finally, after 3 years, when masking is almost a given globally, Alibaba has decided to unmask 5 of the 40 thieves. Dare he expose them to the pandemic without they being vaccinated? Is he cruel or is he testing their bravado? Only time will tell.

For now, whichever hemisphere you are in, let's enjoy the all-weather blooms, with these quick single shuttle sprays that can be used for appliqué, cards, tags, decorations, and so much more. 

Techniques : rosette ; picot join to the right ; luggage tag loop or larks head knot ; lock join.
All worked in Lizbeth size 20 threads (Sunkist mix) with a single shuttle.

Blossoms Motif #31  
2½ x 1½" 
  

Blossoms Motif #32 
<2½ × <1½"
 
Some joins are made between a ring segment. It helps to control the curvature of the spray besides being more stable.
 
Blossoms Motif #33 
2½ × 1¼"
 

Blossoms Motif #34 
> 2 × > 1½”

Blossoms Motif #35 
> 1¼ ×  1"

As with previous motifs, these can be arranged together in various formations to create new shapes and larger designs. I will share these after the last of the thieves are nabbed! So keep an eye out....who knows there might even be more than 40?

stay masked even if Alibaba comes calling! 😁

All Blossoms Motifs patterns are being listed under Nature 2D.


Saturday 17 April 2021

needling the heart

Pin It now!

 I am thrilled to share Pam Hemenway's needle tatted version of the Happy Hands Heart which was adapted from Frau Endrucks' edging pattern #1 from her 1920 book (all links & modernised patterns listed here). For shuttle pattern - https://tipsaroundthehome.blogspot.com/2021/02/happy-hands-heart.html

She willingly shared her NT notes and tips. Although I included most of it in the above post, I thought it more practical to have a dedicated post, especially now that she has sent in a pic of Two models, one with a bit of tweak.


Pam H's NEEDLE NOTES for Happy Hands Heart :
RingA) 1) Paper clip to hold the ring and pull tight 2) Work to first join and pull off needle to make join.
ChainB) 1) Picots I picked up with needle point to use working thread would twist stitches.
ChainD) 1) Roll tatting = ds 16 wraps around the needle ds Hint- hold tight it is a bugger to take out and re-do.

She was not very happy with the variegated, hence made another. Here's what she says -
"I did another and I did it a bit different on the dimple I tied it tight before joining the dimple and the roll I did not do the ds on the 2nd one you can see the lump of ds on the first so I left it off but hold on tight lol or you will have to restart. but it looks so much better. Here is the link to the photo if allowed https://www.facebook.com/photo.php?fbid=139705824826739&set=pb.100063619655954.-2207520000..&type=3"

TIP: Needle tatting Josephine Chains   
When roll tatting with a shuttle, there is a tendency for the thread to untwist, hence we need to suspend the shuttle to balance the twist again, as for spiral tatting. Pam pointed out that there was no need to suspend the needle and answers as follows -
"Yes Josephine chains unwind and yes to the untwist also but I found if my twist is going right, I use the 2nd half of ds and reverse for opposite twist. It works with the thread rather than against it. But we do have the needle to hold against until it is done."


Pam H has graciously offered to convert any of my patterns into needle as she enjoyed working the hearts (I leave the choice to her). She is currently teaching needle tatting in Georgia's Online Tatting Class. So if you wish to learn or hone tatting with a needle, hop over to her class. She has a Facebook page titled - Hilltop Tatter

Many many thanks, Pam. Hoping my needle tatting friends will take this opportunity ...
💗

Monday 12 April 2021

meet the lady

Pin It now!

...and the designer/author from a century back! 

‘Die Schiffchen-Spitszen’,1920, by Frau Eleonore Endrucks-Leichtenstern
- German to English Translation -
original bookhttp://www.georgiaseitz.com/public/endrucks/eleonoreendrucks-leichtensternschiffchenspitzenbook1920.pdf

banner/bracelet for #Endrucks1920Project

When tatters get together, magic happens!

It was Ninetta’s brainwave and initiative to have the 3 non-pattern pages from the book translated into English. She attempted it herself first, then sought help from the facebook community and soon we had volunteers willing to do it! And I am still amazed at what emerged!

While volunteers were busy reworking Endrucks’ patterns to modern music, Simone Beyer hummed away at the transcript and translation.

It wasn’t a simple translation from German to English since the book is in Fraktur font which had to be transcribed into regular font (this German transcription is included at the end of the doc). Simone went further, seeking and adding biographical notes with help from the historical society in the town where the designer last lived and died! Unfortunately we do not know if she had any descendants and there is no portrait of Eleonore even in the gravestone. Hopefully we'll be able to glean more in future.

Simone’s excellent English translation reveals Frau Endrucks’ tatting style, thoughts, and expertise within a contextualized framework. 

‘My book shows you the way out of the eternal monotony of all tatted lace so far’ -Endrucks,1920

Frivolousness is not in this designer’s nature! This comes through in the brevity of her instructions (Foreword). She dives right into a key to decipher her patterns, leaving the basic tatting tutorials to others books. Her focus is on 2-shuttle tatting and which of the 2 shuttles is in the right hand determines how to proceed with the pattern. Hence no reverse or turn work is indicated, picots are minimal, and multiples used when segments are repeated in a pattern.

She is no fan of decorative picots and read her Pieces of Advice to know why! We may scoff at a couple of her practices, for instance she asks us to resolutely snip off mistakes...opening a closed ring to fix a mistake appears to be a later development. However she advocates what we now know as 'false CTM' and tatting over tails! It also appears that the lock join was fairly uncommon in her time and she demonstrates it - 

We have tried to list the more popular ‘modern’ terms, wherever possible, against Endrucks’ instructions in an attempt to bridge the tatting language of the past with the present. This is where my meagre contribution comes in. One sentence that warmed my heart – ‘Be clear that one always, even when working rings, works from left to right’. This is the basis of my incomplete TWoT (This Way or Tat?) series! However I hesitated adding this to the pdf – it seemed too much like self-promotion ;-D


Whether you like her patterns or not, whether you will tat any of her patterns or not, I urge you to read the few pages of English translation when you can. It is very interesting. I feel as if Frau Endrucks is talking directly to me and thank Simone for bringing her to life through the translation! I’d also like to thank Jane Potts and Jacquelin Roth for participating and proofreading. And thanks to Ninetta for thinking of this and pursuing it! In fact, if Ninetta wasn’t bilingual, she & I would not have been able to collaborate so freely for so many years.

The image at the beginning is our banner/bracelet for the Endrucks 1920 Project. Ninetta tweaked the fun alphabet designed by Edda Guastella to tat this cuteness. We chose this because it is worked continuously and the letters have long block chains - both features of Endrucks' style. The fun letters can be bought from Edda's etsy shop.


As a token of gratitude we sent the pdf to Martha Ess and Georgia Seitz and this is what Martha wrote back –
Dear Muskaan and Ninetta,
Thank you for sharing this with me. I had groped my way through the introduction and afterword with an online translator and a German dictionary, but it is wonderful to have such a coherent clear translation. I think it is wonderful you found some biographical information for Fr. Endrucks as well. Good job, everyone.

Ninetta joins me in extending our heartfelt gratitude to Simone, Jane, Edda, and Jacqueline.

muskaan & Ninetta 

We'd love to hear your thoughts after reading what Endrucks has to say! Join the project if you wish - contact us through our blogs or through Facebook....
https://m.facebook.com/muskaan.mooskaan ; https://www.facebook.com/ninetta.caruso
https://tipsaroundthehome.blogspot.com/ ; https://ninettacaruso.blogspot.com/
https://www.facebook.com/hashtag/endrucks1920project - #Endrucks1920Project