Thursday 22 February 2024

Endrucksian Links

Pin It now!

 You might remember that we had created categorised Directories of derivatives from Endrucks' patterns and I shared links as and when they were ready. Now all derivatives are removed from the main EP doc which contains mainly the 44 reworked originals in pdf format. 

Besides this trimming, we also created a Spreading the Word doc so that keeping it updated, along with good sized pics, would be easy. Check out how members have spread word of the book or Project through teaching, articles, exhibitions, etc.

And then there are the games we hold in our FB group. All links to these - from the introduction, rules, album, roundups, etc. are listed in this new EP Events doc

All this was necessitated otherwise the main EP doc was getting too large and unwieldy. Now we have active docs that stand alone and there is plenty of space for expansion.

However, to make it easier to refer, reference, share, and save, all important links are compiled in this  E Links doc which can be saved and other docs accessed through it. Here it is -- https://docs.google.com/document/d/1w1TZBg-HIzseGEUoJ-rko7tNbtSgZY5A18Oy2Y9Hh0Y/view

There is still work to be done in creating the collage strips for each directory, updating the EP doc content to reflect the new perspective, etc. We'll get there eventually, LOL.

Meanwhile, here's my first collage of Endrucksian Tatting for the cover of our FB group. We are on a break from gaming till April, but we have invited members to take a pic of all their E tatting thus far to adorn the group cover. 

For the cover, we needed a 2:1 pic size. I chose 16:9 in my cell phone camera since it was closest to the requirement, and after resizing, I hardly had to crop it. Also, I had placed all these motifs on a rectangular wood tray, leaving some space bare on the right (for the notations). This worked well.

The motifs are chosen from two boxes close at hand. Most are in clear plastic zip pouches according to the pattern number. Hence you see multiples of the same pattern. After taking this pic I now think I might require at least 4 or 5 such collages to cover all the E work I've done so far. Let's see .... 


Sunday 18 February 2024

happy surprise

Pin It now!


I was tatting a sampler last night to show placement of beads. In my head was a possible zigzag effect but was so happily surprised to see this shape - such graceful arches! 

On pondering, it is 'elementary' - since the stitches all face the same direction, the broader waistband of the stitch creates an uneven arch -- the same reason why a normal tatted chain curves!

I haven't decided how to put this effect to use - possibly a necklace or even a bracelet? 

It would've been even better if the beads were all the same size. Overall the chain remains straight.

If anybody is interested, here's the 'pattern' for Beaded Scallops:

    One shuttle and ball, both pre-strung with seed beads.

    [ 1 bb1 bbbb bbbbbb repeat for desired length.

The 'up' bead(s) are on the ball or picot thread ; the 'down' beads are on the shuttle or core thread. The red beads are on ball thread and the green on shuttle thread.

TIP: Be careful while snugging the cluster of 3 down beads and 1 up bead to avoid gapsosis. I left the shuttle thread a bit loose, made sure the up bead was positioned and snugged properly, then tugged on the core thread to snug the down beads. 

It might've been done before, obviously. However, this is my very own experiment and trial which threw up an unexpected effect. In fact I had first loaded all my beads on only one thread and it was only when I started tatting that I realized my mistake and went back to string beads on both threads ;-P

Happy happy dance!

Friday 16 February 2024

east to west heart!

Pin It now!

My Budding Heart pattern was published in the Feb 2024 issue of 'Talking Tatting' (No.58.3 quarterly newsletter of Queensland Tatters, Australia), courtesy of Judith Connors. I think this is perhaps the third or fourth pattern she has chosen for publication and it is such a huge yet humbling endorsement.

💗💗

Several versions have been tatted which I sometimes come across on different platforms, but to remind you of one very special version from Krystyna Mura (Poland) - https://tipsaroundthehome.blogspot.com/2021/02/palentine-day.html

💗💗

And most recently, is splocik's (Poland) play with the pattern - not one but four! Such cute versions and I love how she attached the dimple to the flower, thus anchoring the long outline. She shares her thoughts and process here - https://oczka2.blogspot.com/2024/02/zainspirowao-mnie-serduszko-frywolitkowe.html

💗💗

If you remember, this heart is part of the Buddy Hearts (2020) collection of 5 patterns, three of which were shared by Anita Barry(USA)! https://tipsaroundthehome.blogspot.com/2019/02/buddy-hearts.html. This set has been taught in the Online Tatting Class (Feb 2019) and published in the IOLI Bulletin (Summer 2020). Good to see the widespread reach of these little motifs.

You can download all 5 here (long version) - https://drive.google.com/file/d/1frJpMRiHu5fOEH9Zs3VANVGIURZA126_/view   and (short diagram-only version) - https://drive.google.com/file/d/1DZFxEDvEwe-rPUv1evgPaxic1sbaEnHC/view 

💗💗

I had a mind to tat a new heart pattern but couldn't manage my time and other commitments. However, it is definitely on my trial list and should be shared well before the next season of hearts.  

💗💗

💗Many many thanks to Judith, splocik, and of course, Anita and Krystyna!💗

Tuesday 6 February 2024

going wide

Pin It now!

 Remember when I posted the E37 flower flake and star and was not very happy with my wide picot? I couldn't always get the stitches under/within the picot to stay consistent and neat. So, I explored some more which I should've done at the beginning, having the links in my Tatting Resources page already! Well, my oversight gave me a chance to study it better.

Download my pdf of Wide Picot Pictorial here https://drive.google.com/file/d/1Ejb7tVOk15VQHV0omhUt-HIb1CzYAI7I/view 

All tuts I referred to had the wide picot on a ring. This means there is the ring loop besides the loop(s) for the picot, etc. Unnecessary confusion. I decided to do the steps on a chain where I could employ two colours.

This is the main step that differs in different online tutorials. As always, we have options to choose from and see what works best for us.
In all tuts, the wide picot is encapsulated only in the 1st half-stitch while the 2nd half-stitch is worked normally.

The oldest tutorial I found was by Dan Rausch (tatmeister, 2003)http://pages.suddenlink.net/tatmeister/widepicot.html?  However I found it difficult to follow his written instructions, oops.
Now this was a technique that Georgia loved to ask every new batch in her online classes.
Shannon (mytattingplace, 2011) had uploaded a video based on her understanding of Dan's technique and it is so clear to follow - https://www.youtube.com/watch?v=qONlAylfXIQ

In this method (above pic), one needs to hold the loop on the left hand and make the 1st hs on this loop.

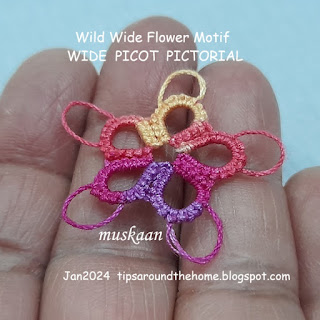
This is a little rosette I made using the wide picot and am fairly happy. Lizbeth size 20 used.
One can make smaller picots inside the wide picot, too. A floating Josephine ring would look good too! See Claudia's pictorial linked below.
 
Added leaves and stem in order to show that the picot in not merely decorative, but functional as well.

Added beads and findings for an earring.
TIP: After making the number of stitches encapsulating/within the wide picot, it is good practice to tug on the picot to remove any slack.

One can add pre-strung beads on the wide picot, too, but I don't see the point. I would much rather make a double picot, loading beads at the time of joining.  

When I showed Ninetta Caruso my pictorial, she shared her own method which involves simply twisting the loop for 1st half-stitch once before inserting the shuttle and snugging. She even made a video to demonstrate it - https://drive.google.com/file/d/1XsqlFZHcVpopvRFBhTgR6_oQWqf98Bw7/view

For the E37 flake I had used Karen Cabrera's Lesson #34 video (kcabrera74, 2011) which is the easiest to perform - http://www.youtube.com/watch?v=IaT-Pktx9nw . It is like making a normal join!

And just to complete the list, there are 2 pictorials by Claudia Meza (2010) in Spanish - https://howtotat.blogspot.com/2010/04/wide-picot-picot-ancho.html and https://howtotat.blogspot.com/2010/04/lochness-monster-picot.html?

So, each method is good. It is up to the tatter to practice and work them properly.

Ninetta has used the wide picot, aka Monster picot, quite often, including with treble tatting - https://ninettacaruso.blogspot.com/2018/09/a-wide-choice.html. Her Falbalà doily is a marvelous play with wide picots - https://ninettacaruso.blogspot.com/search/label/falbal%C3%A0 .

This time again, I am using the Wild Wide Flower earring as my entry for both Natalie Rogers' PICOT bingo (the Tat Earrings box which makes 3 boxes in a column) and splocik's Small Decorations.
Check out what others sent in as small decorations for Jan 2024 here- https://splocik2.blogspot.com/2024/02/male-dekoracje-2-galeria-styczniowa.html .

I haven't really played with the wide picot, satisfying myself with a very basic motif. Hopefully some day ....

Many thanks to all for sharing their knowledge, skills, and ideas so people like me can widen our own repertoire!