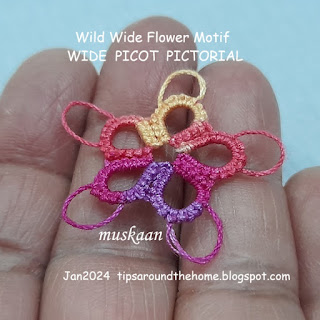
Remember when I posted the E37 flower flake and star and was not very happy with my wide picot? I couldn't always get the stitches under/within the picot to stay consistent and neat. So, I explored some more which I should've done at the beginning, having the links in my Tatting Resources page already! Well, my oversight gave me a chance to study it better.
Download my pdf of Wide Picot Pictorial here - https://drive.google.com/file/d/1Ejb7tVOk15VQHV0omhUt-HIb1CzYAI7I/view
All tuts I referred to had the wide picot on a ring. This means there is the ring loop besides the loop(s) for the picot, etc. Unnecessary confusion. I decided to do the steps on a chain where I could employ two colours.
This is the main step that differs in different online tutorials. As always, we have options to choose from and see what works best for us.Added leaves and stem in order to show that the picot in not merely decorative, but functional as well.
One can add pre-strung beads on the wide picot, too, but I don't see the point. I would much rather make a double picot, loading beads at the time of joining.
When I showed Ninetta Caruso my pictorial, she shared her own method which involves simply twisting the loop for 1st half-stitch once before inserting the shuttle and snugging. She even made a video to demonstrate it - https://drive.google.com/file/d/1XsqlFZHcVpopvRFBhTgR6_oQWqf98Bw7/view


So interesting, thank you. I like the look of the wide picot. Followed the links. Aside from seeing the different ways of creating the picot, I realised that I tat ‘funny’, differently to how those tatters make the second half of the stitch. Oh well, I don’t think it shows in my work. I will give the wide picot a try.
ReplyDeleteNow I am so curious to 'see' how you make the shs, Jane! Hopefully you will be able to show us some time? And, yes, like you said, the end result does not appear different.
DeleteInterestingly, I think that at the end of her video, Ninetta works like I do, all the action at the 'front' of the loop around the hand, rather than the back of the loop.
DeleteJane, I, too work at the 'front' of the loop and if I remember right, both of us make the pinch with our thumb and middle finger? 😍 I think Nin uses the 'back' of hand for clarity in the video. It is always interesting to watch a tatter tat - so many styles!
DeleteYes, thumb and middle finger. I think it could be called the ‘crochet grip’!
DeleteOh, good to know, Jane! Thanks. 💖
DeletePiękny, dekoracyjny kolczyk. :)
ReplyDeleteNie robiłam takich pikotek, ale wszystko przede mną. :)
Dziękuję za informację.
Twój link i fotka znajdą się w podsumowaniu lutego.
Miło mi, że bawisz się u mnie. :)
Pozdrawiam ciepło.
Some times it takes us a long time to reach a certain technique, splocik ;-P I knew about this wide picot for almost 10 years but never made it till now! I will make another small decoration this month, hopefully within the rules.
DeleteZgadzam się z Tobą. :)
DeleteFrywolitkę poznałam dużo wcześniej, niż zaczęłam pisać o niej w blogu.
Zwykle wykonujemy drobne dekoracje do domu, ale czasami może pojawić się także biżuteria.
Pozdrawiam ciepło.
Yes, so true, splocik 😍 And this 'earring' has a hook that can be used to hang it on a tree as decoration, LOL
DeleteMasz rację, można wykonać takie drzewko szczęścia z kolczykami. :)
DeletePozdrawiam ciepło.
This brings a smile to imagine how cute such a tree would look, splocik! 💕
Delete😍
DeletePozdrawiam ciepło.
Great!! :)
ReplyDeleteThose wide picots would be great for folding a ring over. ;)
Yes, Nin has done just that in her doily, Sue 😍
DeleteThank you for sharing an interesting post,
ReplyDeleteYou are always welcome, Margaret 😍
DeleteAn unusual and original earring.
ReplyDeleteThank you so much, Barbara 😍
Delete