Saturday 29 February 2020

Happy birthday, Georgia

Pin It now!

Seeking an elixir for longevity? Look no further. Georgia Seitz is living proof – she is celebrating her 18th birthday today! Yet she completed 20 years of teaching the Online Tatting Class. Stop doing the math and just be born on the 29th of February :-D
The motifs chosen tell a story together. In the order they were tatted….

Laura Angel is a cute beginner pattern by Anita Barry, named after her friend. Here is the link to the pattern. Made only with mock rings. I added some decorative picots and tied off with a bow instead of hiding ends.
In Red Rose metallic size 20, it is 3 cms high and >2½ cms wide.

Itsy-Bitsy Angels are a take-off from Laura angel. A row of single-shuttle motifs makes a cute garland or edging. Made continuously by climbing out/in with folded SSSR. Quite a bit fiddly and challenging, with no stabilising picots. Anita has since modified the pattern to be worked with 2 shuttles. Later in the year, she will release the pattern. 
In Anchor Pearl cotton size 8, it is 2½ cms X 2½ cms.

To me, Laura Angel represents the teacher – Georgia, and below are 2 Knotty imps, attending her class. After all, it is where Anita & I first ‘met’ and connected as tatting buddies. 

I pulled out 2 of Georgia’s patterns, long on my to-tat list …

Basic Split Ring Heart pattern link 
As visual symbolism to Georgia’s generosity, I wanted a large heart embracing her students within it. Hence chose the thickest thread I had on hand.
I 
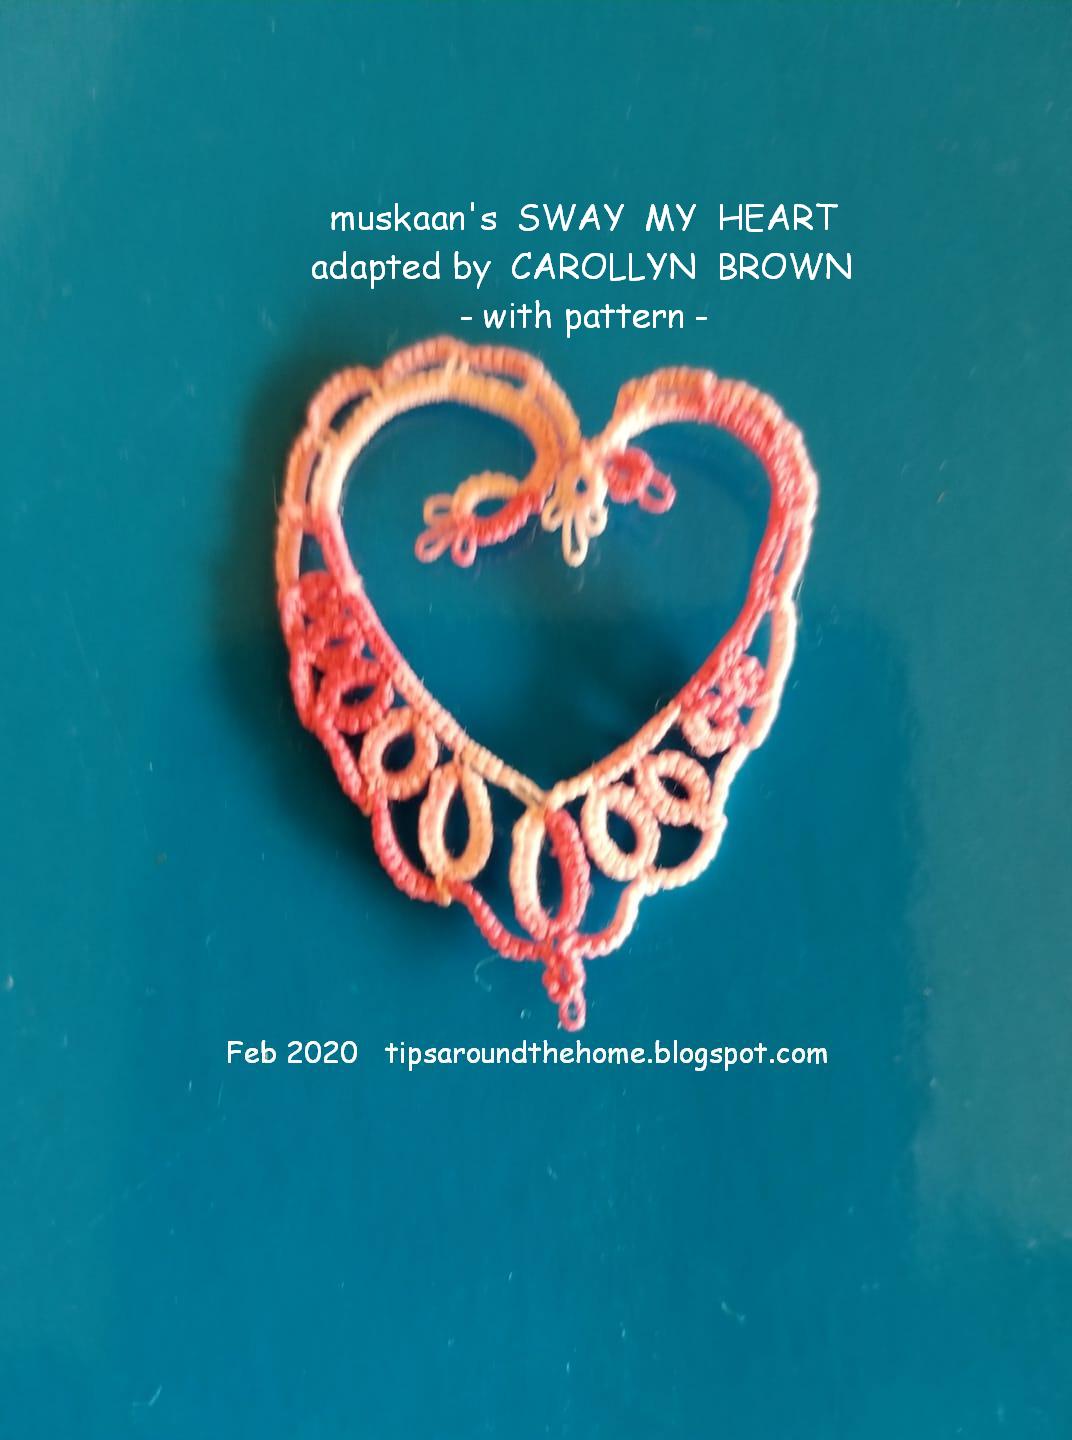
started with the central clover, adding long joining picots on either side, and decorative picots to the middle ring. Moving counter-clockwise, the rest of the pattern was quickly finished. Tails are not hidden, I might tie a tassel or motif later.
In Bliss cotton size 3(?), it is 9 cms high and 7½ cms wide.

The Sitka Rose is one of Georgia Seitz's iconic patterns and I thoroughly enjoyed tatting it!
Worked with single shuttle and ball, I loaded 20 seed beads. Leave 2 beads on ball thread, loop shuttle thread with 16 beads around hand, and work the central ring. 4 beads on each picot. After closing ring, slide the remaining beads – 2 from ball thread, 2 from shuttle thread, make a mock picot and continue with pattern.
I love how this turned out!
In Anchor Pearl cotton size 8, it measures 4½ cms. Size 16/0 beads are used.

The rose symbolises how her protégés have bloomed over the decades.

I first joined her class in mid 2015 and found such a lively tatting cosmos…. meeting so many talented and chirpy tatters in real time, forged friendships and sisterhoods. Georgia, like others before me, encouraged and groomed our potential, letting us spread our wings far beyond what we thought possible.

She has an uncanny eye for detecting something ‘new’, something interesting, in any image or pattern. It is what I liked best – a new perspective, a different way to see the same old.

Being a linguist (she can speak/understand so many languages!), I explained the meaning of my real name and she immediately wrote - “you were meant to tat” - turned out my name is a confluence of 2 common tatting terms in different languages!

I miss our correspondence, chatting about birds and Nature, her sourced fauna pictures, and her ecards with such cute messages. Her humour laces everything! I wish her the best of health and happiness – blossoming just like her Sitka rose.

Many many many happy returns of the day, Georgia !

Wednesday 26 February 2020

another doily snood

Pin It now!
Elizabeth  Doily  Round Robin #15
- snood adaptation -
Started in Oct 2019 as a side project to all those designing projects, completed last month. Sue Hanson remembered the site – it has lots of round robin patterns ranging from snowflakes, butterflies, hearts, to doilies. However, this particular Doily #15 is missing. Check out the pages that are still there.

I like how this doily seems to change shape. From largely circular, these 2 green rounds define a clear octagon.

Designers :
Round 1 – Elizabeth Watts (3 central rounds)
Round 2 – Andrea Vanderpool
Round 3 – Bettina Lauth
Round 4 – Kathy Lowe

Round 5 – Emma Thomas-McGinnis

Worked with Anchor size 40.
False ctm was used several times while adding new thread. 
Some rounds were worked with one shuttle and ball. Keeping it simple!

With due apologies, I substituted the last round designed by Ruth Kurz, with my own. 
I was making this specifically for my hair bun/snood and needed a diameter of 7”. The original round 6 was quite broad and would have worked to around 9”.

This simple round holds the clovers in position and a satin ribbon was woven through the outer spaces (no pic). I’ve happily worn it a couple of times. The choice of dark and light colours was deliberate - to highlight the floral imprint when covering my hair. 

Thanks to the round robin team for this beautiful design ; 
to Jenni Clark for sending me the pattern, and 
to Sue Hanson for her incredible resourcefulness. 

Saturday 22 February 2020

not one ring

Pin It now!
Snowflake #10 in Land of Laces’ 25 Snowflake Project

And you thought out of 2019, out of mind! No, I haven't about posting the left out patterns! When Anetta invited me to share a snowflake pattern and something about myself for her Meeting with Tatting series, I took the longer path instead of giving her an already published pattern. On the 1st of every month, she intends to share a design and designer, and everybody can participate.

Rosette Enchained Snowflake & Ice Drop
free pattern pdf (click to download)

This pattern was first created in 2016 and I have since posted several models. It is made of Chains Only, for what was to be Set 2 of the This Way or Tat series of diagrams. I don’t know when that series will resume, but at least the pattern is here.


The entire motif is worked from the front, in clockwise direction.

Whether you choose 1 or 2 colours; shuttle and ball or 2 shuttles; the join used to switch colours/shuttles; the technique used to change curve of outermost chain; etc., can result in a change of direction.

Hence it was to be one of the practice patterns for the TWoT Set 2 – Chains Only. A fun way to study how our choices affect direction, and may differ from what the designer/pattern says.
The entire snowflake motif is worked in one pass. In the 2 outer rounds, there is a short 2ds chain which can be worked as a split chain by advanced tatters. But if you are not in the mood, why not try the vintage style of leaving some bare thread at the back, lock join, and continue with next round. For all practical purposes, it is not discernible! Don’t do it for a competition, though ;-D

Continuous tatting, vintage style -
In this collage, from top right –
  1. last chain in 4th round with a picot join to the right. Remember to keep both threads to back of work before making join.
  2. Complete 2ds, and lock join to 3rd round (pic shows back of work)
  3. From front, pull up a loop of shuttle thread, and make a lock join leaving sufficient bare thread.
  4. Continue with next round. Voilà, no split chain required.

I have already posted the choices one can adopt for the concave chain segment in last round. It is also part of this pdf. 

Ice Drop
The ice drop is probably a novelty, being made only with chains. There are 2 separate motifs – one larger (yellow), and the other smaller (green). 
 The pattern remains almost exactly the same as the snowflake, except for more repeats. 


When working the 3rd round of smaller motif, the join is made simultaneously through Both previous round as well as the respective round of larger one. With a crochet hook, pull a loop of ball/chain thread through both picots, pass shuttle through loop, and snug tight. Hence simple picot join, not a lock join. The cabochon is inserted before the last 2 joins are made.

Click to download Rosette Enchained Snowflake & Ice Drop pattern

I hope you enjoy this pattern and play with colours, embellishments, etc.
     

Related Posts


Wednesday 19 February 2020

a chained heart

Pin It now!

I fell in love with it right away. It is such a wonderfully elegant heart with a bit of freeform thrown in – just the way I like it. So it had to go to The Most Special person in my life for our very special day.

This is Renulek’s Serce Od Serca or Heart from the Heart. Such a beautiful conversion of a bobbin lace heart to a tatted lace heart. The pattern is free here.
Made with Anchor size 40, it is <7 cms high and 8½ cms wide.

I must apologise to Renulek for bungling up. Despite frequent referencing and such clear diagrams, I ended up joining the last chain on 1st round on a picot rather than at the base of ring. Realised only when I reached it after the 2nd round. Had to wing it, which is why you see a long chain and no small ring.
My eye keeps getting drawn to it ;-(

TIP Notice how the orientation of my heart is opposite to that of Renulek’s? In traditional tatting this wouldn't be a problem, but with directional (fs/bs) tatting, there is only one distinct front side.
TWoT (This Way or Tat?) Notes - The reason lies in the very first ring. I followed the pattern, and tatted the ring frontside, starting with 8ds. Realising it was going to face the other way, I peered closely at her photos. Huh, her rings were backside, and chains frontside - knotty naughty ;-D. This same orientation was used in diagrams, hence the confusion.
However, if you want the heart to face like her’s, in frontside/backside tatting, 
start the ring by reversing the order of half stitches (shs then fhs), 
OR,
start the ring as 5-5-3-8.

It seemed a bit forlorn all alone on the card. These S-chains made with scrap threads, saved the day. There’s more tatted lace and stuff inside, but that’s our secret ;-P

Meanwhile I’ve been hooked on the S-chains, clearing out my scrap lengths. I have a few ideas to cook them in SOUP* when I have a good stock ;-P (This is how the S-chains look with picots)


Many many thanks, Renata,  hubby loved it !


Sunday 16 February 2020

impeccable timing

Pin It now!
We all know and admire Judith Connors’ impeccable tatting, but her timing is, too! Remember how her dictionary arrived on International Tatting Day?  

This time her newsletter, ‘Talking Tatting’, arrived on Valentine’s Day! And a complete surprise since I was expecting a digital copy some day, not a physical one.
She has made certain I remember exactly which days her gifts arrived ;-D

What is even more special is that my pattern is part of their 10th anniversary celebration. It is an honour in every which way, isn’t it?! Can't blame me for wanting to shout from the rooftops.

I enjoyed reading through the entire newsletter. Informative, interesting, inspiring.
I rummaged through my numerous containers/envelopes to locate all the clover wreath lace I had made and used them to cover up the text. A few words/sentences in both images are blanked out.

The printed medallion on the left is tatted by Judith, the mat on the right is an image of the actual ecru mat you see below. She drew a diagram along with the pattern (in her own words). 
Many thanks, Judith.

I had started a border/edging for the mat, but haven’t gotten very far. Only thing I am certain of is that I want the 6 ring florets to be complete around the border. For the rest, I’d like to keep it simple and a bit airy to counter the relatively dense look.

I’m eager to get started on this again and finish it off. I’ve shared the beaded poinsettia pattern, but not the actual medallion. Thought I’d do it along with the completed edging. But if anybody wants the medallion pattern, let me know and I’ll release it. I merely need to rearrange and format the diagrams, etc.

All Clover Wreath posts, pics, & notes 

Thursday 13 February 2020

dress my heart

Pin It now!
design along (DAL)


What bug have I caught?! And why am I trying to spread it around? But then we are already 'suffering' from ATS - Addictive Tatting Syndrome, so what’s one more play-along?!

Recently I revisited this NeoVintage Heart. I gave the prototype pattern in 2015 – a 2-round continuous pattern. This time I ran out of thread after the 1st round and it struck me that there are So Many possible designs that can go around those chains! Since I cannot do them all, here’s a design-along (DAL) for you. You can choose to create your own outer round, although I have given my 2nd round pattern in the pdf

SCROLL DOWN FOR PDF LINK.

In Anchor Pearl cotton size 8,  it measures around 4cms×4 cms

I’d just like to state one rule : Keep Round 1 essentially the same (although you can add beads, etc.). Design Round 2 or more as you wish. It will be interesting to see the variations.
Kind of reminds me of this make me pretty please butterfly and the wonderful diversity that flew in!
Please do share your work either here (comment) or tag me on facebook , on Instagram, or email a pic that I will then upload here.

click to download the one-page pdf NeoVintage Heart DAL 2020

TIP : Dora Young Join (Knot) is exactly the same as what we now know as Catherine Wheel Join,  except that it is made with the same shuttle and no thread is encapsulated. .


And before I leave you to play, here is Elisabetta De Napoli’s beautiful version of Sway My Heart. All set to be a pendant on a necklace !!!


Sue (His Kid) also added a 2nd round using treble tatting – check it out!


Tuesday 11 February 2020

cuori adorabili

Pin It now!
Don’t blame me if you see pinks and reds all around - ‘tis the season!
All hearts worked in Anchor Pearl cotton size 8.
The order in which I tatted them ....

The link to this heart pattern was shared on facebook. It is a 2009 Valentine’s Day heart by Polish blogger Alexander Dajczak.   
Ring spanned with a chain is one of my favourite motifs! And it is an easy way to get the threads across if you don't like split rings.
I worked with ball and shuttle and started with the top right of 5 center leaves and moved counterclockwise to return back to first ring.
I added a few graduated picots at the tip.
TIP : One addition I would make is to add a stabilising picot on the 10ds chains - 2 vsp 8.
It is 5 cms high, 6½ cms wide.

An event was organised in the Chiacchierino: Filo, Amore e Fantasia facebook group that had free heart patterns by 2 very talented ladies. They have another online meeting on the 14th, if you are interested.

Stefania Di Cesare shared 3 versions of All My Heart of which I made only the first to get an idea of the size. Eventually I’ll try another with bead in the center of the ring, and a beaded double picot. (16 mm picot.)
Another of my favourite effects is concentric rings or chains and this design had it in abundance! 
I went with some colour-play, BUT ….
TIP : ... I carried the core thread of previous round into the next. Delayed cutting and fewer ends to sew in. More importantly, no colour blip in the lock join since it was the same colour as the picot!
It is 3 cms high, a bit over 3 cms wide. 

Daniela Galli shared her heart titled the same as the event - Un cuore per San Valentino.
It is also supposed to be worked in one pass using a split ring to climb out. But I could see another heart in the central medallion, hence chose a spring theme palette.
I added a teardrop using my floating beads method.
I like the heart inside a heart!
It is 4½ cms high, 5 cms wide. 

It was great fun doing these quick little tats on the side. I like them all!!! The 2 Italian ones I did in the same evening.
I am still not taking up any large doily (though there are numerous beautiful ones floating about) in order to focus on other stuff, including writing up the snowflake patterns.

Many, many thanks to Daniela, Stefania, & Alexander 
for sharing their beautiful patterns

Friday 7 February 2020

such sways and swaggers

Pin It now!

Oo, là là ! Such sways and swaggers! Such are the hearts here – all a-sway with built-in swagger!

So the green one is my 'official' version – much closer to my original sketch. It still needs stiffening if it is to be dangled. But now that I have the shape I want, I will experiment with some techniques and looks to keep the shape without the use of wire or stiffening.

Look what popped up as I worked around the center ! A possible paisley.

After round 1 - This time I thought of not adding an extra ring around the inner one. But on comparing after it was completed, and confirmed by hubby, I added that outer ring using scrap thread. This is why you see some pics with only 1 ring. Although hubby did say that it can be given as an option.
I like the look without any out round! 
Please note, that this round will need to be dampened and shaped before finalising it and proceeding to next round.

The green one, in Anchor size 20 ( Lizbeth size 10) measures 3”x2”.

All picots are very small. 
I think the ring on the left of the 14-14 ring should be 12-12 rather than 11-11 for a more natural gradient.
The rolls/wraps in the outer roll-tatted chains can be adjusted to suit your tatting tension.

With only the lone inner ring. As mentioned, the outer one was added later as additional decoration.
This motif can be worked continuously by climbing out with a 3ds split chain.
For detailed process, tips, and pattern notes - Round 1 ; Round 2 

Many thanks to those who played along! 
You can join the fun and tag me (facebook/instagram) , leave a comment, 
or send me pics of your versions!

Elisabetta de Napoli started a beautiful center in metallic [UPDATE- see complete heart here], 
and Sue worked in size 40. [UPDATE: treble tatting in 2nd round]
Margaret Davies used spiral/Josephine chains instead of roll tatting. 
And then there are Victorian sets that also provide visual texture.
Carollyn Brown tweaked the pattern as you can see, and shared her count and notes. She seems to have straightened out the errant swagger ;-P In her own words ….
"Well I started at top and placed picots every six ds after the initial 2 rings and chain of 3 ds. This way I could go around twice. I had size 80 which was on shuttles and should have used larger thread but it was fun to make thanks can give more counts if needs be
Here are quick numbers I still used 4ds inbetween and I feel this could be tweak some more maybe less stitch count on out side outline.
 This last picture is the count for outer part no cutting threat till end."

Ninetta Caruso sent in her version – oh my it is already part paisley! And true to form, she has used s small curled ring (sCR) with bead, as well as treble tatting. She also linked adjacent thrown rings . The pattern in her words ....
"With one round only, mine should be sewn up somewhere to keep its shape. Otherwise it needed wire in the core, that would be something worth a try.
The inclination to left or right is just personal taste, in my version for example I would tat it again because at the end I like the other face up, but the sCR defines the front side.
I forget to tell you that I started from the bottom mock ring, then this and next rings are connected, that is the first is mock ring: 4-8-8-4, next is ring: 4-7-7-4, etc. decreasing the joint, till the last that is ring: 2-1-3.
I finished in the little heart at the bottom. "

UPDATE : 2 more decorated hearts !

As they say, 'it takes a village …' I love adaptations/derivations and also get to learn and improve my own work. So, unfortunately, this heart is still not ‘completely’ complete. There’s a lot of play left, right?! ;-D
Only after I am finally done with the ideas, I will release a proper pattern. But this should be enough for you to play along and to experiment.

happy tatting