Showing posts with label Georgia Seitz. Show all posts

Friday, 12 February 2021

beaded SR braid part 1

Pin It now! Before delving back into the Endrucks Project, I had this strong urge to learn a few techniques/effects that are floating around for pretty beaded split ring bracelets. Keep learning, keep trying. 
Turns out I got only one method done before succumbing to that heart motif idea I shared in previous post and other behind-the-scene commitments. 
No progress on the heart and none on this study, either. Turns out there are too many methods and no time to go into each nuance at present. But hopefully a step here, a step there ...
    
Disclaimer: This is not a serious study of origins, primacy, etc. of technique and effect. It is my whimsical & random exploration and experimentation. I will keep adding to this personal learning journey as and when I can. 

I try to avoid stringing beads whenever possible ;-D - a logistical problem with the smallish Pony shuttles. Now Jon had once incorporated a separate string of beads into her tatting. So many lovely applications, but not on a split ring braid (SR braid). Called for some adaptation.

Beaded SR Braids
In order to clearly differentiate what comes from where -
  1. shuttle 1 has pink thread strung with yellow seed beads;
  2. shuttle 2 has green thread with purple seed beads; and,
  3. where needed, a blue thread with pearl beads.
1. beads on third thread. 
Adaptation of Jon Yusoff's Beads on a String .
I thought this would be easy. Turns out the 3rd thread needs to be anchored before starting next SR! Here is what I tried -
1. Weaving: The beaded thread weaves up and down between alternate rings. 
Well, it leaves a colour blip when brought to the front, (notice the blue between SR1 & SR2) unless using fine, invisible, or same colour thread. Further, the string would be too loose.

2. Encapsulation : To avoid any colour blip I prefer the first of 2 ways to encapsulate the beaded string.
NOTE:  KEEP beaded string at back of work throughout. 

2A. Encapsulating Within SR (in last half-stitch): Make SR but do not close yet. Move bead to center, make final half stitch and pass beaded string through the open loop (parallel to core thread) of half-stitch before tensioning and closing ring. Thus string is held tight through the last hs and start next SR.
TIP: do it through the 2nd half-stitch, then move string to the back again. It does not leave any imprint!

2B. Encapsulating Outside SR (in unflipped half-stitch): Close SR, move bead to center, then make an unflipped or wrapped stitch with SH1 encapsulating both remaining threads, and start next SR. (I did this before the 4th and also the 5th SRs above). 
This will leave a tiny space between 2 SRs, but it can become a design element.

In both encapsulation methods, the beaded string is not locked and can be pulled to adjust. I went to town pulling away (see above), but the braid can be smoothed back into shape easily.

Despite being invisible from the front, encapsulation simply moves the blip to the back as seen in above pic. Obviously, we need to choose a string that will not be seen as pointed out earlier. I used 3 contrasting colours for purpose of learning. 

3. Knotting: In order to lock the beaded string in place, knotting is required. 
3A. Knotting with 2 threads: We can make an overhand tie or SLT between 2 threads, one of which is the beaded string. In above pic, after closing last SR with bead in center, choose any one shuttle thread and the beaded thread to make the knot, then continue with next SR.
3B. Knotting with 3 threads: Or we can make a knot using all 3 threads (as seen at end). This makes a larger, more visible knot and increases distance between SRs, but can act as a design element.

This is it so far - all my own 'ideas'. 
But before posting, I did a bit more research and found the following !!! 
However, none of these resources make any reference to anchoring the 3rd thread (I didn't check any class logs for possible discussion).  

....to be explored further

Sunday, 30 August 2020

one is here

Pin It now!
Remember this? Well, the Summer 2020 IOLI issue has arrived and I am so excited to hold the magazine in my hand! The previous (Spring) issue is obviously lost, though editor-in-chief Prabha has generously assured me they will send in another copy. 

Hubby was so excited to see the article, co-authored by my prodding pardner, Anita Barry, that he has now urged me to reveal my real name and use/include it in future. So, meet Meenakshi Jain, popularly known in the tatting community as muskaan ;-)  Most correspondents already know my name and Georgia Seitz gave me one of the best compliments when I told her the meaning of this Sanskrit term,  'eyes shaped like a fish'. She said, I was 'meant to tat! Rings are often called oeillets and shuttle is called fish (because of it's shape) in certain languages.'

Back to the publication. It is the last article in the bulletin, and the only exclusively tatting article. But there are so many interesting articles to go through and the images have already inspired me to convert those laces into tatting patterns!

Bookmark adapted into a Mat - WIP

One of the distractions a couple of weeks back was test-tatting a bookmark pattern for Ruth Perry. I liked the central round rings made with balanced double stitches and decided to work it as a square mat instead. It is still a work in progress and can be worked in one pass - several magic pathways are possible! However, I ran out of threads and have shifted attention to completing the hanky edging.

In Anchor size 20, this is just over 7" long. The thread is probably 20 years old and considering the deceptively large amount used up in just this, it might be sufficient to complete the entire mat. Have some ideas in mind to introduce another colour...

This is a multi-purpose pattern. Work it as a single square motif or a beautiful bracelet with ribbon woven through the rings! Or with multiple rows, as a mat! 

Download Bookmark-8-2020 pattern here. She has several more patterns, including a beautiful new Celtic Knot Tatted Square, that I am resisting for now.


Saturday, 29 February 2020

Happy birthday, Georgia

Pin It now!

Seeking an elixir for longevity? Look no further. Georgia Seitz is living proof – she is celebrating her 18th birthday today! Yet she completed 20 years of teaching the Online Tatting Class. Stop doing the math and just be born on the 29th of February :-D
The motifs chosen tell a story together. In the order they were tatted….

Laura Angel is a cute beginner pattern by Anita Barry, named after her friend. Here is the link to the pattern. Made only with mock rings. I added some decorative picots and tied off with a bow instead of hiding ends.
In Red Rose metallic size 20, it is 3 cms high and >2½ cms wide.

Itsy-Bitsy Angels are a take-off from Laura angel. A row of single-shuttle motifs makes a cute garland or edging. Made continuously by climbing out/in with folded SSSR. Quite a bit fiddly and challenging, with no stabilising picots. Anita has since modified the pattern to be worked with 2 shuttles. Later in the year, she will release the pattern. 
In Anchor Pearl cotton size 8, it is 2½ cms X 2½ cms.

To me, Laura Angel represents the teacher – Georgia, and below are 2 Knotty imps, attending her class. After all, it is where Anita & I first ‘met’ and connected as tatting buddies. 

I pulled out 2 of Georgia’s patterns, long on my to-tat list …

Basic Split Ring Heart pattern link 
As visual symbolism to Georgia’s generosity, I wanted a large heart embracing her students within it. Hence chose the thickest thread I had on hand.
I started with the central clover, adding long joining picots on either side, and decorative picots to the middle ring. Moving counter-clockwise, the rest of the pattern was quickly finished. Tails are not hidden, I might tie a tassel or motif later.
In Bliss cotton size 3(?), it is 9 cms high and 7½ cms wide.

The Sitka Rose is one of Georgia Seitz's iconic patterns and I thoroughly enjoyed tatting it!
Worked with single shuttle and ball, I loaded 20 seed beads. Leave 2 beads on ball thread, loop shuttle thread with 16 beads around hand, and work the central ring. 4 beads on each picot. After closing ring, slide the remaining beads – 2 from ball thread, 2 from shuttle thread, make a mock picot and continue with pattern.
I love how this turned out!
In Anchor Pearl cotton size 8, it measures 4½ cms. Size 16/0 beads are used.

The rose symbolises how her protégés have bloomed over the decades.

I first joined her class in mid 2015 and found such a lively tatting cosmos…. meeting so many talented and chirpy tatters in real time, forged friendships and sisterhoods. Georgia, like others before me, encouraged and groomed our potential, letting us spread our wings far beyond what we thought possible.

She has an uncanny eye for detecting something ‘new’, something interesting, in any image or pattern. It is what I liked best – a new perspective, a different way to see the same old.

Being a linguist (she can speak/understand so many languages!), I explained the meaning of my real name and she immediately wrote - “you were meant to tat” - turned out my name is a confluence of 2 common tatting terms in different languages!

I miss our correspondence, chatting about birds and Nature, her sourced fauna pictures, and her ecards with such cute messages. Her humour laces everything! I wish her the best of health and happiness – blossoming just like her Sitka rose.

Many many many happy returns of the day, Georgia !

Monday, 9 December 2019

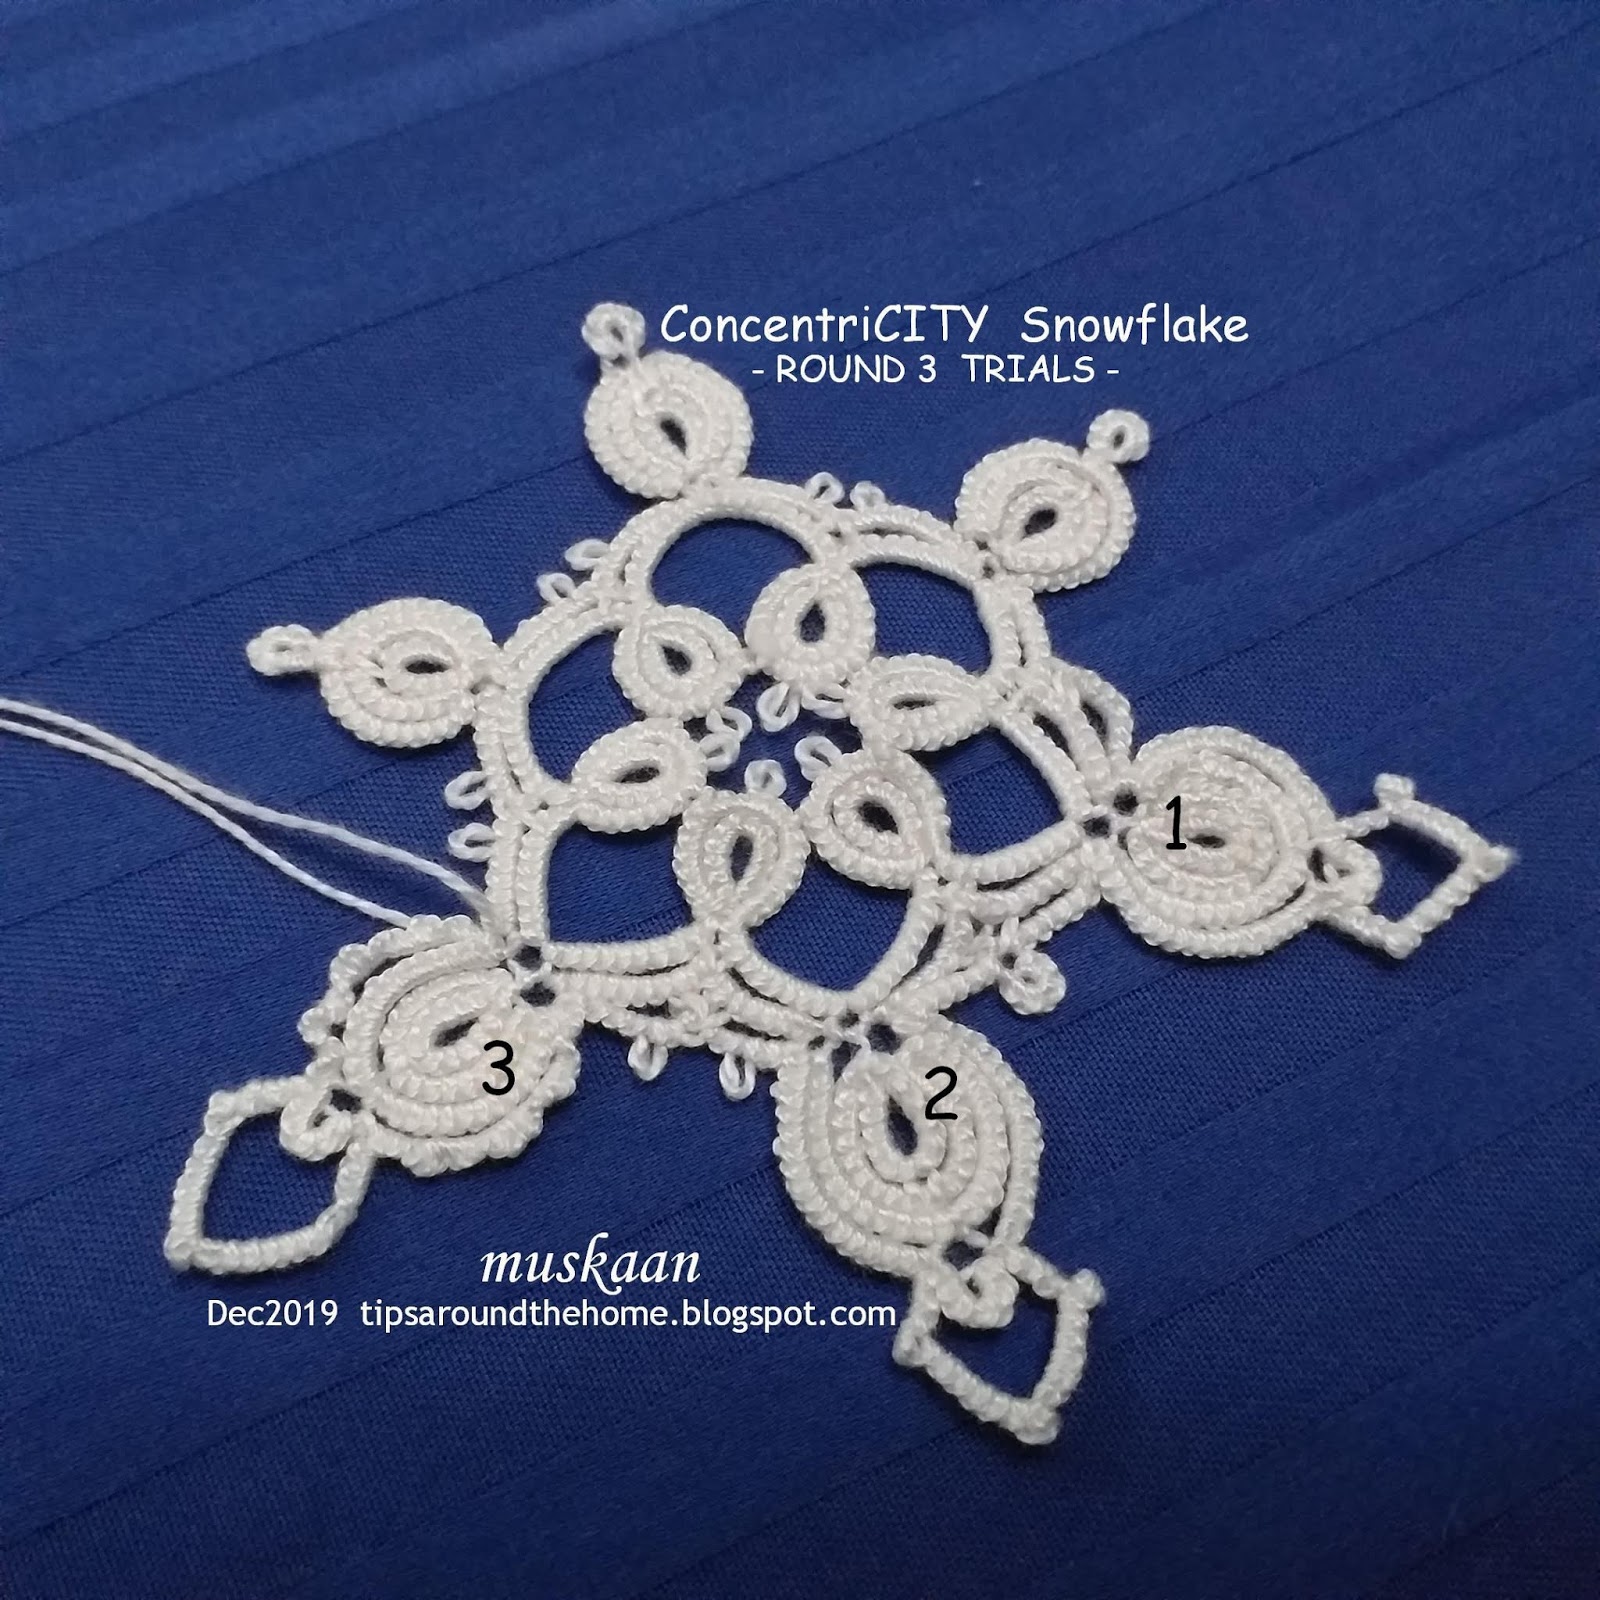
ConcentriCITY pattern

Pin It now!

Snowflake #21 in Land of Laces’ 25 Snowflake Project

This time I decided to go simple. Trouble with ‘simple’ is the constant fear that it’s already been done! Which is perhaps one of the reasons I did a 2nd round. A quick search did not throw up anything like this, and if there is, I haven’t seen or copied it.

I’ve used Kathleen Minniti’s captured adaptation of Aurora Lozada’s Onion Rings method. I find it ‘simpler’ and easier to remember, with great results. Kathleen captures the 1st/innermost ring in the first half stitch (within the loop after flipping the stitch) and proceeds with the 2nd half stitch. The rings stay snug.
In the 2nd round, where I worked the 2nd ring backside (RODS), I captured the inner ring in the 2nd half stitch (see pictorial below).

Both rounds are worked from front, clockwise....

ConcentriCITY snowflake
Small / Round 1 pattern
Worked in both Anchor Pearl (size 8, white) and Lizbeth (size 20), it is <4½ cms. As a hexagon, the side is 2cms.
Ball and shuttle, continuous thread. Start with the innermost ring (A) of onion ring. 
Choose your favourite method to make the onion rings.
I used Georgia Seitz’s Onion Ring or ball thread join.
Then work the chain. Note that the chain picots are NOT linked to each other. They remain free, and are slightly longer.

ConcentriCITY snowflake
Medium / Round 2 pattern
Worked in Anchor Pearl (size 8, white), it is 8 cms. As a hexagon, the side is 4cms.
2 shuttles, continuous thread.
Join to the 2 free picots on adjacent chains. I used a normal lock join, pulling up a loop simultaneously through both.
Check out this explorative study by Eliz Davis of how different ways of joining 2 picots together can be visually different. She tried Consecutive vs Simultaneous Joins. 

Start with the chain, going clockwise.
Lock join to the center picot. Make the 2 inner onion rings. Outer one is a chain, with a thrown ring. Join chain to middle ring, leave some picot space and make thrown ring. Leave equal space after closing ring, and continue chain. Lock join to same picot and continue chain, again making a join to the double picots simultaneously.

Repeat all around.

NOTE: I often have to tweak the stitches - adding half or full stitch in onion rings. Hence, depending on your tension, make the necessary adjustments.

PICTORIAL (with FRONTSIDE/BACKSIDE TATTING) 

The following pictorial shows how I worked one repeat, in directional or frontside/backside tatting. Red is shuttle1 & yellow is shuttle2.
1. After making the chain, make innermost ring with Sh1.

 2. Turn work and start next ring backside. Capturing the inner ring in 2nd half stitch.

 3. Close ring. Both shuttles are now in position to start chain.

 4. Make chain around the onion rings. Make onion ring join or lock join. Switch shuttle to tat a thrown ring, leaving mock picot space. Switch shuttle, and continue chain back on other side. Lock join to base. [see inset].   
 5. Make chain. Put hook through both picots of previous round to pull up a loop and make a lock join.
 6. Continue chain
 7. Make lock join and repeat from 1.
8. Snowflake complete.

 Round 3 TRIALS
I tried a 3rd round. These are the 3 repeats with tweaks in each (from 1 to 3). I couldn’t decide whether to go through with it or not, but feedback on facebook seems to be in favour of making a 3rd round.
I have a couple of questions, though –
  • Should there be a small ring (as in 1 & 2) or 2 picots (as in 2 & 3) between chains?
  • Should the outermost onion ring round be normal (1 & 2) or Victorian Set (as in 3)?
  • Anything else?
This will require making the entire snowflake afresh to make the picots the right size and avoid stretching. Hence it will be counted as a new snowflake for the project – I have 4 more to design/tat before the 25th, so I’m taking this lifeline ;-P


Saturday, 1 June 2019

valley of flowers

Pin It now!
Valley of Flowers mandala doily/coaster
Eleonore Endrucks Leichtenstern  
Pattern #28 from Schiffchen-Spitzen 1920 
UPDATE: 

Starting in 2015, as a summer holiday project for the Online Tatting Class, I have been converting many of Endrucks’ patterns to modern notation in English. These are (mostly) still only on paper as I didn’t get around to actually tatting a sample. The ones I tatted still need a proper presentation. So besides the angel lace and angelette, I haven't shared anything since. I've also come across a couple of errors.

When Georgia shared pattern #28 in this Bellaonline article, I had already written out my own notations. It is such a pretty pattern that I was eager to convert it into thread. 


I took a few little liberties especially with picots to highlight flowers.
The entire book can be downloaded from Georgia Seitz’s Archive (Endrucks 1920 & Endrucks 1920 diagrams insert).

There is some beautifully natural ruffling after some of the rounds, eg. the one above. However I kept tatting and it lays flat easily after blocking with the rolling pin. 
The magenta rings were supposed to be thrown rings on the previous round. Instead I shifted the rings to this outer round and the previous is chains only, so that I could play with  colours easily.


You can see I’ve gone to town with the palette. I had a floral theme (perhaps I was inspired by Jane McLellan’s doily?) and though some colours were changed as I went along, it turned out fine. 

The chains in Endrucks’ tatted model are pretty loose (see last pic below) whereas my tendency is to pull the stitches close. Hence a few stitches had to be added on some chains - starting with the ones under blue flowers, and the 3 corresponding ones in later rounds.

Just shy of 4” in Anchor pearl Cotton which is equivalent to Lizbeth size 20.


I’m calling it Valley of Flowers Mandala – it does have the mandala look about it, right? And I need a Zen-like state to tolerate these soaring summer temperatures of 45+ degree Celsius with no respite for yet another week.

Now for the eye-opener .... 
What I missed while converting the pattern, Georgia Seitz's experienced eye caught!!! Although she wrote in the article, it still took me some time to locate!!
CLIMBING OUT WITH CHAINS : Endrucks worked all 9 rounds continuously WITHOUT any split rings or split chains to climb out. She used simple chains!!! Can you trace these?

Not acceptable by modern standards, yet I think this is a great way to climb out especially when we are doing trials of possible designs – quick and easy and obviously lazy ;-D

Hope you are enjoying much better weather and lots of tatting creativity :-)

UPDATE: For all links and pattern pdfs in modern style scroll through Endrucks 1920 Project document - https://docs.google.com/document/d/17LEVftXweztBIOWh4sL4BB7bX65ssoOsOn4oXIgCepY/view

Monday, 15 April 2019

joys of dancing

Pin It now!
We are enjoying the sights, sounds and antics of a variety of birds; including their dance of courtship or under the sprinkler or in a puddle! The kingfisher (with a few sparrows) has returned after a gap and sits on a tree in clear view!
joys of dancing with friends !
When we had first moved here over 20 years back, there used to be a couple of peacocks strutting around! They soon disappeared, never to return.

Anita Barry has been strutting my Dancing Peacocks & it's my turn to dance now :-D
She converted the medallion into a beautiful pendant and also worked out her stitch count for the earrings for a size 8mm bead. The green chain has padded double stitch!

This is another pic of her very first try immediately after I uploaded the pattern ('18) – love the vibrant colours & frayed picots!!!
While adding her count, I took the opportunity to draw some stepwise diagrams of the floating beads method, as relevant here, as well as generic. With her valuable and in-depth feedback, the notes on page 2 are more streamlined now.

I will delete the old one and substitute it in my patterns page above

At Camp Wanna Tat they have a “Pattern Binder” available for workshop attendees to look through and review. This April my peacocks have been mailed to attendees.
And the same pattern will now be taught at Palmettos Tat Days in September this year! Here's a link to the inspiring class pictures. 

My patterns have made it to the Tat Days goodie bags two years in a row ('16 & '17), thanks to Georgia Seitz's initiative.  
Speaking of, she will be teaching Noorjahan's Rubies - necklace and earrings - at the Shuttlebirds event in May! She is using metallic thread, though I haven't seen it yet. I hope to do the same someday.


I have fair reason to dance despite this hot Indian summer, right ?!


All these patterns have floating beads methods! I was hoping to create more diagrams for the method and it’s variations, but doubt if it’ll get done by the end of this month. There Has been progress, though.


My heartiest thanks to Georgia and Anita for letting me dance :-))))

An update to my previous post - 2 new pics have been added - one of mimosa knot leaves, and another prototype of a rose bud. Do check them out. 


Related posts

Monday, 1 April 2019

happy tatting with old and new

Pin It now!
A very happy International Tatting Day!

I’ve had a fruitful day – I’ve tatted a cross from a vintage edging, tried a new technique, gorged on black forest pastry (it has chocolate ;-P), and am now going public with this blog post. 

Georgia Seitz has a puzzle - can we work this vintage edging continuously? Hmm, I couldn’t, but I did convert it into a cross that can be tatted in one pass. And if the puzzle intrigues you, attend class today to see if our talented participants have answers. They always have tons of ideas !

The dark purple one was made first but felt too long, then 'improved' upon in the brown one. But I think the chains in the long arm should be shorter, leaner. That arm looks like it’s grown biceps !!!
In Red Rose pearl cotton (size 8) the brown cross measures 8½ cms x 6½ cms & the first one is longer at 9½ cms.
Techniques I used : 2 shuttles, directional (fs/bs) tatting, central picot, SCMR with mock picot and thrown ring, ring made with 2nd shuttle (like thrown rings), lock join.

I need your help in naming the cross. What should I call it?
It is edging #436 from Coats and Clark #138 Priscilla Edgings. And if you have any design improvement ideas, please do advise.


Now to the lovely new effect, Mimosa Knot, shared by Daniela Mendola to create pointed rings and chains. I tried them on rings only including half-closed rings.
My understanding of the Mimosa Knot on ring, based on movements in video :
  1. It starts off as a self-closing mock ring or SCMR (holding core thread loop at base) ;
  2. Make the 1st half stitch, but before snugging, pass shuttle front to back through open loop and adjust tension – this creates a twist in the thread just like in the treble tat stitch. Except that in treble, there are 3 twists, whereas here there is a single twist.
  3. Next make the 2nd half stitch, and pass shuttle back to front to twist, and snug.
  4. Close loop in 2 stages as we do for any regular SCMR. But my core thread did not slide freely after closing SCMR. I had to do this 5th step to ensure free movement & it worked every time ...
  5. Hold the mimosa knot in pinch and tug/pull the core thread such that the knot transfers and core thread becomes free.
Doesn’t this remind you of Frivolé’s one-stitch SCMR (for pointed chain) combined with Ninetta’s treble tat stitch (2nd half)? The SCMR lifts up the stitch to create a point (see 1 wrap tds here). 
Usha’s dot picot also creates a pointed effect and I remember doing a comparative study on pointed rings (perhaps privately?). Jon Yusoff also created pointed chains. Now I’ll have to add the mimosa knot to the compilation :-D

All links can be found in the tabs above (My Tutorials & Tatting Resources) or type in search box.

Can’t thank global tatters enough for sharing generously !