Showing posts with label Eliz Davis. Show all posts

Saturday, 30 November 2024

SOUP catcher

Pin It now!


I haven't touched my shuttles for almost 3 weeks now, but I needed a small decoration for splocik's monthly game. So, I did a quick search in my stash and found motifs I had tatted in September. I hastily put these together to create some kind of ornament. It resembles a dreamcatcher somewhat, but could just as well be a suncatcher, a window decoration or a tree ornament. And overall, it could've been better! This will have to do for now since only a few hours remain of November.

Being made of pieces in my stash and with no clear identity, I was tempted to call it my SOUP* catcher! Remember what SOUP stands for? - Sewing On / Using Pieces of tatting. However a few of my friends say it does look like a dreamcatcher. And these are the component pieces ....

Motif #1 Mituko Ikuta's 1994 book 'Shuttle Lace: Tatting and Beads 1' has several picot effects which became popular as 'Ikuta Picots' through Georgia Seitz's tribute to the designer. The above motif is from Ikuta Picots Diagrams 1  by Georgia Seitz (https://www.theonlinetattingclass.com/technique-tools). Worked in Lizbeth size 20.

Motif #2 And this is from Diagram 2 same link as above. In the first motif the long picots appear like adjoining or continuous picots, being joined at the same distance. These are double picots and the two threads can be arranged to better resemble them - I did not. Worked in Anchor Pearl Cotton size 8.
In this 2nd motif the very long picots are joined to adjoining elements (rings here) and form overlapping layers with careful interweaving.
This time I pinned the long picots in 2nd motif while blocking in order to achieve the points. I like this better since it opened up the picots - what about you?
My pictorials for her overlapping picots effect - https://tipsaroundthehome.blogspot.com/search?q=Ikuta+picots
Motif #3 I was inspired by Corina Meyfeldt's beautiful Sakura pattern (https://cmhandmade.blogspot.com/2014/11/pattern-sakura.html). I had started out to tat the sakura, but pre-stringing the beaded picots (notice I put 3 yellow beads at the tips?) was quite time-consuming so I went freeform with only 5 stamens. Worked in Anchor Pearl Cotton size 8.

There's a backstory to this. When I did the post about Tatted Fringe (https://tipsaroundthehome.blogspot.com/2024/08/on-fringes.html) Stephanie W told me about her beaded fringe which she made using Nina Libin's 'single file beaded picot' and even sent me a pic! It reminded me of Corina's Sakura which had been taught in Georgia's class. The method is exactly the same, though for a fringe the picots would likely be longer.
Motif #4 The large mustard 4-petalled motif in the center of the bangle is an adaptation of Eliz Davis' motif (https://tatknot.blogspot.com/2016/05/mock-ring-by-joining-chain-back-to.html) which I made before in blue (https://tipsaroundthehome.blogspot.com/2016/05/of-long-chains-large-rings.html). After everything was assembled, I realised I hadn't taken a pic of the motif separately. Worked in Anchor size 20 (¬size 10).

Motif #5 There was a prominent negative space in the 4th motif so I sewed in the Fringe Star 

I wanted to take a short video of the SOUP dreamcatcher but it wasn't to be. 

How fast this year has slipped by! Only one more month left, one last submission left. Do check out the range of October entries in splocik's 'Small Decorations' game - https://splocik2.blogspot.com/2024/11/male-dekoracje-2024-galeria.html

Many many thanks to all mentioned in this post!  

Saturday, 6 November 2021

fooled by the tool

Pin It now!
It is always such a thrill to see my pattern crop up and even more so when it comes in such wonderful versions with impeccable tatting. So which tool did these talented artists use to tat?

I have chosen a very small selection of the many that are gladdening my heart and eyes; these are presented here in chronological order. They are all needle-tatted from my patterns that were presented for the shuttle.

needle-tatted by Gloria Nelson, June 2019

Gloria Nelson's modification of the Paisley Snowflake with graduated picots has brought more character to the flake, and the design and variegate fell in sync! But can you tell it is needle-tatted?

New tatters often ask which tool is better or easier - needle or shuttle. Valid question but no easy or straightforward answers. There are tatters who spent their life using one tool and muscular ailment forced them to change to the other because their love for the craft overpowered their discomfort. On the other hand a tatter may stick with the first tool s/he learned on, for their entire life without any curiousity to try another. Then there are those who deliberately learn tatting with the other tool (&/or hand as Eliz Davis did) in order to become more proficient at teaching and diversify their knowledge.

Ninetta Caruso said it best - hand is the tool

We could take this quite literally, too! Teri Dusenbury used finger tatting a lot. Hey, where's that tool now? And for the truly determined one hand will get the task done as Marilee Rockeley has demonstrated.

needle-tatted by Amarilys Cwb, Sept 2021 
Amarilys Cwb made some mistakes in this first attempt (not that I had noticed any) and worked it a 2nd time below with minor adjustment to picot size on chains.  
needle-tatted by Amarilys Cwb, Sept 2021

Second attempt of the Silver Linings Snowflake by this tatter from Brazil who can work with both needle and shuttle.

For some reason, probably starting with it being a late entrant, the needle has been looked down on as the stepsister in tatting. To date some purists consider only shuttle as the legitimate tool for tatting. 

Why? Look at the numerous patterns Nicola Gooday Bowersox has shared with us for free. I could never identify from only seeing her model that it was needle tatted! Could you tell? 

needle-tatted by Amarilys Cwb, Oct 2021
What about this gorgeous rendition of the Floating Beads earrings?! I had to ask Amarilys whether it was done with a needle or shuttle! Those cute beads really transform my simple pattern with 'boring' pearl beads, into something fun and enticing.

Elena Kozinenko is proficient with all tools be it shuttle, needle, or a cro-tatting hook. Even a netting needle! And unless she points out, one would never guess whether she used a needle or shuttle. I asked her which tool is her favourite and this is what she says - 
'I have absolutely no choice. It all depends on the idea that needs to be implemented and even on the mood!'
Oh, to have that kind of flexibility! She has such a range of patterns and frequently uploads videos that demonstrate a technique using each of the 3 tools - https://fairylace.kozinenko.com/three-types-of-tatting/

needle-tatted by Lella Loops, Nov 2021
Lella Loops is yet another needle-tatter who has such finesse with her needle! Besides this recent Frost Flower Snowflake, she has tatted a few more of my patterns earlier and wowed me every time!


Returning to Gloria Nelson, she needs no introduction! She frequently shares her expertise with her Facebook group for needle tatters. If we follow and apply her tips, the usual 'visual identifiers' of needle tatting will disappear! 
But here are a few of her must-read articles, shared in her Sparkling Light Creation Studio page https://m.facebook.com/story.php?story_fbid=1774052256037040&id=724059564369653
  • Needle and Shuttle – What’s the Difference?
  • Can a needle tatter follow shuttle videos and tutorials
  • Patterns - Can a Needle make shuttle patterns
So any tool in the right (or left!) hands, combined with the passion to lace, is ultimately what matters. And the journey's enjoyment for accompaniment...


As an aside .... I have wondered for years how needle tatters feel when shuttle tatters collectors display their collection of shuttles? There is such a Vast range to choose from, with new designs, materials, and decorations coming out frequently. Now a tatting needle can be so boring in that sense, except perhaps for the material used? 
 
At the very least, why can't the needles be colour-coded for size at the eye end? eg these tapestry and chenille needles from Pony - https://tipsaroundthehome.blogspot.com/2018/08/needle-tips.html 
Or can some kind of fortified coloured plastic needles for tatting? 
Can needle-tatters come up with ideas to share with suppliers and manufacturers to make the needles prettier and more of a collectors' item?

I'd like to thank each of the tatters mentioned in this post for all their dedicated and inspiring work. 
I want to stress that they constitute a very thin slice of the talented multitude,
all of who I cannot name or might not even know of. 


All patterns mentioned in the post are free and can be found here - https://tipsaroundthehome.blogspot.com/p/patterns-designs.html

Monday, 9 December 2019

ConcentriCITY pattern

Pin It now!

Snowflake #21 in Land of Laces’ 25 Snowflake Project

This time I decided to go simple. Trouble with ‘simple’ is the constant fear that it’s already been done! Which is perhaps one of the reasons I did a 2nd round. A quick search did not throw up anything like this, and if there is, I haven’t seen or copied it.

I’ve used Kathleen Minniti’s captured adaptation of Aurora Lozada’s Onion Rings method. I find it ‘simpler’ and easier to remember, with great results. Kathleen captures the 1st/innermost ring in the first half stitch (within the loop after flipping the stitch) and proceeds with the 2nd half stitch. The rings stay snug.
In the 2nd round, where I worked the 2nd ring backside (RODS), I captured the inner ring in the 2nd half stitch (see pictorial below).

Both rounds are worked from front, clockwise....

ConcentriCITY snowflake
Small / Round 1 pattern
Worked in both Anchor Pearl (size 8, white) and Lizbeth (size 20), it is <4½ cms. As a hexagon, the side is 2cms.
Ball and shuttle, continuous thread. Start with the innermost ring (A) of onion ring. 
Choose your favourite method to make the onion rings.
I used Georgia Seitz’s Onion Ring or ball thread join.
Then work the chain. Note that the chain picots are NOT linked to each other. They remain free, and are slightly longer.

ConcentriCITY snowflake
Medium / Round 2 pattern
Worked in Anchor Pearl (size 8, white), it is 8 cms. As a hexagon, the side is 4cms.
2 shuttles, continuous thread.
Join to the 2 free picots on adjacent chains. I used a normal lock join, pulling up a loop simultaneously through both.
Check out this explorative study by Eliz Davis of how different ways of joining 2 picots together can be visually different. She tried Consecutive vs Simultaneous Joins. 

Start with the chain, going clockwise.
Lock join to the center picot. Make the 2 inner onion rings. Outer one is a chain, with a thrown ring. Join chain to middle ring, leave some picot space and make thrown ring. Leave equal space after closing ring, and continue chain. Lock join to same picot and continue chain, again making a join to the double picots simultaneously.

Repeat all around.

NOTE: I often have to tweak the stitches - adding half or full stitch in onion rings. Hence, depending on your tension, make the necessary adjustments.

PICTORIAL (with FRONTSIDE/BACKSIDE TATTING) 

The following pictorial shows how I worked one repeat, in directional or frontside/backside tatting. Red is shuttle1 & yellow is shuttle2.
1. After making the chain, make innermost ring with Sh1.

 2. Turn work and start next ring backside. Capturing the inner ring in 2nd half stitch.

 3. Close ring. Both shuttles are now in position to start chain.

 4. Make chain around the onion rings. Make onion ring join or lock join. Switch shuttle to tat a thrown ring, leaving mock picot space. Switch shuttle, and continue chain back on other side. Lock join to base. [see inset].   
 5. Make chain. Put hook through both picots of previous round to pull up a loop and make a lock join.
 6. Continue chain
 7. Make lock join and repeat from 1.
8. Snowflake complete.

 Round 3 TRIALS
I tried a 3rd round. These are the 3 repeats with tweaks in each (from 1 to 3). I couldn’t decide whether to go through with it or not, but feedback on facebook seems to be in favour of making a 3rd round.
I have a couple of questions, though –
  • Should there be a small ring (as in 1 & 2) or 2 picots (as in 2 & 3) between chains?
  • Should the outermost onion ring round be normal (1 & 2) or Victorian Set (as in 3)?
  • Anything else?
This will require making the entire snowflake afresh to make the picots the right size and avoid stretching. Hence it will be counted as a new snowflake for the project – I have 4 more to design/tat before the 25th, so I’m taking this lifeline ;-P


Wednesday, 3 July 2019

journey to 500th

Pin It now!
A journey that started due to limitations of pinterest and continued to this 500th blog post! And this simple edging symbolises that journey - from sketch to lace.  
I'd dabbled in some paintings & doodles in MS Paint, but this was my first 'tatting diagram’ in July 2014. 
2014 was the year when I transitioned from traditional tatting to learning 'new' techniques,  methods,  experimenting,  consolidating,  applying, .... Help, encouragement and inspiration came from InTatters (now Craftree), tat-alongs, & numerous online resources including blogs. And later the Online Tatting Classes (including Design Class) & now facebook. Numerous individuals left their mark and continue to do so, many of who have become friends, diligent readers, and commenters. A truly satisfying journey in all respects.

So, the sketch remained only as my personal eye-candy, not knowing how to estimate stitch count and realise into tatting. (The original got lost in a crash but luckily I had this printout.)
In 2016 tatters were making those Concentric Rectangles doilies and I remembered this diagram. Was it similar and if not, could it be adapted similarly? Eliz Davis backed me enthusisatically and offered to test And make the entire mat as soon as I finalised it. 
This is what I did in July 2016. You can see it in this Nov ’16 collage.

Another 3 years had to pass before I picked it again on realising that my 500th post was round the corner!!! Okay, the July is purely coincidental, but it also happens to be the month I landed on earth! And 'muskaan' is a moniker I adopted due to trolling fears, but most of you privately know my real name. After so many years interacting with this lovely community I would reveal my name, but now I'm happy with the moniker which means 'smile' :-))))

500 posts in  years. Filled with so much of my learning journey from a transitional newbie to 'teacher' and ‘designer’, accepting and thriving on personal challenges. What started out as a blog of many things soon converged into tatting for lack of time, with only a smattering of other interests. And yet not everything has seen the blogging light! 

As a thank you, I dedicate this to the generous online tatting community and all my readers. The name was aptly suggested by Anita Barry (along with a few other wonderful options). I’m still working on the possibilities and will share patterns along the way.

Blogging has sustained and satisfied me in almost all spheres and roles. I hope you continue to journey with me, spicing up my blogging life :-) I regret not taking the name of every individual who touched and affected my tatting path but please know that you have become part of my treasured tatted lace.

Thank you, with a muskaan  J
ZYZ

Monday, 16 April 2018

make me pretty please

Pin It now!
Still waiting patiently but the butterfly has not shown up yet. Instead of losing hope, I decided to have some collective fun while we wait.

Ready for a bit of fun to empty your shuttles and use up scrap threads ?

Here's a little pattern - with only 4 rings and a couple of chains. I wasn't going to show a diagram or tatted model, but then succumbed in the fear that you might start throwing your shuttles at me... wouldn't want you to lose or break them now ;-P Hmmm, but I could possibly start my own shuttle collection then - now there's a thought! Bring it on, then ...

The working order and stitchcount is diagrammed on the right (above). 

And below is the written pattern for the ‘skeleton’ -
For directional or fs/bs tatting, rings are worked frontside and chains backside.

“make me pretty” butterfly fun pattern
          
        One shuttle and ball, CTM.
A-Ring : 6 vsp 10 rw
B-Chain: 14 – 3 rw
C-Ring : 4 + (to vsp) 18 – 2. dnrw
D-Ring : 2 + (to C) 18 vsp 4 rw
E-Chain: 3 + (to B) 14 rw
F-Ring : 10 + (to vsp) 6.
         Tie and cut.

I would love for you to decorate this ‘skeleton’ as your heart desires - with picots, beads, or what have you. Be a designer and choose your style & placement of picots, beads, accessories, and colours.

For a list of options, inspiration, and tutorials/resources, please check out Eliz Davis' incredible compilation - An Element-al Approach to Tatting Techniques.

You can post a pic on your blog, social media site, etc., but please do send me a link so that I can share it with everyone.  Or you can email (on my profile page) a pic and I will upload it here.

Do you feel inspired to join? I hope so …
Let’s fly together ! 

Wednesday, 14 February 2018

beautiful hearts

Pin It now!
First, erratum in Heart Square pattern : I have updated the pdf and also written it out in my previous post here. If you have printed, add the ‘cwj’; otherwise please download the pdf again.


Usha sent me this quote after seeing my heart square :
Y One beautiful heart is more  important than a million beautiful faces. Y
This post is all about beautiful hearts in the tatting world. I have been fortunate to share their special friendship as well their creativity, making tatting that much more pleasurable.
So dedicating this to All my tatting friends, many of who have a presence in this compilation. 


Rose Bookmark
I had the pleasure of testing and diagramming it for her. It is such a fabulous adaptation, extension & application of Vicki's original. In one pattern you have a bookmark, pendant and earrings! 
In diagram – change in colour denotes turn or reverse work. and switch shuttles. The accompanying pics of tatting steps further clarify the process in her beautifully laid out pdf.
Judith reminded us of the reverse join instead of lock join. With the former, the rose can be worked with ball & shuttle instead of 2 shuttles.

I added a bud and some floating twisted picots for thorns
The bud needs some tweaking.

In answer to a question in class – We are using 3 threads for pearl tatting the stem, adding the third thread as directed.
‘Pearl tat in sets of 6’ means you make 6 unflipped stitches with one shuttle then 6 with the other shuttle, over the 3rd core thread (thus encapsulating it). This tutorial & this stepwise pictorial show how to get the sets to face in opposite directions. 
This time I cheated making sets of normal 6 ds by using the ‘encapsulated’ thread in shuttle and alternating the green threads to form the stitch. This made it easier to twist the picots for thorns.

The stitches should’ve been snugged closer to make the chain more compact and stiff. I needed to stiffen it with diluted white PVA. It does work!
I would’ve loved to make a Josephine chain with thorns, but using finer thread for the stitches.

The pattern is free on her blog.

UPDATECheck out Coretta's tutorial on the multiple ways in which this rose can be worked, not including all-chains (starting with a mock ring).

YYYYYYY

I chose to do the rose in yellow again for my niece for her book.
YA friend is the best gift ! Y
The collage shows the other bookmarks that will go into her big book of 
'what happens after' in popular fairy tale stories ! Clockwise from top left, - 
Morning Glory bookmark (my virtual soulmate, Eliz) ; 
Rose bookmark (creative Coretta from Craftree) ; & 
Jane's bookmark (my hands-on inspiration Jane McLellan)


YYYYYYY
Rosebud  Heart
The little rosebud effect in this Rose Circle doily posted by Ka-ryun intrigued me. You know I love layers! Initially I mistook it for some kind of onion ring. However, these are simple rings that are inserted inside one another before joining on the way back. I worked a heart shape around it.
This was a quick trial. The ring size needs tweaking to better resemble a rosebud. 

Heart
by Anita Barry (my tatting mate)
This belonged with her tip in previous post. But I deliberately saved it for now.
However, I will now add the pic there as well. You can clearly see how the picot between 4 first half stitches (seta) & 4 second half stitches (setb) creates a pronounced dip.

Heart Square
Usha Shah's red heart model!
See the heart square in red & pink, worked by Usha (the friendly dot picot tatter)!
I was sick of working with pink after my 5-day marathon and had opted for a gold and purple combo. I'm glad she did the work for me ;-P

There are so many others, not named here, who have immensely enriched my tatting life in these few short years. Y My thanks to each one of you for your beautiful heart. Y

Y wishing you many happy hours of hearty tatting  Y

Friday, 7 October 2016

a mixed bowl

Pin It now!
First things first…
I was going to post some of these along with the answers to my Set I questions. But This Way or Tat? (see all related posts at end for all links) has been lapped up by Georgia Seitz for her Online Tatting Class on Oct 10th (wait for the official announcement, though, just in case!) :-P  Thanks Georgia! Makes no sense in giving out answers at this stage. Plus, it struck me, why should I give answers ? It is the interested reader who should be sending in the answers if they wish, right ?! However, I will share some of the links later next week.
And now, ladling out …..

a mixed bowl of  tattiness :-P

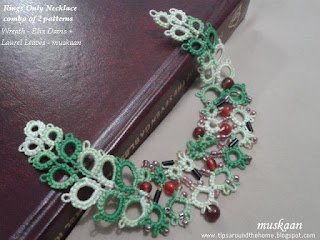
Eliz Davis’ Ring Only Wreath – beads in the soup !

Decided to make the wreath  more Christmasy with beads for bling and ‘red cherries’ for a crunchy topping. Strung all these beads (and more) while thread was still on the ball, and then realized it was a short leftover thread :-( Restarted. 
Wound the beaded part on to shuttle but left thread attached to ball (the dark green on left side). It was a good decision coz I ran out of thread midways and could continue from the ball end, by stringing in more beads.
With beads adding some nice weight, it looked like a potential paazeb (broad anklets here) . (this video is of a Hindi movie song. It is a very decent song - don't get all excited by the first glimpse! I added this link because the song is all about the paazeb as a metaphor and as a bond between the 2 lovers. They are the Romeo-Juliet couple of Indian folklore). Of course, it would need a few ghungroos too!
Instead, wary of bead-stringing, I took the easier route – sewed in the two laurel leaves from previous post (mirror images).
Can be used as a necklace/choker with some stiffening & the right materials, and a chain added. Or as a frame around an oval daguerreotype.

My Butterfly Liberated - can't escape now, booked for a serving !
Wherefore did this daguerreotype emerge ?  The House of the Seven Gables – that’s where.
I’d read this long back, but picked it up again by mistake, and decided to read again. I love these leatherbound editions (although there are always some typos) with their attached satin ribbon bookmarks. However, the ribbon is short & tends to fray. It s also difficult to actually find the page coz there's no long ribbon end to hold on to. Here’s my instant solution (and expect many more such for all my other books in this publication)
My butterfly prototype with ribbon inserted & glued. Added just the right weight & stability, too.
TIP : My idea is also to try to string a few more butterflies & flowers along the entire length…..must rummage through my stash of old motifs !

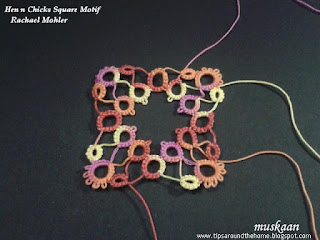
Rachael Mohler’s Hen n Chick Square Motif – a mini coaster to set the bowl !
Intending it for a mini coaster, I used thick thread – a size 7 perhaps.
My first time trying out the Dora Young Knotless Method (DYK) on a Ring ! Loved it! Opens up more possibilities. UPDATE: video link - https://www.youtube.com/watch?v=4SoGklhCqL0
Unsure how the DYK rings would turn out, I had started with leftover threads. Hence the numerous tails.
TIP : Adding new thread to a bare thread pattern : Leave about 4-5" tail of previous ring. Start new ring with new thread by grabbing the old tail within the new thread loop, and tatting over the new tail for few stitches. This takes care of one tail. Later, sew in the old tail in this new ring. No Knots !!!

And I misspelled Rachael's name in the Set I pdf . So I took the plunge into Doc Hubs and figured out how to edit it, YAY! New downloads will have the correction, but those who have already printed it out, please make the correction.
It was also my very first Hens n Chicks working.

But my MIL had made several handkerchief edgings using this pattern back in the 90s for gifting, etc.. Sorry about the blur - the original pics were small.


Together we fly butterfly – it’s all in the mix !
A small butterfly project on Craftree. Unknown designer, stitch count & prototype by Claudia & diagram by me. Many others have shown interest in test-tatting. That’s why I called mine ‘Together We Fly”. The diagram is not finalized – waiting for more feedback. This is my working. All in one pass. Can easily be made in 2 colours, using single shuttle and ball. Will share more details eventually. It’s such a pretty butterfly.


tattingweed’s Crinoline Doily – keep stirring in all directions !
This gorgeous doily pattern by the talented Korean, Hamigyeong, was added to the Craftree database yesterday. And the moment I saw the pattern, I just Had to give it a go. See all the directional changes it incorporates ? Wow ! Started in size 40, aiming for a glass window effect . This has given me so much more thought for the TWoT series. Will share working details later; this is just a quick peek ….

I enjoyed this multi-project bowl tremendously ! Hope you enjoyed my serving :-)


happy tatting always :-)

Related Links :
This Way or Tat? (TWoT) Series - Preface (Quo vadis) ; Introduction ; Set I - Rings Only
Eliz's left v/s right hand tatting effect on direction