Showing posts with label Gloria Nelson. Show all posts

Sunday, 17 April 2022

Deaconess Butterfly 1916

Pin It now!

Back in 2019, I had tremendous fun tatting the Deaconess Butterfly (from 1916) using beads to pretty it up. Recently Cross-eyed Tatter left a comment asking for help. (https://tipsaroundthehome.blogspot.com/2019/10/beady-eyed.html). 

After reading up my notes as well as the rewritten pattern by Carolyn Groves (in 2002) to refresh my memory, and being in a diagramming mode, I decided it would be better to share a diagram than simply notate the model. So here it is ---


And here is the pdf link (click to download) - https://drive.google.com/file/d/1gDRWAwqyN7f6kdsu9yybtQj9-l_QpsFn/view

For the above beaded version refer to my detailed notes here - https://tipsaroundthehome.blogspot.com/2019/10/beady-eyed.html

It took me a while to do the diagram to my satisfaction since parts of the pattern can be a bit confusing especially if one is a visual tatter. 
Pay close attention to the sequence. 
TIP: There are multiple joins between the head and body, and body and tail. Hence make sure the picot is sufficiently accommodative. 

Cross-eyed Tatter already figured it out and was tatting it based on her last comment. For what it's worth, I hope this diagram helps tatters in future. I will also send it to The Online Tatting Class, since that's where I first tatted it as homework. 

UPDATE: Thanks to some good sleuthing by Gloria Nelson and Wally Sosa, the original source of the pattern is as follows: 'Butterfly Motif' by The Deaconess in 'Practical Tatting Book No.1', 1916. (Reprinted in the book, 'Tatting- A Potpourri of Patterns' by Handy Hands). The pdf and image above have been updated with this info.

That's it for now. Butterflies never go out of season! So, let's enjoy 🦋🦋🦋
And if you find a mistake, please holler!

Saturday, 6 November 2021

fooled by the tool

Pin It now!
It is always such a thrill to see my pattern crop up and even more so when it comes in such wonderful versions with impeccable tatting. So which tool did these talented artists use to tat?

I have chosen a very small selection of the many that are gladdening my heart and eyes; these are presented here in chronological order. They are all needle-tatted from my patterns that were presented for the shuttle.

needle-tatted by Gloria Nelson, June 2019

Gloria Nelson's modification of the Paisley Snowflake with graduated picots has brought more character to the flake, and the design and variegate fell in sync! But can you tell it is needle-tatted?

New tatters often ask which tool is better or easier - needle or shuttle. Valid question but no easy or straightforward answers. There are tatters who spent their life using one tool and muscular ailment forced them to change to the other because their love for the craft overpowered their discomfort. On the other hand a tatter may stick with the first tool s/he learned on, for their entire life without any curiousity to try another. Then there are those who deliberately learn tatting with the other tool (&/or hand as Eliz Davis did) in order to become more proficient at teaching and diversify their knowledge.

Ninetta Caruso said it best - hand is the tool

We could take this quite literally, too! Teri Dusenbury used finger tatting a lot. Hey, where's that tool now? And for the truly determined one hand will get the task done as Marilee Rockeley has demonstrated.

needle-tatted by Amarilys Cwb, Sept 2021 
Amarilys Cwb made some mistakes in this first attempt (not that I had noticed any) and worked it a 2nd time below with minor adjustment to picot size on chains.  
needle-tatted by Amarilys Cwb, Sept 2021

Second attempt of the Silver Linings Snowflake by this tatter from Brazil who can work with both needle and shuttle.

For some reason, probably starting with it being a late entrant, the needle has been looked down on as the stepsister in tatting. To date some purists consider only shuttle as the legitimate tool for tatting. 

Why? Look at the numerous patterns Nicola Gooday Bowersox has shared with us for free. I could never identify from only seeing her model that it was needle tatted! Could you tell? 

needle-tatted by Amarilys Cwb, Oct 2021
What about this gorgeous rendition of the Floating Beads earrings?! I had to ask Amarilys whether it was done with a needle or shuttle! Those cute beads really transform my simple pattern with 'boring' pearl beads, into something fun and enticing.

Elena Kozinenko is proficient with all tools be it shuttle, needle, or a cro-tatting hook. Even a netting needle! And unless she points out, one would never guess whether she used a needle or shuttle. I asked her which tool is her favourite and this is what she says - 
'I have absolutely no choice. It all depends on the idea that needs to be implemented and even on the mood!'
Oh, to have that kind of flexibility! She has such a range of patterns and frequently uploads videos that demonstrate a technique using each of the 3 tools - https://fairylace.kozinenko.com/three-types-of-tatting/

needle-tatted by Lella Loops, Nov 2021
Lella Loops is yet another needle-tatter who has such finesse with her needle! Besides this recent Frost Flower Snowflake, she has tatted a few more of my patterns earlier and wowed me every time!


Returning to Gloria Nelson, she needs no introduction! She frequently shares her expertise with her Facebook group for needle tatters. If we follow and apply her tips, the usual 'visual identifiers' of needle tatting will disappear! 
But here are a few of her must-read articles, shared in her Sparkling Light Creation Studio page https://m.facebook.com/story.php?story_fbid=1774052256037040&id=724059564369653
  • Needle and Shuttle – What’s the Difference?
  • Can a needle tatter follow shuttle videos and tutorials
  • Patterns - Can a Needle make shuttle patterns
So any tool in the right (or left!) hands, combined with the passion to lace, is ultimately what matters. And the journey's enjoyment for accompaniment...


As an aside .... I have wondered for years how needle tatters feel when shuttle tatters collectors display their collection of shuttles? There is such a Vast range to choose from, with new designs, materials, and decorations coming out frequently. Now a tatting needle can be so boring in that sense, except perhaps for the material used? 
 
At the very least, why can't the needles be colour-coded for size at the eye end? eg these tapestry and chenille needles from Pony - https://tipsaroundthehome.blogspot.com/2018/08/needle-tips.html 
Or can some kind of fortified coloured plastic needles for tatting? 
Can needle-tatters come up with ideas to share with suppliers and manufacturers to make the needles prettier and more of a collectors' item?

I'd like to thank each of the tatters mentioned in this post for all their dedicated and inspiring work. 
I want to stress that they constitute a very thin slice of the talented multitude,
all of who I cannot name or might not even know of. 


All patterns mentioned in the post are free and can be found here - https://tipsaroundthehome.blogspot.com/p/patterns-designs.html

Sunday, 30 June 2019

spin away

Pin It now!
Firstly, thank you for your response to my design dilemma with respect to this snowflake. I do love blogging :-)

Snowflake #3 for Land of Laces25 Snowflake Project on facebook.

Spin Away Snowflake

Here’s what I have done with it finally.... 
I switched the rings around the central ring to face in the opposite direction, leading to the next rings having their broader side on the outside, and so on. 
It gave me the long arms, but a broad base tapering naturally to the tip unlike the blue version previously where the dendrites appear spindly.  
In that sense, the arm is an extension of the original yellow flake.
The 2nd chain segment could've been shorter in version 3. Instead I changed something else … 
This is the final version worked in Lizbeth size 20. 


Can you spot the change between versions 3 & 4 ? 
Which do you prefer - the green or blue one?

Since there was no clear consensus, and I Have worked on them all, the pdf contains all 4 patterns. You can pick and choose one or more, since each is a stand-alone.
I also included the 2-colour version merely to show the working sequence of shuttles.


The snowflake is worked in one-pass by climbing out of the central ring with a mock picot, as instructed in the pattern. However, here are a couple of alternate routes …

Alternate working :
  1. Pull out a length of thread from shuttle 1, work the central ring and climb out with mock picot. Use this tail to work the 2nd side of the first split ring, and then add 2nd shuttle when the tail ends. I used this in a couple of the models.
  2. Instead of starting with a central ring and climbing out, work the first ring as a mock ring (SCMR), and throw off the central ring leaving a mock picot between them. Then continue as normal, after rotating work and switching shuttles.
I’d still like to add some graduated picots on the lower chain segment to see the effect, but that will be for another day. Or perhaps some keen tatter will do it and share?!
It was amazing to see the response and wonderful tweaks made to the Paisley snowflake! And Gloria Nelson has entered her needle-tatted, graduated picots model in a Handy Hands draw! First time my pattern has been entered in any kind of competition/draw that I know of!

There are ideas spinning in my head, so watch out for more spin-offs on this pattern!

click to download free Spin Away Snowflake pattern 


Monday, 11 February 2019

simple in spring

Pin It now!


Vasant Panchami, also spelled Basant Panchami, is a festival that marks the arrival of spring, celebrated by people in various ways depending on the region.’

The Hindi word for spring is ‘basant’ and from it is derived the colour ‘basanti’ which is similar to the yellow of mustard flowers. (Remember my 2017 spring garland with it’s mustard fields, etc.?)
By chance, but perfect timing!
When I saw Elaine P Gan’s Rose Heart, I wondered whether 2 shades of yellow would work well here.
This is my first project from any of her patterns, though as you know, I’ve been a frequent user of her reverse join! And, through Sue’s test tatting, I have admired how she puts together patterns using simple motifs and fairly basic tatting.

Worked in Anchor size 40 (00293 & 00302), with ball and shuttle.

No heart should be alone!
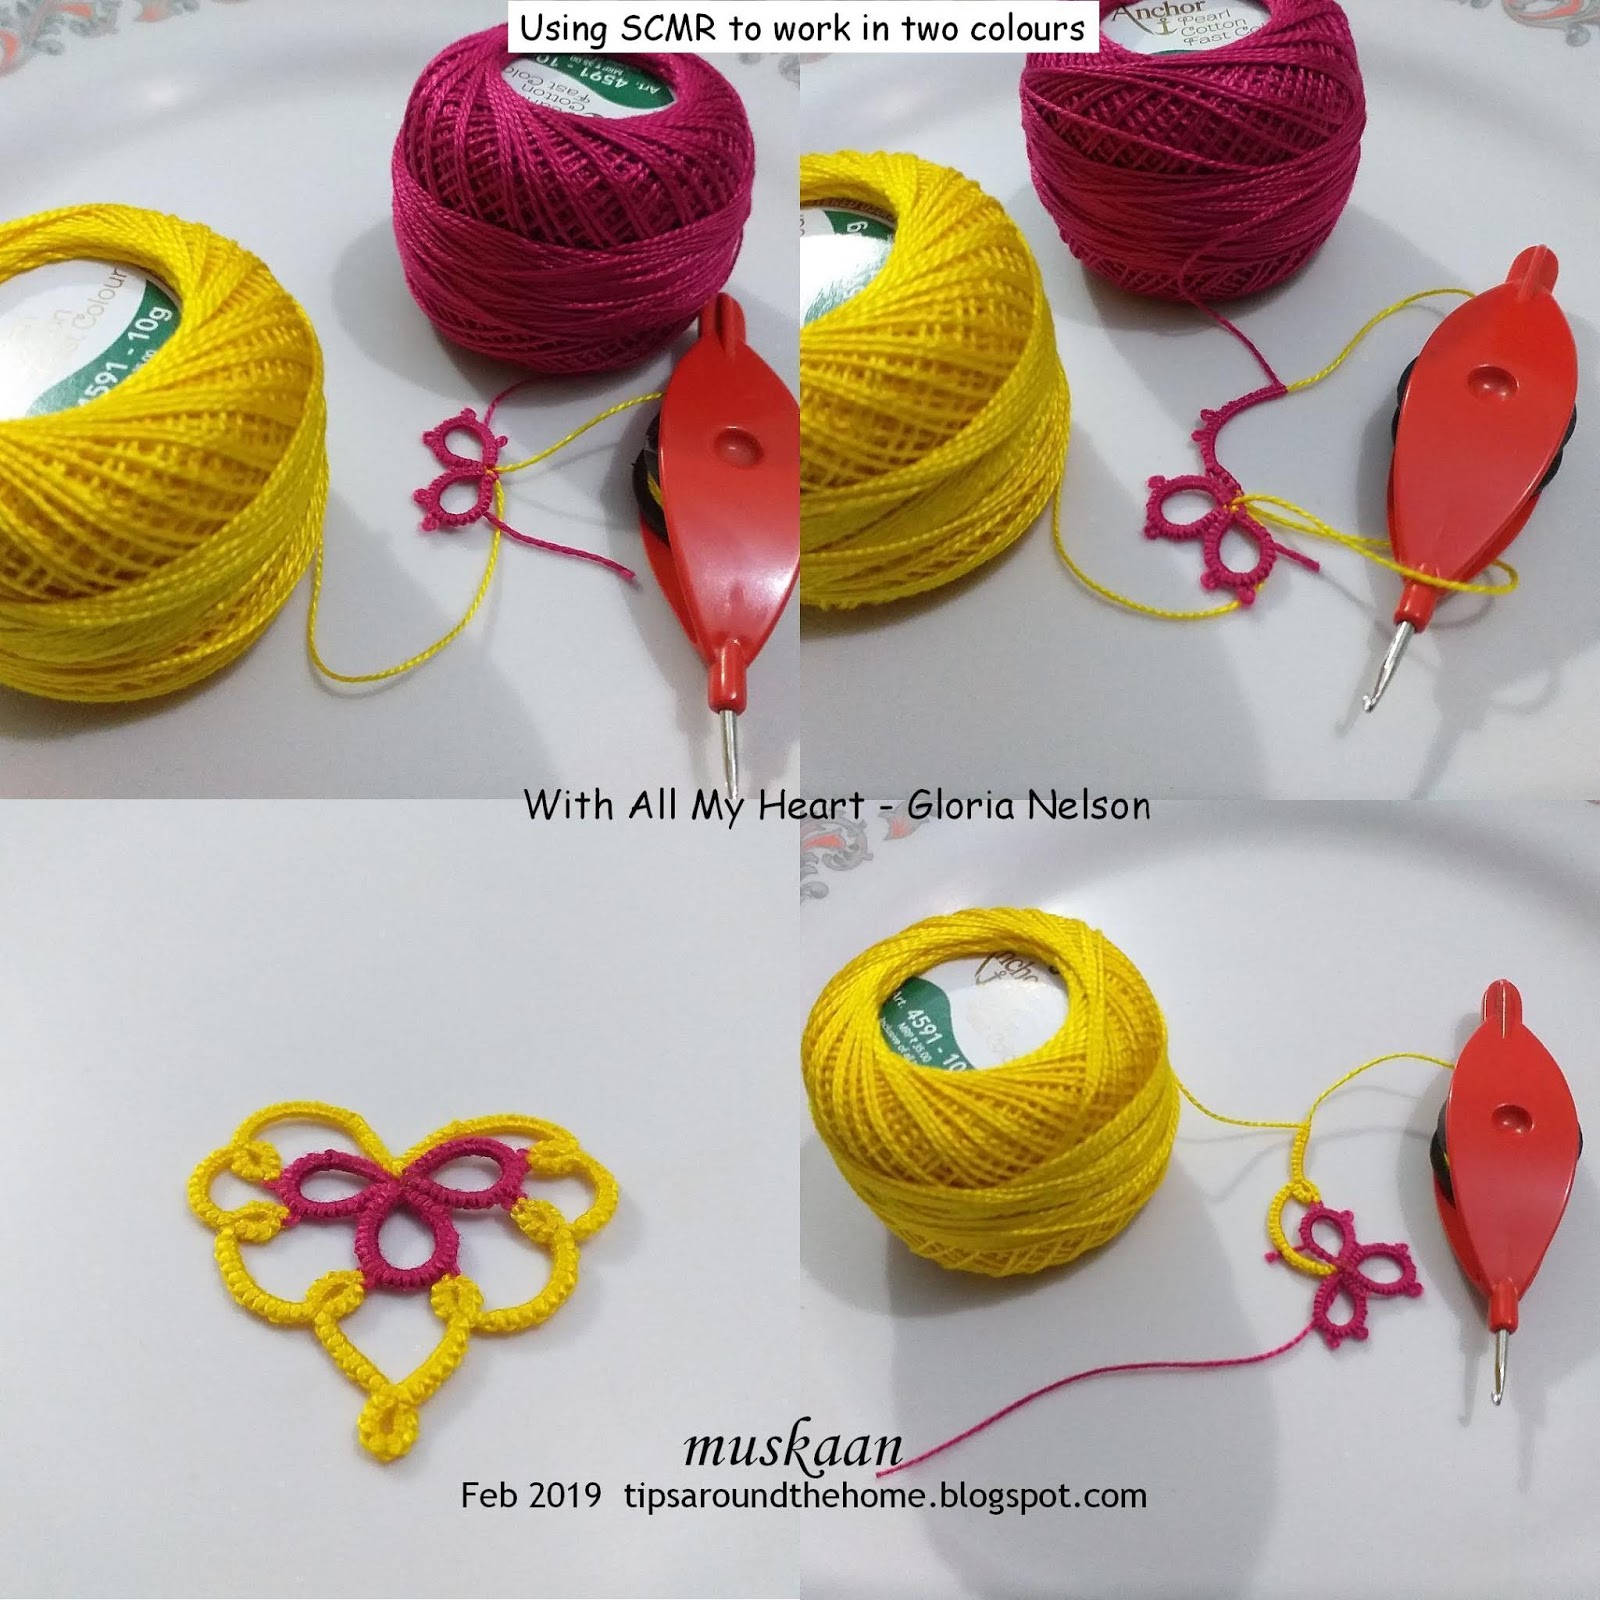
I’ve been seeing lovely models of Gloria Nelson’s With All My Heart in facebook and liked it’s simple elegance. The outline appears like a free-flowing scroll!

A clover is arguably the simplest heart shape in tatting. So why not highlight that with a contrasting colour? How to do it without too many ends to hide???

Aha. SCMR – self closing mock rings! And all worked with one shuttle only! Same as what I did with the very colourful scrappy doily
I wound yellow in the shuttle without cutting it from the ball. The magenta is ball only.
Work all 3 clover rings as mock rings using yellow core thread from shuttle.
Then snip off the magenta (with tail to whip stitch later) and continue the outer round using yellow ball thread.
The thrown/floating ring at the bottom is also worked as a mock ring.

Worked in Anchor Pearl size 8 (00291 – shuttle & ball ctm & 04380 ball).

Both hearts measure approx. 4cmsx4cms (bit longer than wide) and are quick enjoyable tats. And I used Ninetta's blipless join again. 
I like the contrast of these designs - one frilly the other stark. Yet both so beautiful. Although I worked both as simple motifs for now, Gloria's pattern is for a beaded lanyard and Elaine has used hers on a card.

AND, Buddy Hearts will be taught in the Online Tatting Class by Georgia today ! All are invited and hope I can join in.  With frequent and long spells of illness over the past year, I haven't been able to attend regularly,  if at all  :-( 


Tuesday, 21 August 2018

The picot stands tall

Pin It now!
Many of us ‘eye-ball’ the picot. When precision is needed as in case of graduated, double/triple, interlocking/interwoven, central and tuft picots or in tatted hairpin lace, a gauge is required. Some ink/tattoo dots on their finger! I merely measure and cut some cardstock to use as a homemade gauge. To me, vertical meant looping the picot thread around the gauge, while horizontal meant laying the picot thread flat along the measuring side. 

But Robin pointed out that there are different interpretations (see comments) and it led to a lot of research ending in this article : Measuring the Picot.
I will use 2 images sent by her to illustrate how some tutorials/resources differ in their approach & terminology. One set speaks of how to hold the rectangular gauge, while the other talks about how the picot thread lies (in relation to core thread or the gauge) when measuring. 

 
            In A, the picot gauge is held horizontally, but the picot thread is vertical.
In B, the gauge is held vertically, but picot thread is horizontal.
But notice that the core thread remains the same throughout – horizontal!
Core thread is the only constant during measurement.
It lies flat (horizontal or on the X-axis)
irrespective of the picot thread or the picot gauge.
In A, we measure the height of the picot (5mm in this case) and the finished picot is of the same measure viz 5mm.
In B, we measure the length of the picot (10mm in this case) but when finished, the picot will measure 5mm.
Length of thread in any picot is twice the height of that picot.
Conversely, height of picot is half its length. 
In A, multiple picots can me made before slipping them off the gauge.
In B, only 1 picot at a time is possible.

Thus the seeming dichotomy is resolved. But this is not all. There are ways to use the gauge unconventionally; and ways to measure a picot without using any separate tool (see collage below) !!! These are all covered in the article, along with pictures – some stepwise. 

Part of the article was published in Bellaonline on July 12, 2018. More sections were added later, and refined further, to make it quite a comprehensive document.

Click to download the pdf of the complete article -

This article is a compilation of the many ways – old & new - to measure a picot. Each method has it’s advantages and it is entirely up to the tatter to choose the method(s) they prefer. The article makes no claim of superiority of one method or of one gauge over the other.

The contents of the article :
I.  Orientation of Picot Gauge – horizontal and vertical
II. Orientation of Picot Thread in Relation to the Core Thread – height (vertical) and length (horizontal)
III. Non-conventional  Applications/Uses
A.                  Direct Tatting (unflipped stitches)
B.                  Decorative Effects
C.                  Graduated Picots 
D.                  Multiplier Effect of Gauge 
E.                  BEADS as Picot Gauge
IV. Stitches as Picot Gauge – length and height
Recap / conclusion
References
¯¯¯¯¯

During the course of my research, many good friends helped with their own insights, though not everything was included in the final article. This post is to share this new information rather than repeat what’s in the article.

Historically, a pin was used to measure the picot loops. “Tatting. Edgings and Insertions”, Mlle Riego de la Branchardiere, 1861.
‘A Pearl Loop – After the number of double stitches are worked as directed, the thread which forms the loop round the hand is passed over the pin, invented for the purpose, facilitates the work.’
Since a pin has a circular cross-section, there is no vertical/horizontal dilemma here. The number of times one wraps the picot thread around it can alter the size of a finished picot.
This same technique is used by Jon Yusoff on modern gauges for extra long picotsThe collage above shows how to measure a 10cm picot using a 2cm gauge.

¯¯¯¯¯

Bonnie Swank (through Anita Barry) sent me her description derived from “The Art of Tatting”, Lady Hoare, 1910, page 20
“Pinching the ring and shuttle threads together then tatting the double stitch and sliding the new double stitch next to the previous double stitch.
This is a horizontal method of making the picot without a gauge.”
Lady Hoare suggests ‘leaving about the eighth of an inch of thread on both loop and shuttle threads….’ This is what we refer to as eyeballing.
¯¯¯¯¯

An elementary and universal method is to employ
the stitches themselves as a picot gauge.
If a gauge is not available, the stitches themselves can act as a gauge. Even beads can be used for measurement if size is known. The advantage of using one’s own tatted stitches as a gauge is that it accommodates all types & sizes of threads as well as individual difference in tension.
I used the height of a picot-in-the-making to estimate the size of central picot and arrived at the following thumb rule. Jane McLellan stepped in with trials, experiments and feedback to confirm the rule.
A thumb rule for measuring the central picot
around which rings will be linked :
1ds width for each ring.
(± half stitch to account for individual differences)
¯¯¯¯¯

While technically not a picot, it is a different way of using a picot gauge. Jeanie Schekel, in her unpublished book, calls it a folded picot gauge ideal for bare thread tatting and mignonette. She shared her images and also these video links –  Double picot gauge by needledreams and this video by mytattingplace which also shows how to get uniform half-closed rings.
¯¯¯¯¯

Coretta Loughmiller sent me many pics of the BTS and Picot Tool being used. Now this stepped tool, at first glance, defies the vertical/horizontal position. However the detailed markings of length and directional arrows helps us understand how to hold and use the gauge to measure either the height or the length of the picot thread and also bare thread. Gloria Nelson, the designer & manufacturer of this compact efficient tool, has been most gracious in our communication, even offering to send in more pics.
Such markings are a good way to avoid any confusion and communicate clearly - whichever gauge a designer uses.
¯¯¯¯¯

Martha Ess’ sliding gauge is ideal for graduated picots. She graciously gave me permission to use any of the photos and instructions!
¯¯¯¯¯

I’d like to sincerely thank each and everyone mentioned 
for prompt and enthusiastic help – over and above my expectations !  
And I cannot thank Robin & Georgia enough! 
Robin Perfetti has helped proof the multiple drafts carefully and offered valuable feedback/suggestions. Some of the words, thoughts & of course images, are hers. 
Georgia Seitz has provided us with a wonderful platform and opportunity to reach a wide audience through Bellaonline and her Online Tatting Class.