Showing posts with label inward picot. Show all posts

Thursday, 20 July 2023

luggage tag loop

Pin It now!

 Since Georgia Seitz's site is still in transition to the new site (https://www.theonlinetattingclass.com/) and not everything has been transferred, I needed a link to the luggage tag loop or lark's head knot. So I took a few pics from my Jan 3, 2023 post (https://tipsaroundthehome.blogspot.com/2023/01/measured-picot-on-core-thread.html), making it easy to share.

This loop or knot looks like a double stitch and in the same colour it can be an 'invisible' join/addition. Following are some of the ways and situations in which it can be used - 
  1. To add new thread. I have used it add green thread in the Blossoms Project. https://tipsaroundthehome.blogspot.com/search/label/blossoms%20project
  2. To add new thread in a ring. When running out of thread, new thread can be added before closing the last ring using a LHK. Credited to Judi Banashek (thanks, Gillian Buchanan). See Marilee Rockeley's video here - https://www.youtube.com/watch?v=w9pmL1kyirc
  3. Marilee uses the method to add the third (core) thread in pearl tatting in the above demo.
  4. To start on a paper clip - https://tipsaroundthehome.blogspot.com/2017/05/rising-month-late.html
  5. To hold space on the core thread for an inward picot or a starter picot on chain instead of using a pin or clip. https://tipsaroundthehome.blogspot.com/2023/06/bigger-flower.html
  6. To make measured mock picots and inward picots - https://tipsaroundthehome.blogspot.com/2023/01/measured-picot-on-core-thread.html
  7. To attach a tassel - https://tipsaroundthehome.blogspot.com/2015/01/tatting-away-x.html
  8. (UPDATE) To add a fringe - a spot adaptation of Corina Meyfeldt's method - https://tipsaroundthehome.blogspot.com/2015/12/fringe-benefits.html)
  9. (UPDATE) To tat short floating chains or to add a 3rd colour for a specific element - eg., the E3 Inside Out flower by Michelle F - https://tipsaroundthehome.blogspot.com/2024/01/what-heart.html and PDF link 

These are a few that I can recollect at the moment, but I am sure I'm missing something ;-P Perhaps the knot in my head will clear at a later date and I will update this post.

Tuesday, 27 June 2023

bigger flower

Pin It now!

 Over the years it has often happened that in response to a technique question or a blog post generous tatters have sent me scans of relevant portions of tatting books. While I saved them, I don't always remember who shared them. One such is the following - 

This is the Big Flower pattern from Anne Dyer's 'To Boldly Go Where No Shuttle Has Gone Before', 1995. I have scans of some of the technique pages from a while back and stumbled across them recently while organizing my digital storage.

I invited Anita Barry to work through the pages. This was back in April when I wasn't feeling too well. She agreed immediately - she owns a copy of the book! We started with page 13 - Lines for Chains or Rings and had a lot of fun with the chains, effects, and tossing ideas. I'll share those some other time. Already the book was worth it's name! 

Above is my first attempt at the Big Flower pattern using Anchor size 40. But I was dissatisfied with those unseemly 'thorny' points and discarded it.

Started afresh with Anchor Pearl cotton size 8, using one shuttle and ball - after all it is a chains-only pattern. Much better and smoother, right?!

I had to write the pattern to suit my preference - the short notation format. The frequent turns due to inward/downward picots was quite confusing to keep track of.
Later, Anita found an alternate way to write the pattern!
We also noticed several omissions in the original which were included in our notes. 

Anne's diagram (only half drawn) would have 9 or 10 repeats. At 7 repeats mine seems only halfway there. The reason is the shorter picots I used.
This is a very springy/elastic piece, reminiscent of a 'samvadini' or hand harmonium being played. 

This reminded me of a collar I had once crocheted using a single strand of white silk thread on a printed silk top/blouse. It was a chains-only scalloped rounds and was large enough to cover my shoulders, yet so delicate and lacy.
Of course, the crochet collar was worked in a circle, rojnd after round. 
This tatted motif is cleverly worked outward-inward for the desired width, ending in a broad circle. A clever construction where the width can be increased easily.

Like I said it is such an elastic pattern that I finished off at the 12th repeat and it still lays flat! I have been waiting to fill in the center before posting, but didn't get around to it.
Those are mogras (Arabian Jasmines) from my potted plant. It has given us so many fragrant flowers these past several months! 

Anita completed her flower, too, and also tatted a center. I'll share her pics after seeking permission.

I continued with page 14. While many of the effects are already known to us by one name or the other, there is one stitch that was absolutely new to me and I loved how it came out! Hopefully I'll remember to use it in future.

With other projects jostling for attention, we haven't continued further. But it was a good decision to work together with exchange of ideas, tips, trials, and the fun element obviously! Working together also ensured we read the instructions correctly with inherent motivation.

So I did manage 4 posts in as many days! And there's still so much to share. 

Many thanks to my unnamed benefactor for sharing the scans!

Saturday, 21 January 2023

double juggle

Pin It now!

 I'm calling it double juggle, not double trouble, coz I'm thoroughly enjoying myself and only wish I had more time and brain space to spare. I am deeply involved in 2 large projects with 2 different partners and have to juggle between both - I find that my brain is compartmentalised and have to 'get into each mode'. 

First project is my late friend's tatting book I am editing- it is over 200 pages consisting of a manual and a dictionary. This will take many more months but Angela is an enthusiastic and quick worker, providing excellent technical and formatting support and then some more.

Second project is our current tat-along in our EP Facebook group with Ninetta. some of our participants have already completed the entire doily even though 2 more parts need to be shared. They followed Reiko's diagrams without waiting for us ;-D Oh, and the colours and combinations that are emerging are truly inspiring!

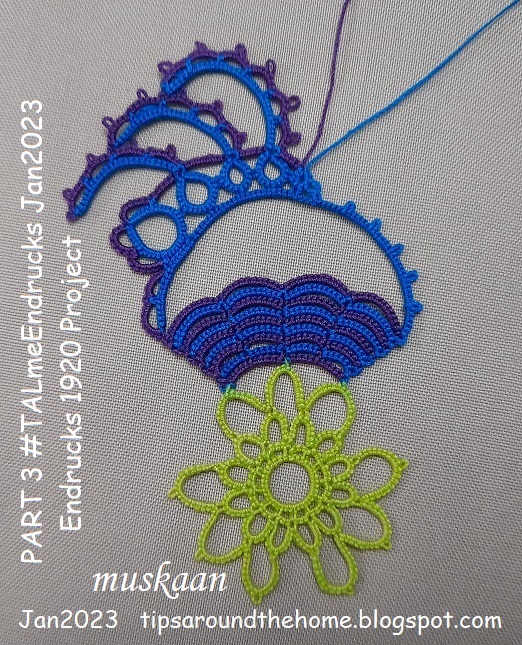
Parts 1-4 of #TALmeEndrucks completed in size 40 threads, going for a peacock impression.
Parts 1 & 2 posted here - https://tipsaroundthehome.blogspot.com/2023/01/tat-along-doily.html

PART 3 - After the central 'flower' and the 'basket', we work the first half over the 'handle' of the basket, continuing from Part 2. 

There is one inward picot and the rest is simple rings and chains.

Endrucks worked the entire doily continuously. However we are following Reiko Akamatsu's modified pathway and count.


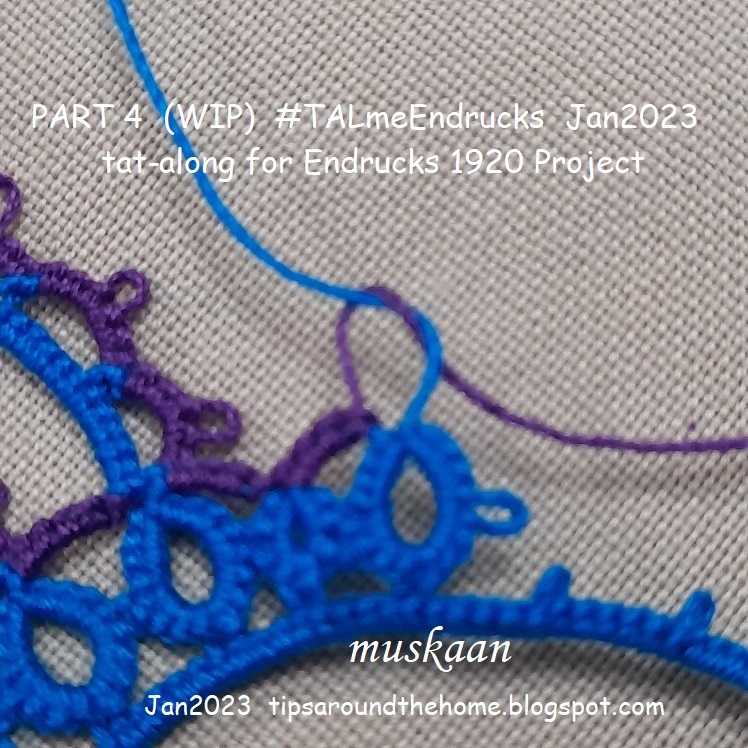
PART 4 - This is a mirror image of Part 3. Working with 2 colours means we need to switch shuttles before working the floating chains in order to get the same colour, unless one wants to use inward picots or Block Below Tatting (BBT).
I decided to work the lower chain first, then the upper scalloped chain. And since after this pair is made we need to anchor to the base and move to the right, I made an overhand tie/SLT, leaving a vsp space to lock join to later. 
I've used this SLT Picot before in a different scenario - https://tipsaroundthehome.blogspot.com/2015/03/experimenting-with-colours.html

And then again, for a mirror effect so that the last ring tilts accordingly, we need an inward picot on the chain. https://tipsaroundthehome.blogspot.com/2023/01/measured-picot-on-core-thread.html

As you can see, the first and last rings are reflections of each other. Believe me, I tried the ring 'normally', thinking the chain could be attached to the ring accordingly. But it looked all wrong and I had to undo it. So it is worth the effort.

I absolutely love the clever arrangement of the floating chains. Even if they are not joined to each other, there are so many possibilities - peacock's plumes, a jester's hat, a rooster's tail, foliage, .....what else?

Playing with flipping to see what comes up, LOL. Nothing to write home about.
The blue colour runs a bit and has seeped into the green below.

Fortunately, no more seepage occurred. Parts 3 and 4 are worked twice more.

Part 5 will be released tomorrow as 3 detached motifs and I will share my fun arrangements in a future post. But first I have to get back to juggling the editing and tatting the final part of this cover doily!
Tuesday, 3 January 2023

measured picot on core thread

Pin It now!

 It is difficult to get an accurate measure of an inward picot on the core thread which is held by a paperclip or coil-less pin, etc., till the time of joining. 

Then we have a mock picot where the norm is to make an overhand tie and then work the stitches. This is something I have never been comfortable with. 

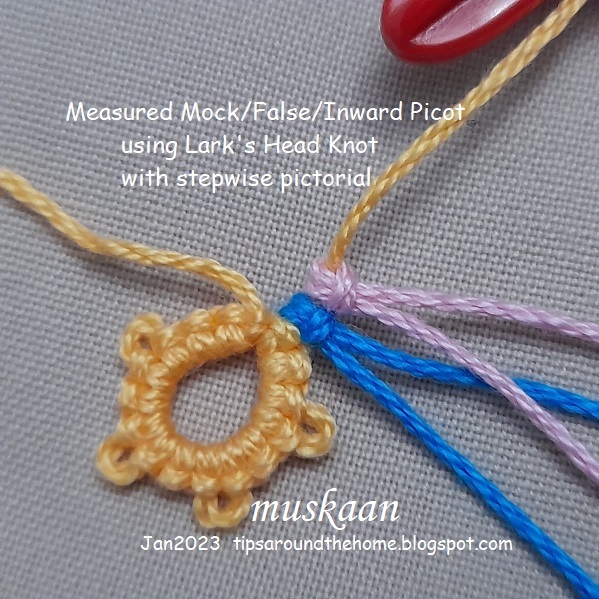
And it is these that led me to use scrap thread to hold the space, by making a lark's head knot (LHK), which is exactly the size and form of a double stitch. Now this gives me an accurate measure of a picot even when it is on the core thread.

Measured Mock/Inward Picot with LHK pdf  (click to download) https://drive.google.com/file/d/1GciBBglABtYVt3Jew5zn6chqhMjLQuqG/view 


1 Lark's Head Knot = 1 Double Stitch

The best part is that we can alter the size as desired! 
For a very small picot, make 1LHK with a smaller size scrap thread;
for a regular picot, use the same tatting thread and make 1LHK;
for a longer picot, use thicker thread for 1LHK, or several scraps for 2 or more LHK. 
The possibilities are endless. The mock or inward picot needn't even be regular. You can easily have an irregular picot with a longer core thread side and barely any space on the ball thread side, if a future join is to be made only on the lower end. 
The marker/scrap thread can be removed once the element is joined and the core thread is locked either with a lock join or with a ring.
Notice how all the picots above are of the same size and all the stitches are the same with not a single thread or bar out of place.

I put together some pics in a one-page pdf to show the steps involved.  Measured Mock/Inward Picot with LHK pdf  (click to download)https://drive.google.com/file/d/1GciBBglABtYVt3Jew5zn6chqhMjLQuqG/view 

If you remember, I've used the LHK to join at the beginning - it was called luggage tag loop (Georgia Seitz). eg. Radiant Sun paper clip tatting, Blossoms motifs, etc. (click for search results and patterns). The LHK is also used to add new thread since it gives the appearance of a double stitch. 

Related articles/resources -
Measuring the Picot - https://drive.google.com/file/d/1Kk6rtyIUvo5JFA5u3vE3ruU2Z7zQ9fuq/view

Wednesday, 16 February 2022

a small gift

Pin It now!

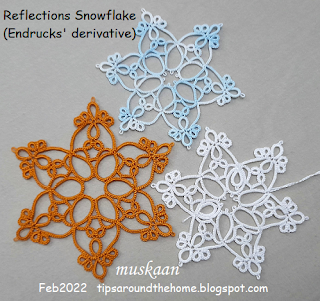
derived from Endrucks (1920) pattern #17

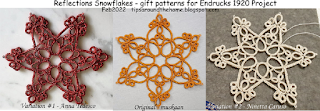
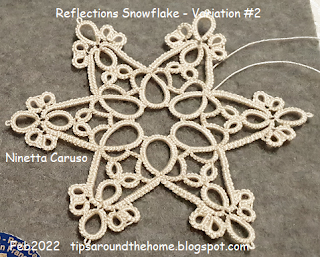
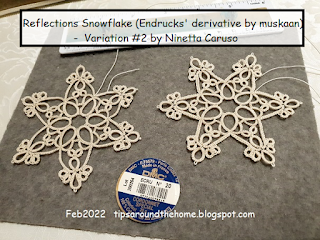
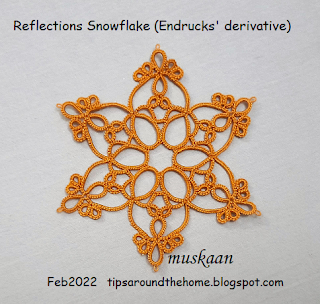
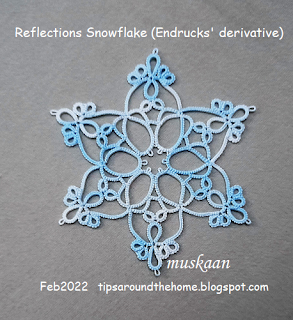
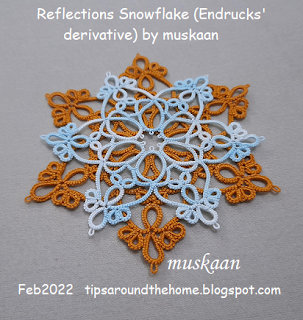
We’ve had such a wonderful group of tatters contributing to the Endrucks 1920 Project, and Ninetta and I wanted to show our appreciation in some material form. We finally decided on this snowflake. It is a direct derivative from one of Endrucks’ own patterns (#17) yet has quite a trendy modern appeal and application, and the prototype was very well received. It lacks Endrucks' denser block segments, though.

In December 2021, we gifted it to all our original volunteers who had worked on their respective patterns. Since then, many more tatters have joined our FB group and displayed their skills and shared patterns, too. This gift now goes out to all who participate and show a completed working/adaptation of any pattern from the modern pdfs or the original book.

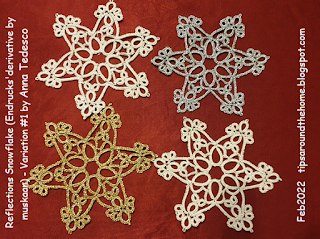
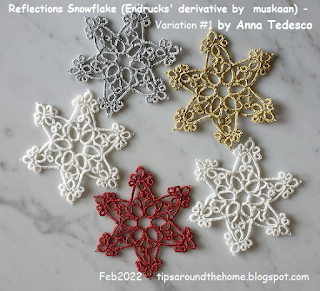
The finalization of this snowflake pattern is another reflection of joint effort. I wanted a test-tatter to try it in cordonnet cotton, but because it was to be a surprise gift, we couldn’t ask for volunteers. Ninetta finally suggested Anna Tedesco, who jumped right in with her characteristic enthusiasm and speed.
Using Sanbest 6 strands, she worked 5 complete samples, systematically sharing her feedback and even altering her style to improve on her previous samples till she was satisfied!
While the first round can be a standalone or tiled motif, with one arm of the 2nd round, it looks like an earring or pendant! She had to shorten a chain segment in the inner round, which might be due to the thickness/metallic nature of the thread or a longer inward picot.
These tips/links for inward-facing picots in both regular and direct tatting might come in handy-https://tipsaroundthehome.blogspot.com/2021/12/inward-picot-with-marker.html

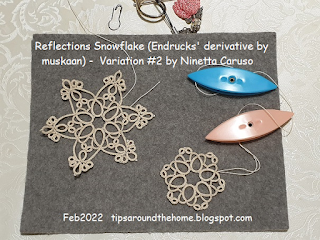
Ninetta, herself, got into the exercise, tatting 2 models, and we have a tweaked count for the inner rings and padded stitch (BDS) version for outer chains from her!
Notice the thicker chains on the arms. 
It is amazing that between the 3 of us, we had a total of 8 freshly tatted snowflakes within 5 days, including 2 variations! The power of the collective. This was in early November and the gift went out to all our original contributors in December. Now we are gifting it to anybody who completes a pattern and actively participates in our group.
As feedback poured in, I started a new model (mustard/gold in Anchor size 20) and much later I finished the earlier incomplete model in Lizbeth size 20, which is seen in the last photo here - https://tipsaroundthehome.blogspot.com/2021/10/spirited-seventeen.html

While I worked on presenting the pattern, Ninetta composed a beautiful letter of thanks. She also translated the entire pdf into Italian because the largest contingent of volunteers was from Italy (followed by the USA). Pattern is diagrammed as well as written. And the composite diagram shows all 3 versions/tweaks. I’m getting to like this style of diagram!

Not merely did I get such diligent testing, there were a few design lessons to be learned along the way! A very satisfying and happy experience.

Remember the newsletter I spoke about? Well, one tatter already completed that doily, joined our FB group and has started more patterns from the project. Yes, she, too, has received her gift.

There is one very exciting news to be shared in future about the past!

All patterns from the Endrucks collection can be accessed here (feel free to innovate and adapt) - https://docs.google.com/document/d/17LEVftXweztBIOWh4sL4BB7bX65ssoOsOn4oXIgCepY/view

Ciao for now and many many thanks to Anna and Ninetta and our Endrucks community

Sunday, 30 January 2022

who knew

Pin It now!

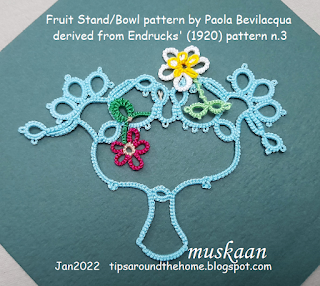
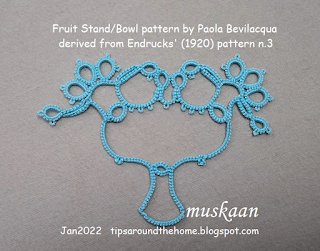
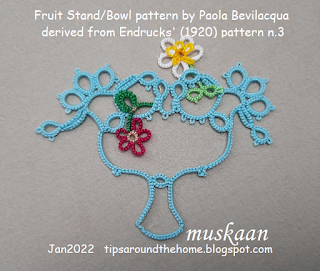
 ... who knew a fruit stand or fruit bowl would emerge from an edging pattern! Who knows what a designer's imaginative eye can see?!

Endrucks' n.3 edging pattern gave rise to 2 square motifs and now the seed has sprouted a fruit bowl, thanks to Paola Bevilacqua. Recently she shared her prototype, with sketched pattern, in our Endrucks 1920 Project Facebook group and the very next day she tweaked the count and posted a beautiful new version with modified count, in stepwise pics and diagram. It immediately caught my fancy and I quickly tatted it up.

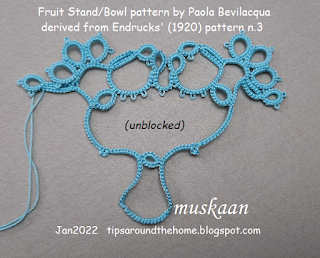
This is fresh off my shuttles, unblocked. And I was trying not to snug the chain stitches too tightly, resulting in uneven lengths on either side. Lesson re-learned: snug tightly; you are no good with loose tension ;-P Or, apply Anita's tip to measure the chain but using a grid paper background to assess the curve as well.
As I worked the motif, so many minor details emerged making me truly appreciate the thought Paola put in!

My Thoughts/Notes -
1. I started at the leftmost single ring.

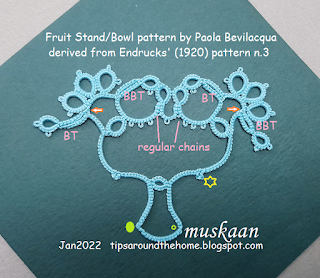
2. Techniques: 2 shuttle tatting, fs/bs tatting, thrown/floating rings, changing the direction of a chain, inward picot, lock join, mock ring using a lock join.

(refer to pic below)
3. Inward picot - the orange arrows show where I used a folded chain to flip a picot down - set-a (picot, 2fhs) and set-b (2shs, p) because I wanted a bit of space before the thrown ring. At other places I used a paper clip.

4. There are 3 types of paired chains
    BTworked as block tatting - parallel chains where the new chain lies above the previous one and a lock join is made through picot; 
    BBT: worked as block below tatting - parallel chains where the new chain lies below the previous one and is joined normally through an inwards picot;
    regular chains: where the stitches face each other and the chains are joined normally. Now here's an idea for yet another Block Tatting effect !!!
5. Tiny Mock Ring -The yellow star is another important designer detail. This is a 3ds chain lock joined at the base to form a mock ring. Now if it was a SCMR, we would've had a clear point/break/dip in the chain's inner edge. By using a lock join, the picot creates a kind of continuum with barely a break in the inner edge!
I should add small mock ring to my Mock Ring series since the visual effect is different from that of  larger mock rings

6. Pointed Chain - The small green ring is where I tried to make a 1ds SCMR to create a point, and failed miserably, forgetting that the chain turns course at that point. 
Hence I followed Paola's example for the left one, switching shuttles and reversing/turning work to continue. The point is more marked here. 

In Anchor size 20, it measures 10.5cm x >7cm at the extremes. I rummaged and found these 2 daisy picot flowers to add some colour and density. When I tat this again, I'd like to add lots more colour and picots for a bowl of flowers, and/or strategically placed beads to enhance the effect! 
It could well be a trophy, too, right?!
This is very appealing to applique or glue to a card topper. Otherwise it needs stiffening to hold it's shape. Of course the bowl outline can be padded tatting (either BDS or inserting extra core thread). Perhaps some graduated treble tatting, too, especially at the base!

Many many thanks, Paola, for stretching the boundaries!

Please don't go by my sub-par model.... once we have her permission, we can put her model and pattern in our Project doc here -

Sunday, 12 December 2021

inward picot with marker

Pin It now! Often a picot is required on the core thread. But when the core thread is pulled to snug stitches, the 'picot' would disappear! In order to hold this picot in place till we need it for joining, a temporary marker or holder is inserted in a loop of the core thread. Most common is the paper clip, but coil-less safety pin, scrap thread, stitch marker, etc, are also employed.

TIP: Always remember that the thickness of the marker/holder will affect the size of the picot formed. Hence choose a marker carefully.

This is a common enough picot and you must have your own method down pat. But if I am not careful mine turn out to be fiddly to handle (with marker getting in the way) and untidy or twisty. Yet this method gives the best visual result. So here's what I do to keep the inward picot tiny and neat ---

Inward Facing Picot in normal tatting –

1. Pull a longish loop of the core thread. Make the first DS. Then insert marker.
https://tipsaroundthehome.blogspot.com/2016/07/double-duty-due-to-delegated-dusting.html
2. Continue to tat at least 2 to 4 stitches, before snugging the stitches and closing the loop.

Advantages –
  1. Avoids any gapsosis in the knotting/chain thread, keeping the stitch before and after the picot close together.
  2. The picot on the core thread remains tiny or the required size.
  3. No twisting of chain/element.
  4. The marker does not get in the way of working.
2 motifs/repeats have been worked above....
...and when it is time to join, remove the paperclip and join through that tiny loop, taking care to not let it slide and hide! A crochet hook is handy.

Inward-facing picots in direct tatting
 – 

For direct tatted chains, where reverse (unflipped) stitches are worked, Ninetta demonstrates how she twists the marker to hold the picot in place. https://youtu.be/d02yb-cKSLI 
This twist makes it easier to hold the picot and work unhindered.

TIP: It is important to realise that this twist adds some length to the picot. Hence choose a marker that is finer than the required picot size.
        Alternate solution: Once all stitches are completed in that chain, untwist the marker and pull the core thread taut. This will bring the picot to desired size.

We can actually use this twist for the normally tatted chain, too, instead of leaving the loop long as photographed above. And when it is time to snug, untwist and remove slack from the core thread.


There are many other ways to make such inward, downward, starter, or drop picots (https://ninettacaruso.blogspot.com/2017/10/fun-or-fan-in-direct-tatting.html). Since the most common is using a paperclip the above tips are limited to markers. 
This post is in response to a recently raised query. 

Friday, 9 July 2021

a pernickety question

Pin It now!

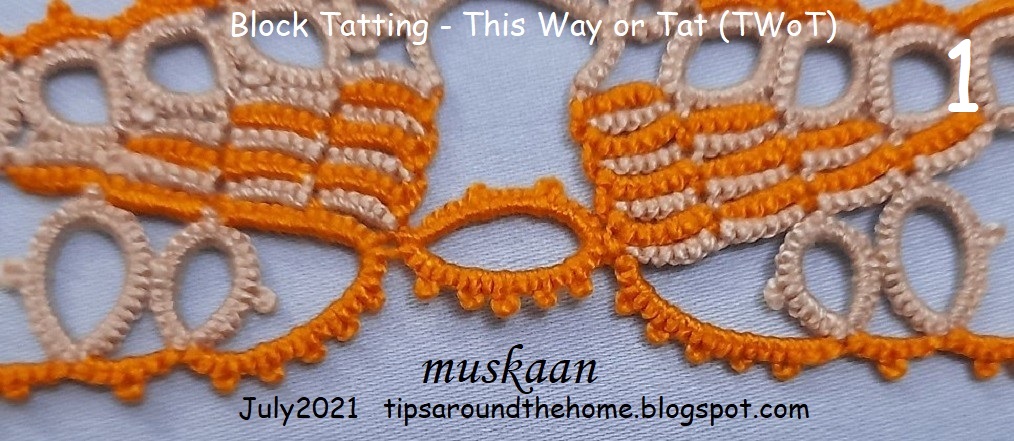
 When I focused on bilateral symmetry in this pattern, I forgot about the blocks (see 3rd pic below). Thus, while most rings on left and right halves face the same way, the chains in the left and right blocks are incongruous -- instead of being mirror images, they all face the same direction.

Block Tatting is made up of rows/tiers of chains. These rows/tiers can be worked one above the other, or one below the other.

1. Block tiers moving up ie. tatted ABOVE the previous, are simple to make, joining below with a lock join to the picot(s) on previous chain. Like the blocks in pic #1 below -

The block on the right is tatted the same way starting from the shortest chain on top, and moving 'above' to the next row/tier (though it looks upside down).
Now compare the left and right blocks with respect to 2 variables - the colour of each chain/block, and where the chains face. Not symmetrical, right?!

2. When the next tier is tatted BELOW the previous one, it means we need a picot on the core thread to which the new chain level can join. We need down/downward/inward facing/intruding picots! Of the many methods, holding the picot space with a paper clip is most common. This is how the right block was tatted ....

In above model, the left block is tatted 'normally' with chains stacked above. But for a mirror image, the block on the right is tatted with the next chain worked Below the previous one, with a regular picot join instead of lock join. The penultimate chain (beige) in the right block held 4 paper clips till each join was made! (sorry about the shoddy tatting)
Again, compare the 2 blocks in terms of colour placement and chain direction.
Mirror images!!! 
This is the way Pina Pinto has worked her sampler for the Endrucks Project - I will be sharing the pattern when it is diagrammed.

In the above model, all the blocks (in cream and in purple) face towards the right. (The cream rings along the 'belt' are not mirror images since I did not think ahead). Since the row moves from left to right, it is easier to tat in this manner.
Frau Endrucks tats all her blocks with the next chain above the previous one, although she states clearly in her tips that it is not necessary to have picots. Simply move the stitches a bit, clearing space to make the join.

Now here's my pernickety question - Would you be Mr Meticulous with perfect mirroring of blocks despite the invasion & interference of all those paper clips or would you rather be Dr Downplay, just going with the flow without bothering overly much about the left and right sides?
 
Which factors would influence your choice -  whether working with 1 or 2 colours; mood; time constraints; competition submission; etc. 

Please enlighten and entertain ....


And hopefully you will join the global lace community on International Lace Day (July 11th) ....choose your form of lace-making and celebrate the day. I have already registered (free, but only a few hours left, so hurry) with this ILD group on Facebook and intend to tat a new earring/pendant - the motif can actually be repeated to create a lovely edging! I am hoping it will work .... let's see. Off to load my shuttles. Maybe I can upload a diagram on or before 11th, in case you wish to tat and experiment with the same pattern? Stay tuned .....

Thursday, 2 July 2020

what an intrusion

Pin It now!
A few weeks back, while tatting the doily, a simple mistaken intrusion brought on the realisation this could become a new picot method! Hence I'm calling it the Intruding Picot for now. Suggestions for a different name are welcome.

And as I thought over it, more and more applications arose, making this picot not just practical, but versatile. Some applications are not visibly elegant, while for others it seems tailor-made. A peek into my first trials .....

The topmost scroll shows a picot, including 3 graduated picots in 3rd, intruding in the ring space.
In the 2nd ring, a direct comparison can be made between normal picots and this slightly textural one.
On chains, I tried directional tatting with these new picots.

Tried it on onion rings. The sequence of tatting is altered - outer ring made first, with one intruding picot in the middle. Then the inner ring is worked and joined to that picot. The extra length works as a decorative picot.
I first came across this altered sequence by Ninetta (please see details in section 1.3 here). But there is no need for 2 picots with this unobtrusive intruding picot as you can see below ....

Next the outermost chain/mock ring was worked and joined to that Same single intruding picot!
Nifty, eh?! And pretty invisible, too.

And finally for the present - mock rings. No more holding the core thread with a paper clip! Make intruding picot, tat the 'ring' segment, and join to the picot. That's it!
Oh, no there's more... unlike the paper clip inward or core thread picot, we can actually alter the length of the picot. Notice the difference in the base of each mock ring - the variability in 'distance' is deliberate.
There is a slight twisting of chain segments near the picot - needs work and practice.

There are a couple more ideas I want to try out (one as a ring filler), but couldn't resist sneaking you a peek! So, what do you think? And can you guess how it's done? It is so simple, you'll be stumped!
Do you think it is worth sharing - will you be willing to try it/use it? Can you think of more applications? Waiting eagerly for your comments and suggestions .... please don't disappoint :-)))

Related Posts showing pictorial and effects -