Showing posts with label Angela E. Show all posts

Friday, 23 January 2026

something new

Pin It now!

 For the last several weeks, starting around mid-December, I've been mainly focused on completing the Glossary for the book 'Six T's of Shuttle Tatting' by Net Best. Long back I had divided the glossary into separate letter files for ease of work and have gone through anywhere between 5 to 10 drafts of each over the years. Angela has been a patient and efficient support. This time it is 'final' ... my humble request to the tatting community is "Please stop bringing out new effects and techniques for this year so that I won't need to include it in the glossary ;-P Take a pause, my talented community!" 😁

So anyway, I've been tatting samplers for the glossary which were missing or for new entries. This, and the fact that I need a refresher on a few 'rarely' used techniques, I took up Natalie Rogers' Picot Bingo 2026 challenge again this year after skipping it last year. But instead of a completed project I might only make small samplers - to keep it short and quick. Some of these will actually dovetail with the glossary samplers, thus reducing any distraction or time constraint.

Learnt something 'new' - Stacked Dimpled Split Rings by Sandra Eichelberger (Crazy Mom Tats). It is a very clever application of techniques towards continuous tatting which she shared here - https://psychotatter.blogspot.com/2012/07/how-to-tat-stacked-dimpled-split-ring.html

NOTE: 'Stacked' is used for tatted elements that overlap and/or lay one above the other as a 3D formation. Hence in the present technique, 'stacked' is a bit of a misnomer and is probably used to indicate continuous tatting in a line or row of rings. (Thanks, Mary Arnold)

I used her stitch count. It is like working a split ring backwards where the 1st side is worked after working the 2nd side and the 1st side lies on the right instead of the left. Reminds me of Teri Dusenbury's SQDR (where she started with 1ds and then the entire ring was worked with reverse stitches) or a Reverse Ring, applied here to a dimpled yorkie split down the center.

It was a bit of a challenge to figure out the process but once I got it, it went smoothly. I think a pictorial or a video would help a great deal.
TIP: The main thing to keep in mind is to make the mock picot long enough. Notice how the dimple in the 2nd heart from top is less pronounced? The fault lies in a short mock or false picot.

Tied in a quick tassel made from the first scrap threads I could get my hands on. So one more tatted bookmark in my stash, though the body could've been longer.
The boxes crossed out in the Picot Bingo 2026 game (Level 2) -
  • Dimpled Ring - I'm sure these count even if they are split.
  • Tat a Rings Only Pattern - why do we limit ourselves to vintage rings only style patterns, LOL?
  • Tat a Heart - five hearts here.
  • Mock Picots - gravely important in this pattern/technique!
Two different levels of cards are shared by Natalie although I believe the above project falls in a bit of a higher category than even Level 2 (wink, wink). Check out the details and downloads here - https://www.patreon.com/posts/happy-new-year-147124370

UPDATE: (31 Jan 2026) Jane McLellan had worked on this technique to create a bookmark and a beaded bracelet here - https://janemactats.blogspot.com/search?q=stacked+dimple+rings
Many thanks to Sandra and Natalie !!! Keep it interesting and challenging! Great opportunities for new learning and consolidation of past learning.

Thursday, 30 January 2025

gratitude

Pin It now!

 Over the past year or more I have been in touch with several tatters be they domain experts, designers, originators, tatting teachers/mentors. They have helped to explain nuances or clarify concepts, particular techniques, which in turn has aided me in hopefully improving the presentation and authenticity of information in the Glossary (and an occasional chapter item) for the book, 'Six T's of Shuttle Tatting' by Net Best which I have the pleasure of editing (I will write a separate post giving more details about the book). 

I will tender a formal thanks with each name when the book is complete (including in the book itself). Yet stepping into this new year it just feels right to acknowledge their general contribution and gracious and prompt help. To date not a single person refused to share their knowledge and understanding and each of them has been prompt in responding. Some have graciously sent me pic(s) of their work which is now included in the book. 

There are a few who I have pestered more frequently, though. Obviously my dear friends Ninetta Caruso and Anita Barry but also Judith Connors whose expert guidance is always welcome.

Angela Edwards is the late author's friend who is doing all the formatting, proofing, and compiling the master copy for the book. She has been a constant and enthusiastic companion in this journey, even acting as a sounding board and converting my UK English, LOL. Without her help it would've become too overwhelming.  

💖💖💖

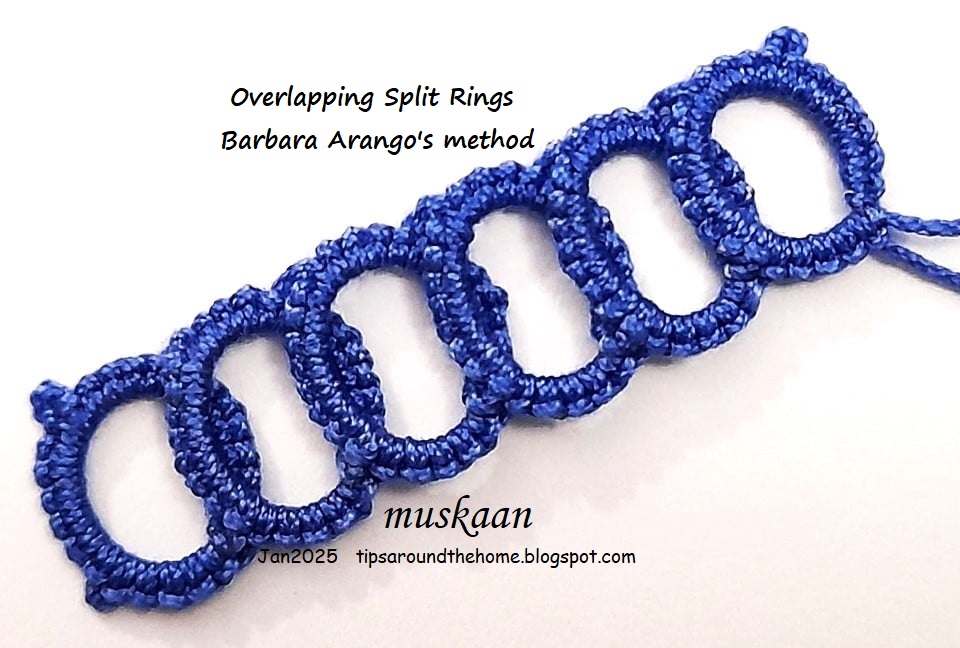
Bit of a visual treat before I proceed ... above is Barbara Arango's method of making Overlapping Split Rings. She tends to join them (where I had left them unattached ; and a snowflake) and has used them beautifully in several of her designs. Look for her in the FB group, Just-Tatting. 

Above left was my first trial and I enjoyed it so much that I kept going till I got this ring, joining back to the first. I want to add some beads but haven't been able to yet .... will post again when I finish.

💖💖💖

Laurel McFarlane noticed that several links in my past posts no longer worked, especially from Georgia's classes. She volunteered to send me the correct links, often delving into the wayback machine, etc., and diligently compiled them over several months! I am ashamed to say that except for a few I haven't been able to update them all yet. So in the interim, if you come across any, please ask. 

Of course Ninetta has been a huge support with the Endrucks 1920 Project and words fail to express how much I can rely on her and her friendship. I had the good fortune to make several new friends through this project even during 2024.

💖💖💖

During the year, I was also humbled by several gifts during the year, some of which I blogged about, but some slipped by. These included tatted coasters from Bandini, books from Ninetta & Lilas Lace, newsletters/bulletins from Ring of Tatters, IOLI, and a surprise from Judith - their last printed newsletter, another surprise pattern gifted by Edda Guastalla, and threads from Madhur. 

All these goodies do not diminish the joy (and some trials) from learning 'new' tatting techniques, comparing and contrasting them, sharing pictorials, and taking up challenges. In fact my next two posts include my pictorials and explorations. Stay tuned .... what is a blog without readers, huh?!

💖💖💖

A Huge Thanks to all! 

Saturday, 21 January 2023

double juggle

Pin It now!

 I'm calling it double juggle, not double trouble, coz I'm thoroughly enjoying myself and only wish I had more time and brain space to spare. I am deeply involved in 2 large projects with 2 different partners and have to juggle between both - I find that my brain is compartmentalised and have to 'get into each mode'. 

First project is my late friend's tatting book I am editing- it is over 200 pages consisting of a manual and a dictionary. This will take many more months but Angela is an enthusiastic and quick worker, providing excellent technical and formatting support and then some more.

Second project is our current tat-along in our EP Facebook group with Ninetta. some of our participants have already completed the entire doily even though 2 more parts need to be shared. They followed Reiko's diagrams without waiting for us ;-D Oh, and the colours and combinations that are emerging are truly inspiring!

Parts 1-4 of #TALmeEndrucks completed in size 40 threads, going for a peacock impression.
Parts 1 & 2 posted here - https://tipsaroundthehome.blogspot.com/2023/01/tat-along-doily.html

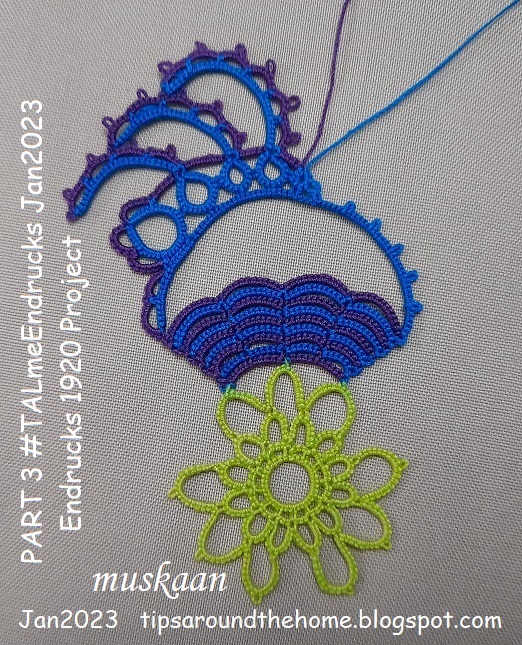
PART 3 - After the central 'flower' and the 'basket', we work the first half over the 'handle' of the basket, continuing from Part 2. 

There is one inward picot and the rest is simple rings and chains.

Endrucks worked the entire doily continuously. However we are following Reiko Akamatsu's modified pathway and count.


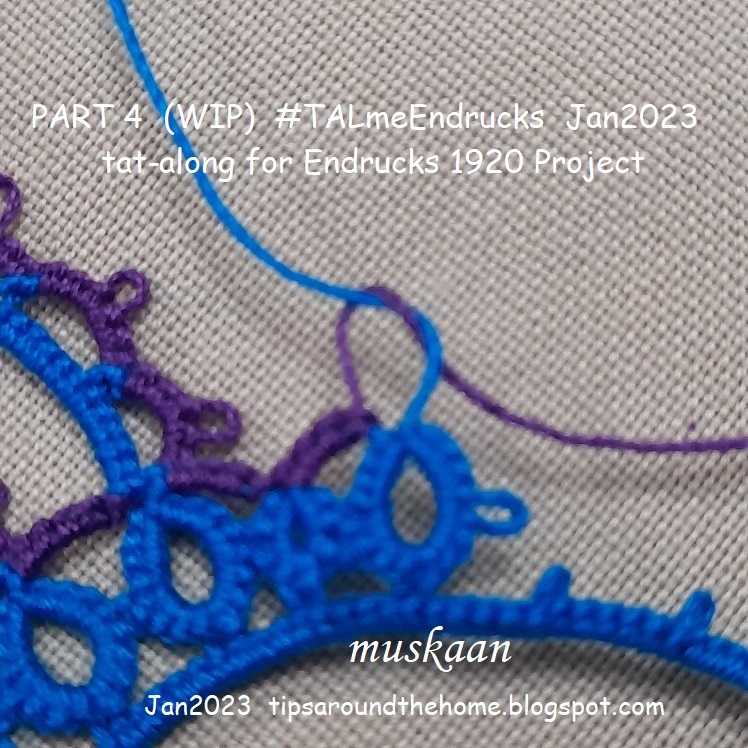
PART 4 - This is a mirror image of Part 3. Working with 2 colours means we need to switch shuttles before working the floating chains in order to get the same colour, unless one wants to use inward picots or Block Below Tatting (BBT).
I decided to work the lower chain first, then the upper scalloped chain. And since after this pair is made we need to anchor to the base and move to the right, I made an overhand tie/SLT, leaving a vsp space to lock join to later. 
I've used this SLT Picot before in a different scenario - https://tipsaroundthehome.blogspot.com/2015/03/experimenting-with-colours.html

And then again, for a mirror effect so that the last ring tilts accordingly, we need an inward picot on the chain. https://tipsaroundthehome.blogspot.com/2023/01/measured-picot-on-core-thread.html

As you can see, the first and last rings are reflections of each other. Believe me, I tried the ring 'normally', thinking the chain could be attached to the ring accordingly. But it looked all wrong and I had to undo it. So it is worth the effort.

I absolutely love the clever arrangement of the floating chains. Even if they are not joined to each other, there are so many possibilities - peacock's plumes, a jester's hat, a rooster's tail, foliage, .....what else?

Playing with flipping to see what comes up, LOL. Nothing to write home about.
The blue colour runs a bit and has seeped into the green below.

Fortunately, no more seepage occurred. Parts 3 and 4 are worked twice more.

Part 5 will be released tomorrow as 3 detached motifs and I will share my fun arrangements in a future post. But first I have to get back to juggling the editing and tatting the final part of this cover doily!