Showing posts with label E44. Show all posts

Monday, 8 July 2024

E44 motif arrangements

Pin It now!

 Ninetta has been showcasing the E44 cover doilies (links at the end) from our tat-along in January last year and asked me to write something for her final post on the topic where she will share her pattern for continuous tatting. Had to refresh my memory and discovered I hadn't posted the motif arrangements mentioned in my post here -  https://tipsaroundthehome.blogspot.com/2023/02/the-cover-covered.html So, like Ninetta said, better late than never. 

One of the advantages of working in pieces rather than in one pass is that one can play with arrangements and combinations! So without much ado, here are some quick pics I had taken back then. Perhaps it will inspire some one to tat one or more. 

Pattern : Motif G from E44 cover doily TAL Jan2023https://drive.google.com/file/d/1km6Fy-tS-1o5LRW2TMI-KFb3KWlzRiCp/view

Four motifs in a closed circle

Two individual motifs that look like they are flying away! Angels? Birds?

A single motif fits nicely under Round 2 of the doily. 

Holding hands 

Same arrangement but with an overlap

Repeats of the above for a bracelet or belt

Straight border or bookmark?

A ladder or tower arrangement

Close-up of above. Good for a bookmark.

A different tree-like arrangement of four motifs.

A more symmetrical arrangement for a cross.


In my previous posts, too, some ideas from this doily have been shared. Links at the end. 

Hope you enjoyed these. In single colour, with beads, or in different colour combinations, and with a bit of tweaking/adaptation some of these could be brought to life.
So many possibilities but so little time.

Related Posts
https://ninettacaruso.blogspot.com/2024/06/cover-doilies-roundup-1.html
https://ninettacaruso.blogspot.com/2024/07/cover-doilies-roundup-2.html
https://ninettacaruso.blogspot.com/2024/07/cover-doilies-roundup-3.html

https://tipsaroundthehome.blogspot.com/2023/01/tat-along-doily.html
https://tipsaroundthehome.blogspot.com/2023/01/double-juggle.html
https://tipsaroundthehome.blogspot.com/2023/02/the-cover-covered.html

Monday, 6 February 2023

the cover covered

Pin It now!

 It's February already and instead of posting the arrangements I spoke of last time, here is the completed doily. The former will be shared at a later date.

This is Reiko Akamatsu's reworking of Eleonore Endrucks' doily on the cover of her book. It is tatted as separate parts, unlike the original which is worked continuously using shadow chains to climb out. 
For our Jan 2023 tat-along game Ninetta released the pattern in 6 parts and the doilies are still coming in - exquisite works in a range of colours/shades!
Part 5 motif (the orange and green one) was worked separately (I will share it next time) and then in Part 6 we attached it to the main body. I used the same green as the center, but as you can see the blue seeped into it. 
Something interesting emerged, though - notice how Yellow the same thread looks when positioned on the side of the orange/green motif?!

The three Part 5 motifs attached. Ninetta had to tweak the count for it to fit. I guess our tatting tension is way tighter than Reiko's.

The same but rotated. Different angels and all that ;-P

This the 2nd little motif of Part 6. I added 2 different shades to work it, using a shuttle and ball and reverse join instead of lock join to return.

Completed in 7 colours/shades inspired by a dancing peacock. In size 40, using different brands of mercerised cotton. It measures a wee bit over 16cms tip-wise. 

This was not a doily I would've tatted since it did not appeal to me. But at Ninetta's request to work it in 2 colours, I started and have thoroughly enjoyed the experience. However, after seeing some of the versions that have come in, I can't but admire the design and the vision of both the designer and the tatters. And some of our tatters have worked it multiple times already!

Meanwhile our February event has started which will segue into our March event. 

Related posts -  

Many many thanks to Reiko and Ninetta for their wonderful commitment and work

Saturday, 21 January 2023

double juggle

Pin It now!

 I'm calling it double juggle, not double trouble, coz I'm thoroughly enjoying myself and only wish I had more time and brain space to spare. I am deeply involved in 2 large projects with 2 different partners and have to juggle between both - I find that my brain is compartmentalised and have to 'get into each mode'. 

First project is my late friend's tatting book I am editing- it is over 200 pages consisting of a manual and a dictionary. This will take many more months but Angela is an enthusiastic and quick worker, providing excellent technical and formatting support and then some more.

Second project is our current tat-along in our EP Facebook group with Ninetta. some of our participants have already completed the entire doily even though 2 more parts need to be shared. They followed Reiko's diagrams without waiting for us ;-D Oh, and the colours and combinations that are emerging are truly inspiring!

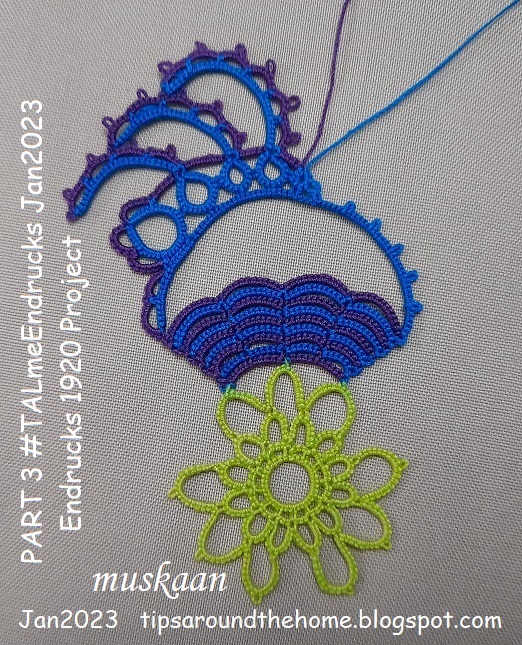
Parts 1-4 of #TALmeEndrucks completed in size 40 threads, going for a peacock impression.
Parts 1 & 2 posted here - https://tipsaroundthehome.blogspot.com/2023/01/tat-along-doily.html

PART 3 - After the central 'flower' and the 'basket', we work the first half over the 'handle' of the basket, continuing from Part 2. 

There is one inward picot and the rest is simple rings and chains.

Endrucks worked the entire doily continuously. However we are following Reiko Akamatsu's modified pathway and count.


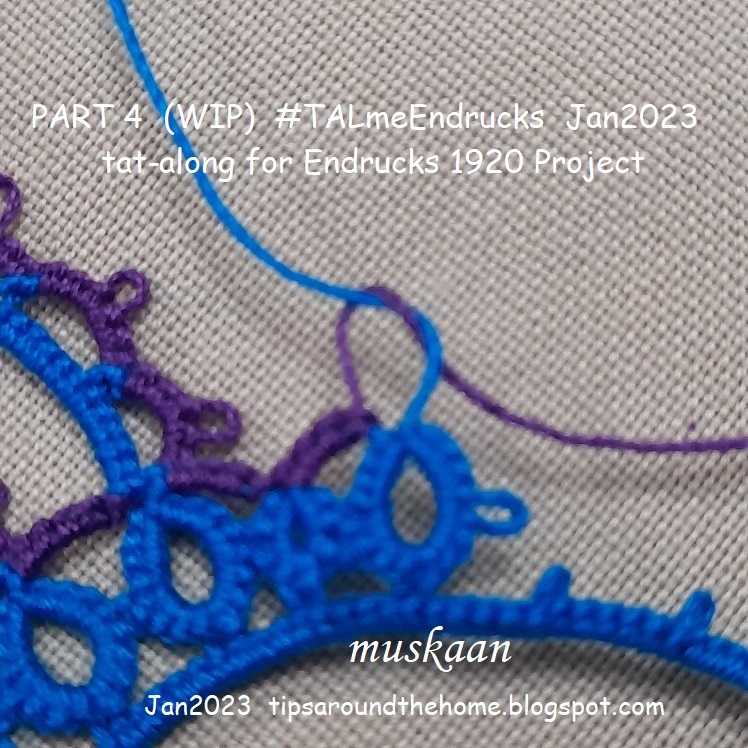
PART 4 - This is a mirror image of Part 3. Working with 2 colours means we need to switch shuttles before working the floating chains in order to get the same colour, unless one wants to use inward picots or Block Below Tatting (BBT).
I decided to work the lower chain first, then the upper scalloped chain. And since after this pair is made we need to anchor to the base and move to the right, I made an overhand tie/SLT, leaving a vsp space to lock join to later. 
I've used this SLT Picot before in a different scenario - https://tipsaroundthehome.blogspot.com/2015/03/experimenting-with-colours.html

And then again, for a mirror effect so that the last ring tilts accordingly, we need an inward picot on the chain. https://tipsaroundthehome.blogspot.com/2023/01/measured-picot-on-core-thread.html

As you can see, the first and last rings are reflections of each other. Believe me, I tried the ring 'normally', thinking the chain could be attached to the ring accordingly. But it looked all wrong and I had to undo it. So it is worth the effort.

I absolutely love the clever arrangement of the floating chains. Even if they are not joined to each other, there are so many possibilities - peacock's plumes, a jester's hat, a rooster's tail, foliage, .....what else?

Playing with flipping to see what comes up, LOL. Nothing to write home about.
The blue colour runs a bit and has seeped into the green below.

Fortunately, no more seepage occurred. Parts 3 and 4 are worked twice more.

Part 5 will be released tomorrow as 3 detached motifs and I will share my fun arrangements in a future post. But first I have to get back to juggling the editing and tatting the final part of this cover doily!

Friday, 6 January 2023

tat-along doily

Pin It now!
Our new game in the Endrucks 1920 Project FB group has started. This time it's a tat-along of the cover doily. We are following Reiko Akamatsu's reworking of the original. And we are sharing 2 options. I am tatting it in 2 or more colours without climbing out. Ninetta is working it in one-pass using split chains, etc. to climb out. Of course Frau Endrucks herself tatted it in one pass using shadow/extra chains to climb out.

Tat-along of endrucks' cover doily #TALmeEndrucks jan2023 
Part 1 - Rounds A,B,C. I used the measured mock/inward picot to climb out of the central ring which can be tatted as a true ring or a mock ring.
Interestingly, this is the only pattern where Endrucks starts with a chain (aka mock ring)!!! Hadn't noticed it before. There is always something new cropping up.

Actually this was my 1st attempt where I used false ctm to climb out of the central blue ring. I kept the blue on the shuttle and continued with green ball. So not happy with the work which becomes even more glaring in the pic. 
PART 2 - Rounds D,E.  This is where the difference between individual rounds and continuous tatting emerge. Details are in the notes in the Part 2 pdf.
I tried Frivole's Ending on a Chain to avoid hiding ends but the thread broke and I had to start over.

Tatting as separate rounds gives us the freedom to increase our colour palette. Both rounds can be tatted with one shuttle and ball, including block tatting.

I am going for a peacock rendition, hence the choice of these colours. I chose size 40 and this time all 3 colours I used are from different brands! Green - Swati; Purple - Anchor; Blue - Gopal.

Doesn't the top make a nice little basket?! Would love to tat it separately and fill it with flowers. 

All links in the top right panel of my blog. You are welcome to participate.