Tuesday 28 May 2019

accidentally

Pin It now!
a happy design accident
Remember the butterfly that wished to become pretty and my dear tatter friends obliged? And the subsequent Butterfly edging? The origins of that pattern accidentally emerged from this 2018 Design Round Robin (DRR) doily …. Read on.

HEXAFLOWER 
Design Round Robin 2018 , Craftree
Coretta,  muskaan, Tim, Kathleen
Pattern (unedited) link

Coretta Loughmiller designed the center or Round 1 of the Hexaflower doily. Notice how the small rings are left unattached! I love the shape of the inner rings despite the fact that mine didn’t turn out as neatly as hers. They are mock rings made with a shuttle & ball. 
TIP: Working with 2 shuttles, ctm, I threw the central ring from 1st mock ring, making a mock picot. 
Worked in Anchor size 40.

I was next in line. These are my various trials (with numerous elemental tweaks) trying to get a design going. I had intended to work an all-white doily. But the thread didn’t agree with me and I switched to the yellow above.

I got valuable feedback & suggestions/insight from Craftreans which finally led to this. Notice that I did Not set out to incorporate butterflies. But as I tweaked the count during trials, the butterfly emerged. I’ve already shared my tips here on how the colours were switched to highlight shape. 
The orange chains (worked in 2 strands of embroidery thread, but yellow size 40 core) were added to anchor the free rings. 
TIP : Kathleen made a lovely variation by joining directly on the central ring to look like stamens.
This beautiful 3rd round was designed by Tim Kaylor. Clever use of split rings!
Considering it’s shape, I chose to continue with yellow so that the piece looks like a large flower.
Kathleen Minniti designed the final round. A bit of denseness to hold down the openness of the previous round. Well, in my version, it is perfect as foliage. A sober shade of green keeps the focus on the flower.
Final measurement in size 40 - 4½”.
Techniques used : mock rings, lock join, split rings, colour placement.

I snipped off the orange from below, shifted it above, and added a new calyx at the back.
As seen from the back. Inward facing chains topped with a ring for calyx.
All except Tim's round can be tatted with single shuttle and ball.
I’m very happy with the way this floral story in tatted lace developed, doing justice to it’s name.

In size 20, the doily measures 5½”. Considering it is small, Coretta has designed another round. I am waiting to see how it develops and will participate only if I think the flower story can continue.

The pattern is free to share. However, since it is not ‘cleaned up’, for now it is accessible only within Craftree. Hopefully Coretta will convert it into a pdf soon.

UPDATE (July 2019) : The pattern link is shared, though still unedited, and you are invited to continue the design round robin. You can contact Coretta on facebook, Craftree, or her blog

Related Posts

Saturday 25 May 2019

a wee bit bold

Pin It now!
…ummm, perhaps? perhaps not.

Next leg of the design journey from mistaken round to snood-in-the-making which I now think can hold it’s own as a doily.

Continuing from where I left off last -
The outermost beige round ended with 45 repeats. That’s 15 more than the 30 in central beige round. And it measures about 6¾” in Anchor size 40.
The main dilemma was connecting it to the previous round. 
I set 2 guidelines –
1. it should be in brown ;
2. it should be fairly open and airy, yet durable.
That’s when I remembered this post by Lilas Lace – those intertwined/interlaced double picots had caught my eye. She herself has since used the effect in her own doily here.

6. Made the shorter brown round with 30 repeats. All chains.
Ch1  : 5 lp (8mm) 5 lp 5, lock join
Ch2  : [ 5 + 5 lp 5, lj ] x28
Ch30: 5 + 5 + 5, lj
The long picots (lp) are 8mm tall.

7. That round went fairly easily, but designing the next to fit in nicely took a lot of trials. I had 15 extra points to take care of!
This pic (sorry about the quality - it was taken with my tablet) shows the 1st and 3rd trials; the 2nd trial has already been snipped off since it didn't work at all.
This round is a mix of rings and chains.
Ring: [ 7 + 7. rw
Ch   : 5 lp (1cm) 7, lj ,
         7 + (interlaced) 5 lp 7, lj,
         7 + (interlaced) 5. rw ] x15
The long picots (lp) are 1cm tall.

I like how it finally turned out.
Meanwhile I have completed the final outermost round, but will share only after filling in the center.

It was while answering Emily’s comment that I finally hit on the name – Repetition Doily/snood. It is a reminder to the original Repetition Mat (in 'Mastering Tatting') - the round which ended up in the center later. It is also a reference to the alternately  repeating rounds of clovers v/s chains. This is a common theme of Lyndsay Rogers' book where the objective is to take the tatter through simple to complex using simple techniques. 
All rounds in this doily, too, can be worked with one shuttle and ball,  except for the construction sequence. 

Now my question is –
Considering the numerous additions I’ve made, can I share the stitch count for Lyndsay’s round as well?

Monday 20 May 2019

Russian Bracelet and Brooch

Pin It now!
 aka The Importance of Polyester !
BRACELET PARACORD 
This link was shared in a fb group and it was fun to come back to 3D tatting.
But I decided to do a short beaded version for earrings. 

One can start the split ring braid with a normal ring.
For the ring and chain scroll I chose to work with shuttle and ball continuous thread instead of 2 shuttles, with beads strung on ball thread.

I made 16 chains with 8 beads on each.

Really, for better results, for the intertwined elements to keep their shape, polyester thread is an essential.
This is how it looks from the back....

... and against a black background.

Simple Anchor size 40 thread and size 18/0 seed beads. Final measurement – 2¼” long, ¾” broad.  
I tried another pattern. This time the DOUBLE-SIDED BROOCH. This pattern is made of 5 individual rosettes or medallions. After all 5 are completed, they are interlaced/intertwined. I’ve done this type before, though not so dense.
I have no trouble tatting large rings. However, in order to get a stiff ring, I increased the stitch tension. You can see the mess I made (even broke the thread once while closing a ring, and then switched to mock rings).
I’ve decided to scrap this project. No use until I have the right thread. What has been your experience? Any tips?

It’s a pity I couldn’t get better results – the video demonstrations are very clear! I’ll jot it down as gaining some more experience :-D

Thursday 16 May 2019

do the twist

Pin It now!
knit legwarmers 
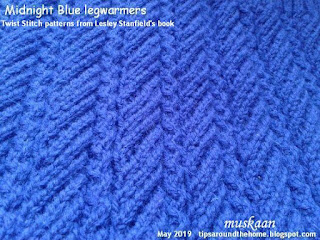
Finally blogging about an old project, started on 11th Jan 2016 and completed on the 31st Jan, and gifted in Feb 2016. Legwarmers for my MIL. The third set I’ve knit for her – she finds my hand knit ones much more warm and comfortable and obviously customized :-D
She had asked for blue and this was the best shade in the pure wool quality. I've suggested shaping the knees, but she prefers these. 


The day I started knitting this, I thought I'd gone blind - the shade was too dark to work with. Very soon the eyes acclimatised.

Yet, the camera had a tough time getting a good fidelity.


Again, I combined 2 stitch patterns from Lesley Stanfield's The New Kinitting Stitch Library. 


Stitch/Pattern #305 is the broader strip. Originally these strips were separated only with a couple of purls. I inserted the narrow braid-like strip from #309.
This came to a multiple of 14+2 stitch repeats [2 purl,7,2 purl,3].

Twist Stitch is common to both. In the narrow braid, the twist alternates.

UK #12 needles for the cuffs, and #10 for the body.
Jaypee double knit Shade/lot: 044931. Around 5 balls (~250 gms) were consumed.

As you can see, I tried various backgrounds, locales, camera/flash settings to try and capture the pattern in the midnight blue colour. It can be quite frustrating.

The knitting journey was undeniably successful and I happily did the twist !!! 

Monday 13 May 2019

no bold moves

Pin It now!
…yet not a simple design journey for me.

Remember the counting error that led to 30 repeats from the designated 9 in Lyndsay Rogers’ Repetition Mat? And I decided to adapt it into a snood?

This is my story so far. Sharing my design and thought process, for those interested –

1. I started round 2 from the original pattern, but didn’t like my working. 
Snipped. But I did want to use 2 colours in order to highlight the beige round. 

2. Instead of a completely new centre, why not work Lyndsay’s original round correctly, but with 10 repeats – that would be one-third of the outer round?
Halfway through I feared it might be a stretch, so squeezed in 15 repeats....

...with overlapping chains that complemented the raised rings in outer round for texture.


3. Back to centre, I added a chains-only round.
Chain: [3 ± 2 – 2 - 3, lock join] x15
Will most probably do a filigree stitch to fill in the center. 

4. The negative space between the beige rounds was smaller than hoped. Initially I thought of simply weaving in bare thread (as in attaching to bangles, etc). It meant basting the rounds to fabric to hold taut on a embroidery hoop - too much work!
After a lot of trials and errors to get the stitchcount right, I went with another chains only round.

Chain: [5 +(to p between rings) 5, lj ,
              5 +(middle p of first chain) 2 +(middle p of next chain)  5, lj] x15 
At the end of this round, the diameter is 4 inches in Anchor size 40.
The reason I used the dark colour is evident against this dark background -

5. After a lot of deliberation, this way or that. inward or outward, I ended up with a tame larger repeat of my mistaken round (no bold moves).
[Ring1: 6 ± 6.
 Ring2: 12 + 6 – 6 – 12.
 Ring3: 6 – 6. RW
 Chain: 6 – 3 – 3 – 6 RW] Repeat around {45 times?}  
TIP : With a full shuttle I used the scmr to add new thread to/within rings, thus milking the shuttle thread to the max! 

This round should be completed by the end of the day when the total number of repeats will be confirmed.
After blocking, will come decisions on how to connect. 
This morning I had another idea to fill in the center - a treble stitch ring! Or would it be too cluttered/dense? But this can wait till the end.

Eager to read your opinions and suggestions!

Friday 10 May 2019

coronet doily for snood

Pin It now!
I need snoods or hair bun nets. In different colours and designs to go with my mood ;-P


This time I chose Linda Davies’ Coronet Doily (the larger version) with the beautiful center and a clever end round.

The initial rounds ruffled but I continued tatting, and a quick rolling-pin blocking after 5th round flattened it out neatly. However, a bit of overlap re-emerged in Round 7.

After Round 9 there is pronounced ruffling (overlap clearly visible in pic), which will get masked when pulled into a snood. Tatted continuously till the end, as instructed in pattern. 


In Anchor size 40 this now measures 6½ inches in diameter.
Round 10 is beautiful with a very interesting construction, but had to be forgone here. Perhaps I can adapt that pattern into a bookmark?

TIP : One can work round 10 but string the tie through round 9. When worn, the final round will create a nice trim or frill around the hair bun.

My first snood (also a Linda Davies pattern) lovingly slogged daily for over a year and half. Finally binned it when many of the outermost chains wore out due to friction with the tie.
I used a satin ribbon in the next (yet to blog) but am not very keen on it.


Hence this time I used my homemade French knitter to weave a loose cord, also in size 40 thread. Let’s see how long this works – it is very soft unlike the previous lock chain tie/cord. 
And for those who had asked how the hair bun holder looks, I've stuffed a bun net with some cotton to give an idea. Cover the hair, make a simple overhand tie, and hide the long tails around the base.

I have another in the pipeline


Many thanks to Linda for generously sharing her beautiful patterns for us to enjoy and use. 

Related Posts
https://tipsaroundthehome.blogspot.com/search?q=snood