Showing posts with label 3D earrings. Show all posts

Thursday, 16 May 2024

a simple solution

Pin It now!
 A month back, Ines-Carmen Wischniewski asked for help in a FB group. She wanted to load seed beads on an existing picot but her crochet hook was too large for the small beads. She received answers and finally this is what she came up with.... Sharing with her gracious permission.

1. The Objective - To add seed beads on the long chain picots (in the lace below). 

2. The Dilemma - Size mismatch or tools lacking. Beads are smaller or thread is thicker. 


I use the following methods whichever works for the project in hand --
  • My go-to is using a fine crochet hook obviously.
  • If possible, I use this threader which I showed here - https://tipsaroundthehome.blogspot.com/2017/07/productive-designs.html
  •  And when both these fail, I use the finest tapestry needle threaded with sewing thread. After inserting the needle through the picot, I tie the thread in a simple, slim knot. Then needle the beads and pass them over the picot. Then snip off the thread near the knot and reuse. This is very effective, but a bit cumbersome. Hence you can imagine my excitement at seeing this easy threader hack!

3. The Hacked Threader - Ines-Carmen solved her dilemma by cutting the wire threader on one side. In the photo 3 beads are loaded on the wire.

4. The Hook - The cut portion of the wire acts like a crochet hook to snag the picot. The beads are moved over this 'hook' towards the picot.

5. The Transfer - The 3 beads are then transferred on to the picot, leaving the threader 'hook' free to be removed.

6. Continue - The join is made to the beaded picot and tatting continues. Notice the hacked threader lying on the side.

I remember buying a beading wire with some findings a few years back, hoping to use it to thread beads. It turned out to be too thick for the purpose. Threader wires are fine, hence work nicely. 

The Backstory - This is where it all started. A simple insertion which Ines-Carmen thought to convert to 3D. But there were no picots. So she had this idea to sew the edges at intervals and cover the thread with bead(s). Since it worked, she decided to tat a real model but encountered the above dilemma and then found the solution! 
See the transformation into 3D earrings in this mini video - https://drive.google.com/file/d/1HmAwUzaskmukA3_gxsYVSAPjplm2NV66/view

There is always a new or different way to do things! You never know what might work or be a better option. I have a couple of projects lined up where I can use this in the near future. Also, it does not necessarily have to be beads on a picot. We can use it to add a free bead wherever required during the work in progress. 

Many many thanks to Ines-Carmen for sharing

Sunday, 10 December 2023

about Helix Tatting and more

Pin It now!

In late October, while working on the Dictionary part of ‘The Six Ts of Shuttle Tatting’, Anita introduced me to the term Helix Tatting and the developer of the technique, Richard Embrey. We worked on a definition or description to include in the dictionary and I also tried my hand at a quick trial to get a feel for it.
My very first trial (with mistakes) without shuttles

While I don’t want to reveal the definition, I will certainly do a sort of comparison to put things in perspective. Richard came up with this technique in 2019 while trying to make an I-cord in tatting when he couldn’t find a tatted equivalent. It started out as a tatted tube or cord but has since evolved and diversified into many more shapes, including a coronation cord and a fish! As always, it is our imagination that gets us soaring into new skies.

UPDATEhttps://tipsaroundthehome.blogspot.com/2024/01/helix-tatting-pictorials.html  -- Includes PDF OF HELIX TATTING Pictorials 

Let me list down the major characteristics of Helix tatting (HT) as well as include links to visually similar techniques. Please note that a lot of these are my own thoughts and notes. Feel free to critique or suggest.

1. It is basically a 3D hollow cord or structure, made solely of chains, using multiple shuttles (4 or more). The outward appearance is like a spiral, especially visible when different colours are used.

2. Each shuttle alternately and sequentially acts as an active shuttle to become the core thread, and then  as a ball thread to form the stitches.

3. It is NOT bauble tatting, though it can be considered to be a variation. No separate ‘ribs’ are added for a scaffolding. Instead, each shuttle, in turn, acts as a core thread and provides the necessary stability to the structure. It also 'locks in' the previous segment when shuttles are switched.

4. It is NOT a continuous spiraling chain since short segments are made with a sequential change of shuttles. Each segment can consist of merely 1 stitch or as many stitches as one desires to create a broader shape. Two or more stitches give a more distinctive spiraling of the colours. The spiral is directional and there are ways to determine beforehand which direction one wants the spiral to run.

For instance this 3D Pond Reed prototype I had made back in 2014 using 2 shuttles– it is a continuous chain spiraling around itself, where I used the slope and roll joins to hold the shape. Clearly it is very different from HT.

5. It is NOT block tatting, though chain segments are apparently ‘stacked’ over each other. No lock joins are used. However the outward appearance can be confused with tatted ropes, with or without beads. Ninetta has done a wonderful study of various ways in which these 3D tatted ropes can be made, with links to respective tutorials. A couple of them even create a spiral effect! https://ninettacaruso.blogspot.com/search/label/stacking

6. HT is not limited to merely spiraling chains. With so many shuttles in play, it is easy to throw off rings and chains, use beads, add picots, and so on. Versatile.

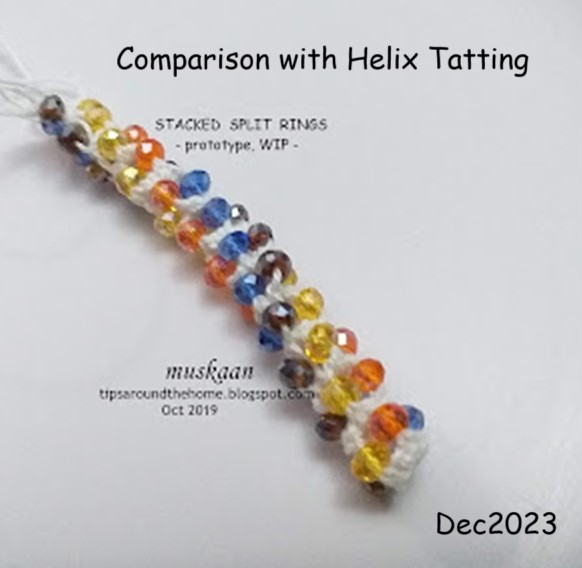
7. There is another tatted tube example where we use stacked or layered split rings. No chains involved, only rings. And if the picots are shortened, the stacking will be that much closer. Clearly this is not HT in any sense of the term, except that it is also a form of continuous tatting for a 3D hollow tube.

tatted beaded rope made with stacked or layered split rings https://tipsaroundthehome.blogspot.com/2019/10/tat-beaded-rope.html

See Ninetta's version of a spiraling tatted rope made with interlocking rings - https://ninettacaruso.blogspot.com/2020/08/gold-rope-chain.html 

8. BUT, there is something that definitely follows the same principle and concept as HT, and also gives a directional spiral! It is called Mac-Tatting (MT) and was first developed by Usha Kota in an attempt to imitate a crochet braid in tatting – it was a flat braid, worked too and fro. However, when I understood what HT was, it immediately crossed my mind that MT could be similar if worked continuously. And YES, it is the same, except that we work with unflipped or reverse stitches rather than flipped or double stitches! And you get a spiral, though the stitches face down while in progress. 

Helix tatting & Mac-tatting trials, together
In my first attempts, I found it easier to work the Mac-tatting version - I had a better control of the threads and there was no tension issue. Helix tatting is fine once you get into a rhythm, but it requires more finesse. And managing all those shuttles can of course be an issue.


A couple of weeks back, Richard was invited to TOTC as a guest teacher to demonstrate the Helix Tatting technique. You can watch the video here - https://youtube.com/live/DXO9Pm0fq1U
Bonnie Swank shared her notes on how to do HT with needles. Richard also shared a practice pattern called Watermelon Dreams, with the class. https://www.theonlinetattingclass.com/patterns
Creative members have already shared a couple of clever ways to organize their shuttles to avoid tangling. I simply laid them down spread-eagled, on my bed. I did find that it is better to leave a longish length of thread to avoid frequent winding/unwinding; and since it is only 1 or 2 stitches each, the long length is not a bother. 

I am test-tatting a pattern for Richard for his upcoming book. It is called Watermelon Dreams Beaded Helix Embellished Earrings
It took me a few hours to find and empty all my shuttles, glue the numbers (I did it on both sides, LOL), string beads and wind the shuttles. 
In progress.
I've completed Round 7. My version is a Caps In spiral where the double stitch faces inside the cord and tatting progresses in a clockwise circle. 

That’s it from me for now ….. Welcome your thoughts.

Many thanks to Richard, Anita, and all the creative minds mentioned above! 

Monday, 20 May 2019

Russian Bracelet and Brooch

Pin It now!
 aka The Importance of Polyester !
BRACELET PARACORD 
This link was shared in a fb group and it was fun to come back to 3D tatting.
But I decided to do a short beaded version for earrings. 

One can start the split ring braid with a normal ring.
For the ring and chain scroll I chose to work with shuttle and ball continuous thread instead of 2 shuttles, with beads strung on ball thread.

I made 16 chains with 8 beads on each.

Really, for better results, for the intertwined elements to keep their shape, polyester thread is an essential.
This is how it looks from the back....

... and against a black background.

Simple Anchor size 40 thread and size 18/0 seed beads. Final measurement – 2¼” long, ¾” broad.  
I tried another pattern. This time the DOUBLE-SIDED BROOCH. This pattern is made of 5 individual rosettes or medallions. After all 5 are completed, they are interlaced/intertwined. I’ve done this type before, though not so dense.
I have no trouble tatting large rings. However, in order to get a stiff ring, I increased the stitch tension. You can see the mess I made (even broke the thread once while closing a ring, and then switched to mock rings).
I’ve decided to scrap this project. No use until I have the right thread. What has been your experience? Any tips?

It’s a pity I couldn’t get better results – the video demonstrations are very clear! I’ll jot it down as gaining some more experience :-D

Monday, 30 January 2017

beady-eyed but dim

Pin It now!
playing with beads and lace
I’m getting better at stringing beads ! So playing is much more fun now. OTC homework for Jan 2017.
Sbrilluccicante
(or Bugle Bead Star)
Ninetta Caruso
Ninetta’s brilliance has always been apparent in her tatting, lacework, designing, and innovation ! Little surprise to see another winner from her.

Materials : 2 shuttles, size 20 Anchor 4054-0241 ; 72 glass bugle beads 5mm from Itsy-Bitsy
Techniques : working with beads, block tatting, reverse stitch (for block tatting and for split rings), split chain.
Dimensions : Rnd 1 – 1⅜” ; Rnd 2 – 2¼” ; Rnd 3 – 3½”  all tatted in one pass.

The video is excellent and really helps. The written pattern could’ve been better, though the images help.
Unfortunately, these are the only bugle beads I have on hand – not as shimmering, but good quality with hardly any jagged edged or broken ones.
TIP : My quick way of choosing similar sized beads – arrange along the edge of a flat-bottomed lid as seen in collage above!
After the first block, I followed my own way, using 2 same half stitches as a riser. The difference is noticeable (see below).

So you think the beads and thread are dull and dim? Wait till you see how dim I am ....
In this inverted V arrangement (Ù) of Round 1, notice how the thread goes under the bugle bead on the left and over the bead on the right arm ? I liked the shadowy effect and deliberately went with it, thinking I will do the same for the split rings in next round. BUT the thread Has to remain Above the bead for following reasons :
Ø      Bead count in shuttles goes awry
Ø      Joining to it in next round is slightly tricky because the picot can turn downwards.
Ø      More importantly, in split rings, the thread just bunches together when trying to close the ring !!!
I fell in love with the pattern at first glance and the tatting was equally fun !

{{{{{{{{{
3D Beaded Flower Earrings
Jane Eborall
Now this was undoubtedly an interesting piece when I saw it on Jane’s blog
But at the time I skirted around beads. With Georgia taking it up for the Online Tatting Class this week, I had a go at it. These are listed as Palmetto 3D Earrings here and are sewn up as a brooch here .
Pretty quick and easy. I loved the green calyx shape (sorry, no pic)! One can start the calyx as a mock ring with thrown center ring, too, but it is not required. I like it just as it is. 
I did not, however, add a bead between 2 petals, preferring to join to plain picot, and keeping the petals inside the hollow calyx. I like layered effect in tatting.

Materials : size 20 Anchor 4054-0241 green and 4054-020 maroon ;
Bead Craft emerald green seed beads – 5 ;
Bead Craft golden yellow seed beads – 36 ;
Gold beads size 9 – 5
Pearl bead cream size 3 (10mm) – 1 for inner center
Pearl bead size 6 – 1 for outside.

The finished flower measures just about ½” !
A clever design that makes the beads look like another round of petals, adding interest & texture ! Bead placement can be customized to create different looks. Hence beads in diagrams and tatted models may vary slightly.

This was a fun project and a good one to clear shuttles. I like the look of it as a little tree ornament.

{{{{{{{{{

{ Many thanks to Ninetta & Jane for sharing their brilliance with us  {

{{Happy tatting and come join us in The Online Tatting Class{{