Showing posts with label TOTC. Show all posts

Wednesday, 22 July 2026

angels needed

Pin It now!

 Tamie Montgomery who has taken over the baton from Georgia Seitz and has been successfully conducting classes through The Online Tatting Class (TOTC), has organised a Heavenly Angels Challenge for a charity drive. She is looking for angel patterns and designers who can share their patterns for the drive. 

She has been asking in several FB groups, including in our Endrucks group. So when I contacted her, this is what she wrote to me some days back - 

"There is a charity foundation that I am trying to get involved with to share tatting around the world. I have students from all walks of life and different countries. I thought a good way to get everyone involved in sharing their love of the art is to open up a charity drive and make it a challenge.

The rules are this. I will start the challenge off by nominating 5 tatters and they each have to tat 5 angels. Each one must be different. Then once they tat their 5 angels and send them to a local branch of this particular charity then they nominate 5 tatters to tat 5 angels. Where the designers come in is we need more angel patterns to choose from and I am asking designers to design 1 angel then everyone can choose from the patterns listed on the website from each designer. The patterns will be located on the designers page. This will also drive traffic to each designer's website who participates. So if they are monetized then they will make a few dollars for their time and effort.

The charity is Angel Tree Foundation. They put paper angels on the Christmas trees and people pick an angel off the tree and the angel will have a child's name on it. They will then purchase a gift for that child for christmas and it will be a gift from an Angel. Churches and childrens hospitals all participate in this charity all over the world. The children that the Angels on the trees in Churches are underprivileged Children. Children's hospital's participating are children who are very sick and may not see another Christmas. It gives them hope and love. The person donating the gift keeps the tatted Angel as a thank you for being an Angel.

Now for the overseas people we want them to give to the local children's charities in their country if there is none then give a sick child an Angel to watch over them. Small things to sick little ones are big to them.

 The Challenge's name is Heavenly Angel's Challenge."

She has now opened a dedicated page for the event with details and links to patterns/sites and you can read about it here - https://www.theonlinetattingclass.com/tatting-angels-tribute

- 3D model only -

On behalf of the Endrucks 1920 Project, we are offering the patterns we already have. You can find them in the Angels and Tree Ornaments from Endrucks directory here - https://docs.google.com/document/d/1MVEEhKE79euDmOY65Es95rYihb5P9UcqmAJWG5qw4Ws/view or scroll down for individual PDF links.

E7 The Slim and The Chubby Angels by Ninetta Caruso (2022) - https://drive.google.com/file/d/1sHQfHC2Al-o5dGE0tTRhuhwajN0QRB5D/view


E12 Angel in White (one pass) (page7) and its coloured version E12 Sky Blue Angel (page11) by Krystyna Mura (2021) - https://drive.google.com/file/d/1E26K3FFgHygdkEKUvVHn-f0MFlENDsqA/view   

The 3D model of E12 Christmas Angel at the lead is also part of this document but without a dedicated pattern. 

E22 Eleonore's Li'l Angel by Muskaan (2015) - https://drive.google.com/file/d/0B5MqI5ByadI4RmRhS3ZBeDVjcnc/view

E37 Endrucks' Angel n Bell by Margaret Davies (2022) - https://drive.google.com/file/d/1aq202-ESOzP_DLlA1bQ1mz3unyTTrpwr/view 

For different versions of this E37 Angel with beads, halo, etc., scroll through the images in these posts -
https://tipsaroundthehome.blogspot.com/2022/12/tagme-roundup-1.html 
https://tipsaroundthehome.blogspot.com/2022/12/tagme-roundup-2.html
https://tipsaroundthehome.blogspot.com/2023/03/tagme-roundup-3.html

All the above patterns are free to use but please give credit to the designers and use the hashtag #Endrucks1920Project if you post online. 

Many thanks to all designers for their willingness to share.
With best wishes ... keep your shuttles busy ...

Saturday, 21 March 2026

Dedicating my 1000th

Pin It now!

For this 1000th post I kept musing on the choice of subject. And I finally decided to dedicate it to some of my favourite people who have shaped and inspired my tatting journey. This is a symbolic gesture to ALL the tatting teachers, designers, innovators, experimenters, explorers who have shared their own learnings and experiences. 

Three Geniuses and a brand new stitch in tatting!

Two years back I stumbled upon two drawings that gave Ninetta Caurso's treble tatting stitch a basis in tatting history! 

A drawing on page 31 in Anne Dyer's 1994 book, To Boldly Go Where No Shuttle Has Gone Before, showing the decorative chain picots. 

A drawing on page 85 in Rhoda Auld's 1974 book, Tatting: the contemporary art of knotting with a shuttle showing her twisting the thread (this twisted picot is something I had pointed out in my pictorial) and passing the shuttle through it. Her tatted model is what we now call the vapour stitch.

Well, our very talented Ninetta engineered the two movements to create her treble tatting stitch (tds) all on her own! At the time she did not posses either of the books and till I pointed it out to her, she had not noticed! Basically, the chain picot became the 1st half of the tds while the vapour stitch became the 2nd half of the tds! 

💧One of the reasons for the delay in posting this was ambiguity about whether I could share the diagram pic from the book with due credit. Anita suggested I ask Tamie Montgomery, who now runs The Online Tatting Class and is very mindful of such issues. She was very receptive and we discussed it. Although she said it was okay to use the accredited pics (like Georgia had done) since it was a 'technique', I still wasn't comfortable, till I hit upon the idea of showing it in thread as above. 

💧💧💧

Auld is gold bead effects!

Last year I found some new beading effects by Rhoda Auld in the same book and took the liberty to give them each a name based on words used by her.

Framed Bead - The diagram on page 107 has been in circulation through Georgia Seitz's classes for several years now. Georgia pitched it as a way to add a bead in the center of a ring and I used it in this butterfly. 


However, Rhoda showed it as a way to add a free bead on a long picot with bare thread framing the bead on both sides when slack is removed. Makes for some good possibilities.

Piggyback Beads - Now this was fun to discover! On pages 99-100 Rhoda shows how to place two free beads one over the other using simple movements. I tweaked it a bit to make it easier to tat.
Instead of loading the bead on the core thread where she has to move the chain stitches, I loaded it on the knotting thread (teal in above sample) and the rest of the process remains the same. On an earlier page, Rhoda makes the teal picot longer and ties up both picots till required for joining. Hence there are many options depending on the pattern.
My sample is a bit wonky, but you get the picture, right?
💧💧💧

Generosity knows no bounds!

💧I can't thank Anita Barry enough for gifting me so many vital books on my list. Without these I wouldn't have been able to review and edit Net Best's, Six T's of Shuttle Tatting, not with any satisfaction or confidence. These have helped me to confirm, correct, or refine terms for her glossary, and even understand and discover so many gems, some of which I took the liberty of adding to the glossary.

💧Judith Connors has been taking an active interest in the glossary, too, either as an answer to my question, as a reaction to my blog post, or reaching out on her own privately. You can imagine what a treasure trove of knowledge she is and how lucky we are to benefit from her skills. 

Judith sent me a copy of her 2000 book, Creative Tatting with beads, shuttle, and needle. It has some of my all-time favourite patterns besides numerous interesting effects and applications. While I read the book, tatting models will be later in the year. 

💧Late last year I received a wonderful digital book by Carin Jansen, Riego ReTatted (2023).  She needed some advice on selling the book through the USA, not being sure of its reception. With permission, I sought Anita's advice and we both gave our respective take urging Carin to put it on the market. Eventually she decided against it for personal reasons, though she has shared her Dutch version within her group. It is such a labour of love and we hope she will change her mind in future. Carin has chosen patterns from each of Mlle Eleonore Riego's books (1850-1886) and shared detailed steps and modernised versions/tips in a pleasant format alongside diagrams and written patterns. 

💧💧💧

I'd like to think that my blog has stayed true to its name to the extent that almost 95% of my posts have a tip of some kind. Unfortunately I couldn't stay true to the url since this blog soon turned into a tatting blog ... not that I'm complaining, LOL. 

Hope you continue to follow my blog and read my posts. 💞

You will find tutorial links to terms in this post here - https://tipsaroundthehome.blogspot.com/p/tatting-resources.html and you can use the search box on the right panel to look for past posts on the tags used here and much more.

💧💧💧

Many many thanks to all the wonderful tatters mentioned here and also to those not mentioned who have influenced, inspired, and improved my tatting journey and maintained my eagerness to blog.

Tuesday, 14 October 2025

Starter Picot pictorials

Pin It now!

 Ninetta and I have been working on a resource page dedicated to the Endrucks 1920 Project. Over the years many tips and pictorials have been shared but they were scattered. In our attempt to finally gather and organise them, we discovered certain lacunae and decided to create pictorials and/or videos to address the issue. 

One such is the Starter Picot or Starting with a Chain. Elgiva Nicholls calls it the Link Loop or link loop picot. Several of Eleonore Endrucks' patterns in her 1920 book 'Die Schiffchen-Spitzen', start with a chain. She ties two threads together, and starts with a chain of 1ds, picot, and the rest of the chain. Of course most tatters now start directly with a picot and with continuous thread (CTM). Yet there are different approaches. Following are glimpses into the options detailed in the PDF which I won't repeat here....

Please note that this is a compilation sourced from various sites/blogs, some of which are no longer accessible. It is the reason Ninetta and I wanted a resource that did not have to rely on outside links, as far as feasible. The only outside link we included is for The Online Tatting Class, besides our own blogs. As it is my Tatting Resources page (tab above) lists tons of outside resources with credit. 

Starter Picot Options with Pictorials by Muskaan Oct2025 (starting with a chain) - https://drive.google.com/file/d/1vzSHMxas51Yn5iujdmror1obx27AuIhw/view

1. Starter Picot with paper clip, marker, or coilless pin.

Between the choice of spacers, I prefer the thread marker (or luggage tag loop) as you might remember from my past posts. I find it less interfering, and more importantly we can measure the picot to the exact size required - https://tipsaroundthehome.blogspot.com/2023/01/measured-picot-on-core-thread.html

2. Starter Picot with 1st half-stitch

or 2nd half-stitch
I left out this 2nd hs collage from the PDF since it is basically the same as the 1st hs pictorial.

3. Starter Picot with lock stitch


What happens when we want to work with two colours or we have leftover threads on our shuttles and wish to use them? Obviously CTM is not an option, but we do have False CTM. 

4. Starter Picot with false ctm in two-colour tatting

5. Starter Picot with false ctm in two-colour block tatting

The above collage was shared by Ninetta showing a two-coloured block in progress. And she starts the 1st chain with 1ds, picot like Endrucks. However, instead of tying the threads together, she uses the false CTM method.

For many more situations in which a False CTM comes in handy, click on the tag at the end of the post. I have two dedicated posts along with some specific projects where I used it. https://tipsaroundthehome.blogspot.com/search?q=false+CTM

Hope this is helpful in your future projects. 

Friday, 29 December 2023

oversew and so on

Pin It now!

For the longest time since (mid-1980s) I have wondered what ‘oversew’ meant when hiding tails at the end of a tatting project. I came across it in my Anchor and Coats books. Tried my own methods (including overcast stitch as in embroidery) but none worked out – knotting was the only way I knew and continued with it despite the 'ugliness'. 

Two decades later, on the net, I asked around, to no avail, but I switched to whip stitch some years ago.  Until a few months back when Jean Inglis used the term in her FB post! At my request, she explained and also uploaded a WIP pic. It got me thinking and I obviously had to try it out to compare and contrast with other sewing methods of hiding ends/tails as compiled here -. https://tipsaroundthehome.blogspot.com/2016/11/beginning-or-ending.html

In my current study, I found two main methods that are commonly used to sew in the ends. Please excuse my shoddy samplers below (the sewing thread/tail should not be visible once it is pulled tight). I have used a contrasting blue thread as tails or ends for the purpose of clarity.

The first is what I will now refer to as OVERSEW. 

Here, we sew the tail Under the cap or waist band of the double stitch, and weave between the legs of the ds - under and over the half-stitches.  Hence a 10 ds count segment will give you 10 stitches front and behind. This method is diagrammed clearly by Jennifer Williams - https://www.cariad-tatting.com/techniques.  

A variation of this method is shared by Lily Morales where we weave between the double stitches. Hence if there are 10 ds, you have 5 stitches under the caps in front, and 5 behind. [the link from The Online Tatting Class is currently unavailable]. 

The second method is WHIP STITCH. Here we sew the tail across the Top of the caps, weaving in between the double stitches. You can clearly see the tail (blue thread) moving over the top of the stitches instead of through the sides. This is my go-to method for 7 years now, when Carollyn Brown uploaded her video - https://www.youtube.com/watch?v=7Q-JloBBdIM and it just clicked with me.

Jean Inglis'  Mom taught her to tat in 1980 and to sew in her ends as above. She used the term 'oversew'. She unravels the tail and uses the thinner thread to sew and hide, thus leaving a tinier footprint. But look closely, and you realise it is actually the whip stitch! Yet, this unraveling of thread can be used for the oversew methods described above, too.

This is also called OVERCASTING in some literature.

In conclusion, I'd say traditionally 'oversew' would simply have meant to sew in the tails whether you wove the tail under or over the caps; between double or half-stitches. However, if we wish to fine tune it, we can differentiate oversew from whip stitch as explained above.

Feel free to share your own thoughts and experience; no need to hide them!


For an annotated and frequently updated listing of the many ways to start, add, or hide ends, mostly knotless: https://tipsaroundthehome.blogspot.com/2016/11/beginning-or-ending.html

Many thanks to all mentioned above, and those not mentioned, who constantly help us improve our knowledge, understanding, and skills.

Sunday, 10 December 2023

about Helix Tatting and more

Pin It now!

In late October, while working on the Dictionary part of ‘The Six Ts of Shuttle Tatting’, Anita introduced me to the term Helix Tatting and the developer of the technique, Richard Embrey. We worked on a definition or description to include in the dictionary and I also tried my hand at a quick trial to get a feel for it.
My very first trial (with mistakes) without shuttles

While I don’t want to reveal the definition, I will certainly do a sort of comparison to put things in perspective. Richard came up with this technique in 2019 while trying to make an I-cord in tatting when he couldn’t find a tatted equivalent. It started out as a tatted tube or cord but has since evolved and diversified into many more shapes, including a coronation cord and a fish! As always, it is our imagination that gets us soaring into new skies.

UPDATE - https://tipsaroundthehome.blogspot.com/2024/01/helix-tatting-pictorials.html  -- Includes PDF OF HELIX TATTING Pictorials 

Let me list down the major characteristics of Helix tatting (HT) as well as include links to visually similar techniques. Please note that a lot of these are my own thoughts and notes. Feel free to critique or suggest.

1. It is basically a 3D hollow cord or structure, made solely of chains, using multiple shuttles (4 or more). The outward appearance is like a spiral, especially visible when different colours are used.

2. Each shuttle alternately and sequentially acts as an active shuttle to become the core thread, and then  as a ball thread to form the stitches.

3. It is NOT bauble tatting, though it can be considered to be a variation. No separate ‘ribs’ are added for a scaffolding. Instead, each shuttle, in turn, acts as a core thread and provides the necessary stability to the structure. It also 'locks in' the previous segment when shuttles are switched.

4. It is NOT a continuous spiraling chain since short segments are made with a sequential change of shuttles. Each segment can consist of merely 1 stitch or as many stitches as one desires to create a broader shape. Two or more stitches give a more distinctive spiraling of the colours. The spiral is directional and there are ways to determine beforehand which direction one wants the spiral to run.

For instance this 3D Pond Reed prototype I had made back in 2014 using 2 shuttles– it is a continuous chain spiraling around itself, where I used the slope and roll joins to hold the shape. Clearly it is very different from HT.

5. It is NOT block tatting, though chain segments are apparently ‘stacked’ over each other. No lock joins are used. However the outward appearance can be confused with tatted ropes, with or without beads. Ninetta has done a wonderful study of various ways in which these 3D tatted ropes can be made, with links to respective tutorials. A couple of them even create a spiral effect! https://ninettacaruso.blogspot.com/search/label/stacking

6. HT is not limited to merely spiraling chains. With so many shuttles in play, it is easy to throw off rings and chains, use beads, add picots, and so on. Versatile.

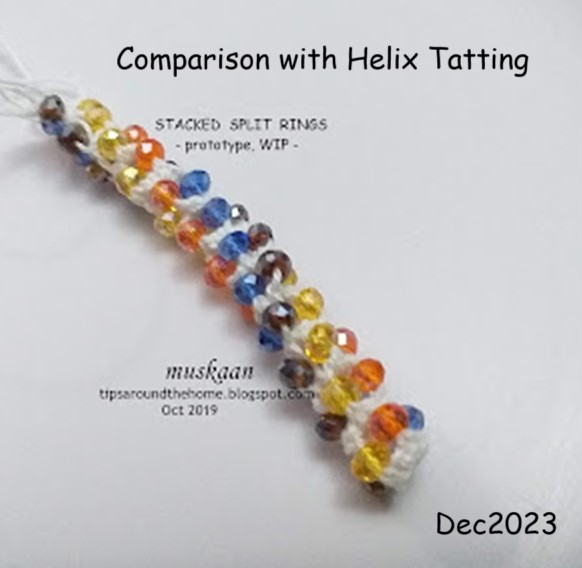
7. There is another tatted tube example where we use stacked or layered split rings. No chains involved, only rings. And if the picots are shortened, the stacking will be that much closer. Clearly this is not HT in any sense of the term, except that it is also a form of continuous tatting for a 3D hollow tube.

tatted beaded rope made with stacked or layered split rings - https://tipsaroundthehome.blogspot.com/2019/10/tat-beaded-rope.html

See Ninetta's version of a spiraling tatted rope made with interlocking rings - https://ninettacaruso.blogspot.com/2020/08/gold-rope-chain.html 

8. BUT, there is something that definitely follows the same principle and concept as HT, and also gives a directional spiral! It is called Mac-Tatting (MT) and was first developed by Usha Kota in an attempt to imitate a crochet braid in tatting – it was a flat braid, worked too and fro. However, when I understood what HT was, it immediately crossed my mind that MT could be similar if worked continuously. And YES, it is the same, except that we work with unflipped or reverse stitches rather than flipped or double stitches! And you get a spiral, though the stitches face down while in progress. 

Helix tatting & Mac-tatting trials, together
In my first attempts, I found it easier to work the Mac-tatting version - I had a better control of the threads and there was no tension issue. Helix tatting is fine once you get into a rhythm, but it requires more finesse. And managing all those shuttles can of course be an issue.


A couple of weeks back, Richard was invited to TOTC as a guest teacher to demonstrate the Helix Tatting technique. You can watch the video here - https://youtube.com/live/DXO9Pm0fq1U
Bonnie Swank shared her notes on how to do HT with needles. Richard also shared a practice pattern called Watermelon Dreams, with the class. https://www.theonlinetattingclass.com/patterns
Creative members have already shared a couple of clever ways to organize their shuttles to avoid tangling. I simply laid them down spread-eagled, on my bed. I did find that it is better to leave a longish length of thread to avoid frequent winding/unwinding; and since it is only 1 or 2 stitches each, the long length is not a bother. 

I am test-tatting a pattern for Richard for his upcoming book. It is called Watermelon Dreams Beaded Helix Embellished Earrings. 
It took me a few hours to find and empty all my shuttles, glue the numbers (I did it on both sides, LOL), string beads and wind the shuttles. 
In progress.
I've completed Round 7. My version is a Caps In spiral where the double stitch faces inside the cord and tatting progresses in a clockwise circle. 

That’s it from me for now ….. Welcome your thoughts.

Many thanks to Richard, Anita, and all the creative minds mentioned above! 

Friday, 24 November 2023

game antics

Pin It now!

 The saga continues from my previous post (https://tipsaroundthehome.blogspot.com/2023/11/flaky-antics.html). 

We chose the Antiks Snowflake pattern for our November 2023 game in our Endrucks FB group - Snowflake Me Endrucks. This name was chosen to indicate that we can try to adapt a pattern into a snowflake. We've derived snowflakes with E17, E3, E37, E31, E12, (see Snowflakes and Stars Directory)  but not as a game. We wanted to open the possibility of repeating the game in future with a different pattern.

Antiks Snowflake pattern (an E42 adaptation and extension by Muskaan) - https://drive.google.com/file/d/1U5J5sjuAA7D0qGPOGnK9RJ83MKdNkWSZ/view

We have a wide spectrum of skill levels in our FB group be it tatting or linguistic. Hence visuals become important. This flake has a few tricks. Ninetta offered to take stepwise pics! Hence we prepared an entire Supplement which has the detailed pictorial as well as a lot of other info, options, and links. 
  
Ninetta's version in Lizbeth 10, colour 686. Hmmm, I wonder how her fingers, used to dainty threads, worked on this large thread, LOL.

Ninetta also uploaded a video demonstrating how to make the Split Chain!
She had actually done a couple more videos but this was the best. This is the kind of backroom activity we are engaged in to provide a wholesome experience!

Like I said before, we are beginning to use this as a platform for learning and bridging any gaps in tatting knowledge, while making it easy and accessible to all levels of tatters.
The Antiks snowflake uses Split Chains to climb out, and we already have some tatters who learned to make them for this pattern after watching Ninetta's video!
However, in case a tatter does not wish nor have the time, there are a few optional paths one can employ to climb out to the next round.....
 
Three such options are explained in the Supplement and each of these can be worked with a ball and shuttle, just like for split chains : 
How to Avoid Split Chains -
1. Bare thread space with a double lock join - an extension of what Mlle Riego did in her Bunch of Grapes (1850) single shuttle pattern.   (yellow model)
2. Shadow Chains - Frau Endrucks (1920) method   (purple model)
3. A continuous spiral - this one is more visually organic. (green model)
Pattern for this Rose Motif is also included for practice.

The main pattern pdf as well as the Supplement has more tips and links, including to the original ANKARS site (https://ankars-club.ru/). It is worth reading, given the common misconceptions about this technique.

Coincidentally, in November, The Online Tatting Class (TOTC) also did a few classes on ANKARS. You can access their articles and patterns here - https://www.theonlinetattingclass.com/ankars-patterns. Their YouTube site - https://www.youtube.com/c/TheOnlineTattingClass

Many many thanks to Ninetta for all her contributions!

Monday, 28 November 2022

teachable moments

Pin It now!

or learnable moments! 

 We are having a fun time playing games in our FB group, and surprisingly several teachable moments have arisen especially in our current event #tagmeEndrucks! Sharing tips, sharing resources, sharing options, ... There is even a hashtag #eptutorials in our FB group to locate them.

These short games are a good opportunity to learn and apply a 'new' technique, try something different, improve one's skills, experiment, find solutions.

#1. If you run out of thread in one shuttle before completing the project, simply do a shoelace trick (SLT) and switch threads if there is plenty of thread in the other shuttle. (SS - switch shuttle)
Or choose a convenient element further down the line to add new thread (false CTM).
Add new thread, knotless or with a knot, and hide ends simultaneously.
(a huge curated list of situations, options, tutorials - http://tipsaroundthehome.blogspot.com/2016/11/beginning-or-ending.html).

My resolve to never share the length of thread required in shuttles has strengthened after this project - my personal learning moment. Too many variables to factor in!

#2. We decided to use 2 colours to tat the model in order to clearly show which shuttle was in use. However, this meant the split rings were bi-colouted while their corresponding rings on the other side were a single colour, See the encircled areas.

Solution - Double core SSSR Karen Cabrera's lesson #43 - https://www.youtube.com/watch?v=bfILdiZ2C20&t=4s  

#3. Alternatives to Lock Join - Lock Join is needed when joining to a picot below our line of tatting or below the core thread. It is basic, convenient, and tiny. However it leaves a little dip and it also locks the core thread (the colour of the picot below is also more visible - see image below). For a smooth edge, there are alternatives such as Catherine Wheel Join, Anne Dyer's Join the Smooth Side, and the Slope and Roll Join, to name a few.

In the first pic, 3 white arrows indicate where the Lock Join was replaced with a Slope & Roll Join for an unbroken rows of stitches.

SLOPE & ROLL JOIN (SRJ)
[This was all meant to be part of the Joins in Shuttle Tatting series (2016!)... perhaps some day].

WHEN TO USE -
1. when the joining picot is below the line of tatting/below core thread.
2. when we want a smooth, unbroken line of stitches.

ADVANTAGES -
1. easier to accomplish than a CWJ
2. can be done with shuttle and ball
3. keeps the core thread sliding freely
4. can be used for ring or chain. Especially useful for Onion Rings or Concentric rings, hence also known as the Onion Ring Join
5. If the join is followed by the 2nd half-stitch, it resembles a double stitch. Hence it is a seamless or invisible join.
6. in 2-colour tatting, it creates a blipfree join.

DISADVANTAGES -
It is sometimes difficult to hold a picot space, especially a vsp, immediately before or after the SRJ since it appears to twist. After completing the 2nd half-stitch, ensure the space is intact and a slight tug with a hook/pick helps prop up the picot.

RESOURCES -
Debbie Arnold (coined the term SRJ)- https://www.facebook.com/photo/?fbid=4089642167730639&set=a.3691414670886726
Karen Cabrera (video Lesson 25) - http://www.youtube.com/watch?v=x6o3RT4bb9
Ninetta Carusoo (diagrams Simple Joins) - https://www.flickr.com/photos/ninettacaruso/6896834805/
The Online Tatting Class - https://www.theonlinetattingclass.com/technique-tools


Teaching or Learning are interchangeable, just as we have tons of options to choose from our tatting kitty and can change when needed!

Tutorials to all terms and techniques mentioned in this post can be found here - https://tipsaroundthehome.blogspot.com/p/tatting-resources.html