Showing posts with label onion ring join. Show all posts

Monday, 28 November 2022

teachable moments

Pin It now!

or learnable moments! 

 We are having a fun time playing games in our FB group, and surprisingly several teachable moments have arisen especially in our current event #tagmeEndrucks! Sharing tips, sharing resources, sharing options, ... There is even a hashtag #eptutorials in our FB group to locate them.

These short games are a good opportunity to learn and apply a 'new' technique, try something different, improve one's skills, experiment, find solutions.

#1. If you run out of thread in one shuttle before completing the project, simply do a shoelace trick (SLT) and switch threads if there is plenty of thread in the other shuttle. (SS - switch shuttle)
Or choose a convenient element further down the line to add new thread (false CTM).
Add new thread, knotless or with a knot, and hide ends simultaneously.
(a huge curated list of situations, options, tutorials - http://tipsaroundthehome.blogspot.com/2016/11/beginning-or-ending.html).

My resolve to never share the length of thread required in shuttles has strengthened after this project - my personal learning moment. Too many variables to factor in!

#2. We decided to use 2 colours to tat the model in order to clearly show which shuttle was in use. However, this meant the split rings were bi-colouted while their corresponding rings on the other side were a single colour, See the encircled areas.

Solution - Double core SSSR Karen Cabrera's lesson #43 - https://www.youtube.com/watch?v=bfILdiZ2C20&t=4s  

#3. Alternatives to Lock Join - Lock Join is needed when joining to a picot below our line of tatting or below the core thread. It is basic, convenient, and tiny. However it leaves a little dip and it also locks the core thread (the colour of the picot below is also more visible - see image below). For a smooth edge, there are alternatives such as Catherine Wheel Join, Anne Dyer's Join the Smooth Side, and the Slope and Roll Join, to name a few.

In the first pic, 3 white arrows indicate where the Lock Join was replaced with a Slope & Roll Join for an unbroken rows of stitches.

SLOPE & ROLL JOIN (SRJ)
[This was all meant to be part of the Joins in Shuttle Tatting series (2016!)... perhaps some day].

WHEN TO USE -
1. when the joining picot is below the line of tatting/below core thread.
2. when we want a smooth, unbroken line of stitches.

ADVANTAGES -
1. easier to accomplish than a CWJ
2. can be done with shuttle and ball
3. keeps the core thread sliding freely
4. can be used for ring or chain. Especially useful for Onion Rings or Concentric rings, hence also known as the Onion Ring Join
5. If the join is followed by the 2nd half-stitch, it resembles a double stitch. Hence it is a seamless or invisible join.
6. in 2-colour tatting, it creates a blipfree join.

DISADVANTAGES -
It is sometimes difficult to hold a picot space, especially a vsp, immediately before or after the SRJ since it appears to twist. After completing the 2nd half-stitch, ensure the space is intact and a slight tug with a hook/pick helps prop up the picot.

RESOURCES -
Debbie Arnold (coined the term SRJ)- https://www.facebook.com/photo/?fbid=4089642167730639&set=a.3691414670886726
Karen Cabrera (video Lesson 25) - http://www.youtube.com/watch?v=x6o3RT4bb9
Ninetta Carusoo (diagrams Simple Joins) - https://www.flickr.com/photos/ninettacaruso/6896834805/
The Online Tatting Class - https://www.theonlinetattingclass.com/technique-tools


Teaching or Learning are interchangeable, just as we have tons of options to choose from our tatting kitty and can change when needed!

Tutorials to all terms and techniques mentioned in this post can be found here - https://tipsaroundthehome.blogspot.com/p/tatting-resources.html

Wednesday, 1 July 2020

never say die

Pin It now!
Serious readers of my blog may recall my inexplicable difficulty in working Aurora's onion rings, despite the fact that I understood the concept and she had laid out a stepwise pictorial with instructions here. Yet based off that method, I easily accomplished Kathleen's variation as seen in this pictorial.  Judith left a couple of comments there today and I decided to give it one more try.

This time I did not follow Aurora's pdf. I went with her concept in my mind and Voila, I got it!!! Yup, never say never! So here is my take ... a quick comparison of 3 methods which includes Judith's suggestion that lies in between.

Specs :


From left to right :
  1. Kathleen's captured onion rings (Variation #1 of Aurora's onion rings method). The inner ring is captured within the base of the 1st half stitch of outer ring - within the leg of the half stitch.
  2. Judith's half-hitch capture (Variation #2 of Aurora's onion rings method). The inner ring is trapped between the 1st and 2nd half stitches - between core and working thread. 
  3. Aurora's onion rings (original method). The inner ring is trapped after making 1ds. Thus it is trapped between 2 stitches - between core and working threads.
  4. Kathleen's method repeated for sake of consistency.

My first thoughts :
  • I found it easier to maneuver and position the inner ring using Kathleen's method.
  • In Aurora's method (#3 OR) I worked only 5ds in the last segment since 1ds had been worked while trapping the inner ring at the start.
  • This also causes a slight offset or perhaps I need to practice more.
  • I can barely detect any difference in the bulk in either of the 3 methods, although I understand that technically Judith's comment is right. 
  • They are all fairly flat.
  • I think Judith's variation is visually best, though Kathleen's is easier to implement. 
  • Judith also mentioned posting the shuttle. I tried it, but didn't like the result, and pulled the thread back to 'normal'. To be sure, I post shuttle Only for backside rings - works for me.
  • More practice and application required, along with experimenting with 2 colours.

UPDATE : I forgot to add a slightly different type of "captured rings" - Floating Beads method used to capture the inner ring with the flexibility that it can lie flush against the outer ring, or can float at a slight distance. Here are a couple of pictures showing the diversity -
 
It is not as elegant as the above methods, obviously.
Dancing Peacocks medallion was adapted to become the center of my Design Round Robin doily. This is the center where Kathleen tatted the floating inner ring using her captured OR method instead of the FB method and I learned it from her.


Many thanks to all three tatter-designers ; 
love to have options and multiple paths toward improvement!

Friday, 8 May 2020

captured onion rings

Pin It now!
Ninetta has been posting a comprehensive study of Onion Rings – their construction and variations – along with pictorials and tutorial links. A must-read for anybody wishing to learn, explore, or improve. A sumptuous dish!
My guess is that Marilyn followed one of those links to my blog and left a comment for help with captured onion ring
Ever since I tried it here for the first time, I have been hooked to this method and have used it consistently with good effect. I think this is a good excuse, and opportunity, to present a stepwise tutorial.

Captured Onion Rings
Kathleen Minniti's method

BACKGROUND :
Captured Onion Rings are a pair of concentrically placed True rings. These true rings can be tatted with the same shuttle, or with different shuttles for a 2-colour version.

Aurora Lozada first shared her Perfect Onion Ring method (pdf) in 2014 with the Online Tatting Class. She captures the inner ring between the core and working thread After making 1ds. Thus the inner ring is captured Between adjacent stitches of the outer ring. After closing the outer ring, the emerging thread is offset by the 1st ds. 

Kathleen Minniti improvised Aurora’s method to capture the inner ring Within the 1st half-stitch of outer ring. After completing the outer ring, the thread emerges from the center.

I can now understand Aurora’s method, but am still unsuccessful at executing it! Kathleen’s method is like tatting over tails, substituting the inner ring for the tail. I can do that - and if I can, You certainly can!  

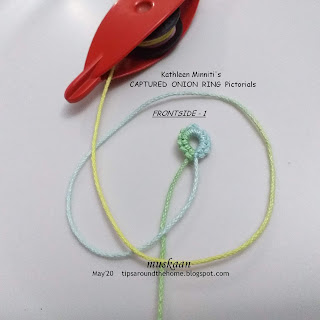
Captured Onion Ring Pictorial - FRONTSIDE

I have used a single shuttle for the pictorial. 
Inner ring : 6 – 6.
Outer ring : 10 + 10.
1. Tat inner ring. Close ring and loop the thread around to start outer ring.

2. Hold in pinch.

3. Start 1st half stitch – under ….

4. …..over

5. 1st half-stitch seen clearly after the flip, but do not snug.

6. Pass the inner ring through the open leg of this 1st half-stitch. Follow the core thread (just as in tatting over tail).

7. Bring the leg to the base of the inner ring by wiggling your left index finger, and

8. snug tight. Make sure the stitch is as close to the base as possible, and that the core thread slides freely.
9. Make the 2nd half-stitch (over-under) and

 10. snug normally. 1st ds complete.

11. Tat around the inner ring, joining to the picot. I used the ball thread or onion ring join

12. Close the outer ring normally. A pair of concentric or onion rings is ready.


In the above ConcentriCITY snowflake, there are 3 concentric rings where the outermost is a chain or mock ring. To bring the shuttles in position, the middle ring is worked backside. This is what Marilyn was referring to. Hence here are a few pics showing the backside working of the captured onion ring.

Note: In directional or frontside/backside tatting, the sequence of half-stitches in a ds is reversed (hence called RODS – reverse order of double stitch) working 2nd half before 1st half-stitch. 

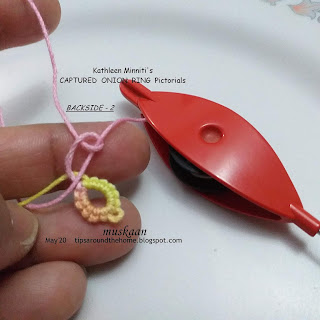
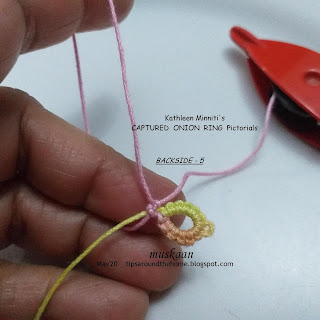
Captured Onion Ring Pictorial - Backside

In this pictorial, both rings are worked backside, but this is not compulsory.

1. Inner ring worked backside. Loop the thread around to start outer ring, and pass shuttle over-under to make the 2nd half-stitch.

2. 2nd half-stitch made, but do not snug.

3. pass the inner ring through the open leg of the half-stitch, following the core thread.

4. Snug the stitch as close to the base of inner ring as possible.

5. Make 1st half-stitch. 1RODS complete.

6. Continue around, joining to the picot, and close the outer ring normally.

7. This is how it looks from the front. (There is some inadvertent space left at the base - the ring should've been pulled close more tightly to avoid that pink line).

Note : This method is so basic that it can be used even for chains/ mock rings, etc. , either in onion rings or in other situations. 


Hope this answers your question, Marilyn?


Many many thanks to Aurora & Kathleen :-) 
My onion rings have certainly improved!  

UPDATE : Comparison of Captured Onion Rings - original and variations!

Tuesday, 23 January 2018

floating with tatting

Pin It now!
updated Jan 24, 2018 with schematic for earring

Pozdrawiam ciepło (I greet warmly).

This month’s task for “I Love Tatting” is titled Goose Circle – isn’t that cute! Justyna listed some tutorials and examples of bead(s) within rings and also alternate forms of beading. I’ve already used the bead in SR and in SCMR in a few of my own patterns & other projects. Since “floating beads” was also a listed option, I chose to float along :-).  

Peacock earrings and Charmed Cross pendant
I used the floating bead (FB) method to add both teardrops in the Charmed Cross pendant – yes, this is the final version. I’ve added more crystal beads and the horizontal arms don’t look like stumps any more. But more on that when I share the pattern.

There are 2 versions of the Peacock earrings. 
These are derived from this dancing peacock medallion.

Worked with 2 shuttles, 2 colours.
Anchor embroidery threads are used : 3 strands of each colour woven with 1 strand of silver.

The bead in the center and the teardrops were added when required, using floating beads method. Seed beads are pre-strung for the overlying string.
For outermost round, one can use seed beads instead of picots, but I didn’t have any in suitable size/colour.

In version 2, I tried a little heart shape in the green, and a slightly tipped point in the blue. 
For outermost round, one can use seed beads instead of picots, 
but I didn’t have any in suitable size/colour.

After working the outermost blue chain to required length, 
I used a shoelace trick (SLT) to lock it in place. This also created the sharper tip.


These earrings are free-style and I didn’t follow any strict stitch count. But I will share the sequence :


  1. Start with topmost ring, attaching the findings.
  2. Add large bead (red crystal or gold) using floating beads method (or pre-strung).
  3. Work innermost ring in blue around the bead, with picot small midways.
  4. Bring forth the seed beads and create a layer around blue ring. Lock join to base of ring.
  5. Switch shuttles and work green chain. Join to blue ring. In version 1, add a small picot for linking next round; in version 2, make chain longer and lock join to blue ring.
  6. Over and under or Alligator join across base of rings, switch shuttles, and work the outermost round in blue with decorative picots. In version 1, join to green ring then add FB teardrop midways. In version 2, make chain longer, SLT, add FB teardrop, continue around.
  7. Tie and cut; hide ends.

Beads give us the opportunity to add more colours without having to use extra shuttles!

One can pre-string the teardrop (or sew it on later) instead of floating bead method. But I like how the FB makes the bead dangle a little further from the stitches. Also, since I use Pony shuttles that are too small to load large beads, this is a convenient alternate.

I hope you take the time to check out what the other talented participants have created. 

to the love of tatting, with beads

Friday, 10 November 2017

Am I the right person?

Pin It now!
Especially where picots on tatted lace are concerned?
I generally go for minimum decorative picots, preferring clean lines that show the design clearly. Not that I don't admire the lacy, airy effect of picots.

A couple of weeks back Agnieszka (Frywolaga) invited her readers to a fun picot challenge.
She usually makes 2 versions of her beautiful patterns – one with and other without decorative picots. This time she shared a picture of her Doily #10 without free picots and those interested need to put in picots where they wish. She sends out instructions for the next round when the previous is finished.

When I first set eyes on her doily I loved the simple lines and didn’t want to muck or clutter it up with picots (sorry, dear picot-ists, no offence ;-D). But when I received the 1st round pattern, I had to think slightly out of the box and came up with the following …

Here are my first 2 rounds worked in Anchor size 40 …
I used a double picot in round 1 enhancing the floral effect.
Measures 2.5cms
She shares her suggestion here

Dot picots in the 2nd round.
Measures just over 5cms


I hope to repeat both type of picots in later rounds.

It really is fun! And knowing the complete design, it becomes easier to plan ahead. Just hope I do a good enough job while enjoying the journey. If you wish to join in, the links above provide all the information.

What I did muck up, though, was this simple pattern - the Onion Ring Magic Square #2. I had no problem following the pattern or direction, yet stumbled on simple joins! Thrice rings are attached incorrectly. Noticed only in the picture when the negative space seemed wonky. 

Since I wanted only the one square, most joining picots in outer chains were discarded. (Next time I might even discard the free picots on inner rings ;-P)

Onion rings were tatted with same shuttle. Inner ring from backside, turn work, outer ring from frontside. Outer ring is looped from Behind the inner ring as I had done for the marigolds here.. I found it much quicker to work especially when not using 2 colours. This is the onion ring join used - very effective.


with or without picots, tatting is always lacy fun J

Saturday, 27 May 2017

journey of a single shuttle

Pin It now!
single shuttle medallion prototypes with pattern and dot picots on a ring !
How far can a single shuttle take you ?! Come journey with me ....

update June 6: star pattern edited

single  shuttle  medallions
Usha told me about a challenge her whatsapp group, Happy Tatters, is doing – tatting a single shuttle medallion or motif daily for a week. While I am not on any SM, InTatters members will certainly remember the gorgeous doilies tatted by Madhurwho is also a member.
What better way to get one’s creative juices flowing ?!
I let my shuttle loose. A couple of mangled attempts were thrown away (I keep forgetting to include picots). The ones that have survived so far are these … still in the process of completion. But if I waited to show till each was complete, it’d take forever.
I find myself using different techniques to overcome the ‘handicap’ of a single shuttle. To my pleasant surprise, there is hardly anything one cannot do with a single shuttle !!!!
I am really enjoying this challenge and drawing on all the techniques I’ve learned so far to tackle each piece differently.

1. Star of Halves
A 2-round one pass single shuttle medallion in size 20 thread
Techniques : half or half-closed rings (HR), lock join (LJ), onion ring join (ORJ), very small picot (vsp)

Round 1 : comprises of twin rings separated by tiny half rings.
*** R1 : 5 vsp 3 p 5. DNRW
R2 : 5 + 3 vsp 5. RW
HR : 3. RW ***
Repeat 5 times total, ending with a join to base of first ring. Do not cut thread.
Round 2 : This round is made up entirely of large half rings, joined to previous round using onion ring join for a slight texture.
Make a LJ through bare thread of last HR in Round 1.
*** HR : 6 ORJ (vsp of R1) 8 p 8 ORJ (vsp of R2) 6. LJ through next HR ***
Repeat 6 times total, joining back to start. T & C. Hide end or use as dangler.

One can use Anne Dyer’s Join to smooth side (JSS) instead of onion ring join, but I wanted a subtle dip. Pull loop of the other thread through picot, pass shuttle through, tension; make 2nd half stitch.    


2. Rambling

I wanted more rings in the center, but that wasn’t going to work. Hence left it as a diamond, to ramble along the next round.

Made in one pass with 4-ring rosette in center, and half-closed folded rings (setb then seta) and Josephine rings , lock joined (twice – on either side of JR) to the picots in Rnd 1 rings.

It does seem to have a diamond in center and an elongated hexagon along outer edge.
This one will probably be discarded; still, grist for the design mill.


3. Tiny Wildflower
This was actually just the first round. But I kinda like the look of it as a tiny flower.

Techniques : picot join to the right, Josephine Knot (JK) on twisted picot (TwP) 
Note : for picot join to the right, one can use a folded join, rosette join (twisted picot join) or avoid a folded join, since these are outward facing rings.

Ring 1 : 1 vsp 7 p 7 vsp 1
***Leave about ½” bare thread. Tat 1 JK (7hs). Twist bare threads to make a picot with JK at tip.
Rings 2 : 1 + 7 p 7 vsp 1 ***
Repeat till end, joining last ring to the first using a picot join to the right, and another twisted picot with JK.
Tie & Cut, hide end.

Exciting news : Usha (link to her channel) has graciously demo-ed 2 videos on the twisted picots Twisted Picot (with and without bead) and Twisted Picot with knotted bead In the latter, one can substitute a Josephine Knot for the bead. Thanks so much ((( hugs )))


Dot Picots on a Ring !
This started out as a medallion too, but I got into experimentation mode.
I started with SCMR using a length of tail (smallest ring). easy to make dot picots here since it is basically a chain.
Middle ring is a true ring with dot picots, but they tend to unravel (middle one is fully unraveled, while the right one is beginning to) .
Large ring was another idea to secure the dot picots – and it worked ! A wee bit fussy initially, but very much doable.
Those bare threads visible on the left of the 3 dot picots was left on purpose – I wanted offset picots. The BTS needs some tweaking to get my visualized effect.
I'll leave you to figure it out for now ...


I started another medallion last night, using other techniques. But no pics yet, and is still unfinished. 

Anybody game for a similar challenge ?
happy tatting always :-))) 

More of my Single Shuttle motifs /medallion patterns : Jewellery Medallion , Ring in the Bouquet , Inchies.
Latest in this challenge series - Have a Heart (June) 

Friday, 10 March 2017

revisiting options

Pin It now!

When learning, we move from easy to complex to consolidation. Further learning and explaining requires an ability to break the complex into easy. I’ve come full circle with this tutorial. In my defense, I am continually learning J

A Craftrean is working on Renulek’s Wiosna 2015 and referring to my notes. This prompted me to read through my Round 9 notes. Errrghh ! Unnecessary complication!
In light of more experience, here’s a simpler, more direct method of working that round, with shuttles always in position (no SLT or ungainly cross-threads). And how changing the base join can change colour placement. 
click on image for larger view

Wiosna 2015 Round 9 REVISITED

Start with 2 shuttles, CTM (if using one colour).
I have used 2 colours to differentiate the 2 threads at a glance and also to illustrate colour placement options.
When working from the backside, you can use the reverse order of half stitches (RODS - optional, but indicated).

Start with shuttle 1 ring, working from backside. (RODS)
Reverse Work
Tat chain from front.
Lock/shuttle join to ring picot. Continue around the ring as per pattern. 
Last chain is to be attached in space between ring and chain as indicated by the pin in #5.
Lock join to base. (see join options below).
Turn Work
Switch shuttle and work the chain from backside. (this chain is attached to Round 8 in doily)
Switch shuttle and work ring backside. Notice that it is worked like a thrown/thrown off ring.
After closing ring, Reverse Work.
Work chain frontside and join to previous motif as per pattern. Continue around.
2nd motif complete. Continue in similar fashion for entire round.

Colour Placement Options
When working with a single colour, the above method is sufficient. But when we work with 2 colours, choices need to be made between colour of ring, colour of chains around ring, and colour of chain between adjacent rings.

Shoelace/Overhand Tie
We already know that colours can be switched using the SLT or shoelace/overhand tie. I am not a great fan of this method, but it does the job.

Onion Ring Join
Instead of a Lock Join at base of ring, an onion ring join can be used.
Pull a loop of chain thread & pass core thread through it. Tension and continue as before.
Compare the change in colour placement with first two motifs.
If we use onion ring join, the switch in colour will happen naturally after every 2 repeats.

Reverse Join
Pull a loop of core thread as if making a lock join. But encapsulate the chain thread within, and then make the lock join.
This tends to switch shuttles/colours automatically. What we would do with LJ+SLT, is accomplished with one RJ.
Compare colour placement with earlier motifs.

In conclusion, for the same pathway and working, we can choose our colour placement by choosing the type of join.
And, of course, there are many options available to work Round 9, as discussed in the earlier post and here.
Also, this same path can be used for onion rings ! I've been using it since Robin's Frauberger Bookmark which I learnt later (so I'm excused, right ?!)


If anybody wants larger pictures or a pdf, please let me know through comment or email and I will mail the original pics to you or upload the pdf.

till then, happy tatting always J