Showing posts with label Kathleen Minniti. Show all posts

Tuesday, 24 September 2024

DRR long time

Pin It now!

 Can't believe its been six years since we worked the Design Round Robin (DRR) doilies in Craftree and I find that I have posted round-wise pics of only one doily! Time to rectify the situation. However, I will have to limit myself to pics, 'coz it is too much work to hunt down my notes for each round I either designed or tatted. Good for you, huh, less to read ... but plenty of pics! ;-D 

Dancing Peacocks
Design Round Robin 2018 (DRR 2018), Craftree
Muskaan, Coretta, Kathleen, Tim, Coretta.

Worked in Anchor embroidery threads, 3 strands equivalent to Lizbeth size 20.

Round 1 - Muskaan. I designed the center for this doily. 

The green/blue one was made first but not being happy with my tatting, I started over with the bottom one. This pattern is originally from my enclosed space medallion phase with only minor tweaks to add picots for joining subsequent rounds. It has triple onion rings where the innermost Josephine ring is made using the floating beads method so that it stands a bit apart. 
Dancing Peacocks Medallion design process - https://tipsaroundthehome.blogspot.com/2018/01/mad-or-maddening.html
Dancing Peacock Earrings derived from the medallion -https://tipsaroundthehome.blogspot.com/2018/01/floating-with-tatting.html  Later that year Anita Barry taught this pattern at the Palmetto Tat Days.

Round 2 - CORETTA L.  

I like how she opened up the design!

Round 3 - KATHLEEN M.  
So much to learn in this round. However it started with me having to snip off quite a length and restart because of some mistakes - https://tipsaroundthehome.blogspot.com/2018/06/rotten-core.html

She used her tweak on the Captured onion ring technique, which I have been using since. 


Round 4 - TIM K.  
He designed the round in such a way as to fit any tension.

He used Split SCMR and also shared a video on how to make it in his blog - http://timtatstoo.blogspot.com/p/the-split-self-closing-mock-ring.html
However I remember discovering that the split scmr was not really needed in this case and explaining how to go about it. 

This completed our round robin of four designers. Started in Feb 2018 and finished within the same year. Design round robin entails we each tat all the rounds of each doily sequentially designing and tatting by turns. No need to mail off the doily ....
I felt we could do with another round or two, but was not sure how to go about it. In March 2023, Coretta worked out a 5th round and shared it!!! I tatted it early this month.

Round 5 - CORETTA L.  
After mulling over the colour scheme since I wanted the round to reflect the earlier colours, yet not be too overwhelming or bright, I came up with the following solution... 

The onion rings are tatted in three peacock colours but as separate motifs. Carrying 3 extra threads encapsulated within the chains would add too much bulk and skew the arches.
The tails are hidden or sewn, but left untrimmed. Couldn't risk any tail being pulled out when the outer chain round was tatted and joined! 
Green for border would make the entire composition too greenish which is why I chose to repeat the inner round blue; it also carries forward the peacock impression.

All trimmed and done. However, I used 4 strands of blue after realising that 3 might not allow the doily to lie flat since my chains are usually tight.

Anchor embroidery 3 strands equivalent to Lizbeth size 20.
Orange - 0333 ; Yellow - 0306 ; Green - 0258 ; Purple - 097 ; Blue - 0170 (4 strands in last round).
Final diameter - 17 cms or just under 7 inches.
This additional round has really brought the entire design together and I love how it looks. What do you think? Too many colours or ....

You can find the Dancing Peacocks doily pattern here - https://docs.google.com/document/d/1LBml-8Q0WYbCQyBrSLVKg713T9D3HE9YAPlKmg3wxTo/view

Many many thanks to Coretta, Kathleen, and Tim and a very special thanks to Grace Tan for her forethought in creating the Google docs for each doily!  

I am also entering this doily for both the 2024 games ....
Small Decorations hosted by splocik - This doily is my submission for September.
The August gallery of submissions is posted here - https://splocik2.blogspot.com/2024/09/male-dekoracje-2024-galeria-sierpniowa.html  with such a diverse range of projects!

And this doily also crosses off several blocks in Natalie's PICOT Bingo!
- Tat a Doily
- Josephine Ring
- Onion Ring
which means I have a 2nd BINGO - the 4th column is done!!! My first bingo was posted here - https://www.patreon.com/posts/picot-tatting-we-110762797
Actually I've finished tatting some more but blogging is taking a backseat ....

Thanks for the fun Natalie and splocik!

Sunday, 10 April 2022

EP medley 1

Pin It now!

Activity in the Endrucks 1920 Project continues with tatters chipping in with their versions. Some are shared in respective blogs, others in our Facebook group. A section called ‘Gallery of Possibilities’ in the EP doc features the more clear variants or adaptations. [If any adaptation is accompanied by a dedicated pattern, it is shifted to the main entry of the respective pattern]. But beyond these are several more versions that can inspire us.

Although we can pin an image from a public FB page/group, it will not lead back to the source or provide any information about the tatter, pattern, etc. 

All these factors made me realize that sharing them through blogposts will not only reach a wider audience, but will also help us pin correctly. Under the title ‘EP medley’, I will occasionally share the projects (and blog post links) with due credit, for all to enjoy and pin correctly.

Description will be at a minimum, and images are in no particular sequence. More details and information can be garnered in the Endrucks 1920 Project Facebook group or the respective blogs. The medley is in no particular order. (links at end)

EP Medley #1 

pattern #17 adaptation

1. Recently Coretta Loughmiller uploaded 2 versions of ‘Upended Endrucks Snowflakes’, adapted from an adaptation! Check out her beautiful models and other details here- http://corettadeesign.blogspot.com/2022/03/endrucks.html

2. Molly worked a beaded version of the Upended Snowflake and draped it beautifully over a tree ornament. ---


3. Eulalia worked the same snowflake in 3 strands of sewing thread as a trial while incapacitated! ---

I had extracted a motif from #17 and used it in several adaptations, starting with the Lace Day earrings, edgings, snowflake. 
4. Marie of West Pine Creations tatted a beautiful rendition of the earrings here - http://westpinecreations.blogspot.com/2022/04/lacy.html

5. And this is Kathleen's lovely beaded version from last year. ---

pattern #1 + #40 combo:
6. Reiko tatted the central rounds of #40 and edged the circle with #1! Happy Hands know no limits :-) ---

pattern #2 adaptation:
7. Ninetta is still not back to blogging, and has dumped her images on me for the present! My tiny fragile shoulders carry a heavy burden, LOL.
This is her bracelet adaptation extracting and repeating only one motif from #2,  reminding her of fishbone. ---
Notice how cleverly she has attached the tatting to the clasp?! Seamless. The rings look like they are part of the clasp.

pattern #43 adaptation:
8. Agnieszka (Aga) tatted an exquisite Jewelry Set extracting a motif from #43. Her beautifully tatted necklace and earrings are displayed through several pics here - https://agaszowopapierkowo.blogspot.com/2022/03/komplet-bizuterii.html

9. Pop Maria followed suit adapting the motif slightly for a bookmark worked in her own delicious hand=painted thread, here - https://maryshandmade.blogspot.com/2022/03/proiectul-endruks-1970.html 

10. And several years back, Patty Dowden inserted some freeform tatting to create this yummy Strawberry Doodle using almost the entire motif.  ---


This is a small window into the possibilities with so much still to explore and adapt. Hope you enjoyed this display and will leave a comment if you want some changes in the presentation. 


All pattern pdfs can be downloaded from Endrucks 1920 Project document (EPdoc) - https://docs.google.com/document/d/17LEVftXweztBIOWh4sL4BB7bX65ssoOsOn4oXIgCepY/view
Endrucks 1920 Project FB Group - https://www.facebook.com/groups/1235560633606162
#Endrucks1920Project - https://www.facebook.com/hashtag/endrucks1920project
Endrucks 1920 Project Pinterest board - https://pin.it/16AYBmv

Wednesday, 16 June 2021

using silk thread

Pin It now!

Melanie wished for some details on how to put silk threads to use, and this post is a short compilation of my projects showcasing some of the ways I've used them along with my thoughts/tips. But first step over to see the silk project she's working on here.

1. Embroidery on paper - 

So my very first project with silk thread, for which I specifically bought a spool, was for embroidery on greeting cards in 1986-87. These are some of the many I and my sis made together. Except for the towers on the left which used 2 strands, the rest all use only one thread.

2. Hand embroidery (single thread) - 

These next 3 are hand-embroidered on handkerchiefs, using only one thread. 
I tried to use the thread for a picot edge but unless the tension is very precise, the silk thread tends to break. I finally settled on coloured sewing thread for the edges.
I've posted details about this here. The sheen and colour choices are amazing! However, ironing needs to be done by placing a damp fabric over the embroidery. Otherwise the threads may singe and fray.
Another hanky where I used single silk thread. These are all old well-used hankies, hence the fraying is visible. For really long-lasting embroidery, I recommend Anchor embroidery thread/floss.
TIP: One tip when using silk for hand embroidery - Use short lengths. Long threads tend to unravel or knot. More importantly, the thread frays due to friction with the needle eye. My solution is to keep moving the needle along the thread so that it does not cut through the thread at one point. It works really well, as in the next project ... 

3. Hand embroidery (multiple threads) -
Here I used 3 strands of silk (1 from each spool - yes, I bought several in the same colour, LOL). Working with multiple strands of silk is not an easy task since unlike embroidery thread, these are smooth and do not adhere together. But where there's a will, there's a way!

This is also the go-to thread for another form of hand embroidery - Phulkari, a traditional style with geometric designs that fills up the entire fabric from the front! The Punjabis use brilliant colours to fill up the spaces. I am not much into symmetrical patterns, hence have never tried this stitch/pattern.

4. Machine embroidery -
Above is my sole venture into machine embroidery. I deliberately went freeform with the neck coz I could not manage to 'stay within the lines' - my design choice, haha. It is for my MIL's nightie way back.
It took a lot of manoeuvring to get the tension right and avoid breaking thread midways. I managed successfully for the most part, but not always.
This is nothing compared to what my Mom could do, including using a horizontal needle to couch over. It was mesmerising to watch how she moved the hoop on the machine with one hand, while turning the hand wheel with the other, phew!

5. Tatting - 
Finally, tatting with silk. Above is my first venture with single silk thread tatting back in 2014. The sheen is not very clear here. I simply let my shuttles take the lead, belting out a freeform braid. As you can see, it has rings, chains, split rings, onion rings, floating rings.
I found it surprisingly easy to tat, except for the eye strain. Thread moves smoothly and surely, rings close neatly. There wasn't a single break throughout! And see how dainty it is.
TIP: Before closing the ring, if you post the other shuttle through the open ring, it creates an overlapping and enclosed effect!!!!
See how the threads seem to emerge from within the topmost ring? It happened when I posted the other shuttle through the ring before closing it. And the chain seems to emerge through the ring!
The flaws in tatting are purely my lack of skill at the time.

6. Tassels - 
Then of course, the common use for silk threads, as advertised when selling, is for tassels, as in the above bookmark. Long tassel earrings are a rage at present.

Silk thread brands in my stash - 
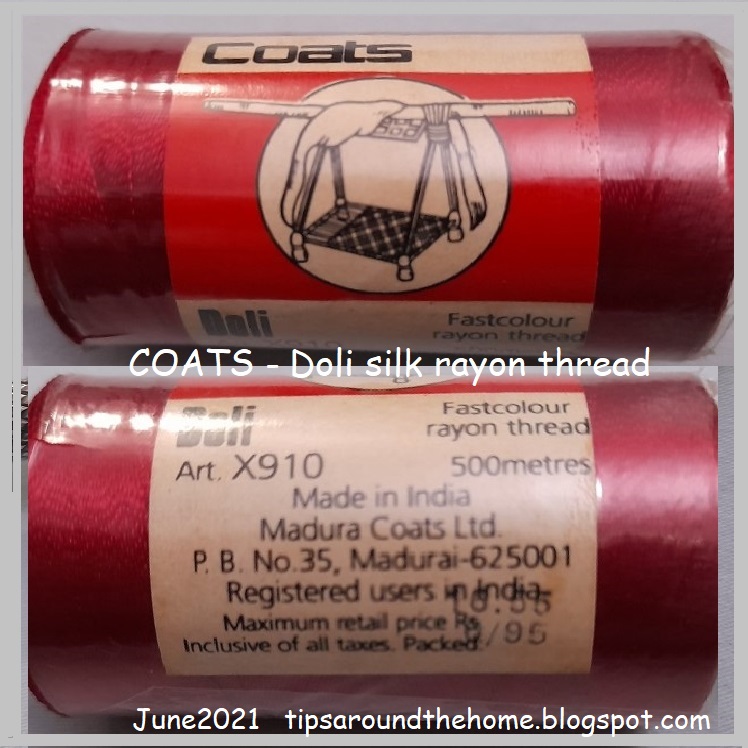
I was asked about the colour fastness & brands of these silk threads. Above are the 3 brands where the tags/sleeves are still intact. Below are each with clearer details ....
I like this Coats' Doli brand the best. The spool itself is tightly wound, as is the thread. I prefer this for machine embroidery.
Besto is another I have several spools of. Both the thread and the spool are not as tightly wound as Coats. But colours are gorgeous - lots of pastel shades.
Codak is from my MIL's leftover stash. I have 3 or 4 colours in this brand, which appears similar to Besto, except that the spool is smaller. No thread details on the sleeve, except for colour fastness.

I have a few twisted strands of silk thread as well, but forgot to take a pic. Maybe I'll add a pic tomorrow. So do check in tomorrow ....
UPDATE - Here's my complete silk thread stash -
The 5 wooden spools are vintage pure silk threads (at least 60-70 years old) as I'd mentioned in my earlier post. 
On the left are some skeins of Opella brand silk threads. Some have been used, others are still intact after decades! The tag says 'Fast to Bleach' (does that mean it is bleach-proof?), and it has the shade number as well, unlike the other spools.

UPDATE - This is what Kathleen Minniti says in her comment below - NO CHEMICAL BLEACH EVER ON SILK! It will literally dissolve silk to nothing. The label may be referring to fading from sunlight; laying garments out in the sun to "bleach" has been a time-honored method of lightening cotton and linen fabrics.

On the cards below Opella, are leftover lengths from projects.
And under that is my new metallic thread stash that I will show you once I've tatted with it!

Monday, 31 May 2021

hopping around

Pin It now!
Bunnies and Tulips for Easter 2021
pattern - Kathleen Minniti

Couple of months back I was in a tatting funk - had lost the will to pick up my shuttles. And then suddenly patterns sprang into my inbox from generous friends! One such was from the very talented Kathleen Minniti. She sent me these bunnies and tulips pattern as an International Tatting Day gift on April 1st!

My shuttles came to life! Tried these, adding a bead for nose. The one on the right has whiskers and a dense tail which was supposed to have been frayed, but haven't gotten around to it yet. These were straight off the shuttles, without blocking or shaping or trimming the whiskers (made from sewing thread)
I still have thread left in the shuttle for a 3rd one, this time with a bead for eye.
Although I made little tweaks - so many what-ifs floating around in my head - there are no notes to share. I went with the flow and pleasure of simply tatting away.....

I Love the sense of movement this pattern has. Almost as if the bunny is about to hop, or is already hopping! Above, the black-nosed bunny is enjoying the fragrance of the tulip while the red-nosed bunny wouldn't be left behind and hops closer ...

... and displaces the smaller black-nosey who switches to the other side, awaiting it's turn again.

Aha, our curious red-nosey has found a new flower to explore, so black-nosey gets right back to it's original perch!

Although tatted around 4th/5th April, it's taken me so long to take pics and post. There's a whole lot more I wish to try out which was one of the reasons for this delayed post. There are lots of little versions to choose from or to tweak for our pleasure! Kathleen's genius in designing is evident in the use of simple techniques and effects to create several versions of swaying tulips and hopping bunnies.
And the great news is that all these patterns are now public - shared with the Online Tatting Class recently - https://www.georgiaseitz.com/2021/lessons_loglinks_reg2021.html 
You can be sure I'll be getting back to this again some time to make a proper composition!

Many many thanks to Kathleen, a generous friend and constant inspiration !


Wednesday, 3 March 2021

lounging by the sea

Pin It now!

...if only ;-D But one can always bring the sea home or a friend can send us the sand and waves, sprinkled with pearls!  

This is a slight adaptation, in trying to manifest Ninetta Caruso's Heart by the Sea in thread, which is the reason for this unusual colour combo. An island surrounded by the sea and pearls, and palm trees!
It'd been ages since I picked my shuttles and you can see how my first attempts failed due to uncooperative threads. The yellow one is in metallic-wound size 20 which was no fun this time. The beige one got stuck while closing! 
So, in my 3rd attempt, I worked the hearts as mock rings (SCMRs). Worked. Notice the extra hearts? I wanted to show partially open oysters with a pearl inside. Not my best effort, but Dr Downplay came out to play :-) I really just wanted to enjoy some tatting time.
And for fun, I used a CWJ to join the small heart to the lower large one. Hmm, please don't, unless the picot is long! While the small heart had a smooth outline, it distorted the large one slightly.
I love the flower she inserted! I chose tinted green to represent a palm grove and the brown crystal could be coconuts?
The tiny seed beads represent the frothy waves on pristine blue waters, hitting the shores! The almost white sands and brilliant blue sea is an image stamped in my mind from the outskirts of Perth (Australia).
TIP: If you start the heart frontside, the pattern will move counterclockwise unlike that indicated in the diagram (starting with A). I was following the diagram only, and hence all my subsequent rings were worked backside. It is only now that I noticed her stepwise pics showing her counterclockwise WIP pics!
In Anchor Pearl cotton size 8, the heart measures 5cmsx5.5cms.
TIP: I started the green motif at the ring marked E in diagram, moving clockwise, so that there was more open space to close out the motif in the end.
Beads used - size 10/0 pearls (rescued as can be seen in their darker tinge!); 2 pearls - 4mm; crystal size 9/0; silver seed beads size 26/0.
For all pearl beads, I used my Floating Beads method - no need to load beads on a shuttle! However, I added one more step - capturing the bead within the first half stitch as in this onion rings method. It was Kathleen Minniti who captured the 'floating ring' in our round robin doily instead of simple FB method. 

This lovely pattern and instructions can be found here - https://ninettacaruso.blogspot.com/2021/02/hearts-friends-and-flower.html I had not realised until I read her post, that the heart is derived from her doily - one that was already on my to-tat list! 

Many thanks to Ninetta for sharing her pattern and also for creating a lovely pictorial for my Block Heart ( I need to update the post). Both were chosen for the Un Coure Per Te event in the very active and inspiring Italian facebook group - Chiacchierino:Filo, Amore e Fantasia. My heart is late for the event, but I'm happy to have tatted something! And there's an event every fortnight, so join in!

Wednesday, 1 July 2020

never say die

Pin It now!
Serious readers of my blog may recall my inexplicable difficulty in working Aurora's onion rings, despite the fact that I understood the concept and she had laid out a stepwise pictorial with instructions here. Yet based off that method, I easily accomplished Kathleen's variation as seen in this pictorial.  Judith left a couple of comments there today and I decided to give it one more try.

This time I did not follow Aurora's pdf. I went with her concept in my mind and Voila, I got it!!! Yup, never say never! So here is my take ... a quick comparison of 3 methods which includes Judith's suggestion that lies in between.

Specs :


From left to right :
  1. Kathleen's captured onion rings (Variation #1 of Aurora's onion rings method). The inner ring is captured within the base of the 1st half stitch of outer ring - within the leg of the half stitch.
  2. Judith's half-hitch capture (Variation #2 of Aurora's onion rings method). The inner ring is trapped between the 1st and 2nd half stitches - between core and working thread. 
  3. Aurora's onion rings (original method). The inner ring is trapped after making 1ds. Thus it is trapped between 2 stitches - between core and working threads.
  4. Kathleen's method repeated for sake of consistency.

My first thoughts :
  • I found it easier to maneuver and position the inner ring using Kathleen's method.
  • In Aurora's method (#3 OR) I worked only 5ds in the last segment since 1ds had been worked while trapping the inner ring at the start.
  • This also causes a slight offset or perhaps I need to practice more.
  • I can barely detect any difference in the bulk in either of the 3 methods, although I understand that technically Judith's comment is right. 
  • They are all fairly flat.
  • I think Judith's variation is visually best, though Kathleen's is easier to implement. 
  • Judith also mentioned posting the shuttle. I tried it, but didn't like the result, and pulled the thread back to 'normal'. To be sure, I post shuttle Only for backside rings - works for me.
  • More practice and application required, along with experimenting with 2 colours.

UPDATE : I forgot to add a slightly different type of "captured rings" - Floating Beads method used to capture the inner ring with the flexibility that it can lie flush against the outer ring, or can float at a slight distance. Here are a couple of pictures showing the diversity -
 
It is not as elegant as the above methods, obviously.
Dancing Peacocks medallion was adapted to become the center of my Design Round Robin doily. This is the center where Kathleen tatted the floating inner ring using her captured OR method instead of the FB method and I learned it from her.


Many thanks to all three tatter-designers ; 
love to have options and multiple paths toward improvement!