Showing posts with label tassel. Show all posts

Saturday, 16 May 2026

itch scratched

Pin It now!

 From April 2019 to May 2026 - took all of seven years for me to put up the pictorial for curled ring connectors! I had a one-page graphic prepared in 2019 but kept putting it off. The 7-year itch proved advantageous because now I am sharing a comprehensive tatted ring connectors presentation which includes two main types of connectors as well as numerous applications and variations along with tips and options! You no longer need to rummage through your stash of motifs wondering what to do with them, or to worry about finding the right findings for your tatted jewellery! No preplanning, no joining picots needed!

Since this is an image-heavy post, I will try to keep the text to a minimum. You can read all details in the PDF and the links provided below.  

Tatted Ring Connectors
Two main types are the Curled Ring Connector (CRC) and the Tatted Ring Connector (TRC) as seen above.

Curled Ring Connector
All you need is a single shuttle to tat picoted rings and a lock join to curl each either individually or simultaneously at the end. 
Curled Ring Connector in progress. These are single shuttle rings curled around desired motifs to connect them.
Collect all your motifs or lace and arrange as desired.

My CRC SOUP bracelet. Here, I have added beads in the center of the 3-way CRCs. 
The large ring at the bottom left will be curled and will act as a toggle for the bracelet.

Detail of the beaded CRC.

This is my Italian Connection bookmark made by linking Patty Castagno's Square Motifs.
Notice the 3-way CRC decorating the tassel and its 'empty' counterpart at the other end.

Not merely tatted motifs, these connectors can be used to link sequins! There are even 4-way connectors here tatted with metallic thread.
First sneak peek here - https://tipsaroundthehome.blogspot.com/2019/04/pattys-square-pattern-and-peeks.html
Ninetta Caruso's E37 Iris Pendant uses a triple onion ring to curl around the necklace. And on the other end she worked a curled ring to link to the tatted motif with a split ring between the CR and OR!

Tatted Ring Connector
All you need is a single shuttle to tat picoted rings and a picot join between them, encapsulating  two motifs/pieces. 
Some of my E37 Eye Spy Hearts #2 motifs left over from my trials and prototypes are now linked with TRC or tatted ring connector. More hearts here - https://tipsaroundthehome.blogspot.com/2025/09/timeline-and-play.html
Detail of a TRC in progress.
My E37 SOUPy Vine bookmark with E37 Eye Spy Hearts #1 has a variation of the tatted connectors where the two rings are not joined to each other but to the motifs! More details here - https://tipsaroundthehome.blogspot.com/2023/07/soupy-vine.html
My E1 Happy Hands Linked Bookmark uses the main motif 'hands' to link the tail to the body! More here - https://tipsaroundthehome.blogspot.com/2022/03/linked-hands-trial.html 

My E1 Happy Hands Linked Bracelet has two motifs and the linkage to the body is made with the crossed long beaded picots. https://tipsaroundthehome.blogspot.com/2022/08/a-bonanza-of-happiness.html  
Detail of the crossover picots between the two motifs.

Ninetta Caruso's E1 Happy Hands Necklace uses 3 individually tatted interlocking rings to link the clasp to the lace! Lots more pics and details here - https://tipsaroundthehome.blogspot.com/2022/10/not-just-edging.html

Ninetta uses a similar technique to attach the clasp to the lace in her E2 Fishbone Bracelet. Her pattern pdf also has a detailed pictorial of the process and she has shared two important tips for our presentation as well.

I hope you are sufficiently impressed by the variety and will want to assemble your practice and prototypes pieces to create useable articles and jewellery!

Many thanks to Ninetta for her feedback, input, tips, and proofing!

Wednesday, 12 July 2023

SOUPy vine

Pin It now!
Our game of the month for July was to tat a bookmark from any of Endrucks' patterns. Her book has a lot of edgings making it easy to choose one and adapt into a bookmark. I've done it with a few of her patterns already. However this time I went with a SOUP* (*Sewing On / Using Pieces) bookmark.
Bookmark directory (soon more models will be added): 

I was actually rummaging for another project through my Endrucks' models stash which is now so huge that it is stored in several different truffle boxes! My eyes landed on these hearts (these include trials and prototypes) and it felt like a good opportunity to use them. It would keep them 'in line' and also be of use.

Not wanting to make it 'permanent', I tatted something that can be cut off if required.
This is my SOUPy Vine Bookmark from E37 for the game ....

Tatted with only one shuttle using teal shade, it is made solely of rings. A bit free style. 
The two large 'leaves' are lock joined to both heart motifs and joined somewhere along the edge, too, for stability. However since the heart edges did not have picots, I had to pierce a fine crochet hook into the space and make a join while tatting the ring.

In her book, Frau Endrucks advises: 
Should you have forgotten a picot, poke a needle between the respective double knots. The picot created that way is large enough for joining. 

Wanting to avoid cutting and hiding ends after each pair of rings, I went with a half-closed ring string! 
TIP: Half-closed rings (aka half rings, scallops) act like split rings with thread(s) emerging at a point away from the start. 
Each HCR is 3ds.
The leaf rings range from 20 to 30 ds.

The heart motifs were worked in Anchor size 20 which is like Lizbeth 10. Adding this connecting 'vine' in the same size would make it too bulky for a bookmark. Hence the vine is worked in Anchor size 40.

The tassel is made of short leftover lengths in brighter colours. And another HCR string or vine is inserted to sort of bring it all together.

The entire work took me less than 2 sittings and was a fun task. I now have one more bookmark to use!
In different colours the leaf rings could've been butterflies 🦋 .

PATTERN: Eye Spy Hearts #1 derived from Endrucks' #37 (E37). All hearts derived from Endrucks' book are collected in the Hearts Directory - https://docs.google.com/document/d/1MpYw9XMB8Asz8zusj1ZpHvX8A8Ww424-rEVORtxcL1w/view

Related Posts -

Wednesday, 16 June 2021

using silk thread

Pin It now!

Melanie wished for some details on how to put silk threads to use, and this post is a short compilation of my projects showcasing some of the ways I've used them along with my thoughts/tips. But first step over to see the silk project she's working on here.

1. Embroidery on paper - 

So my very first project with silk thread, for which I specifically bought a spool, was for embroidery on greeting cards in 1986-87. These are some of the many I and my sis made together. Except for the towers on the left which used 2 strands, the rest all use only one thread.

2. Hand embroidery (single thread) - 

These next 3 are hand-embroidered on handkerchiefs, using only one thread. 
I tried to use the thread for a picot edge but unless the tension is very precise, the silk thread tends to break. I finally settled on coloured sewing thread for the edges.
I've posted details about this here. The sheen and colour choices are amazing! However, ironing needs to be done by placing a damp fabric over the embroidery. Otherwise the threads may singe and fray.
Another hanky where I used single silk thread. These are all old well-used hankies, hence the fraying is visible. For really long-lasting embroidery, I recommend Anchor embroidery thread/floss.
TIP: One tip when using silk for hand embroidery - Use short lengths. Long threads tend to unravel or knot. More importantly, the thread frays due to friction with the needle eye. My solution is to keep moving the needle along the thread so that it does not cut through the thread at one point. It works really well, as in the next project ... 

3. Hand embroidery (multiple threads) -
Here I used 3 strands of silk (1 from each spool - yes, I bought several in the same colour, LOL). Working with multiple strands of silk is not an easy task since unlike embroidery thread, these are smooth and do not adhere together. But where there's a will, there's a way!

This is also the go-to thread for another form of hand embroidery - Phulkari, a traditional style with geometric designs that fills up the entire fabric from the front! The Punjabis use brilliant colours to fill up the spaces. I am not much into symmetrical patterns, hence have never tried this stitch/pattern.

4. Machine embroidery -
Above is my sole venture into machine embroidery. I deliberately went freeform with the neck coz I could not manage to 'stay within the lines' - my design choice, haha. It is for my MIL's nightie way back.
It took a lot of manoeuvring to get the tension right and avoid breaking thread midways. I managed successfully for the most part, but not always.
This is nothing compared to what my Mom could do, including using a horizontal needle to couch over. It was mesmerising to watch how she moved the hoop on the machine with one hand, while turning the hand wheel with the other, phew!

5. Tatting - 
Finally, tatting with silk. Above is my first venture with single silk thread tatting back in 2014. The sheen is not very clear here. I simply let my shuttles take the lead, belting out a freeform braid. As you can see, it has rings, chains, split rings, onion rings, floating rings.
I found it surprisingly easy to tat, except for the eye strain. Thread moves smoothly and surely, rings close neatly. There wasn't a single break throughout! And see how dainty it is.
TIP: Before closing the ring, if you post the other shuttle through the open ring, it creates an overlapping and enclosed effect!!!!
See how the threads seem to emerge from within the topmost ring? It happened when I posted the other shuttle through the ring before closing it. And the chain seems to emerge through the ring!
The flaws in tatting are purely my lack of skill at the time.

6. Tassels - 
Then of course, the common use for silk threads, as advertised when selling, is for tassels, as in the above bookmark. Long tassel earrings are a rage at present.

Silk thread brands in my stash - 
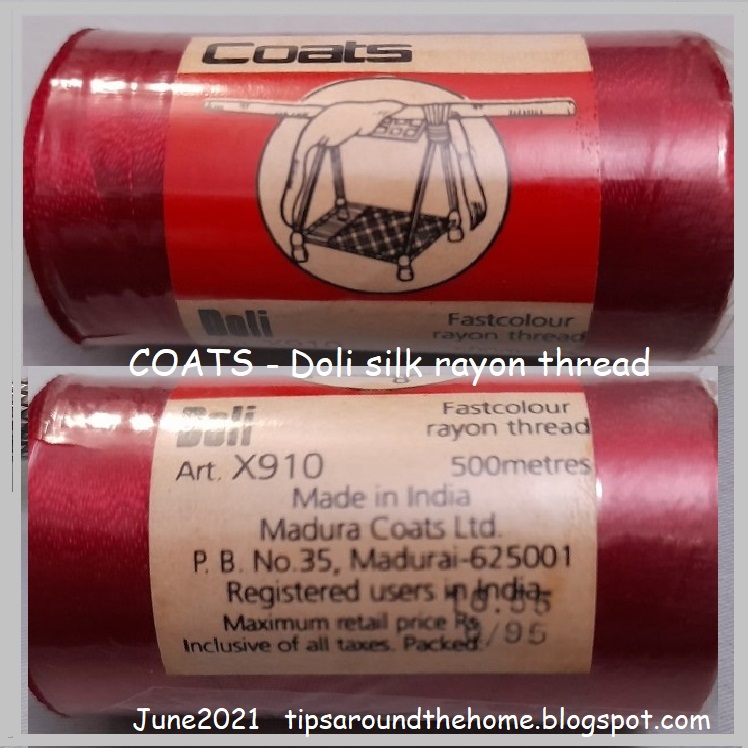
I was asked about the colour fastness & brands of these silk threads. Above are the 3 brands where the tags/sleeves are still intact. Below are each with clearer details ....
I like this Coats' Doli brand the best. The spool itself is tightly wound, as is the thread. I prefer this for machine embroidery.
Besto is another I have several spools of. Both the thread and the spool are not as tightly wound as Coats. But colours are gorgeous - lots of pastel shades.
Codak is from my MIL's leftover stash. I have 3 or 4 colours in this brand, which appears similar to Besto, except that the spool is smaller. No thread details on the sleeve, except for colour fastness.

I have a few twisted strands of silk thread as well, but forgot to take a pic. Maybe I'll add a pic tomorrow. So do check in tomorrow ....
UPDATE - Here's my complete silk thread stash -
The 5 wooden spools are vintage pure silk threads (at least 60-70 years old) as I'd mentioned in my earlier post. 
On the left are some skeins of Opella brand silk threads. Some have been used, others are still intact after decades! The tag says 'Fast to Bleach' (does that mean it is bleach-proof?), and it has the shade number as well, unlike the other spools.

UPDATE - This is what Kathleen Minniti says in her comment below - NO CHEMICAL BLEACH EVER ON SILK! It will literally dissolve silk to nothing. The label may be referring to fading from sunlight; laying garments out in the sun to "bleach" has been a time-honored method of lightening cotton and linen fabrics.

On the cards below Opella, are leftover lengths from projects.
And under that is my new metallic thread stash that I will show you once I've tatted with it!

Saturday, 15 August 2020

free together

Pin It now!

The florets fell off the tree and got threaded into a bracelet! This is my Independence Day bracelet, with a stylised representation of our tricolour (or Tiranga,  as in Union Jack or Stars and Stripes).
I remember using the Indian flag colours in tatting twice before - unintentionally in the Spring Garland , and intentionally in Ninetta's Girotondo . But neither had any blue in it.

Each colour has a meaning attached to it. Saffron for strength and courage; white for peace; green for growth and prosperity. The blue crystal in the center represents the Dharma Chakra - wheel of truth, or righteousness.

I'm sure you can choose colours to symbolise your own flag if you end up tatting it.

FREE  TOGETHER  BRACELET (aka Tiranga bracelet)

This is a very simple pattern. Worked in Anchor Pearl Cotton size 8. 

Each of the 12 rosettes is tatted separately. 5 rings of 5-15-5, linked in a circle, made with one shuttle.

The 'toggle' is made as follows :

Rosette : [4-12-4]x5 . To reduce tail ends, work the last ring as a split ring (4+12/4), joining to 1st ring. Then add new colour to make the chains. Each chain is 14ds, lock join. After completing the round, snip off one thread and add 3rd colour. Each chain here is 16ds, lock join.

Tat over tail at the start of each round, and hide previous tail within new element or whip stitch. Refer False CTM and/or Adding new thread to chain (tutorial links In case a link does not work, substitute .in with .com)

I had to improvise a lot while assembling the flowers! Lots of false moves and backtracking, but I am more than happy with the result - the overlapping of flowers is exactly how I'd visualized it.

Without boring you with details, here's how the final assembly happened - Start 3 spiral or Josephine chains, one in each colour. At the beginning, I held open each chain with a paper clip. In the end, it was through these tiny open spaces that thread was inserted to secure the tassel.

We no longer need the shuttles. Beads and flowers are strung through these 6 strings in this order - blue crystal, flower, 2 pearl beads. Repeat till all 12 flowers are strung. End with desired length of pearl beads, 1 blue crystal, the 'toggle' flower, 1 more pearl, knot together, leave a length like a stem for the flower, and knot again. Snip. 

This bunch of threads makes it easier to grip and insert through the spiral chain spaces and pull the flower through, to hold the bracelet in place.

Now here's a behind-the-scenes solution. It turned out that the blue crystal could carry only 4 threads, and was small enough to pass through the flower center. My solution : Depending on the colour of the flower which follows the blue bead, thread the crystal and flower with 4 threads of the other 2 colours. The 2 remaining threads are inserted Between 2 rings of the flower, on 'opposite' ends, and knotted securely Behind the flower. This holds the beads in place, takes care of the unstrung threads, and maintains the overlap!

I could've snipped off 1 thread in each colour, but I liked this solution and nothing is visible. Hence, make sure you have everything pre-planned and pre-measured ;-D

@@@ 

Almost every Indian household starts the day with "utterly butterly delicious" Amul butter ;-P

As I scroll through this 50th year celebration book (2012) - Amul's India - it is like refreshing and revisiting the various facets of India and Indians - a fun way to review history through their weekly slogans! It would not be an exaggeration to say India's Amul. 

They usually avoid controversial topics, focusing more on the positives and achievements. To tell a story in a few short words using clever puns, portmonteaux (mostly bi-lingual), and wordplay - just too good! It is a great book to spend some moments with any time of the day!

To my Indian readers, how many of you look forward to Amul's ad every Wednesday? I still remember almost leaning out of the train on my way to college, to catch a first/early glimpse of the new hoarding every week! Now of course, I quickly skim through the newspaper to see what the polka dotted girl has to say.


Wednesday, 10 April 2019

tassel tips n tricks

Pin It now!
Over the years I’ve assimilated a few tips and tricks for making the perfect tassel – umm, aspiring to. I was simply going to share the link to this latest trick, except that the link does not open now without membership to the Japanese site/platform. Despite a fairly thorough search I couldn’t find a single video or pin where this trick was used, hence I made a quick collage.

With tassel earrings raking up quite a storm, it is a simple and neat trick to have in one's kitty. 
  1. Cut a length of paper and roll it over the tassel. The length of the paper cylinder should be the desired length of tassel.
  2. It is important that the cylinder is snugged up to the base of the tassel if one wants identical lengths as in earrings.
  3. Then snip close to and along the lower edge of paper. Remove paper, and voilà, we have a neatly trimmed, perfect tassel each and every time!
  4. This tip was shown in stepwise detail, by sekiraralace here to make red tassel earrings. 

Some more tassel-making links and tips


  • Silk thread tassel earrings using fork – uppunutihome’s video 
  • Midway through the above video, notice how the threads curl and spread when she puts the scissors inside the tassel and cuts? Judith Connors had once highlighted this point in Craftree (sorry, don’t have a link) – Always cut across, never through the threads. This keeps the threads together and it really works.

There are loads more youtube videos, all pretty similar.


UPDATE (Apr 24, 2019): Patricia Lynn-Cobb has an excellent tutorial for a Great Tassel. Download the pdf from this post.


Do you have a tassel tip or trick or tutorial to share? I would love to add it to this list which will be on the Tatting Resources tab above. Waiting eagerly to hear from you …

Saturday, 30 March 2019

tape lace bookmark

Pin It now!
I went into a tizzy trying to find tatted bookmarks for 10 books in Hindi I was sending to my MIL for her friend. They were either brand new or almost so. In the very short time left after hunting down the books, I could only find 5 bookmarks, and no time to take pics either!!! Despite gifting or using bookmarks, I know there are more left. Time for some major reorganising, but before that some tatting ;-P

On cue, this video from Sushma’s Craft & Creations turned up. She regularly uploads videos on tatting, crochet, and embroidery, in Hindi. This is the first time I’ve tried her pattern. This is an insertion pattern she calls Tape Lace.
If planned ahead, I would’ve started with a ring at the tip – now the top looks ‘cut off’.
Also, the stark contrast in colours does not show the undulating effect clearly. 2 shades of the same colour would’ve worked better.

Decided to cut short my misadventure and end with a zigzag chain and tassel.
Using Red Rose pearl cotton (size 8), the body is 8 cms long and 2½ cms wide.
Techniques I used : 2 shuttles, directional (fs/bs) tatting, blipless join, SLT, zigzag chain, tassel.

If doing fs/bs tatting, all rings on one side are done frontside and on the other backside (reverse order double stitch or RODS). En bloc, as in the spinning wheel glass mat. 
SLT is used only once in each block
This is a comparative listing of Chains in Shuttle Tatting, along with tutorial links.
Don’t you like how even my tassel is this time? There’s a trick I’ll share soon.

The Book of the Vedas - Timeless Wisdom from Indian Traditions. By Virender Kumar Arya.
Since there is this ‘Hindi’ or Indian connection in this thread, I chose this book on Vedas. 
It is in English and offers a lucid 2-page summary of major religions, cultures, traditions, deities, beliefs, etc. A bird’s eye view of spiritualism with lots of images and charming layout. One can start and stop at any page! Hardbound with dust-cover.

I'm excited to show the other bookmark I've finished....