Showing posts with label zigzag chain. Show all posts

Friday, 18 August 2023

differences

Pin It now!

A few months back I worked on some lattice tatting samplers. 

This one is in Lizbeth size 10 threads. Each zigzag chain is made in a different shade. 

This one is in Anchor mercerized size 20 (which is almost similar in thickness to Lizbeth size 10) threads. Only two colours, worked continuously. 
But notice the difference in the stitches?!! 
The difference in how flat and even the chain segments are in the former? 
And not to mention the sheer joy it was to tat with the former, and that Lizbeth photographs so much better.

Hmm, there are tatters who can work with any thread and their results are always perfect and spectacular. Guess I'm not one of them! Threads seem to alter the visual appearance of my models, LOL.

LATTICE TATTING is simply stacked rows of zigzag chains, each trough joined to the peak of the  previous row. You can work it in separate rows, giving you the option to use several colours. Or work it continuously in one or two colours. 
Each zigzag chain is made with a segment of double stitches alternating with a segment of reverse stitches. This automatically creates the visual zigzag effect. Depending on the length of each segment, numerous effects are possible! 

https://tipsaroundthehome.blogspot.com/2020/04/picoted-s-chain-cords.html - picoted zigzag chain (1ds,p,1rs) with pictorial and explanation
https://tipsaroundthehome.blogspot.com/2023/07/tailed.html - single stitch zigzag chain (1ds,1rs)

The above sampler is worked with 2 shuttles loaded with 2 contrasting colours. To climb up to the height in order to start the next row, I used a Lock Chain.Lock chains can be considered a very basic zigzag chain where each flipped half-stitch is alternated with an unflipped half-stitch.

Somewhere in the 3rd and 4th rows I made a mistake while climbing out. I got confused and kind of winged my way through. Hence the chains are worse than the thread be blamed for ;-P Hopefully I will find the time to try it again in a better frame of mind.

Each row in this multi-coloured sampler is tatted individually using one shuttle and ball. The threads were a gift from a loving friend, Denise W (https://tipsaroundthehome.blogspot.com/2018/06/im-on-take.html). Took me years, but I've used the samples to fairly good effect, with some lengths still remaining.

I left the threads uncut and unhidden 'coz I have yet to decide how to use this sampler (a bookmark is my guess, which means continuing for some more length). 

Friday, 28 July 2023

tailed

Pin It now!


Today's haul of fully blossomed mogras!

After more than 10 days I decided I'd had enough of computerwork and deliberately took the night off to do some quick tatting. 

In 2020, I had joined these motifs on the go (I do like this staggered arrangement!) and suggested it could be used as a bracelet or bookmark. At the time I simply inserted some satin ribbons to showcase the beauty (https://tipsaroundthehome.blogspot.com/2020/11/arranging-motifs.html - check out the post for many more arrangements). 

Now I brought out the box of perle cottons, looked for the right shades to match the motifs, wound only one shuttle for each pair of threads, and set about tatting the three tails. All except the lead pic, were taken last night, fresh off the shuttle.

The chains are simple zig-zag of 1ds/1rs repeats, ending each thread in a ring of 8ds. In no mood to sew in ends, I tied a square knot and snipped to resemble bows.

TIP: This is also called a S Chain though it is a subset of the Zig Zag Chain or Zig Zag Tatting. These are straight chains but bendable. Some other terms used for this particular chain is Wavy or Lark's head chain. 
For a stepwise pictorial (with picots) - https://tipsaroundthehome.blogspot.com/2020/04/picoted-s-chain-cords.html

My second bookmark for the Mark Me Endrucks July 2023 game in our FB group. The first was posted here - https://tipsaroundthehome.blogspot.com/2023/07/soupy-vine.html
 
The pattern for Square Diamond Motifs derived from Endrucks' pattern #37 can be found here - https://drive.google.com/file/d/1wqAPnOUZwLJ9tEUk55wDZhAMw2qCNFSj/view

I like multiple tails (have made them before plenty of times) since each can be used to bookmark a separate page in the same book. So instead of one bookmark I get four, LOL.  

This is my short tale of tails.

Thursday, 25 June 2020

bonding together

Pin It now!

I haven’t been able to pick up my shuttles for the last several days - a tatting hiatus seems quite inviting! But I have permission (some for quite a while now) to share pics of stuff inspired or learned from this blog. 
So here's a colourful spread to cheer us all -
Tatting binds us.....and liberates us! Soaring together ....

In no particular order ….
Krystyna Mura – tweaked Blossoms heart (from Buddy Hearts) to create quite a wild boho version. Love it!

Sheetal Kakodkar – her bookmark journey took a zigzag path instead of S turns, giving us such a picturesque view! Tweaked from the picoted S-chain tutorial! (https://tipsaroundthehome.blogspot.com/2020/04/picoted-s-chain-cords.html)

Carolyn Miller – her practice piece for various techniques, starting with Interlaced Rings. She has cleverly converted it to hold picot gauges. See, we put every little piece to good use!

Margaret Davies – Such a beautiful adaptation of the Hidden Rose snowflake into an ice drop! She shared the pattern here - http://margaretsdesignercardspatternsandhowt.blogspot.com/2020/05/hidden-rose-ice-drop.html

Usha Shah had tatted and sent me her version of the Magic Square Cross almost within hours of my posting the pattern!

Anita Barry - Master Tatter - has often been inspired, and sent me her off-shoots –
 
Inspired by the Heartland Rainbow Snowflake, she went wild with these hearts ...posing as plumes on a proud peacock and colourful heart balloons (lead pic top) – such happiness and good cheer emanates from these - a true reflection of her peesonality!

 
Remember my invite to design-play? This is how Anita added a new round to the NeoVintage heart.  Looks like an embrace,  doesn't it? !

She has also shared her count.

And finally, such an honour - she used the Rosette Enchained Ice Drop only-chains idea to frame a miniature of her tatting teacher!
This is how the back looks.

I know of 2 tatters who actually learned treble tatting in order to make the Peacock in the Snow flake - one of them worked it a second time using a different colour palette !

These are but a few of what I would like (or remember,  sadly) to accommodate. Any omission is due to a faulty memory, not intentional.
There are quite a few others I have to share, but need to hunt them down for a future post. I invite you to send in your versions to share in my blog!

Many thanks to all these wonderful tatters – 
you inspire me to try harder and do better!

You can find links to respective pattern or tutorial in one of these pages –
All my Snowflake patterns - https://docs.google.com/document/d/1r4OmXX_c5LjFebMN2UbSNiYqXYETLmoridK0X1YIQco/view

Saturday, 30 March 2019

tape lace bookmark

Pin It now!
I went into a tizzy trying to find tatted bookmarks for 10 books in Hindi I was sending to my MIL for her friend. They were either brand new or almost so. In the very short time left after hunting down the books, I could only find 5 bookmarks, and no time to take pics either!!! Despite gifting or using bookmarks, I know there are more left. Time for some major reorganising, but before that some tatting ;-P

On cue, this video from Sushma’s Craft & Creations turned up. She regularly uploads videos on tatting, crochet, and embroidery, in Hindi. This is the first time I’ve tried her pattern. This is an insertion pattern she calls Tape Lace.
If planned ahead, I would’ve started with a ring at the tip – now the top looks ‘cut off’.
Also, the stark contrast in colours does not show the undulating effect clearly. 2 shades of the same colour would’ve worked better.

Decided to cut short my misadventure and end with a zigzag chain and tassel.
Using Red Rose pearl cotton (size 8), the body is 8 cms long and 2½ cms wide.
Techniques I used : 2 shuttles, directional (fs/bs) tatting, blipless join, SLT, zigzag chain, tassel.

If doing fs/bs tatting, all rings on one side are done frontside and on the other backside (reverse order double stitch or RODS). En bloc, as in the spinning wheel glass mat
SLT is used only once in each block
This is a comparative listing of Chains in Shuttle Tatting, along with tutorial links.
Don’t you like how even my tassel is this time? There’s a trick I’ll share soon.

The Book of the Vedas - Timeless Wisdom from Indian Traditions. By Virender Kumar Arya.
Since there is this ‘Hindi’ or Indian connection in this thread, I chose this book on Vedas. 
It is in English and offers a lucid 2-page summary of major religions, cultures, traditions, deities, beliefs, etc. A bird’s eye view of spiritualism with lots of images and charming layout. One can start and stop at any page! Hardbound with dust-cover.

I'm excited to show the other bookmark I've finished....


Friday, 23 March 2018

squares from knotty creations

Pin It now!
updated post with revised images

As promised, here are 5 free patterns from Vrinda. She created 6 patterns one of  which was called Checkers. However, even though she came up with it independently, since it is a common split ring square, the pattern is not shared here.
All Vrinda’s patterns have also been uploaded to Cathy’s facebook page.

At the very beginning, Vrinda had graciously given me permission to share them on my blog. Unfortunately it has taken time. In deference to individual preferences, I have notated the pattern in photos alongside the written pattern.
 
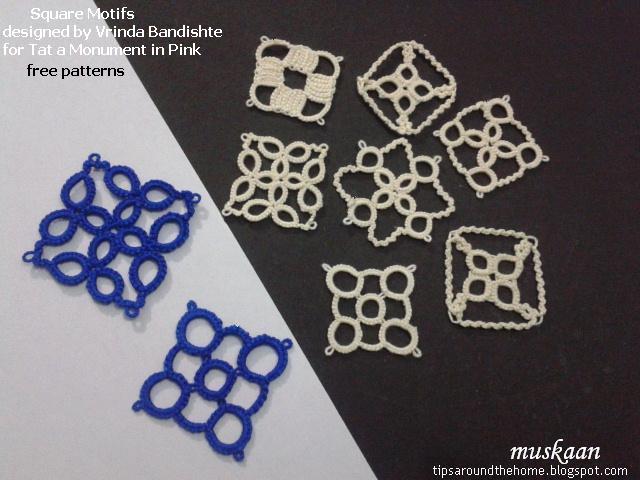
Squares from Knotty Creations !
3cms square motifs designed by Vrinda Bandishte
for Tat a Brussels Monument in Pink

I started in size 20 blue then switched to size 40 cream. I will show you why in the next post.
I like the way different techniques have been used to create interesting squares.

NOTES:
A few general notes before I begin with the actual patterns.

  1. Vrinda’s pink squares, designed for Tat a Brussels’ Monument in Pink measure 3cmsx3cms when worked in Anchor size 20. As I’ve often pointed out, Anchor 20 is thicker than Lizbeth 20. Hence, stitches will need to tweaked depending on the brand you are using. 
  1. slip ds” in her notation refers to reverse stitch (rs) or lark’s head knot or unflipped stitches as used in the 2nd side of a split ring or in encapsulation. 
  1. Zigzag chain” here refers to Sabina Carden-Madden’s S-chain. It is made of alternating flipped and unflipped stitches. i.e., 1 double stitch and 1 reverse stitch. Vrinda counts each stitch separately, not as a pair. Thus chain of 5 means (1ds,1rs,1ds,1rs,1ds). And she always starts with a normal double stitch.
  1. Some medallions use a central picot in first ring, to which later rings are attached. Ensure that this central picot is long enough to hold additional rings. 
  1. In 2-shuttle tatting, when in doubt, use the shuttle that is closest in position to start the next element. 
  1. I have tried to make minimal changes to the written pattern, except for consistency or bringing it in line with common notations. Sequence and some details are notated on my tatted models. My models are worked in Anchor size 40 in cream. Vrinda’s original models are in pink. 
  1. Some of the squares need to be blocked. 
  1. Leigh Martin has prepared pdfs for these squares, along with her notes. These can be accessed from Craftree.  

Abbreviations :
CTM    continuous thread method.
ds       double stitch
rs       reverse stitch (unflipped stitch in reverse order as in a split ring)
– or p  picot
vsp     very small picot
R        ring
--       long picot
+        join
rw      reverse work
SR      split ring
sh       shuttle
SS      switch shuttle
FR      floating ring


1. URCHIN
The enclosed space in this medallion is formed by clusters of block tatting. 

Techniques used : 
block tatting , starting chain with a picot
Worked all from the front in clockwise direction.

Load the shuttle with the required thread. Keep the ball attached.
Insert a paperclip to hold picot before starting chain.

Start Block One with chain of 6ds, vsp, chain of 6rs. Join to the start of the previous chain.
Repeat twice to form a block of 6 chains, with a vsp at start of each chain.

** Chain of 6ds, p, 6ds. Pull snug.
Block Two : 
Chain of 6ds, join to base of last chain of previous block. Continue the chains to form block two. **
Repeat from ** to **, twice.
Chain of 6ds, p, 6ds.
Attach to the start of the first block.

Hide the ends and neaten.


2. WIGGLES
A zigzag chain outlines the square shape of this central picot medallion

Techniques used : 
central picot, zigzag or S-chain, picot join to the right (folded join)
Worked in counterclockwise direction.


see notes for zigzag chain
revised direction

One shuttle and ball of thread, CTM.

R1: 5 – 5 -– 5 – 5. rw
S-chain : 5 -- 15 -- 5 rw
**R2 : 5 + 5 + 5 – 5. rw
S-chain : 5 + (last p of previous chain) 15 -- 5 rw**
Repeat from ** to ** 2 more times, joining the last ring and last chain to the first ring and chain respectively.

Finish by tying the chain ends to the base of first R. Hide ends and trim excess thread ends.

TIP : Make the pioct on chains long to give a better finish and sharper corners (see the bottom right model in lead photo)


3. BUBBLES
A central ring medallion worked in one pass from the front in counterclockwise direction

Techniques used : 
2-shuttles, mock picot, split ring

NOTE : This motif turned out smaller than 3cms. Hence I added 2 stitches in each segment of each element. Following is the altered stitch count.

Load two shuttles, CTM. Start with sh1
revised direction & stitchcount

Central R1 : 7 – 7 – 7 – 7. close. Leave mock picot space.
SR2 : 7 vsp 10 – 10 / 7.
**Chain (sh2): 7. SS
SR3 : 10 – 10 / 7 + 7. **
Repeat from ** to ** 3 times.
Chain (sh2): 7. Join to first picot of SR2.

Hide ends and neaten.

TIP : One can make the central ring and climb out with a mock picot and split ring; or one can throw the central ring off the first SR (from the 2nd side).

I think this motif would look lovely in 2 colours, especially when tessellated to create interesting patterns.


4. CLOVERS     
A central picot medallion made with inward facing clovers. 

Techniques used : 
2-shuttles, split ring, zigzag or S-chain
  
Load two shuttles, CTM. Start with shuttle 1.

R1 : 10 vsp 10.
R2 : 8 –- 8.
SR3: 10 / 10. rw
Zigzag chain : 1ds, 1rs, 1ds, picot, 1ds, 1rs, 1ds. rw.
**SR4: 10 / 10
R5 : 8 + 8.
SR6: 10 / 10. rw
Zigzag chain : 1ds, 1rs, 1ds, picot, 1ds, 1rs, 1ds. rw. **

Repeat from ** to ** 3 times. Join to the vsp of the first R. Hide ends and neaten.

TIP : I did rw (reverse work) before and after the zigzag chain so that the picot faces outwards easily and the shuttles also remain in the right position.


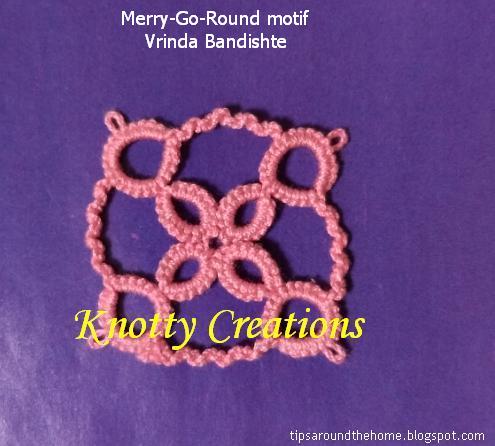
5. MERRY-GO-ROUND
A central picot medallion made with inward facing thrown rings.  
        
Techniques used : 
2-shuttles, split ring, thrown ring (from 2nd side of SR), zigzag or S-chain

UPDATE Mar 23 : revised direction
NOTE: There is a floating ring (FR) thrown off the 2nd side of each split ring. Start the split ring and when we come to that point, switch to shuttle2, make the ring, switch back to shuttle1 and continue to finish the original split ring.
The first floating ring also has a long central picot top which later FRs will be attached.

Load 2 shuttles, CTM. Start with shuttle1.

SR1 : 6 – 6 / 6 SS, FR: 8 –- 8, SS, 6. close.
**Zigzag chain: 9
SR2 : 6 – 6 / 6 SS, FR: 8 + 8, SS, 6. close **
Repeat from ** to ** 3 times,
Zigzag chain: 9
Join to the base of first R. 

Hide ends and neaten.


There was a mistake when I first tatted this motif. 
I made 15 stitch zigzag chains instead of 9 stitches. 
And the merry-go-round spun away !!!
If we add a picot in the center of each chain, we get another square motif !


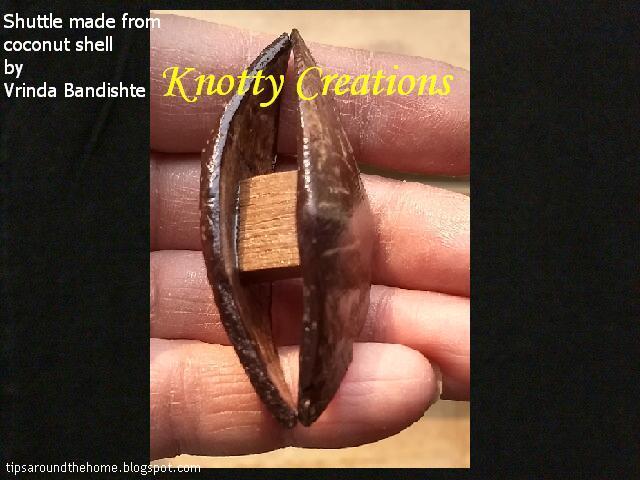
Before I leave, another glimpse of her multiple talents - a handmade and handcrafted shuttle. 
Can you guess the material?
Tatting Shuttle made from a Coconut shell !!!

Many many thanks to Vrinda for sharing her lovely patterns

hope you have tons of fun tatting up squares :-)