Sunday 21 February 2021

waltzing home

Pin It now!
Carin Jansen’s Angel Choir doily TAL 
tatting completed by ANITA  BARRY

As the final strains of the angelic melody dies down, the waltz comes to an end. It was an exhilarating and learning experience that will be treasured for years to come. We didn't just tat lace, we built memories, which is what tat-alongs are all about.

Ah, but it was not an easy romp home for Anita Barry, but no means! You remember her fixation anecdotes here and here? She wasn't wearing 6 inch heels while tatting, so why did more missteps and stumbling follow, despite having the finishing line in sight?!
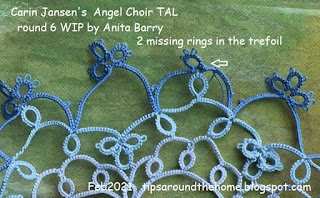
Round 6 struck again, this time with 2 of the 3 rings in a trefoil missing (arrow in pic above).
Some colourful language followed when she noticed the miss! And who can blame her ;-P

Where there's a mistake, there's a fix!

Anita shared her tools of the trade...I like to call it tools of our craft ;-D
The strange looking pick top left is a thorn from the Agave Cactus! Cool, right?!
And on the right is the needle as picot gauge in action.
' The above are "self-threading" sewing needles used for sewing in thread ends. There is a slot above the eye of the needle to slide the thread down into the eye of the needle. '

' And my fabric Ort Bag (scrap bag) for my thread ends. It's a tiny trash bag.'

Round 7 in progress. She followed my example of making the picot at tip longer.
Whoop Whoop waltzing home finally ... 
' The angels are helping me learn more ways to improvise and showing others I Tat like they do with 'do overs'. '

One would think her doily is riddled with fixes. But look what emerged from it - 
We have her husband to thank for this inspiration - he wanted the angel from Carin's doily to have "More Heart"!

I think this quote sums it up nicely since Anita will be sharing this experience in a speech titled "Fear Knot" at the IOLI Convention this year, showcasing the international cooperation this doily embodies, as well as 'bumps and grinds Tatters get themselves into'. 

        Don’t carry your mistakes around with you. 
        Instead, place them under your feet and use them as stepping stones to rise above them. 
                – Anonymous © Source: quotespedia.org

It was Anita's idea early last year, to tat a doily together. We had zeroed in on the Mystery doily whenever we could. On seeing this doily, I just felt we could all use some angels in our lives during these weird times, and Anita graciously accepted. Who knew this doily would come to create so many personal memories for her, besides the ones we made mutually!

And we had the added pleasure of several other tatters tatting along. Use hashtag #AngelChoirTAL to find the doilies on facebook as well as in Just Tatting group. If you type 'Angel Choir' in the Just Tatting search engine, it will throw up more versions by tatters who uploaded their finished doilies. Do take a look at their beautiful work if you are a member there.

Many many thanks to my buddy Anita and all my other tatting friends who joined us in our journey!
Perhaps we can plan another joyful journey next year!
Thanks once again to Carin for sharing her lovely pattern.

All related posts, with joint notes on this doily tat along - 
https://tipsaroundthehome.blogspot.com/2021/01/two-to-tango.html 

Thursday 18 February 2021

Palentine Day

Pin It now!

Came across this for the first time on the 14th 'Palentine Day'. Well, it doesn't have the same ring as Valentine Day, but it certainly has a far greatly reach!!! And it does not have to be limited to a single day - pals brighten our day anytime and every time. And this year, it was extra special as you can see ...

The very talented Krystyna Mura tagged me on her take of the Budding Heart! Don't you just love her vision and impeccable execution?!
Every time I write 'execution' I think what an odd word to use 'coz it evokes more gory images!
She used much thicker pink threads for the heart outline, encapsulating the finer green threads for the foliage. 
Last year she gifted me with her variation of the Blossoms Heart! A dear pal in deed, indeed 💖

Many of my readers must already have seen the pleasant surprise from another dear friend, Ninetta Caruso, who organised a tatting event on the facebook group Chiachhierino: Filo, Amore e Fantasia. They chose my Block Heart (Spring in my Heart) alongside her own very pretty Heart by the Sea to share and tat along with the participants. This online event called Un cuore per te goes on from 14th through to the 28th of this month. So join in! You can find links to both patterns and more details here - https://ninettacaruso.blogspot.com/2021/02/hearts-friends-and-flower.html. Love the pictorial she created, too.

Lovely models of these hearts are coming in everyday from our enthusiastic tatters and talented Italian tatters! More of Ninetta's than mine, but that's to be expected - she is such an exceptional designer!😁 

Also coming into my inbox are the Happy Hands Heart I shared last time. Denise W is so taken in by the little heart that she has tatted several already, trying to learn new techniques and perfect them. Can't wait to share them with you.
What I Can share, however, is HisKid's (Sue) beautiful model in a happy colourway here. It is her first time at roll tatting, but it already seems perfect!


On the 14th, Anita Barry waltzed in with news that she had completed the TAL doily, yay! We should've known that Cupid was her tatting angel 😄 I have all the material, but need some time to put it together into a post. But for those who can, check out her or my facebook timeline for pics of her completed work - love the colour composition!!!


Find all my heart patterns here (which I will update with these recent additions)
https://docs.google.com/document/u/0/d/1LpHU69wNsQspIHgvt9pihgTNhHFDRBab3I5_MDEYyNw/

Before I sign off, here's a Delightful article by Karen Bovard Sayre who nails our thread addiction through studies! Anitra Stone called it Threadus hoardicus, and sadly we tatters seem to suffer from it, with no cure in sight 🤣😁🤪

Thank you pals, you make my life WonderFull ! 💖

Saturday 13 February 2021

happy hands heart

Pin It now!
Happy Hands Heart
- free pattern by muskaan © Feb 2021

Almost down to the wire, but then hearts are in style throughout the year, especially if they bring happiness, happy hands and hearts with some chocolate thrown in!! And it's a fairly quick tat with not much thread required. So jump right in 💖

Based on the trials here, I worked another (top) last evening and then one more (below) which I am counting as the final pattern. Wish I could've tatted it more neatly, but it will still remain unforgettable since the earth literally shook while I was tatting! Earthquake tremors.

Design TIP: I used roll tatting instead of normal chains or lock chains for the lower segments because roll tatting is the narrowest 2-thread tatted line possible, right? 

There are numerous ways one can tat this tiny heart. I am sharing only one path and method. Feel free to adapt to your imagination (and skill level) but please share your version! Depending on individual tatting tension, you might have to tat one less or more half-stitch for the flushed chains.

Materials: 
Best worked in size 10. In Anchor size 20, this motif is 3cms tall and 3.5cms wide.
2 shuttles wound continuously (ctm). (In my yellow trials I had worked with a single shuttle and ball, using SLT to keep shuttle in hand).

Techniques used: fs/bs tatting, dimpled ring, mock ring, lock join, CWJ & DYJ optional, roll tatting. All tutorials can be found here- https://tipsaroundthehome.blogspot.com/p/tatting-resources.html

Abbreviations: Sh = shuttle; -/p = picot; + = join; RW = reverse work; LJ = lock join; dnrw = do not reverse work; SS = switch shuttle; CWJ = Catherine Wheel Join (for frontside); DYJv = Dora Young Join variation (for backside); w = wraps )for roll tatting) 


    Start with Sh1 in hand.
    RingA: 3 - 5 - 5 - 5 + 5 - 5 - 3. RW (this is the central heart-shaped dimpled ring)
    ChainB: p 3 LJ 5 LJ 10. RW
    RingC: 6 + 2 - 6. dnrw. SS
    ChainD: 20 CWJ, 16 wraps, LJ 
    ChainE: p 3 LJ 5 LJ 10. RW
    RingF: 6 + 2 + 6. dnrw SS
    ChainG: 20 DYJv, 16 wraps, LJ 

    ChainH: 3 - 3 LJ. 
    Tie and cut and hide ends. 

💗💗💗
UPDATE (April 2021): NEEDLE NOTES by Pam Hemenway 

RA) 1) Paper clip to hold the ring and pull tight 2) Work to first join and pull off needle to make join.
CB) 1) Picots I picked up with needle point to use working thread would twist stitches.
CD) 1) Roll tatting = ds 16 wraps around the needle ds Hint- hold tight it is a bugger to take out and re-do.
💗💗💗

Some Ideas and Possibilities -
  • Add beads and findings and use as jewellery - pendant, earrings, brooch. Inverted, with beads and a braid/chain, it can work as tikka jewellery for brides!
  • Of course, applique on fabric or glue to paper. Motifs can be used anywhere! By the way, that chocolate (Lindt Lindor Milk Chocolate) is seriously one of the Best I've tasted. 
  • Arrange/sew motifs stacked vertically for bookmark. When joined in a row (with additional picots) we could get an edging or trim, or even a choker! 
  • In the above arrangement, it appears we'll need 5 motifs to complete the polygon. Hmmm, I see a possible 4-leaf clover leaf there, too!
  • And this is such an appealing Arabesque arrangement! Love the curves.
  • UPDATE: I forgot to upload this at the time. The 2 yellow hearts can be worked continuously by tatting the tiny hearts at the bottom as a split rings to climb out of one heart and climb into the next.

So, what will you be making?! Enjoy 💕

UPDATE: Check out His Kid (Sue's) wonderful adaptation of the heart into a mermaid tail, with part of the body as well - http://hiskid66.blogspot.com/2021/03/inspired-by-muskaan.html
UPDATE: Diane Howe adapted this into a Shamrock leaf! - post and pattern - https://tipsaroundthehome.blogspot.com/2021/03/lucky-hands.html

UPDATE: Aug 2022
There are now so many adaptations of and from this heart - all are listed, with patterns, in the EP doc - https://docs.google.com/document/d/17LEVftXweztBIOWh4sL4BB7bX65ssoOsOn4oXIgCepY/view

Friday 12 February 2021

beaded SR braid part 1

Pin It now! Before delving back into the Endrucks Project, I had this strong urge to learn a few techniques/effects that are floating around for pretty beaded split ring bracelets. Keep learning, keep trying. 
Turns out I got only one method done before succumbing to that heart motif idea I shared in previous post and other behind-the-scene commitments. 
No progress on the heart and none on this study, either. Turns out there are too many methods and no time to go into each nuance at present. But hopefully a step here, a step there ...
    
Disclaimer: This is not a serious study of origins, primacy, etc. of technique and effect. It is my whimsical & random exploration and experimentation. I will keep adding to this personal learning journey as and when I can. 

I try to avoid stringing beads whenever possible ;-D - a logistical problem with the smallish Pony shuttles. Now Jon had once incorporated a separate string of beads into her tatting. So many lovely applications, but not on a split ring braid (SR braid). Called for some adaptation.

Beaded SR Braids
In order to clearly differentiate what comes from where -
  1. shuttle 1 has pink thread strung with yellow seed beads;
  2. shuttle 2 has green thread with purple seed beads; and,
  3. where needed, a blue thread with pearl beads.
1. beads on third thread. 
Adaptation of Jon Yusoff's Beads on a String .
I thought this would be easy. Turns out the 3rd thread needs to be anchored before starting next SR! Here is what I tried -
1. Weaving: The beaded thread weaves up and down between alternate rings. 
Well, it leaves a colour blip when brought to the front, (notice the blue between SR1 & SR2) unless using fine, invisible, or same colour thread. Further, the string would be too loose.

2. Encapsulation : To avoid any colour blip I prefer the first of 2 ways to encapsulate the beaded string.
NOTE:  KEEP beaded string at back of work throughout

2A. Encapsulating Within SR (in last half-stitch): Make SR but do not close yet. Move bead to center, make final half stitch and pass beaded string through the open loop (parallel to core thread) of half-stitch before tensioning and closing ring. Thus string is held tight through the last hs and start next SR.
TIP: do it through the 2nd half-stitch, then move string to the back again. It does not leave any imprint!

2B. Encapsulating Outside SR (in unflipped half-stitch): Close SR, move bead to center, then make an unflipped or wrapped stitch with SH1 encapsulating both remaining threads, and start next SR. (I did this before the 4th and also the 5th SRs above). 
This will leave a tiny space between 2 SRs, but it can become a design element.

In both encapsulation methods, the beaded string is not locked and can be pulled to adjust. I went to town pulling away (see above), but the braid can be smoothed back into shape easily.

Despite being invisible from the front, encapsulation simply moves the blip to the back as seen in above pic. Obviously, we need to choose a string that will not be seen as pointed out earlier. I used 3 contrasting colours for purpose of learning. 

3. Knotting: In order to lock the beaded string in place, knotting is required. 
3A. Knotting with 2 threads: We can make an overhand tie or SLT between 2 threads, one of which is the beaded string. In above pic, after closing last SR with bead in center, choose any one shuttle thread and the beaded thread to make the knot, then continue with next SR.
3B. Knotting with 3 threads: Or we can make a knot using all 3 threads (as seen at end). This makes a larger, more visible knot and increases distance between SRs, but can act as a design element.

This is it so far - all my own 'ideas'. 
But before posting, I did a bit more research and found the following !!! 
However, none of these resources make any reference to anchoring the 3rd thread (I didn't check any class logs for possible discussion).  

....to be explored further

Tuesday 9 February 2021

eye spy hearts

Pin It now! Here's part of what I'm doing, juggling between stuff - Extracting! No, no, no... rest assured there's no tooth extraction involved! Extracting designs is what I'm talking about.  And since it's heart season, what else can I extract, huh?! Anita Barry calls this 'Eye Spy' and has passed the bug on to me ;-P

1. Happy Hands Heart from Endrucks' pattern #1.
This has been in my eye for a long time! Finally some trials ....
Below is the original edging (there's a mistake, hence I'll be tatting it all again for the Endrucks Project) - I always felt they looked like happy, clapping hands raised above the head! Or showing solidarity with their team.
On the left is my first trial. Too flattish, but could be tweaked into a strawberry, right?!
My 2nd trial is actually 2 trials in one, with the left and right halves altered. And the head is a heart as well! I used roll tatting on one side in order to reduce the width.
So, what's your verdict? Should I go ahead for a final version? 
 
2. Elizabeth Hearts from Elizabeth Round Robin Doily.
I had extracted 2 hearts last year but both needed tweaking. 
Well, here's what happened when I picked one of them for improvement. Yeah, this one's going in the dump with a lesson in what not to do. I wanted the bare chains raised higher - I think those arches are good. However the clovers on the side need tweaking to bring the 2 ends together.

3. Victorian Trellis Heart (idea) from the eponymous doily Priscilla Tatting Book #2.
When Frivole recently posted her beautiful collar, I noticed these hearts! 


Do you see them as well? I can trace at least 2 heart designs of different sizes. One could be around a single large ring, while the other could have both large rings within. Of course, there's many a slip ... The scans are from pages 15 & 16.


Deviating slightly, have you espied the "Join the Google Web Creators Community...." notification on blogger? Has any of you joined? Care to share your thoughts? Thanks.

Friday 5 February 2021

all song and dance

Pin It now!

 Ta-Da !!! Doily completed.... 

Carin Jansen’s Angel Choir doily TAL – Round 7 (final round) 


I love it and hope you do, too. I enjoyed tatting it very much especially with a few more friends joining in!
Worked all from the front, clockwise. Chain-only round, hence I used a ball and shuttle, ctm. All joins are lock/shuttle joins.
For continuous tatting, you might have exited Round 6 with an 8ds split chain. Climb into this final round with a tiny mock picot and 2ds connecting chain and work clockwise. 
Easy to remember count with a picot after every 2 stitches almost throughout. I found it easier to remember that there are 5 picots on the 4 side chains and only 3 picots on the topmost arch.
Despite her instructions, I did not use a picot gauge - nothing new there ;-P
I used graduated picots on the topmost arch with the center picot especially long for a slight point. I  forgot to mention in my earlier post - I had made joining picot small in round 6 so it was easier to keep track of where to join. Besides, a small picot would mean a more pronounced/rounded chain arch.
Although this colourway had been my original plan at the start of doily, at this final stage I felt it might be too overbearing. So I started the round in green, which looked too understated, and had to be unraveled. Went back to this autumnal variegate and am very happy with the result. Hubby was part of the entire decision-making process for this round. 
Appears almost as if angels are merrily singing and dancing in the center of a large flower – very summery, too. We had wonderful sun after almost a month when I took this pic.
Materials/tools used : Lizbeth size 80 threads in #100, #138, #180, #186. 2 shuttles (or shuttle and ball). #11 crochet hook for joining through very small picots. Size 28 tapestry needles to whip stitch ends; I always start knotless, tatting over tails. Scissors. Occasionally a magnifier or a book light.
It measures 17.5 cms finally.
In her coloured version, Carin used 2 colours, one in each shuttle, and used a SLT in the middle of the short 2ds connecting chain to switch colours. It has a nice framing and dimensional effect since in the previous round she had used the same 2 colours alternately.
Many many thanks to Carin Jansen for sharing her delightful pattern. Her presentation is excellent – with clear diagrams, written notations, along with thread lengths and other tips. RW and SS were the only 2 notations missing in the instructions (for tatters with limited pattern-reading skills). 
It is a lovely pattern to practice and perfect long chain tatting! Some rounds can be worked continuously while some can be worked from a shuttle and ball. Mostly employs basic techniques. 
I found the entire pattern engaging and learned a few tricks to design and present! 

Join us on Facebook using the tag #AngelChoirTAL on your timeline and/or the group Just Tatting
All tutorials can be found here - https://tipsaroundthehome.blogspot.com/p/tatting-resources.html
Related Posts :
Notes/thoughts on Round 1 ; Round 2 ; Round 3 ; Round 4 ; Round 5 ; more on Round 5 & Round 6 ; more on Round 6 ; Round 7